Coconut Cream Pie Delight: Grandma’s Recipe with Cream of Coconut
There’s something magical about a homemade coconut cream pie that transports you straight back to your grandmother’s kitchen. This classic dessert combines a buttery crust, silky custard filling, and billowing whipped cream into pure comfort on a plate. The secret to an authentic coconut cream pie lies in using quality cream of coconut alongside fresh shredded coconut, creating layers of flavor that store-bought versions simply cannot match.
My grandmother’s recipe has been passed down through three generations, and it remains the most requested dessert at every family gathering. What makes this version special is the balance of coconut flavor—not overpowering, but unmistakably present in every creamy spoonful. Whether you’re baking for a holiday dinner or a casual weeknight treat, this coconut cream pie recipe will become your go-to dessert that everyone asks for by name.
Ingredients You’ll Need for Grandma’s Coconut Cream Pie
The foundation of an exceptional coconut cream pie starts with quality ingredients. Unlike many desserts that rely on shortcuts, this traditional recipe deserves your attention to ingredient selection.
For the Crust:
- 2 cups all-purpose flour
- 1 tablespoon granulated sugar
- 1 teaspoon salt
- 1 cup (2 sticks) unsalted butter, chilled and cubed
- 6-8 tablespoons ice water
For the Coconut Custard Filling:
- 1 cup cream of coconut (such as Coco López)
- 1 cup whole milk
- 1 cup heavy cream
- 5 large egg yolks
- 1/4 cup cornstarch
- 1/4 cup granulated sugar
- 1/4 teaspoon salt
- 2 tablespoons unsalted butter
- 1 teaspoon vanilla extract
- 1 cup sweetened shredded coconut (divided)
For Assembly and Topping:
- 2 cups heavy whipping cream
- 3 tablespoons powdered sugar
- 1 teaspoon vanilla extract
- 1/2 cup toasted coconut flakes for garnish
The cream of coconut is essential—it’s different from coconut milk and provides that distinctive richness that defines this dessert. Look for it in the cocktail mixer section of your grocery store, not the baking aisle.
Making the Perfect Pie Crust from Scratch
A flaky, buttery crust is non-negotiable for a proper coconut cream pie. This is where patience and cold ingredients make all the difference. If you’re short on time, you can use a store-bought crust, though homemade always tastes superior.
Step 1: Combine Dry Ingredients
In a large mixing bowl, whisk together your flour, sugar, and salt. These dry components create the base structure of your crust. The sugar adds subtle sweetness that complements the coconut filling without competing with it. Make sure your salt is evenly distributed to avoid any salty pockets.
Step 2: Cut in the Butter
This step is crucial for achieving that coveted flaky texture. Add your chilled, cubed butter to the flour mixture. Using a pastry cutter, two knives, or your fingertips, work the butter into the flour until the mixture resembles coarse breadcrumbs. You want pea-sized pieces of butter throughout—these create steam pockets during baking, resulting in a tender, flaky crust. Avoid overworking the dough, as this develops gluten and creates a tough crust.
Step 3: Add Ice Water
Sprinkle the ice water over your mixture one tablespoon at a time, tossing gently with a fork until the dough just comes together. Don’t add all the water at once. You want the dough to hold together when squeezed, but not be wet or sticky. This restraint in moisture is what separates a mediocre crust from a spectacular one.
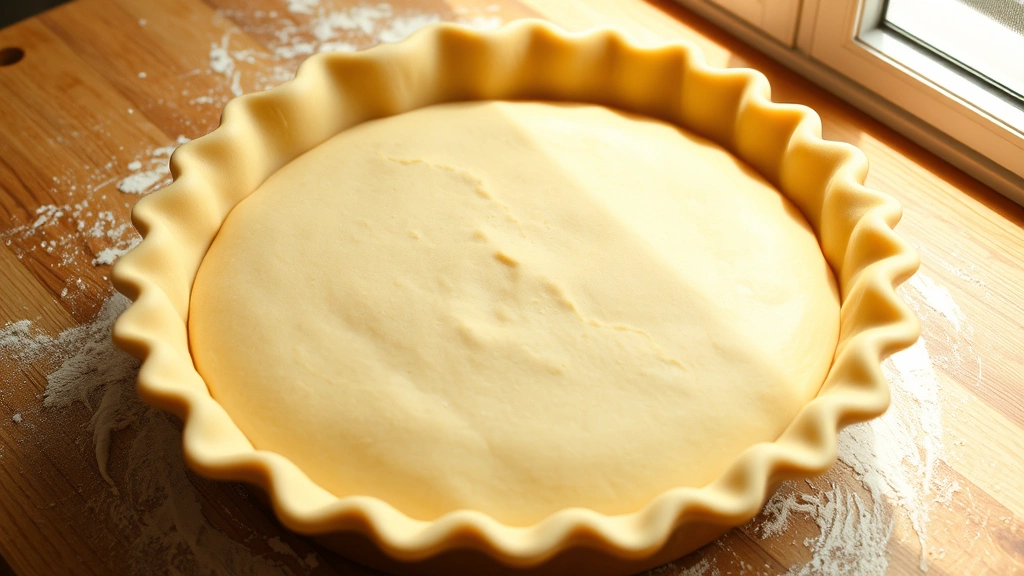
Step 4: Chill and Roll
Form the dough into a disk, wrap it in plastic wrap, and refrigerate for at least 30 minutes (or up to 2 hours). This resting period allows the gluten to relax and helps prevent shrinkage during baking. On a floured surface, roll the dough to fit your 9-inch pie pan. Transfer it carefully to your pan and trim the edges, leaving a 1-inch overhang. Crimp the edges decoratively with your fingers or a fork.
Step 5: Pre-Bake the Crust
Preheat your oven to 375°F. Prick the crust all over with a fork to prevent puffing. Line it with parchment paper and fill with pie weights or dried beans. Bake for 12-15 minutes until the edges are light golden. Remove the weights and parchment, then bake for another 5 minutes. The crust should be set but not fully baked—it will finish cooking when you bake the filled pie. This technique, called blind baking, prevents a soggy bottom crust.
For more detailed guidance on baking techniques, explore easy homemade bread recipes to understand dough handling principles that apply to pie dough as well.
Creating the Creamy Coconut Filling That Defines This Pie
The filling is where your coconut cream pie truly shines. This custard-based filling uses the cream of coconut as its star ingredient, balanced with egg yolks for richness and cornstarch for structure.
Step 1: Prepare Your Wet Ingredients
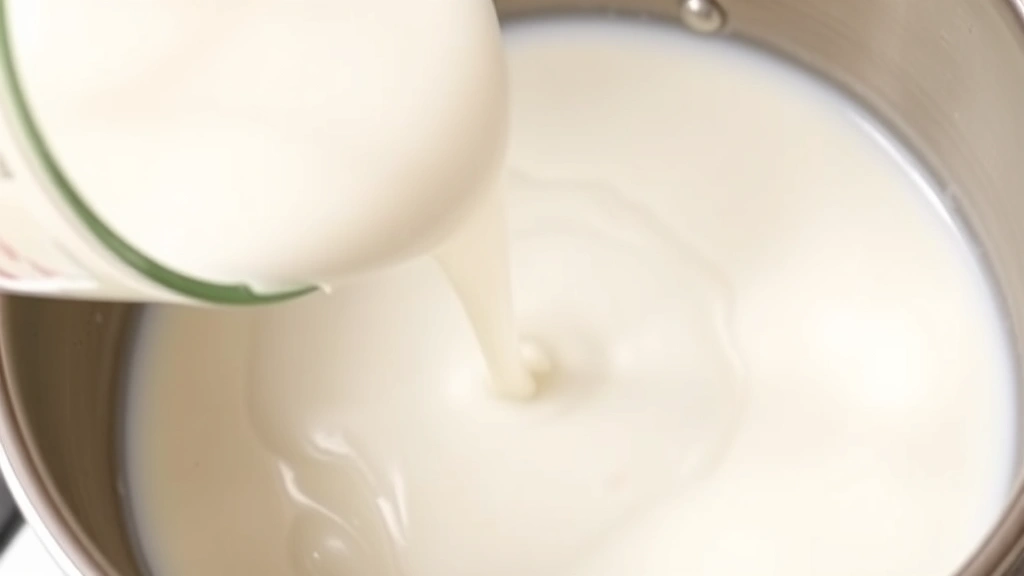
In a medium saucepan, whisk together the cream of coconut, whole milk, and heavy cream. Heat this mixture over medium heat, stirring occasionally, until it’s steaming and small bubbles form around the edges. Don’t let it boil—you’re simply heating it to infuse the flavors and prepare it for the egg yolks. This gentle heating process is crucial because adding cold liquid to hot egg yolks prevents them from scrambling.
Step 2: Create Your Egg Yolk Mixture
In a separate bowl, whisk together the egg yolks, cornstarch, sugar, and salt until the mixture is pale and smooth, about 2 minutes of whisking. The cornstarch acts as a thickening agent and prevents the custard from becoming too thick or grainy. The sugar not only sweetens but also helps stabilize the eggs. This mixture is your custard base.
Step 3: Temper the Eggs
This is the most critical step for avoiding scrambled eggs in your filling. Slowly pour about 1 cup of the hot cream mixture into your egg yolk mixture while whisking constantly. This gradual addition raises the temperature of the eggs without shocking them. Once combined, pour the entire egg mixture back into the saucepan with the remaining cream mixture, whisking constantly.
Step 4: Cook the Custard
Return the saucepan to medium heat and cook, stirring frequently with a whisk or wooden spoon, until the mixture thickens and reaches 160°F on an instant-read thermometer (about 8-10 minutes). You’ll notice the custard will coat the back of a spoon. This temperature ensures food safety while achieving perfect consistency. Remove from heat and stir in the butter and vanilla extract until smooth and glossy.
Step 5: Fold in the Coconut
Gently fold in 1 cup of shredded coconut using a spatula. Folding, rather than stirring, prevents deflating any air in the custard. Reserve the remaining coconut for sprinkling between layers or on top.
For scientific insights into custard preparation and food safety, the Institute of Food Technologists offers comprehensive resources on cooking techniques and temperature guidelines.
Assembly and Chilling: Bringing It All Together
Now comes the exciting part—transforming your components into a stunning dessert.
Step 1: Fill Your Crust
Pour the warm coconut custard into your partially baked pie shell. Smooth the top with an offset spatula for an even appearance. The warmth of the filling will continue cooking the bottom crust slightly, ensuring it stays crispy rather than soggy.
Step 2: Chill Thoroughly
Refrigerate the pie for at least 4 hours, or preferably overnight. This chilling time allows the filling to set completely and the flavors to meld. A properly chilled pie will slice cleanly with a sharp knife dipped in hot water between cuts. If you’re making this for a special occasion, prepare it the day before—it actually tastes better after sitting overnight.
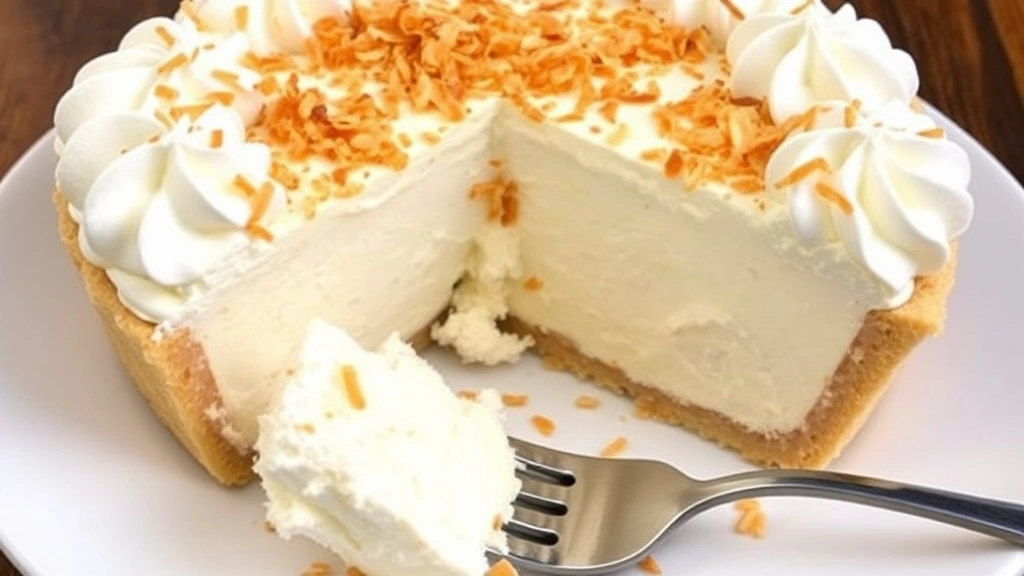
Step 3: Make the Whipped Cream Topping
Just before serving, prepare your whipped cream topping. In a chilled bowl, combine heavy whipping cream, powdered sugar, and vanilla extract. Using an electric mixer or whisk, beat until stiff peaks form—about 2-3 minutes with a mixer. Don’t overbeat, or you’ll end up with sweet butter. Spread or pipe the whipped cream over the chilled pie.
Step 4: Add the Finishing Touches
Sprinkle your toasted coconut flakes generously over the whipped cream. To toast coconut, spread it on a baking sheet and bake at 325°F for 5-7 minutes, stirring halfway through, until golden brown. Toasted coconut has a deeper, nuttier flavor than raw coconut and adds wonderful textural contrast.
Serving Your Coconut Cream Pie Masterpiece
The presentation of your pie is almost as important as the taste. This dessert deserves to be showcased.
Serve slices on chilled plates with a small fork or dessert spoon. The cold plate keeps the pie from warming too quickly, maintaining that perfect creamy texture. A slice of fresh lime on the side adds a lovely visual accent and can provide a subtle citrus note if guests choose to squeeze it over their slice.
This pie pairs beautifully with hot coffee or tea, making it perfect for afternoon gatherings. If you’re looking for complementary dessert ideas, check out quick breakfast recipes that can inspire light accompaniments or brunch pairings.
Consider serving this pie at special occasions like Thanksgiving, Easter, or summer gatherings. It’s elegant enough for formal dinners yet comforting enough for casual family meals.
Storage and Make-Ahead Tips
One of the best aspects of coconut cream pie is how well it stores.
Refrigerator Storage: Keep your pie covered loosely with plastic wrap in the refrigerator for up to 3 days. The custard filling is stable and actually improves as flavors meld. Don’t cover it tightly immediately after adding whipped cream, as condensation will make it soggy. Wait about 30 minutes for the whipped cream to set slightly, then cover.
Freezing: You can freeze the baked, filled pie (without whipped cream topping) for up to 1 month. Wrap it well in plastic wrap and aluminum foil. Thaw overnight in the refrigerator before adding the whipped cream topping. The texture remains excellent after freezing.
Make-Ahead Strategy: Prepare the crust and filling the day before. Assemble the pie in the morning for an evening dessert. Add the whipped cream topping no more than 4 hours before serving for best results.
This approach makes entertaining much less stressful. You can focus on your main dishes while your dessert quietly sets in the refrigerator, ready to impress.
If you enjoy making desserts ahead, explore vintage grandma recipes for other make-ahead options that pair well with this pie for a complete meal.
Creative Variations on the Classic Recipe
While grandma’s original recipe is perfect as-is, there’s room for creative exploration.
Toasted Coconut Crust: Replace half the flour in the crust with finely ground toasted coconut for enhanced flavor and texture. This creates a crust that’s distinctly coconut-forward.
Dark Chocolate Layer: Spread a thin layer of melted dark chocolate on the pre-baked crust before adding the custard filling. The chocolate provides subtle depth that complements the sweetness of the coconut.
Rum or Coconut Rum Addition: Add 2 tablespoons of dark rum or coconut rum to the custard filling for an adult version. The alcohol cooks off, leaving only sophisticated flavor notes.
Macadamia Nut Crust: Combine crushed macadamia nuts with your pie crust flour for a Hawaiian twist that pairs beautifully with coconut.
Lime Zest Custard: Add 1 tablespoon of lime zest to your custard filling for bright, tropical notes that elevate the flavor profile.
For inspiration on ingredient combinations and culinary techniques, Serious Eats provides detailed food science explanations for why certain flavor combinations work.
Troubleshooting Common Pie Problems
Even experienced bakers encounter challenges. Here’s how to solve them.
Soggy Bottom Crust: This happens when moisture from the filling seeps into the crust. Prevention is key: blind bake your crust thoroughly, don’t skip this step. If it happens, you can still enjoy the pie—the flavor is unaffected, even if the texture isn’t perfect.
Curdled Custard: This occurs when eggs are heated too quickly. Always temper your eggs slowly with the hot cream mixture, and don’t exceed 160°F. If your custard does curdle, strain it through a fine-mesh sieve into a clean bowl.
Filling Won’t Set: Ensure you’ve cooked the custard to the proper temperature and that your cornstarch is fully incorporated. Sometimes humidity affects setting time—if your pie isn’t fully set after 4 hours, refrigerate it longer.
Crust Shrinks Excessively: This indicates too much gluten development. Handle your dough gently, avoid stretching it when placing in the pan, and always chill before and after rolling.
Whipped Cream Weeping: Don’t overbeat the cream, and don’t add topping too far in advance. Add it within 4 hours of serving for best results.
Learning from mistakes is part of becoming a better baker. Each pie teaches you something new about technique and timing.
Frequently Asked Questions About Coconut Cream Pie
Can I use coconut milk instead of cream of coconut?
Coconut milk and cream of coconut are different products. Cream of coconut is much thicker, sweeter, and richer—it’s specifically formulated for desserts. Coconut milk is thinner and more savory. You technically can use coconut milk, but you’ll need to reduce other liquids and may not achieve the same creamy texture. For authentic results, stick with cream of coconut.
What if I don’t have an instant-read thermometer?
While a thermometer is helpful, you can use the spoon test instead. Dip a wooden spoon into the custard and run your finger across the back. If it leaves a clear trail that doesn’t immediately run together, your custard is ready. This traditional method works perfectly well.
Can I make this pie without eggs?
The eggs provide both richness and structure. You could experiment with cornstarch-only thickening, but the texture and flavor would be noticeably different. For a custard-based pie, eggs are really essential. If you have egg allergies, consider a different pie style altogether.
How long does this pie stay fresh?
Properly stored in the refrigerator with the whipped cream topping added shortly before serving, this pie stays fresh for 3 days. After that, the crust begins to soften and the filling can develop off-flavors. Make it fresh for best quality.
Can I prepare just the filling ahead of time?
Absolutely! Make the filling up to 2 days ahead and store it in an airtight container in the refrigerator. When ready to assemble, pour it into your baked crust and proceed with chilling. This is actually a great time-saving strategy.
What’s the best way to slice the pie cleanly?
Use a long, sharp knife dipped in hot water, wiping it clean between each cut. The heat helps the knife glide through the cold pie without dragging. For the cleanest cuts, make sure your pie is thoroughly chilled—at least 4 hours.
Can I use fresh coconut instead of shredded?
Fresh coconut adds wonderful flavor but requires more preparation. You’d need to grate about 2 cups of fresh coconut meat, which requires cracking and processing a whole coconut. The flavor is superior, but sweetened shredded coconut is more convenient and works beautifully in this recipe.
Is this pie suitable for freezing?
Yes! Freeze the filled pie (without whipped cream topping) for up to 1 month. Thaw overnight in the refrigerator before serving. Add fresh whipped cream after thawing for best texture.
What’s the difference between this and a coconut custard pie?
Coconut cream pie traditionally has a custard filling topped with whipped cream, while coconut custard pie often has a baked custard filling that’s less creamy. This recipe is definitely a coconut cream pie—the custard is cooked on the stovetop and chilled, then topped with whipped cream.
Can I make mini versions in tartlets?
Absolutely! Use tartlet pans and reduce the recipe proportionally. Baking time for crusts will be shorter (8-12 minutes for blind baking). These make elegant individual servings perfect for dinner parties.


