
Crispy calamari rings are the holy grail of appetizers—golden, tender, and absolutely addictive. But let’s be honest: most home cooks end up with either rubbery, chewy rings or overly greasy disappointments. The difference between mediocre and restaurant-quality calamari comes down to technique, temperature control, and understanding the science behind what happens when you cook squid. This chef-approved method will transform your calamari game forever.
Whether you’re preparing calamari for a dinner party or simply craving that crispy-on-the-outside, tender-on-the-inside texture you get at your favorite seafood restaurant, this guide covers everything you need to know. From selecting fresh squid at the market to mastering the perfect frying temperature, we’ll walk through each step with professional insights that guarantee success every single time.
Understanding Your Ingredient: Fresh Calamari Selection
The foundation of exceptional crispy calamari rings starts at the fishmonger. Many home cooks overlook the importance of ingredient quality, but this is where professionals separate themselves from casual cooks. Fresh squid should have a slightly sweet ocean smell—never fishy or ammonia-like. The flesh should be firm, translucent or milky white, and the skin should be intact without discoloration or soft spots.
When shopping, ask your fishmonger for medium-sized squid, ideally between 6 to 10 inches long. Smaller squid tend to be more tender naturally, while larger specimens can become tough unless handled perfectly. Fresh squid is always superior to frozen, but if frozen is your only option, thaw it slowly in the refrigerator overnight rather than at room temperature. This preserves the delicate muscle structure and prevents excess moisture loss.
Look for squid with clear, bright eyes and firm tentacles. The mantle (the tube-shaped body) should feel dense and springy when pressed. If you’re buying pre-cleaned squid, inspect the interior for any remaining organs or dark membrane that wasn’t properly removed. Quality matters tremendously—it’s the difference between tender rings and rubber bands.
Cleaning and Preparing Squid Like a Pro
Proper cleaning transforms raw squid into restaurant-ready calamari. Start by rinsing the squid under cold running water. Hold the mantle (body tube) in one hand and gently pull the head and tentacles away with the other. The internal organs will come away as one connected unit. Discard this entire section, or save the tentacles if they’re large and meaty.
Now comes the critical step: removing the transparent quill (also called the pen). This is a thin, plastic-like structure running the length of the mantle’s interior. Slide your finger inside the mantle cavity and carefully extract it. You’ll feel it come free—don’t leave any fragments behind, as they’ll create an unpleasant texture in your finished dish.
Next, remove the thin purple or reddish skin covering the mantle. This is where many home cooks make mistakes. Rub the mantle under cool running water while gently scrubbing with your fingers or a soft cloth. The skin should peel away naturally. Don’t scrub aggressively—you’ll damage the delicate flesh. For stubborn spots, blanch the mantle in boiling water for 30 seconds, then the skin will slip off effortlessly.
Rinse thoroughly one final time and pat completely dry with paper towels. Moisture is the enemy of crispness, so don’t skip this step. If you’re not cooking immediately, store cleaned calamari in the coldest part of your refrigerator, covered, for no more than 24 hours. Proper preparation is what separates mediocre calamari from the kind that earns compliments at your table.
The Secret to Tender Calamari: Proper Cutting Technique
Here’s the professional secret that transforms tough, chewy calamari into tender rings: the cut matters as much as the cooking method. Most home cooks make rings that are too thick, which creates a rubbery texture when fried. The mantle should be sliced into rings approximately one-quarter inch thick—thin enough to cook through quickly but thick enough to maintain structural integrity.
Place your cleaned, dried mantle on a cutting board. Using a sharp chef’s knife (dull knives crush the delicate flesh), slice perpendicular to the opening. Work methodically and keep your knife wet—dip it in water between cuts to prevent sticking. The water also helps you see through the translucent flesh, making precise cuts easier.
For the tentacles, leave small ones whole and cut larger ones into manageable bite-sized pieces. The tentacle meat is denser than the mantle, so it can handle slightly thicker cuts. Some chefs prefer leaving tentacles whole for visual appeal, while others cut them for consistency. Either approach works—choose based on your presentation preference.
Pro tip: if you want extra-tender calamari, consider scoring the rings. Using a sharp knife held at a 45-degree angle, make shallow parallel cuts across one side of each ring. This breaks down the muscle fibers without cutting through completely. The cross-hatching pattern also helps the breading adhere better and creates extra texture. This technique is commonly used in high-end restaurants and makes a noticeable difference in the final product.
Some chefs also recommend a brief marinade in milk or buttermilk for 30 minutes to an hour before cooking. The lactic acid gently tenderizes the squid naturally. This step is optional but highly effective if you want insurance against toughness. Pat dry thoroughly before dredging if you use this method.
Dredging and Breading Methods for Maximum Crispness
The coating is what creates that signature crunch. There are several professional approaches, each with distinct advantages. The most basic method uses all-purpose flour seasoned generously with salt, pepper, and optional spices like garlic powder or paprika. The key is seasoning the flour itself rather than relying solely on salt after cooking.
For extra crispness, many chefs use a combination approach: a light coating of cornstarch mixed with flour creates an exceptionally crispy exterior. The ratio is typically one part cornstarch to two parts flour. This mixture is less likely to absorb oil during frying, maintaining that desirable crunch even after resting.
The traditional Italian method uses a simple dredge: calamari pieces go directly into seasoned flour, then straight into hot oil. This produces delicate, thin, golden crusts. For a heavier, more substantial coating, create a wet-dry-wet system. First, toss calamari in a mixture of beaten egg and milk (or water with a touch of cornstarch). Then dredge thoroughly in seasoned flour. Some chefs add a second dry dip for extra thickness.
For the most luxurious crispness, try a panko breadcrumb coating. Panko’s larger, airier structure creates incredible crunch. Combine panko with flour in a 1:1 ratio, add your seasonings, and dredge wet calamari pieces thoroughly. Press gently so the coating adheres. This method is slightly more involved but produces restaurant-quality results that justify the extra step.
Pro technique: place your dredged calamari on a wire rack for 10-15 minutes before frying. This allows the coating to set and adhere better. Resting also gives the exterior time to dry slightly, which promotes even browning and maximum crispness. This seemingly small step makes a measurable difference in the final texture.
Season your dredging mixture boldly. Use at least one teaspoon of salt per cup of flour, plus freshly ground black pepper. Consider adding cayenne pepper for gentle heat, dried oregano for Italian flair, or garlic powder for depth. Experiment to find your signature blend. Remember that some seasoning will be lost during frying, so err on the side of generosity.
Deep-Frying Temperature and Timing Mastery
Temperature control is absolutely critical for crispy calamari. Too cool, and your calamari absorbs oil and becomes greasy. Too hot, and the exterior burns before the interior cooks through. The ideal frying temperature is 350-375°F (175-190°C). Invest in a deep-fry thermometer—it’s inexpensive and eliminates guesswork.
If you don’t have a thermometer, use the bread test: drop a small cube of bread into the oil. If it browns in 60 seconds, you’re at approximately 350°F. If it browns in 40 seconds, you’re closer to 375°F. This method isn’t as precise as a thermometer, but it works in a pinch.
Use neutral-flavored oil with a high smoke point: peanut oil, vegetable oil, or canola oil all work excellently. Avoid olive oil, which has a lower smoke point and will impart unwanted flavors. You’ll need approximately 2-3 inches of oil in your pot or deep fryer.
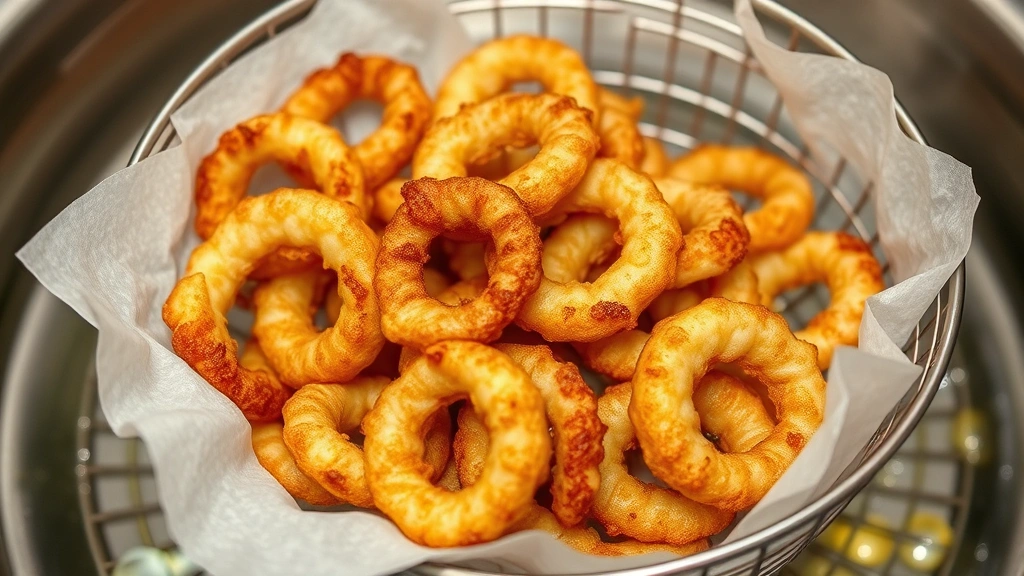
Working in small batches is essential. Crowding the pan drops oil temperature dramatically, resulting in greasy, soggy calamari. Fry in batches of 8-12 pieces, depending on your pot size. Each batch should take 1.5 to 2 minutes. The calamari is done when the exterior is golden brown and the pieces float to the surface. Don’t exceed 2.5 minutes—this is where toughness develops.
The exact timing depends on ring thickness and your specific oil temperature. Thinner rings cook faster (1-1.5 minutes), while thicker pieces or tentacles need closer to 2-2.5 minutes. Watch carefully during your first batch to establish timing for your particular setup. Consistency comes from recognizing the visual cues: golden color, gentle bubbling, and floating behavior all indicate doneness.
Pro tip from experienced chefs: slightly undercook your first batch, then taste. You can always fry a few seconds longer, but you can’t uncook overcooked calamari. Most home cooks tend to overcook slightly, resulting in that disappointing chewy texture. Err on the side of slightly less time until you find your sweet spot.
Draining and Serving Your Crispy Creation
The moment calamari comes out of oil is critical. Transfer immediately to a paper towel-lined plate using a slotted spoon. Don’t pile pieces on top of each other—arrange them in a single layer so steam can escape. Steam trapped between pieces will soften the crispy exterior, undoing all your careful work.
Season immediately while still hot. This is when salt adheres best and flavors penetrate. Use fleur de sel or fine sea salt rather than table salt, which tastes harsher. Add a pinch of freshly ground black pepper and any other finishing seasonings you prefer. Fresh lemon zest adds brightness without moisture.
Serve within 5-10 minutes of frying for optimal crispness. If you must hold calamari longer, place a paper towel-lined baking sheet in a 200°F oven and keep finished pieces there. The low temperature maintains warmth without further cooking. However, calamari is best enjoyed immediately while the contrast between crispy exterior and tender interior is most pronounced.
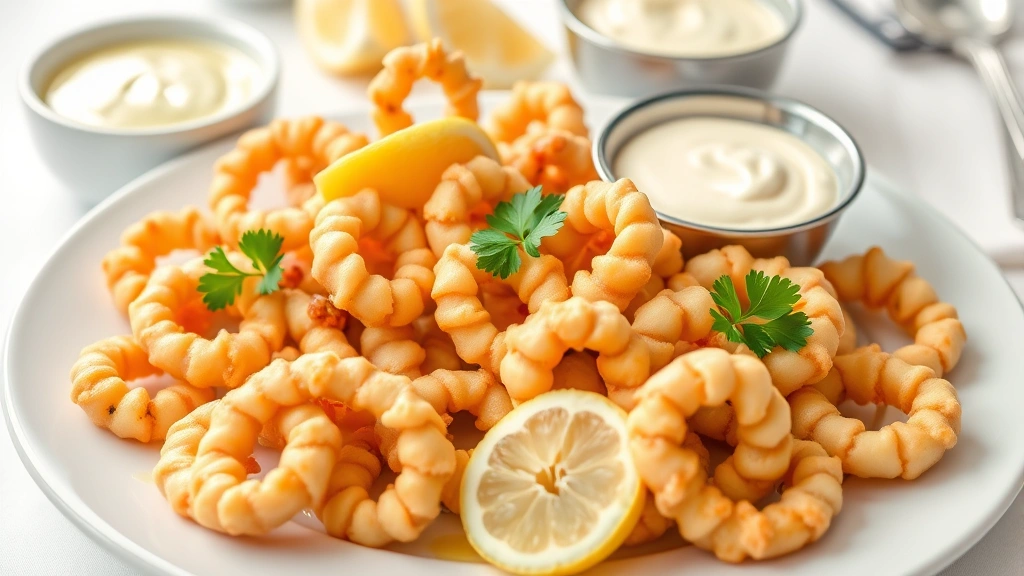
For presentation, arrange calamari on a platter with fresh lemon wedges and your chosen dipping sauce. Garnish with fresh parsley for color and freshness. The visual appeal enhances the dining experience—restaurant presentations matter because they set expectations and create anticipation.
Flavor Variations and Dipping Sauce Pairings
While classic crispy calamari with lemon is perfection, variations offer exciting opportunities. Try incorporating spices into your dredging mixture: smoked paprika, cayenne, or chili powder add depth. Italian seasoning with garlic powder creates a Mediterranean vibe. Lemon zest mixed into the flour adds subtle citrus brightness without moisture.
For a Japanese-inspired version, season flour with wasabi powder and sesame seeds, then serve with a soy-ginger dipping sauce. Greek-style calamari uses oregano-heavy seasoning and pairs beautifully with tzatziki. Spanish preparations often incorporate smoked paprika and serve with romesco sauce.
Create a signature aioli by whisking mayonnaise with minced garlic, lemon juice, and your choice of herbs. Fresh basil and garlic make an excellent Italian version, while cilantro and lime create a Latin American twist. Sriracha mixed into mayo delivers spicy-cool contrast. A simple marinara sauce connects to Italian traditions beautifully.
For a more sophisticated option, prepare a caper-anchovy mayo by blending capers, anchovies, and garlic with mayo and lemon. This pairs exceptionally well with crispy calamari and adds restaurant-level elegance. A squeeze of fresh lemon juice over calamari before dipping is always appropriate—acid brightens the rich fried flavors.
When serving at dinner parties, offer multiple sauce options. This gives guests choice and showcases your attention to detail. Present sauces in small bowls for easy dipping, and provide small plates for comfortable eating. These presentation details elevate the entire experience.
Remember that seasoning flexibility extends to your cooking method too. If you’re interested in exploring other cooking techniques, you might also enjoy exploring how to use a pressure cooker for entirely different dishes, or checking out low-carb dinner recipes if you’re watching macros. For seasonal inspiration, browse fall recipes that might incorporate calamari in unexpected ways. If you want to maximize your seafood preparations, learning about how to preserve herbs ensures you always have fresh garnishes available. Additionally, understanding food waste reduction tips helps you use every part of the squid efficiently.
Frequently Asked Questions
Why is my calamari tough and rubbery?
Overcooking is the primary culprit. Squid muscle contracts when exposed to heat, and even 30 seconds beyond the optimal window creates noticeable toughness. Use a thermometer to maintain 350-375°F, and pull calamari out the moment it floats and turns golden. Alternatively, squid can be cooked very quickly at high heat (under 2 minutes) or very slowly at low heat (over 30 minutes in a braise)—the middle ground creates toughness.
Can I use frozen calamari?
Yes, frozen calamari works, but quality suffers slightly. Freezing damages cell structure, which can affect tenderness. Always thaw slowly in the refrigerator, never at room temperature. Pat completely dry before dredging, as frozen calamari releases more moisture. The method remains identical, though you might need an extra 15-30 seconds of frying time.
What’s the difference between calamari and squid?
They’re the same creature. Calamari is the culinary term (from Italian), while squid is the biological term. In cooking, the distinction is size: calamari typically refers to smaller specimens (under 10 inches), while squid generally means larger ones. Smaller specimens are naturally more tender and preferred for frying.
How do I know when the oil is ready?
A deep-fry thermometer is most reliable, showing exactly when you’ve reached 350-375°F. The bread cube test works if you lack a thermometer. You can also watch for subtle shimmering across the oil surface and a faint wisp of smoke. Never rely on appearance alone—temperature control is too important for guessing.
Can I make crispy calamari without deep frying?
Shallow frying works reasonably well, though results aren’t quite as consistent. Use 1-1.5 inches of oil in a skillet, maintaining 350°F, and flip halfway through cooking. Air frying produces crispier results than baking, though not quite matching deep-fried quality. For the best crispy texture, deep frying remains superior.
How long can I store prepared calamari?
Eat crispy calamari immediately—crispness degrades rapidly. Leftover cooked calamari keeps refrigerated for 2-3 days but won’t regain crispness when reheated. You can reheat gently in a 375°F oven for a few minutes, but texture will be compromised. Raw calamari keeps refrigerated for 24 hours maximum, or frozen for 3 months.
What external resources help understand squid cookery?
The Culinary School at Bay Area offers comprehensive seafood preparation courses. Exploratorium’s Cooking Lab provides food science insights into protein cooking. Serious Eats offers detailed technique articles with scientific explanations. Fish Cookery specializes in seafood preparation methods, and the Incredible Egg provides insights into egg-based coatings and batters.
Should I marinate calamari before cooking?
A brief 30-minute soak in buttermilk or milk tenderizes squid through lactic acid’s gentle enzymatic action. This step is optional but recommended if you’re concerned about toughness. Pat completely dry before dredging—excess moisture prevents proper browning and crispness.


