DIY Sugar Wax Recipe: A Proven Method for Natural Hair Removal
Sugar waxing, also known as sugaring, is an ancient hair removal technique that dates back thousands of years to Middle Eastern and North African cultures. Unlike traditional waxing, which uses petroleum-based products, sugar wax is made from simple kitchen ingredients: sugar, water, and lemon juice. This natural alternative has gained tremendous popularity among home beauty enthusiasts who want to avoid harsh chemicals while achieving smooth, hair-free skin. The beauty of making your own sugar wax recipe at home is that you control every ingredient, know exactly what’s going on your skin, and save significant money compared to professional sugaring treatments.
Creating an effective sugar wax at home requires precision and patience, but the process is straightforward once you understand the science behind it. The goal is to reach the perfect consistency—thick enough to grip hair but pliable enough to apply smoothly. Many people are surprised to learn that homemade sugar wax rivals professional-grade products in effectiveness. Whether you’re preparing for a special event or establishing a regular hair removal routine, mastering this proven method will give you salon-quality results without leaving your kitchen.
Understanding Sugar Waxing Science
Sugar waxing works through a fundamentally different mechanism than traditional waxing. While hot wax adheres to the skin, sugar paste adheres primarily to hair and dead skin cells. This distinction makes sugaring gentler on delicate skin and less likely to cause irritation or burns. The sticky consistency of sugar wax is created through caramelization—a controlled heating process that breaks down sugar molecules and creates the perfect adhesive texture.
The science behind effective sugar wax involves understanding hygroscopic properties, meaning the paste attracts and retains moisture. This moisture content keeps the wax pliable and prevents it from becoming too brittle. When you heat sugar, water, and citric acid (from lemon juice) together, you’re creating a chemical reaction that produces the ideal molecular structure for hair removal. The acid prevents crystallization, which would make the paste grainy and ineffective. This is why precise temperatures and ingredient ratios matter significantly when creating your own sugar wax recipe.
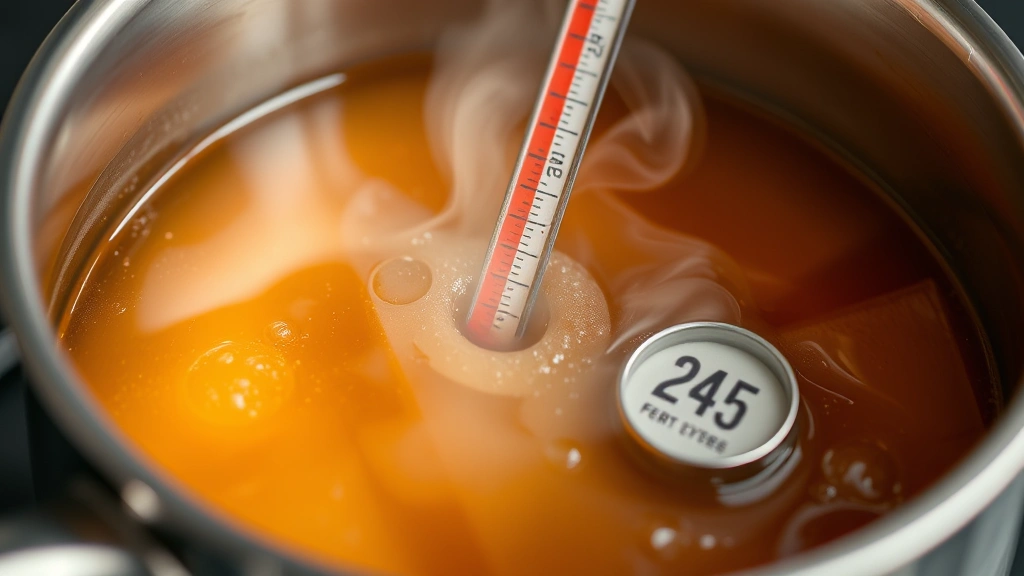
Professional sugaring practitioners understand that timing is everything. The paste must reach a specific temperature—typically between 240-250°F (116-121°C)—to achieve the perfect consistency. Too hot, and it becomes brittle; too cool, and it remains too sticky to manipulate. This is why using a candy thermometer is essential for success.
Essential Ingredients and Supplies
Creating an effective sugar wax requires surprisingly few ingredients, which is one of its greatest advantages. Here’s what you’ll need:
- Granulated white sugar: 2 cups (400 grams) – This is your primary ingredient and provides the sticky base
- Water: ¼ cup (60 milliliters) – Essential for dissolving the sugar and creating the right consistency
- Lemon juice: 2 tablespoons (30 milliliters) – Fresh lemon juice prevents crystallization and adds acidity
- Honey (optional): 1 tablespoon (15 milliliters) – Adds smoothness and anti-inflammatory properties
Beyond ingredients, you’ll need proper equipment to prepare your sugar wax safely and effectively. A heavy-bottomed saucepan is crucial because it distributes heat evenly and prevents hot spots that could burn your mixture. A candy thermometer is non-negotiable—it’s the only reliable way to monitor temperature and achieve consistent results. Silicone spatulas are ideal for stirring because they won’t react with the hot sugar mixture. You’ll also want wooden applicator sticks or tongue depressors for application, cotton strips or muslin cloth for removal, and small containers for storage.
Safety equipment shouldn’t be overlooked. Keep a bowl of ice water nearby in case of accidental burns. Wear long sleeves to protect your arms, and ensure your work area is clear of distractions. Unlike many DIY beauty projects, working with hot sugar requires respect and attention to prevent injuries.
Step-by-Step Recipe Instructions
Follow this proven method to create professional-quality sugar wax at home:
- Combine ingredients in your saucepan: Pour 2 cups of granulated white sugar, ¼ cup of water, and 2 tablespoons of fresh lemon juice into your heavy-bottomed saucepan. Stir these together over medium heat until the sugar begins to dissolve. You should see the mixture become clearer as the sugar dissolves completely.
- Heat without stirring: Once the mixture reaches a gentle boil, stop stirring. This is crucial. Continued stirring can cause crystallization. Instead, insert your candy thermometer and monitor the temperature carefully. The mixture will gradually change color from clear to pale yellow.
- Watch for color changes: As the temperature rises, the mixture will transition from clear to light amber. This color progression indicates caramelization is occurring properly. The ideal temperature is 240-250°F (116-121°C), which corresponds to the soft-ball stage in candy making. If you don’t have a thermometer, you can test by dropping a small amount into cold water—it should form a soft, pliable ball.
- Remove from heat at the right moment: The moment your mixture reaches 245°F (118°C), remove it from heat. Don’t wait for it to darken further. It will continue cooking slightly from residual heat, which is normal and desired. The final color should be a light to medium amber.
- Cool slightly before use: Allow the mixture to cool for 2-3 minutes at room temperature. It should still be warm but cool enough to handle carefully. Test the consistency by rolling a small amount between your fingers. It should be sticky but moldable.
- Transfer to storage container: Once cooled to a workable temperature, transfer your sugar wax to a clean glass jar or silicone container. If you added honey for extra smoothness, stir it in now while the mixture is still warm.
This straightforward process takes approximately 15-20 minutes from start to finish. The key to success is patience and attention to temperature. Unlike baking, where slight variations can be forgiving, sugar wax preparation requires precision.
Achieving Perfect Consistency
The consistency of your sugar wax determines its effectiveness and ease of use. Many home practitioners struggle with this aspect, but understanding the science helps troubleshoot issues. The paste should be thick enough to hold its shape when rolled into a ball, yet flexible enough to stretch without tearing immediately.
If your sugar wax is too soft and sticky, you likely didn’t heat it to a high enough temperature. Remedy this by reheating the mixture, bringing it back to 245-250°F (118-121°C), and cooling it again. If your wax is too hard and brittle, it overheated. You can salvage this by adding a few drops of water and reheating gently until you reach the correct temperature again.
Temperature fluctuations in your environment also affect consistency. In warm weather, your sugar wax will be softer; in cold weather, it will be firmer. You can adjust by microwaving small portions for 5-10 seconds before application if needed. Some practitioners prefer making sugar wax recipe batches during cooler months for better consistency stability.
The humidity level in your home impacts how your sugar wax performs. In very humid climates, the paste may become too sticky because it absorbs moisture from the air. In dry climates, it may become harder. Storing your wax in airtight containers helps maintain consistent texture regardless of environmental conditions.
Application and Removal Techniques
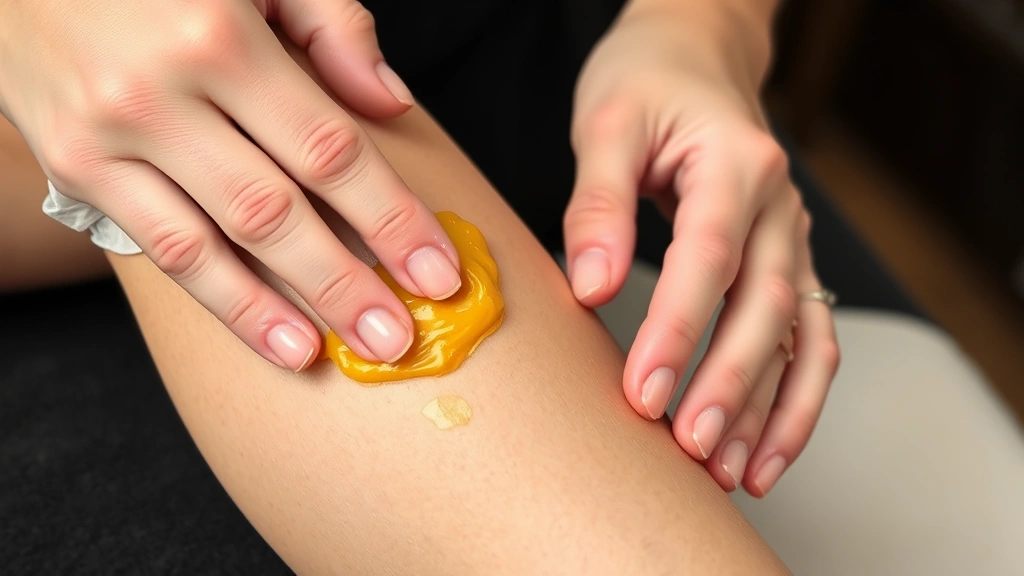
Proper application technique is as important as the recipe itself. Begin by preparing your skin thoroughly. Clean the area with gentle soap and water, then pat completely dry. Any moisture will interfere with the wax’s adhesive properties. Applying a light dusting of talcum powder or cornstarch helps the wax adhere to hair rather than skin.
Warm a small amount of sugar wax between your fingers until it becomes soft and pliable. You should be able to roll it into a ball easily. Apply the wax in the direction opposite to hair growth, using firm, confident strokes. The wax should be pressed firmly onto the skin to ensure good hair contact. Unlike traditional waxing, you don’t need to apply cloth strips—sugar wax can be removed by flicking with your fingers or using muslin cloth.
To remove the wax, use a quick flicking motion with your fingers or pull the cloth strip in the direction of hair growth. The motion should be swift and confident rather than slow and hesitant. Slow removal increases pain and reduces effectiveness. Many people find that sugaring is less painful than traditional waxing because the paste grips hair rather than skin.
After removal, soothe the area with cool water and apply a gentle moisturizer. If you experience redness, apply aloe vera gel or a hydrating face mask. The skin will typically return to normal within a few hours.
Aftercare and Skin Health
Proper aftercare extends results and minimizes irritation. For the first 24 hours after sugaring, avoid hot baths, saunas, intense exercise that causes sweating, and direct sun exposure. These activities can irritate freshly treated skin. Wear loose, breathable clothing to prevent friction on treated areas.
Exfoliate gently 2-3 days after treatment to prevent ingrown hairs. Use a soft exfoliating glove or gentle scrub, being careful not to irritate the area further. Regular exfoliation between treatments significantly reduces ingrown hair occurrence.
Moisturize daily, especially treated areas. Use fragrance-free, gentle products to avoid irritation. If you have sensitive skin, consider applying a hydrating face mask or using a product containing chamomile or calendula for soothing benefits.
Results typically last 3-4 weeks, with hair regrowth becoming finer and sparser with repeated treatments over several months. This is because sugar waxing removes hair from the root, and consistent removal eventually damages the hair follicle’s ability to produce thick, coarse hair.
Troubleshooting Common Issues
Even experienced practitioners encounter occasional issues. Here’s how to address common problems:
- Wax is too grainy: Graininess indicates crystallization occurred. This happens when sugar mixture is stirred after boiling or when crystals form on pan sides. Prevent this by not stirring once boiling begins and by wiping down pan sides with a damp pastry brush.
- Wax won’t stick to hair: This usually means the wax wasn’t heated to proper temperature. Ensure you reach 245°F (118°C) before removing from heat. Also verify you’re applying it firmly enough and that the area is completely dry before application.
- Wax is burning your skin: You likely overheated the mixture. Always allow 2-3 minutes cooling time before application. Test temperature on your inner wrist before applying to larger areas.
- Hair isn’t being removed effectively: This could indicate your wax is too cool. Reheat slightly between applications. Also ensure you’re pulling in the correct direction—against hair growth—and that you’re using a swift, confident removal motion.
- Excessive skin irritation: Some people have naturally sensitive skin. If irritation persists, consider applying a thin layer of coconut oil before sugaring to create a protective barrier, or use the sugar wax recipe less frequently, allowing more time between treatments.
Storage and Shelf Life
Properly stored sugar wax lasts indefinitely, making batch preparation economical. Store your wax in airtight glass jars away from direct sunlight and heat sources. Glass is preferable to plastic because sugar can sometimes interact with certain plastics over time.
Keep your wax at room temperature. Refrigeration isn’t necessary and can make the paste too hard. If your wax becomes too hard during storage, simply microwave it for 10-15 seconds to restore pliability. Some practitioners keep a small jar for immediate use and larger jars in cool storage for backup batches.
Label your containers with the preparation date. While sugar wax doesn’t spoil like food products, ingredients like lemon juice can degrade over extended periods. Most home batches remain effective for 6-12 months when stored properly.
If you’re interested in understanding more about natural beauty alternatives, exploring resources like culinary and beauty chemistry institutes can provide scientific backing for DIY beauty practices. Additionally, food science publications often explain caramelization processes relevant to sugar wax preparation.
FAQ
Can I use bottled lemon juice instead of fresh?
While fresh lemon juice is ideal, bottled juice can work in emergencies. However, bottled versions contain preservatives that may affect consistency and shelf life. For best results, always use freshly squeezed lemon juice.
What if I don’t have a candy thermometer?
A candy thermometer is highly recommended for safety and consistency. However, if you don’t have one, use the cold water test: drop a small amount of hot sugar mixture into cold water. It should form a soft ball that’s pliable but holds shape. This indicates soft-ball stage (240-250°F).
Is sugaring suitable for all skin types?
Yes, sugaring is gentler than traditional waxing and works well on most skin types, including sensitive skin. However, if you have active acne, open wounds, or severe eczema, consult a dermatologist before sugaring. The natural ingredients in a homemade sugar wax recipe are less likely to cause reactions than commercial waxes.
How often can I perform sugaring?
Most people can safely sugar every 3-4 weeks. This timing allows sufficient hair regrowth (typically ¼ inch) while giving skin time to recover between treatments. Frequent treatment over time leads to finer, sparser regrowth.
Can I use this wax on my face?
Yes, sugar wax is excellent for facial hair removal, including upper lip and chin areas. The gentle formula is perfect for delicate facial skin. Always perform a patch test first if you have very sensitive skin.
What should I do if I get burned?
Immediately run the affected area under cool (not cold) water for several minutes. Apply a soothing lotion like aloe vera. If blistering occurs or the burn is severe, seek medical attention. Prevention is key—always allow proper cooling time and test temperature before application.
Can I add essential oils to my sugar wax recipe?
Yes, but add essential oils after the mixture cools slightly. Use only 2-3 drops to avoid affecting consistency. Lavender and chamomile oils are popular choices for their soothing properties. However, avoid oils that may irritate skin, and perform a patch test first.
Why is my homemade sugar wax different from professional products?
Professional products may contain additional ingredients like gum arabic or preservatives for extended shelf life and specific texture properties. Your homemade version is purer and often more effective because it contains only essential ingredients without unnecessary additives.
Can I make a larger batch to share with friends?
Absolutely! Simply multiply the recipe proportions. The process remains the same, though you may need to increase heating time slightly for larger quantities. Ensure your saucepan is large enough to safely accommodate the mixture without boiling over.


