
Best Cornish Hens Recipe: Grandma’s Secret to Perfectly Roasted Poultry
Cornish hens are one of those culinary treasures that deserve a spot on your dinner table far more often than they typically appear. These petite, flavorful birds are the perfect canvas for creating an impressive meal that tastes like you’ve spent hours in the kitchen, when in reality, the process is surprisingly straightforward. My grandmother’s approach to roasting Cornish hens transformed what many home cooks see as an intimidating preparation into an elegant, achievable dish that never fails to impress family and guests alike.
What makes Cornish hens so special compared to regular chicken is their tender meat, higher fat content relative to their size, and the fact that they cook remarkably quickly. Each bird serves as an individual portion, creating a restaurant-quality presentation without the restaurant-level complexity. My grandmother’s secret wasn’t just about technique—it was about understanding the bird itself and respecting its natural flavors while adding complementary elements that enhance rather than overpower.
This comprehensive guide will walk you through every aspect of preparing Cornish hens using my grandmother’s time-tested method. Whether you’re planning a special dinner for two or hosting a larger gathering, you’ll discover why this approach has remained a family favorite for generations and how you can recreate that same magic in your own kitchen.
What Are Cornish Hens and Why Choose Them
Cornish hens, also known as Cornish game hens, are a breed of chicken that was developed in the 1950s by crossing Cornish chickens with White Plymouth Rocks. These birds are significantly smaller than standard chickens, typically weighing between 1.5 to 2.5 pounds when ready to cook. The smaller size is actually one of their greatest advantages in the kitchen, as it allows for faster, more even cooking and creates an elegant individual-portion presentation.
The meat of a Cornish hen is remarkably tender and flavorful, with a slightly higher fat content than conventional chicken breast. This fat is crucial for maintaining moisture during cooking and contributes to a richer, more satisfying taste. Unlike larger birds, Cornish hens don’t require the same careful attention to prevent drying out, making them forgiving for home cooks while still delivering sophisticated results.
From a nutritional standpoint, Cornish hens offer excellent protein content while remaining relatively lean overall. A single bird provides approximately 30 grams of protein with reasonable calorie counts, making them an excellent choice for health-conscious cooks. The smaller portion size also helps with portion control, which is another reason my grandmother favored them for entertaining.
Cornish hens are also incredibly versatile. While this recipe focuses on classic roasting, these birds work beautifully with international flavor profiles. You can prepare them using sous vide cooking techniques for ultimate precision, or adapt them to various cuisines by adjusting your seasoning and stuffing choices.
Selecting and Preparing Your Birds
The foundation of any great dish begins with ingredient selection, and this principle is absolutely critical when working with Cornish hens. When shopping, look for birds that have smooth, unblemished skin with a pale golden or pinkish hue. The skin should feel firm to the touch, and there should be no soft spots or discoloration. If possible, purchase fresh birds rather than frozen, as they tend to have superior texture and flavor. However, frozen birds work perfectly well—simply plan ahead for proper thawing.
Thawing frozen Cornish hens requires patience and proper technique. The safest method is to transfer them to the refrigerator 24 hours before cooking. This slow thaw maintains food safety and prevents any temperature shock to the delicate meat. Avoid thawing at room temperature, which can allow bacteria to proliferate. If you’re pressed for time, the cold water method works in a pinch—submerge the sealed bird in cold water and change the water every 30 minutes. A 2-pound bird typically thaws this way in 2-3 hours.
Once your birds are thawed, proper preparation is essential. Remove them from the refrigerator about 30 minutes before cooking. This allows the meat to reach closer to room temperature, promoting more even cooking throughout. While waiting, pat the birds completely dry with paper towels—this is non-negotiable for achieving crispy, golden skin. Any moisture on the surface creates steam rather than the dry heat necessary for browning.
Next, examine the cavity and remove the giblets package if present. Rinse the cavity gently under cold water and pat dry. At this point, you can inspect the bird for any remaining pin feathers and remove them with tweezers if necessary. Season the inside of the cavity lightly with salt and pepper—this seasons the meat from within and adds subtle flavor.
Grandma’s Signature Herb Butter Mixture
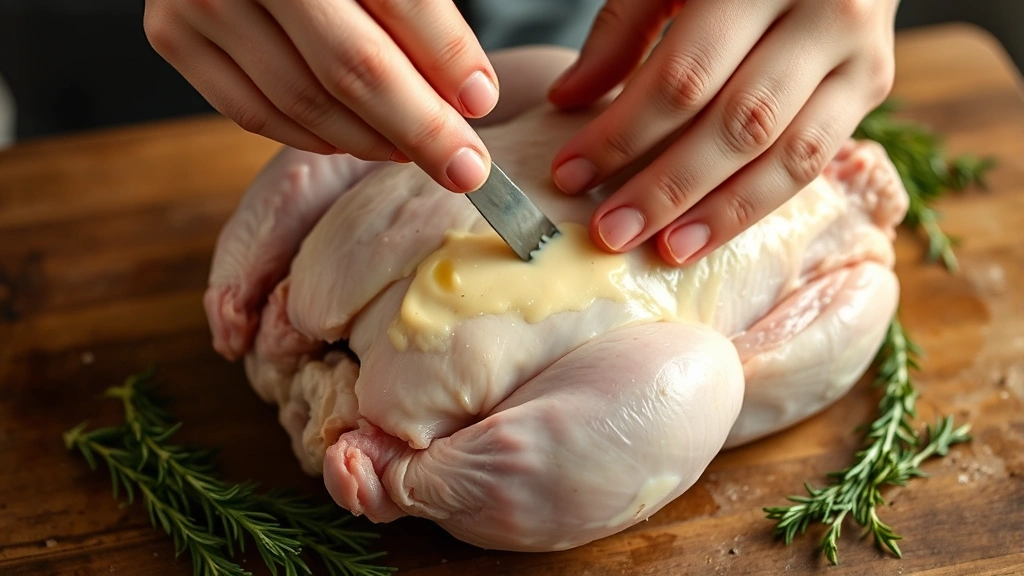
The heart of my grandmother’s method lies in her herb butter mixture, which she applied both under and over the skin. This technique infuses flavor directly into the meat while creating an incredibly moist and tender result. The beauty of this approach is its simplicity—just a few quality ingredients transform the bird completely.
Ingredients for the herb butter (per bird):
- 3 tablespoons unsalted butter, softened to room temperature
- 1 teaspoon fresh thyme leaves (or ½ teaspoon dried)
- ½ teaspoon fresh rosemary, finely chopped
- ½ teaspoon fresh sage, minced (or ¼ teaspoon dried)
- 1 clove garlic, minced extremely fine
- ½ teaspoon sea salt
- ¼ teaspoon freshly ground black pepper
- Zest of half a lemon
My grandmother always insisted on using fresh herbs when possible, claiming they provided a brightness that dried herbs simply couldn’t match. She kept a small herb garden specifically for cooking, though she acknowledged that quality dried herbs work beautifully during winter months when fresh herbs are less available.
To prepare the mixture, combine softened butter with all herbs, garlic, salt, pepper, and lemon zest in a small bowl. Use a fork to blend thoroughly until you achieve a uniform consistency. The mixture should be spreadable but not greasy. If you’re preparing multiple birds, you can multiply these quantities accordingly.
The application technique is where the magic happens. Using your fingers, gently separate the skin from the meat, starting at the neck and working toward the thighs. Work carefully to avoid tearing the skin—this takes practice, but even imperfect separation works well. Distribute approximately one-third of the herb butter under the skin, working it into the breast meat and down toward the thighs. Rub the remaining herb butter over the exterior of the bird, ensuring even coverage. Don’t forget the wings and legs—these areas benefit tremendously from the butter coating.
Step-by-Step Roasting Instructions
Now that your birds are properly prepared with the herb butter mixture, it’s time to roast them to perfection. My grandmother’s method emphasizes consistent technique and careful attention to the birds as they cook.
Equipment and setup:
Preheat your oven to 425°F (220°C). Position the rack in the lower-middle portion of your oven—this ensures the bottom of the birds roasts properly without the tops browning too quickly. Use a roasting pan with sides at least 2 inches high. If you don’t have a traditional roasting pan, a heavy-bottomed baking dish works perfectly well.
Line the bottom of your pan with roughly chopped vegetables: carrots, celery, onions, and garlic. These vegetables serve multiple purposes—they flavor the pan drippings, create a natural rack that elevates the birds slightly, and prevent sticking. Add about ½ cup of chicken or vegetable broth to the pan. This creates a moist cooking environment and prevents the drippings from burning.
Positioning the birds:
Place each Cornish hen breast-side up in the roasting pan, leaving at least 2 inches between birds if cooking multiple ones. Truss the legs by crossing them and tucking them under the body, or simply tie them together with kitchen twine. This isn’t strictly necessary but creates a more compact shape that cooks more evenly. Tuck the wing tips under the body to prevent them from browning too quickly.
Initial roasting:
Place the pan in the preheated oven. The high initial temperature creates a Maillard reaction that develops that beautiful golden-brown exterior. Roast undisturbed for 20 minutes. During this time, resist the urge to open the oven door frequently—this releases heat and extends cooking time. My grandmother had a strict rule about oven-door checking: only peek after the first 15 minutes have passed.
Temperature adjustment and basting:
After the initial 20 minutes, reduce the oven temperature to 375°F (190°C). At this point, check the pan drippings. If there’s a good amount of liquid, use it to baste the birds. If the pan seems dry, add another ¼ cup of broth. Baste the birds every 10 minutes for the remainder of cooking. This continuous basting keeps the meat incredibly moist and promotes even browning.
Perfecting Temperature and Timing
One of the most common mistakes home cooks make is either undercooking or overcooking their birds. My grandmother’s solution was simple: trust a meat thermometer rather than guessing. This removes all uncertainty and ensures perfectly cooked poultry every single time.
For Cornish hens, the total roasting time typically ranges from 45 to 60 minutes, depending on the size of your birds and your oven’s specific characteristics. A 1.5-pound bird usually cooks in about 45 minutes, while a 2.5-pound bird may need up to an hour. The most reliable indicator is internal temperature rather than time.
Insert an instant-read meat thermometer into the thickest part of the thigh without touching bone. The safe internal temperature for poultry is 165°F (74°C). My grandmother preferred pulling her birds at 160°F (71°C) and allowing them to rest, as carryover cooking brings them to the safe temperature while keeping the meat incredibly tender. Many professional chefs follow this same approach.
Check the temperature starting at 40 minutes for smaller birds and 50 minutes for larger ones. Once the thigh reaches 160-165°F, remove the pan from the oven. The birds should have beautiful golden-brown skin, and any juices running from the thigh should be clear rather than pink.
The critical resting period:
This step is absolutely essential and cannot be skipped. Remove the birds from the roasting pan and place them on a warm serving platter. Tent loosely with foil and let rest for 10-15 minutes. During this time, the residual heat continues cooking the interior while the juices redistribute throughout the meat, ensuring maximum tenderness. Cutting into the meat before this resting period causes all those flavorful juices to run out onto the plate rather than staying in the meat where they belong.
While the birds rest, don’t discard that pan! Those precious drippings are the foundation for an incredible sauce that elevates the entire dish. This is where the roasted vegetables and broth combine to create something truly special.
Creating the Perfect Pan Sauce
My grandmother believed that a great sauce separates good roasted poultry from truly exceptional roasted poultry. Her method for creating pan sauce is elegant in its simplicity and requires just a few additional ingredients beyond what’s already in the pan.
Sauce ingredients:
- 2 tablespoons butter
- 2 tablespoons all-purpose flour
- 1 cup chicken broth or stock
- ½ cup dry white wine (optional but recommended)
- 1 tablespoon fresh lemon juice
- Salt and pepper to taste
- 1 teaspoon fresh thyme (optional)
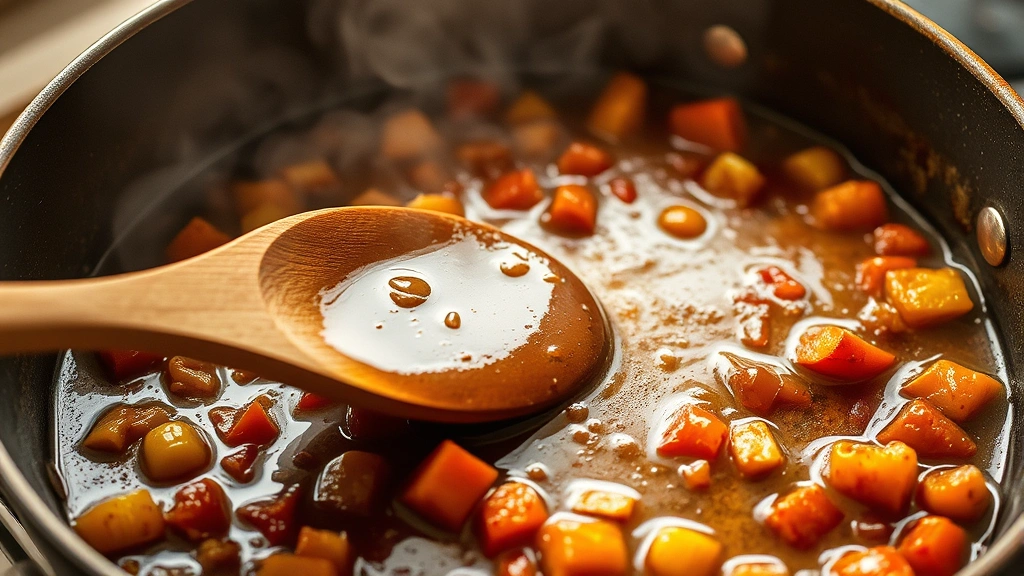
After removing the birds, place the roasting pan directly on the stovetop over medium heat. The roasted vegetables and pan drippings should still be in the pan. Using a wooden spoon, scrape the bottom and sides of the pan, breaking up any browned bits. These flavorful bits, called fond, contain concentrated chicken flavor and are liquid gold for sauce-making.
If the pan seems very fatty, you can pour off some excess fat, leaving about 2 tablespoons. Add 2 tablespoons of fresh butter to the pan and allow it to melt. Sprinkle 2 tablespoons of flour over the butter and stir constantly for about 2 minutes. This creates a roux that will thicken your sauce. Don’t skip this step or allow it to brown too much—you want a blonde roux that provides body without adding color.
Gradually add 1 cup of chicken broth while stirring constantly. If using wine, add it at this point as well. The mixture will initially seem lumpy, but continued stirring breaks up any flour clumps. Bring the sauce to a gentle simmer and cook for 3-4 minutes, stirring occasionally. The sauce will thicken noticeably. Taste and adjust seasoning with salt, pepper, and fresh lemon juice. If you prefer a thinner sauce, add additional broth. If you prefer it thicker, cook a bit longer.
Strain the sauce through a fine-mesh sieve if you prefer a smooth consistency, or leave the roasted vegetables in for a rustic presentation. Either approach works beautifully. Pour the sauce into a serving bowl and keep warm while plating the birds.
Serving Suggestions and Pairings
Presentation matters tremendously when serving Cornish hens, as their individual-portion nature creates an elegant table setting. Place one roasted bird on each plate, positioned breast-side up. The golden skin is a beautiful focal point, so don’t hide it.
Complementary side dishes:
My grandmother typically served her Cornish hens with sides that wouldn’t compete with the bird’s delicate flavor. Creamed spinach, roasted root vegetables, and wild rice pilaf were her go-to choices. For a more casual approach, consider pairing with a chicken and potatoes recipe adapted for individual servings, or try simple roasted potatoes tossed with fresh herbs.
Vegetable sides should be prepared simultaneously with the birds if possible, so everything finishes at the same time. Roasted asparagus, glazed baby carrots, or buttered peas all work beautifully. The key is choosing vegetables that complement rather than overshadow the delicate poultry.
Beverage pairings:
A crisp white wine pairs beautifully with roasted Cornish hens. Sauvignon Blanc, Pinot Grigio, or a light Chardonnay all work wonderfully. If you prefer red wine, a light Pinot Noir is an excellent choice. For non-alcoholic options, consider a quality chicken broth-based consommé served as a light first course, or simply serve with water infused with lemon and fresh herbs.
For special occasions, consider adding a Christmas cocktail as an aperitif. The festive nature of Cornish hens makes them perfect for holiday entertaining.
Dessert considerations:
Since Cornish hens are a relatively light main course, you have flexibility with dessert choices. My grandmother often followed this elegant dinner with something refreshing like sorbet or a light fruit tart. For those with a sweet tooth, explore healthy dessert recipes that won’t leave guests feeling overstuffed. Alternatively, homemade homemade ice cream served with fresh berries provides an elegant finish.
Leftover possibilities:
While it’s rare to have leftovers from Cornish hens, any remaining meat makes exceptional salads or can be shredded for use in various dishes. The bones create excellent stock for soups and sauces. Nothing goes to waste in a well-organized kitchen.
FAQ
How many Cornish hens should I prepare per person?
One whole Cornish hen per person is the standard serving. Each bird typically weighs 1.5 to 2.5 pounds and provides a satisfying portion. For smaller appetites or when serving multiple courses, you might use half a bird per person, though whole birds create a more impressive presentation.
Can I prepare Cornish hens ahead of time?
Yes, you can prepare the birds several hours in advance. Apply the herb butter mixture, cover loosely with plastic wrap, and refrigerate. Remove from the refrigerator 30 minutes before roasting to allow the meat to warm slightly. The herb butter actually benefits from extended time, as the flavors meld together beautifully.
What’s the best way to store leftover Cornish hen?
Store cooled leftover meat in an airtight container in the refrigerator for up to four days. Freeze the bones and any pan drippings to create stock. For longer storage, you can freeze cooked meat for up to three months, though it’s best used within one month for optimal quality.
Can I use this recipe with regular chicken instead?
Absolutely. The technique works beautifully with a whole 3-4 pound chicken, though cooking time will be longer—typically 1 hour 15 minutes to 1 hour 30 minutes. Adjust timing based on internal temperature rather than relying solely on time estimates. You might also try this method with sous vide cooking for even more precise results with larger birds.
What if my oven temperature fluctuates?
Many home ovens have temperature inconsistencies. Invest in an oven thermometer to verify actual temperature. If your oven runs hot, reduce the stated temperatures by 25°F. If it runs cool, increase them by 25°F. Always rely on meat thermometer readings rather than time alone.
Can I stuff the Cornish hens?
Yes, though my grandmother preferred to keep the cavity empty for more even cooking. If you choose to stuff them, use about ¼ cup of stuffing per bird and ensure the stuffing reaches 165°F internally. Stuffed birds require slightly longer cooking time. For quick breakfast recipes using leftover bird meat, consider preparing it without stuffing to simplify storage.
How do I achieve crispier skin?
Ensure the birds are completely dry before roasting, as any moisture prevents browning. Start at a high oven temperature (425°F) for the first 20 minutes, then reduce heat. If skin isn’t as crisp as desired, increase the final oven temperature to 400°F for the last 10 minutes of cooking, watching carefully to prevent burning.
What external resources can help me learn more about poultry preparation?
The Culinary Schools Association offers comprehensive guides on poultry techniques. For food science understanding, check Serious Eats, which provides detailed explanations of cooking processes. ChefSteps offers video demonstrations of professional techniques, while The Spruce Eats provides tested recipes and variations.
Are Cornish hens more expensive than regular chicken?
Cornish hens typically cost more per pound than larger chickens, but since you’re purchasing smaller birds, the total cost per serving is often comparable or only slightly higher. For special occasions, the impressive presentation justifies any modest price difference.


