
Fluffy Sourdough Cinnamon Rolls: Baker’s Favorite Recipe
Sourdough cinnamon rolls represent the perfect marriage of tangy fermented dough and sweet cinnamon sugar filling. Unlike traditional cinnamon rolls made with commercial yeast, these beauties develop complex flavor through slow fermentation, creating a tender crumb with remarkable depth. Whether you’re a seasoned baker or exploring sourdough baking for the first time, this recipe delivers consistently fluffy, pillowy rolls that rival any bakery.
The magic happens when your sourdough starter meets warm milk, butter, and eggs—transforming simple ingredients into something extraordinary. These rolls proof overnight in the refrigerator, which means you’ll wake up to minimal morning effort and maximum flavor. The result? Impossibly soft rolls with subtle tang, perfect for breakfast or brunch entertaining.
Ingredients You’ll Need
For the dough, gather 1 cup active sourdough starter (fed 4-8 hours prior), 1/2 cup whole milk warmed to 90°F, 3 tablespoons unsalted butter melted, 1 large egg, 2 tablespoons granulated sugar, 1.5 teaspoons salt, and 2.5 cups all-purpose flour. The warm milk activates your starter, while the egg creates richness and binds the dough structure.
The filling requires 1/4 cup softened butter, 1/2 cup packed brown sugar, and 2.5 tablespoons ground cinnamon. Don’t skimp on quality cinnamon—it makes an enormous difference in final flavor.
For the cream cheese frosting, you’ll need 4 ounces cream cheese at room temperature, 2 tablespoons unsalted butter softened, 1/2 teaspoon vanilla extract, and 1 cup powdered sugar sifted. This frosting adds luxurious tang that complements sourdough’s natural acidity.
Essential Equipment
A kitchen scale ensures precision with sourdough’s sensitive dough ratios. A stand mixer with dough hook saves arm strength during kneading, though hand mixing works beautifully too. You’ll need a 9×13-inch baking pan, parchment paper, and a sharp knife or bench scraper for cutting clean roll sections. A instant-read thermometer confirms proper dough temperature—crucial for consistent fermentation timing.
A banneton proofing basket prevents sticking during overnight refrigeration, though a parchment-lined bowl substitutes perfectly. Have a pastry brush for egg wash and a wooden spoon for mixing filling into the dough.
Making the Dough
Start by ensuring your sourdough starter is at peak activity—bubbly, doubled in size, and smelling pleasantly sour. This typically happens 4-8 hours after feeding with equal parts starter, flour, and water. An inactive starter produces dense rolls lacking the characteristic fluffy crumb.
Combine your active starter, warm milk, melted butter, egg, and sugar in a large mixing bowl. Stir until the egg is fully incorporated and no streaks remain. The mixture should look slightly curdled—this is normal and indicates proper emulsification.
Add flour and salt gradually, mixing with your hands or a wooden spoon until a shaggy dough forms. At this stage, don’t worry about smoothness; you’re simply incorporating dry ingredients. Let this mixture rest for 20 minutes—a process called autolyse that allows flour to fully hydrate and gluten to begin developing naturally.
After autolyse, knead the dough for 8-10 minutes by hand or 5-6 minutes with a stand mixer on medium speed. The dough should become smooth, elastic, and slightly tacky but not sticky. You’ll know it’s ready when it springs back slowly when poked and holds its shape without tearing.
Place the dough in a lightly oiled bowl, cover with a damp kitchen towel, and perform stretch-and-folds. Every 30 minutes for the next 2 hours, wet your hand, grab one side of the dough, stretch it up and over itself, rotate the bowl, and repeat from each of the four sides. This develops strength without aggressive kneading.
After bulk fermentation (3-4 hours total at room temperature, or until roughly doubled), the dough is ready for shaping. It should be puffy, with visible bubbles beneath the surface and a pleasant sour aroma.
Filling and Rolling Technique
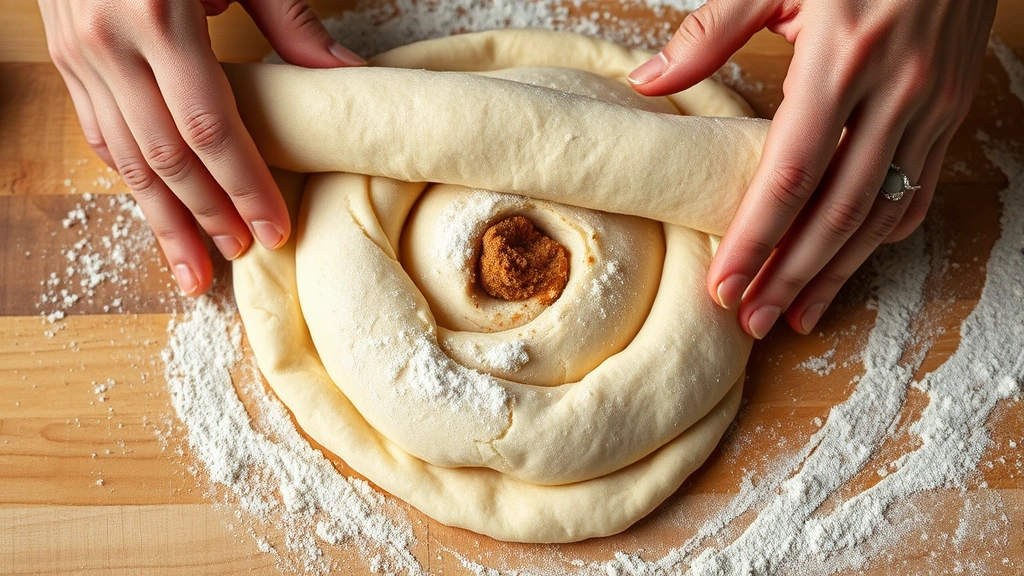
Turn your fermented dough onto a lightly floured surface and gently shape into a rough rectangle. Don’t degass aggressively—those bubbles create fluffiness. Using a rolling pin, gently extend the dough to approximately 12×9 inches, working from the center outward with light pressure.
Spread softened butter evenly across the entire dough surface, leaving a small border. The butter should be thin enough to see the dough through it but thick enough to coat completely. Sprinkle brown sugar and cinnamon in an even layer, pressing gently so the mixture adheres to the butter.
Starting from the long side closest to you, roll tightly toward the far edge. Use both hands, tucking the dough slightly as you roll to create tension and ensure even spiral layers. The tighter your roll, the more defined your swirls and the better the texture.
Cut the roll into 9 equal pieces using a sharp, thin-bladed knife dipped in water. Wetting the knife prevents cinnamon-sugar from sticking and creates cleaner cuts. Arrange pieces cut-side up in your prepared 9×13-inch baking pan, spacing them about half an inch apart—they’ll expand during proofing.
Cover the pan tightly with plastic wrap and refrigerate overnight (or up to 16 hours). Cold fermentation develops flavor complexity while the dough rises slowly in the cool environment. This is perfect for meal planning since rolls are ready for baking first thing in the morning.
Proofing and Baking
Remove rolls from refrigeration 30-45 minutes before baking. They should still be quite cold but beginning to rise at the edges. This cold, slow proofing creates exceptional texture—the dough is more extensible, producing softer rolls than fast-proofed versions.
Preheat your oven to 375°F (190°C) for at least 20 minutes. A fully preheated oven ensures the bottom of your rolls bakes properly while the tops brown beautifully. Prepare an egg wash by whisking one egg with one tablespoon water.
Brush the egg wash gently over each roll’s top, being careful not to deflate them. The egg wash promotes golden browning and adds subtle shine. Bake for 18-22 minutes, until the rolls are puffed and deep golden brown. The internal temperature should reach 190°F when measured with an instant-read thermometer inserted into the center of a roll.
Remove from the oven and let cool in the pan for 5 minutes—this prevents frosting from melting too quickly while the rolls are still piping hot. The residual heat will continue setting the crumb structure.
Frosting and Serving
While rolls cool slightly, prepare your cream cheese frosting. Beat softened cream cheese and butter together until light and fluffy, about 2 minutes on medium speed. This aerating step prevents dense frosting. Add vanilla extract and mix briefly.
Gradually add sifted powdered sugar, beating on low speed to prevent sugar clouds. Once combined, increase speed to medium and beat for another minute until the frosting reaches spreadable consistency. It should be smooth, creamy, and thick enough to hold peaks without being stiff.
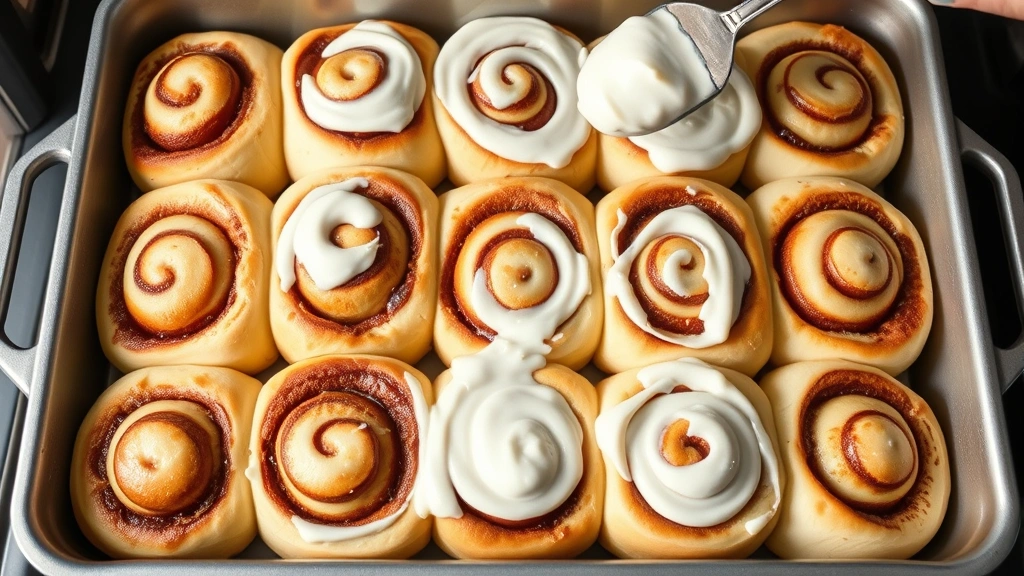
Spread frosting generously over warm rolls while they’re still in the pan. The residual heat softens the frosting slightly, creating that beloved bakery effect where it melts into every crevice. For more frosting coverage, transfer rolls to a wire rack and frost individually.
Serve warm or at room temperature. These rolls are best consumed within 24 hours for optimal fluffiness, though they store well in an airtight container for up to 3 days. Reheat gently in a 300°F oven for 8-10 minutes to restore softness.
Troubleshooting Tips
Dense, Heavy Rolls: Your starter likely wasn’t active enough at mixing time. Ensure it’s doubled in size, bubbly, and smells pleasantly sour before use. Underproofed dough also causes density—rolls should be noticeably puffed before baking.
Rolls Spread Too Thin: You may have overfilled them or not rolled tightly enough. Aim for consistent sugar-filling distribution and roll with gentle tension. Overproofed dough also spreads excessively—reduce final proofing time if this occurs.
Gummy Interior: Your oven temperature may be too low or baking time insufficient. Invest in an oven thermometer to verify accuracy, and always check internal temperature with an instant-read thermometer. Underbaked rolls have a gummy crumb that firms up only partially as they cool.
Dry, Tough Crumb: Overbaking is the culprit. Rolls continue cooking slightly after removal from the oven due to carryover heat. Aim for golden-brown exteriors and pull them out promptly. Overly long bulk fermentation can also tighten the crumb structure.
Frosting Won’t Spread: Your cream cheese or butter wasn’t sufficiently softened. Room temperature ingredients blend smoothly; cold ingredients create lumpy frosting. Let them sit at room temperature for 30 minutes before beating.
Frequently Asked Questions
Can I use a different sourdough starter percentage?
Yes, though it affects fermentation timing. A higher percentage (up to 1.5 cups) creates tangier rolls but requires shorter bulk fermentation—watch for doubling rather than relying on time. Lower percentages (down to 3/4 cup) produce milder flavor and may need extended fermentation.
What if I don’t have time for overnight refrigeration?
Room temperature proofing works, though timing varies by kitchen temperature. After shaping, cover and let rise 2-3 hours at 70-75°F until noticeably puffed. The rolls won’t develop as much flavor complexity, but they’ll still be delicious. Serious Eats offers additional guidance on timing variations.
Can I freeze unbaked rolls?
Absolutely. After shaping, flash-freeze on a baking sheet for 2 hours, then transfer to a freezer bag for up to one month. Bake directly from frozen, adding 5-8 minutes to baking time. No thawing required—the cold dough will proof slightly as the oven preheats.
Why is my sourdough starter sluggish?
Temperature significantly impacts starter activity. Ideally, maintain 75-80°F for optimal fermentation. Cooler kitchens require longer feeding schedules. King Arthur Baking provides comprehensive starter troubleshooting.
Can I substitute whole wheat flour?
You can replace up to 25% of all-purpose flour with whole wheat, though it creates denser rolls. Whole wheat absorbs more water, so you may need to increase milk slightly. The nuttier flavor complements cinnamon beautifully.
What’s the best way to store finished rolls?
Keep frosted rolls in an airtight container at room temperature for up to 3 days. Refrigeration dries them out faster. For longer storage, freeze unfrosted rolls in freezer bags up to one month, then thaw and frost as needed.
How do I get the swirly pattern more pronounced?
Roll the dough tighter during shaping and use a sharp knife for cutting. Press lightly with the knife rather than sawing, which can compress the dough and obscure swirls. Slightly underfilled rolls also showcase the spiral more dramatically.
Can I make these in a Dutch oven?
While traditional baking sheets work best, you can use a Dutch oven for steamed rolls. Cover with the lid for the first 15 minutes of baking, then remove to brown the tops. This creates exceptionally moist rolls, though the bottoms may be less crispy.
What about using instant yeast instead of sourdough starter?
You can, though you lose the distinctive sourdough flavor. Use 2 teaspoons instant yeast and reduce starter to 1/4 cup. Bulk fermentation shortens to 1.5-2 hours. These rolls won’t have the same complexity or keeping quality.
Is there a way to make these dairy-free?
Substitute plant-based milk for dairy milk and vegan butter for regular butter. Use a flax egg (1 tablespoon ground flax + 3 tablespoons water) instead of a regular egg. For frosting, use dairy-free cream cheese and vegan butter. The texture remains excellent.


