Corned Beef Brisket? Grandma’s Secret Recipe!
There’s something magical about a perfectly cooked corned beef brisket that fills your kitchen with an unmistakable aroma of spices and tender beef. My grandmother guarded her corned beef brisket recipe like a treasure, and after years of watching her work her magic in the kitchen, I finally uncovered the secrets that make her version so extraordinary. This isn’t just any corned beef—it’s a celebration of patience, quality ingredients, and time-honored techniques that transform a humble cut of meat into a showstopper dish.
Whether you’re preparing for St. Patrick’s Day, a special family dinner, or simply craving comfort food at its finest, this corned beef brisket recipe delivers restaurant-quality results in your own home. The key lies in understanding how to properly cure, cook, and slice the meat to achieve that perfect tender texture with a beautifully browned exterior. I’m thrilled to share my grandmother’s wisdom with you, along with modern cooking insights that will guarantee your success.
What is Corned Beef and Where Does it Come From?
Corned beef is a salt-cured brisket that has been seasoned with a distinctive blend of spices. The name “corned” doesn’t refer to the grain corn at all; rather, it comes from the large grains of salt (called “corns” of salt) historically used in the curing process. This ancient preservation technique dates back centuries and was particularly popular among Irish immigrants who brought their culinary traditions to America.
The curing process infuses the meat with flavors while breaking down the muscle fibers, resulting in the characteristic tender texture we all love. Traditional corning involves submerging the brisket in a brine solution for several days, allowing the salt and spices to penetrate deeply into the meat. My grandmother always said that patience during the curing stage is what separates good corned beef from extraordinary corned beef.
Understanding the history and science behind corned beef helps you appreciate why certain techniques matter. The salt in the curing brine doesn’t just preserve the meat—it actually changes the protein structure, making it more tender and flavorful. This is why you can’t simply season a brisket with salt and expect the same results as a properly cured corned beef.
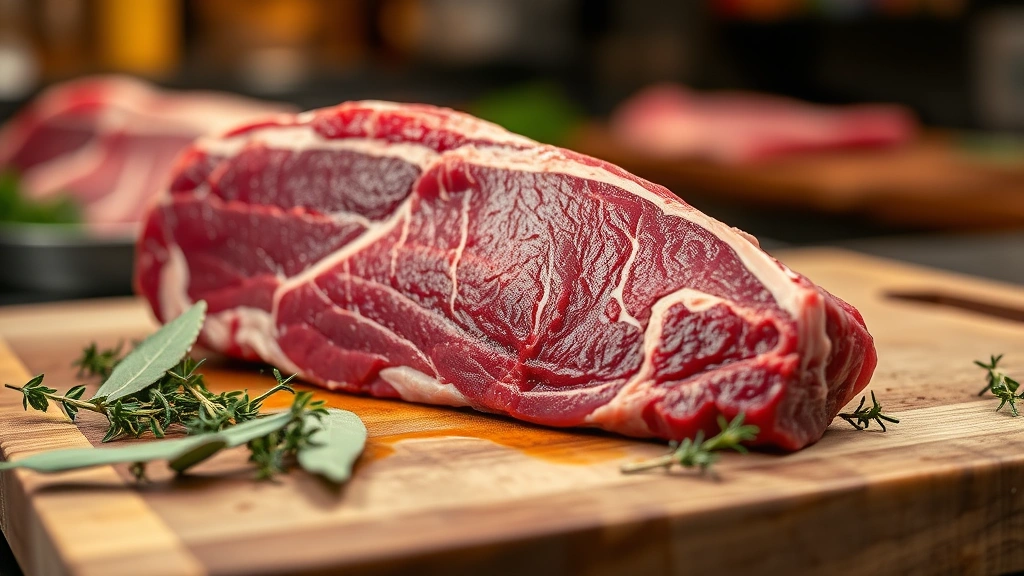
Selecting the Perfect Brisket Cut
Not all briskets are created equal, and choosing the right cut is absolutely crucial for achieving the best results. Beef brisket comes in two main sections: the flat and the point. The flat is leaner with less marbling, while the point contains more fat and connective tissue. For corned beef, the point is generally superior because the extra fat and collagen render down during the long cooking process, creating that melt-in-your-mouth texture.
When shopping, look for a brisket that weighs between three to five pounds—this size cooks evenly and feeds a good-sized family or small gathering. Examine the meat carefully for good marbling throughout, which indicates the brisket will stay moist during cooking. The color should be a deep red, not brown or gray, which would suggest the meat has been sitting too long.
You have two options: purchase pre-cured corned beef from the butcher counter, or cure your own brisket from scratch. Pre-cured briskets offer convenience and consistent results, while curing your own allows complete control over the spice blend and salt content. My grandmother preferred curing her own, claiming it was the only way to achieve her signature flavor profile.
Grandma’s Secret Spice Blend
This is where the magic happens. Grandma’s secret spice blend is what distinguishes her corned beef from all others. The combination of warm spices creates layers of flavor that develop throughout the cooking process. The essential spices include black peppercorns, bay leaves, mustard seeds, coriander seeds, and cloves. Each spice plays a specific role in creating the final flavor profile.
Black peppercorns provide a subtle heat and complexity that builds on the palate. Bay leaves contribute an earthy, slightly floral note that balances the heavier spices. Mustard seeds add a pungent, slightly tangy element that cuts through the richness of the beef. Coriander seeds bring a warm, citrusy undertone, while cloves provide depth and a hint of sweetness.
Beyond these core spices, Grandma adds a few additional ingredients that she swore made all the difference: a small piece of fresh ginger, a cinnamon stick, and a pinch of allspice. These ingredients create a more complex flavor profile that develops as the meat cooks. The ginger adds a subtle warmth without overpowering the other flavors, the cinnamon provides a hint of sweetness, and the allspice ties everything together beautifully.
To prepare the spice blend, toast all whole spices lightly in a dry skillet for about two minutes before using. This releases their essential oils and intensifies their flavors. Don’t skip this step—it genuinely makes a noticeable difference in the final result. The toasted spices should smell fragrant and slightly warm when you add them to the brine.
Step-by-Step Cooking Instructions
Now let’s walk through the complete process of preparing Grandma’s corned beef brisket. If you’re starting with a pre-cured brisket from the store, you can skip ahead to the cooking instructions. However, if you’re curing from scratch, begin here.
For Curing (if starting from raw brisket): Combine water, kosher salt, sugar, and all the toasted spices in a large pot. Bring to a boil, stirring until the salt and sugar dissolve completely. Remove from heat and allow the brine to cool completely—this is essential, as you don’t want to cook the meat with hot liquid. Once cooled, submerge the brisket in the brine, ensuring it’s completely covered. Refrigerate for five to seven days. The longer you cure, the more pronounced the flavors become, but five days is typically the sweet spot.
For Cooking: Remove the brisket from the brine (if cured at home) or rinse the pre-cured brisket under cold water for several minutes to remove excess salt. This step is critical—over-salty corned beef is unpleasant, and rinsing prevents this.
Place the brisket in a large pot or Dutch oven and cover with fresh water. Add the pickling spice packet that typically comes with pre-cured brisket, or add your own blend of bay leaves, peppercorns, and coriander seeds. Bring the water to a boil, then immediately reduce heat to a gentle simmer. Cover the pot partially and maintain a slow, gentle simmer throughout the cooking process.
The low and slow method is non-negotiable. Boiling vigorously will result in tough, stringy meat. A gentle simmer allows the collagen to break down gradually into gelatin, creating that tender, succulent texture. Skim any foam or impurities that rise to the surface during the first thirty minutes of cooking.
Cooking Time and Temperature Guidelines
The general rule for cooking corned beef is approximately 45 minutes per pound at a gentle simmer. A four-pound brisket will typically take three to three and a half hours to reach perfect tenderness. However, the most reliable indicator isn’t time—it’s tenderness when pierced with a fork.
To test for doneness, pierce the thickest part of the brisket with a fork. It should slide through with minimal resistance. If you encounter significant resistance, the meat needs more time. Don’t rely solely on the internal temperature, as corned beef is different from other beef cuts. The goal is to break down the connective tissue completely, which happens through extended moist cooking rather than reaching a specific temperature.
About 45 minutes before the brisket finishes cooking, you can add vegetables if desired. However, my grandmother preferred cooking vegetables separately to prevent them from becoming mushy and to maintain cleaner flavors. She would prepare her vegetables while the meat rested after cooking.
Once the meat is fork-tender, remove it from the cooking liquid and allow it to rest on a cutting board for at least ten minutes. This resting period allows the juices to redistribute throughout the meat, ensuring maximum tenderness and flavor. Don’t skip this step, as cutting into the meat immediately will cause the juices to run out, resulting in drier meat.
The Perfect Vegetables to Cook Alongside
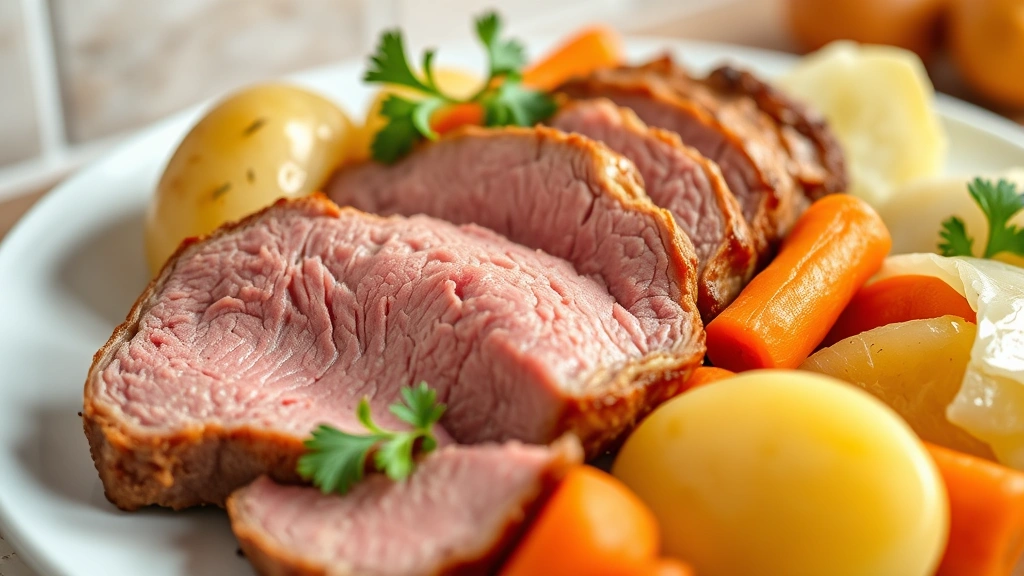
Traditional corned beef and cabbage pairs the meat with vegetables, though the cooking method matters significantly. While some recipes call for cooking vegetables in the same pot as the meat, Grandma preferred a different approach. She would cook the vegetables separately during the final stages of the meat’s cooking, allowing her to control their texture and flavor more precisely.
For the classic pairing, prepare cabbage by cutting it into thick wedges. Peel and cut potatoes and carrots into large chunks. About thirty to forty minutes before serving, bring a separate pot of salted water to a boil and cook the potatoes and carrots until they’re nearly tender, about twenty minutes. Add the cabbage wedges and cook for an additional ten to fifteen minutes until the cabbage is tender but still holds its shape.
This method ensures the vegetables aren’t overcooked and mushy, and it keeps the cooking liquid clear and suitable for making a delicious broth or gravy. The vegetables cook in plain salted water, which allows their natural flavors to shine rather than absorbing too much of the pickling spices.
Serve the vegetables alongside the sliced corned beef, and drizzle everything with a simple mustard cream sauce or serve with horseradish for extra punch. Consider pairing your corned beef dinner with sweet cornbread recipe for a complete meal, or prepare 3 ingredient biscuit recipe for a simpler bread option that won’t overshadow the main course.
Slicing Techniques for Maximum Tenderness
Here’s another crucial secret that my grandmother emphasized repeatedly: how you slice the corned beef determines whether it’s tender or tough. The key is understanding the grain of the meat and cutting against it.
Examine the cooked brisket and identify the direction of the muscle fibers—this is the grain. Using a sharp carving knife, slice perpendicular to the grain, not parallel to it. Cutting against the grain shortens the muscle fibers, making them easier to chew and more tender. If you slice with the grain, the fibers remain long and create a stringy, chewy texture.
The point cut of the brisket has grain running in multiple directions, so you may need to adjust your slicing angle as you work through different sections. Take your time and examine each section to determine the grain direction. A sharp knife makes this task much easier—a dull knife will tear the meat rather than creating clean slices.
Slice the meat about a quarter-inch thick. This thickness is ideal—thin enough to maximize tenderness, but thick enough that the slices maintain their structure and don’t fall apart. Serve the slices while still warm, as cold corned beef becomes tougher and less flavorful.
Serving Suggestions and Pairings
Beyond the traditional cabbage and root vegetables, there are numerous creative ways to serve corned beef. My grandmother loved experimenting with different preparations once she’d perfected the basic recipe. Consider these serving options for your next corned beef dinner.
Classic Irish-American Style: Serve sliced corned beef with boiled potatoes, carrots, and cabbage, topped with a creamy mustard sauce. This is the traditional preparation and remains the most popular for good reason.
Corned Beef Hash: Dice leftover corned beef and combine with diced potatoes and onions. Pan-fry in a skillet until golden and crispy, creating a delicious breakfast or brunch dish. Serve with a fried egg on top for breakfast perfection.
Corned Beef Sandwiches: Layer thin slices of corned beef on toasted rye bread with mustard, pickles, and Swiss cheese. This New York deli classic is perfect for lunch and makes excellent use of leftovers.
Corned Beef Tacos: Shred corned beef and serve in warm tortillas with sautéed peppers, onions, and your favorite taco toppings. This modern twist adds unexpected flavor dimensions to the traditional preparation.
For beverages, Irish stout or ale pairs beautifully with corned beef. If you prefer non-alcoholic options, a crisp ginger ale or sparkling cider complements the rich, spiced flavors wonderfully. Consider preparing how to make homemade bread for an elevated bread service, or explore Trader Joe’s recipes for convenient side dish options that pair well with your main course.
Storage and Reheating Tips
Corned beef actually improves slightly as it sits, making it an excellent make-ahead dish for entertaining. Store the cooked brisket in an airtight container, submerged in some of the cooking liquid, for up to five days in the refrigerator. The liquid keeps the meat moist and prevents it from drying out.
To reheat, slice the cold corned beef and either warm it gently in a low oven at 300 degrees Fahrenheit for about twenty minutes, or reheat the slices in a skillet with a bit of the cooking liquid until heated through. Avoid high heat, which will dry out the meat. The low and slow approach that made it tender during initial cooking also preserves that tenderness during reheating.
For longer storage, corned beef freezes well for up to three months. Wrap individual portions tightly in plastic wrap and then aluminum foil to prevent freezer burn. Thaw overnight in the refrigerator before reheating. The texture remains excellent after freezing, making corned beef ideal for batch cooking and meal planning.
You can also freeze the cooking liquid separately to use as a flavorful broth for soups or to reheat the meat. This broth becomes richer and more flavorful after a few days in the refrigerator as the flavors continue to develop and meld together.
FAQ
Can I cook corned beef in a slow cooker?
Absolutely! Place the rinsed corned beef in a slow cooker, cover with water, and cook on low for eight to ten hours. Add vegetables during the final two hours of cooking. The slow cooker method is incredibly convenient and produces equally tender results. However, you won’t achieve the same browning on the exterior as you would with stovetop cooking.
What’s the difference between corned beef and pastrami?
Both are cured beef briskets, but pastrami is additionally smoked and spiced with a heavier blend of seasonings. Corned beef relies on the curing brine for its flavor, while pastrami gets its distinctive taste from both curing and smoking. The cooking methods are also different—pastrami is typically steamed after smoking, while corned beef is simmered in water.
Is store-bought pre-cured corned beef as good as homemade?
Pre-cured corned beef from quality butchers is excellent and saves significant time. The main advantage of curing your own is controlling the salt level and spice blend precisely. If you prefer a less salty version, curing at home allows you to reduce the salt content. For most home cooks, quality pre-cured brisket delivers outstanding results with minimal effort.
How can I reduce the saltiness of corned beef?
Rinse the pre-cured brisket thoroughly under cold running water for several minutes before cooking. If the finished corned beef still tastes too salty, soak the sliced meat in fresh water for thirty minutes to an hour, which will draw out excess salt. Alternatively, serve it with unsalted sides and avoid adding additional salt during seasoning.
Can I use a pressure cooker for corned beef?
Yes, an Instant Pot or pressure cooker can cook corned beef in about 90 minutes. Use the high-pressure setting with enough water to cover the meat. However, the low and slow simmering method produces superior texture and allows the flavors to develop more fully. Pressure cooking is an excellent option when time is limited.
What’s the best way to serve leftover corned beef?
Leftover corned beef is incredibly versatile. Use it for smothered chicken recipe-style preparations by making a creamy sauce, create corned beef hash for breakfast, make sandwiches, or add it to soups and stews. The meat’s robust flavor works well in numerous applications beyond the traditional dinner.
Should I save the cooking liquid?
Absolutely! This liquid is liquid gold for cooking. Use it as a base for soups, braise vegetables in it, or simply reheat the corned beef in it. The broth becomes richer and more flavorful over time, making it perfect for many applications. Store it in the refrigerator for up to one week, or freeze for several months.


