Hyderabadi Biryani Recipe: Master the Authentic Taste
Hyderabadi biryani stands as one of India’s most revered rice dishes, a fragrant masterpiece that has captivated palates for centuries. Originating from the royal kitchens of Hyderabad, this one-pot wonder combines tender meat, aromatic basmati rice, and a symphony of spices that create an unforgettable dining experience. The magic lies not just in the ingredients but in understanding the layering technique and slow-cooking process that allows flavors to meld into pure culinary poetry.
This comprehensive guide will walk you through every step of creating authentic Hyderabadi biryani in your own kitchen. Whether you’re preparing a special dinner or exploring easy dinner recipes for beginners, biryani’s structured approach makes it surprisingly manageable. We’ll cover ingredient selection, precise cooking techniques, and the secrets that transform a good biryani into an exceptional one.
Essential Ingredients for Authentic Biryani
The foundation of exceptional Hyderabadi biryani begins with sourcing quality ingredients. Unlike low carb dinner recipes, biryani embraces basmati rice as its star component. The rice grains must be long, slender, and aged for at least one year to achieve the perfect texture and fragrance.
For the Rice:
- 2 cups aged basmati rice (preferably Hyderabadi or Kolkata variety)
- Water for soaking and cooking
- Salt to taste
- Whole spices: 4-5 green cardamom pods, 3-4 black cardamom pods, 2 bay leaves, 1-inch cinnamon stick, 4-5 cloves, 1 teaspoon cumin seeds
For the Meat:
- 1 kg mutton or goat meat (cut into medium pieces, preferably from shoulder and leg)
- 200ml plain yogurt (full-fat, ideally hung overnight)
- 2 tablespoons ginger-garlic paste
- 2 green chilies (minced)
- 1 tablespoon mint leaves (chopped)
- 1 tablespoon coriander leaves (chopped)
- 1 teaspoon red chili powder
- ½ teaspoon turmeric powder
- Salt to taste
- Juice of half a lemon
For the Fried Onions and Ghee:
- 300ml ghee (clarified butter), divided
- 4 large onions (thinly sliced)
- ¼ cup milk
- A few saffron strands
Understanding ingredient quality transforms your biryani from ordinary to extraordinary. Aged basmati rice contains less moisture, preventing mushiness during cooking. The meat should be tender cuts that benefit from the slow dum pukht cooking process, allowing connective tissues to break down into gelatin that enriches the overall dish.
Preparation and Marination Process
Successful biryani preparation requires patience and attention to detail. Begin by washing your basmati rice thoroughly under cold running water until the water runs clear. This removes excess starch that would otherwise cause the grains to stick together. Soak the rice in water for 30 minutes before cooking—this ensures even hydration and uniform cooking.
Step-by-Step Preparation:
- Prepare the Meat Marinade: In a large bowl, combine yogurt, ginger-garlic paste, minced green chilies, mint, coriander, red chili powder, turmeric, salt, and lemon juice. The yogurt acts as a tenderizer while adding creaminess to the final dish. Mix thoroughly until the spices coat the meat evenly.
- Marinate the Meat: Add the cut meat to the marinade and mix well, ensuring every piece is coated. Cover the bowl and refrigerate for at least 30 minutes, though 2-4 hours yields superior tenderness and flavor penetration. This resting period allows the enzymes in yogurt and spices to work their magic.
- Prepare Fried Onions: Heat 100ml ghee in a heavy-bottomed pan over medium-high heat. Add thinly sliced onions and fry until they turn deep golden brown, stirring frequently to ensure even cooking. This requires 12-15 minutes of patience. Reserve half of these crispy onions for garnish and crush the remaining half into smaller pieces for layering.
- Prepare Saffron Milk: While the onions fry, steep saffron strands in warm milk for 10-15 minutes. This infuses the milk with color and subtle floral notes that will perfume your biryani.
- Soak Rice: After marinating the meat, place your washed basmati rice in a bowl of water and let it soak for 30 minutes. This step is crucial for achieving separate, fluffy grains.
The marination phase cannot be rushed. During this time, the yogurt’s lactic acid begins breaking down muscle fibers, while the spices penetrate deep into the meat. This is what separates Hyderabadi wala recipes from simpler preparations—the respect for process and timing.
The Layering and Cooking Technique
Layering is where Hyderabadi biryani truly distinguishes itself from other rice preparations. This technique ensures that each grain of rice absorbs the aromatic essence of the meat and spices without becoming mushy.
Cooking the Rice Separately:
Bring a large pot of water to a rolling boil. Add the soaked rice along with whole spices (cardamom, bay leaves, cinnamon, cloves, cumin). The rice should cook until 70% done—the grains should have a slight bite to them. This usually takes 4-5 minutes. Drain immediately using a colander and reserve.
Layering Process:
Select a heavy-bottomed pot or handi (traditional clay pot) with a tight-fitting lid. The thickness of the vessel is critical for even heat distribution during the dum pukht process. Brush the bottom generously with ghee.
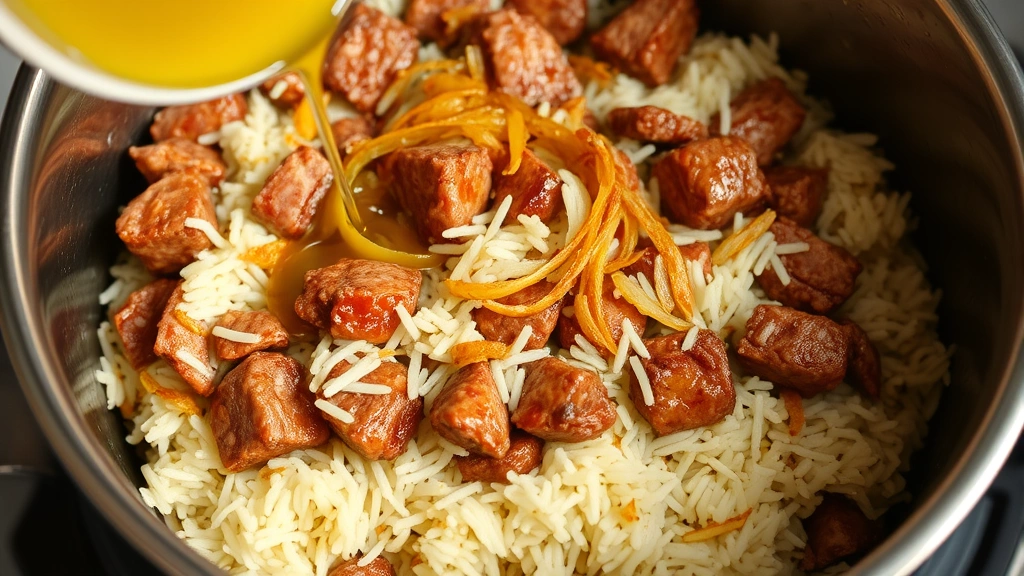
- First Layer: Spread half of the marinated meat evenly across the bottom of the pot. Ensure the pieces are distributed uniformly to allow heat to penetrate evenly.
- Second Layer: Add half of the partially cooked rice, spreading it carefully over the meat. Don’t press down—allow the rice to settle naturally.
- Third Layer: Add the remaining marinated meat in an even layer.
- Fourth Layer: Top with the remaining rice, again spreading without pressing.
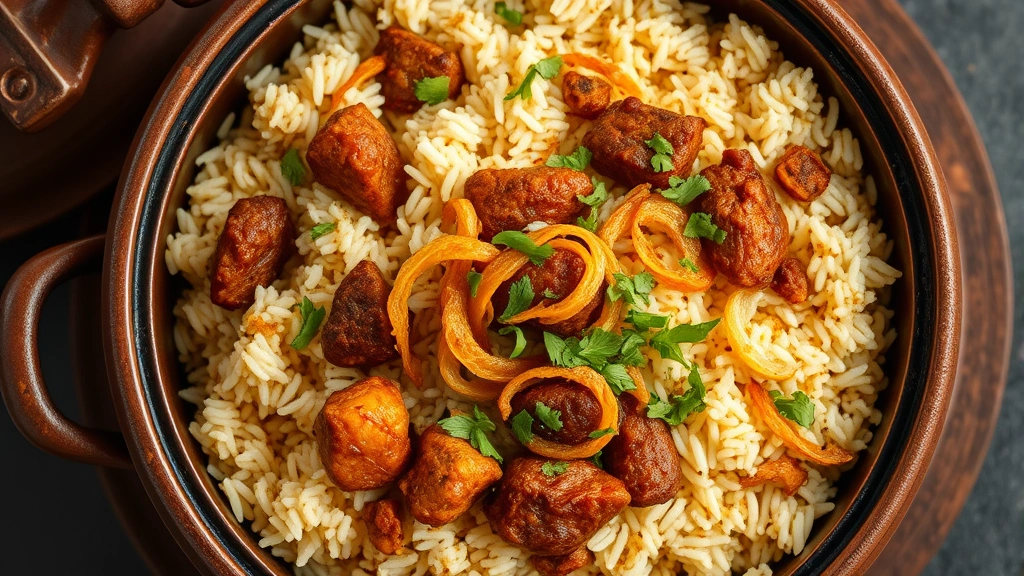
- Garnish Layer: Distribute the reserved fried onions over the top. Drizzle with the remaining ghee and pour the saffron milk evenly across the surface. Sprinkle remaining mint and coriander leaves.
This layering ensures that the heat from the pot bottom conducts through the meat, while steam rises through the rice, cooking it gently and infusing it with meat juices and spice flavors.
Understanding Dum Pukht Method
“Dum pukht” translates to “cooked by steam pressure,” a cooking technique perfected by Mughal royal chefs. This method relies on sealing the pot to trap steam, creating a pressurized environment where food cooks in its own moisture and aromatic essence.
The Sealing Process:
After layering, place the lid on your pot. If your lid isn’t perfectly tight, seal the edges with dough (a simple mixture of flour and water works well). This seal is essential—it prevents steam from escaping, ensuring the biryani cooks evenly and the rice grains remain separate.
Heat Management:
Place the sealed pot over medium-high heat for 3-4 minutes until you hear steam building inside—you’ll notice the dough seal beginning to puff or hear small hissing sounds. This indicates adequate steam generation. Reduce heat to low and place the pot on a tawa (griddle) or heat diffuser to prevent the bottom from burning.
Cook for 45 minutes on low heat. Resist the urge to open the lid—every time you do, you release precious steam and interrupt the cooking process. The sealed environment creates a unique microclimate where meat becomes incredibly tender and rice absorbs all the flavors.
After 45 minutes, turn off the heat and let the biryani rest for 5 minutes without opening the lid. This allows the residual heat to complete the cooking process gently.
Opening and Serving:
Carefully remove the dough seal and open the lid slowly, allowing steam to escape gradually. You’ll be greeted with an intoxicating aroma—the hallmark of perfectly executed biryani. Using a fork, gently separate the rice grains, being careful not to break them. This aeration ensures each grain remains distinct and fluffy.
Regional Variations and Adaptations
While this recipe captures the essence of Hyderabadi biryani, regional variations exist throughout India. Understanding these differences enriches your cooking knowledge and allows for creative adaptations based on ingredient availability or personal preference.
Kacchi Biryani vs. Pakki Biryani:
Hyderabadi biryani typically uses the “pakki” (cooked) method, where meat is partially cooked before layering with rice. Some regions prefer the “kacchi” (raw) method, where raw marinated meat is layered directly with raw rice. The pakki method offers more control and typically results in more consistent tenderness.
Chicken Biryani Adaptation:
While this recipe uses mutton, chicken can be substituted. Use 1 kg boneless chicken thighs (more flavorful than breast) cut into medium pieces. Reduce marination time to 20-30 minutes and cooking time to 30-35 minutes, as chicken cooks faster than mutton. Adjust spices slightly—use ½ teaspoon red chili powder instead of 1 teaspoon.
Vegetarian Version:
For vegetarian preparations, replace meat with vegetables like potatoes, cauliflower, green peas, and carrots. Marinate vegetables in yogurt with the same spices for 15-20 minutes. Layer with rice as directed but reduce cooking time to 25-30 minutes.
These variations allow you to explore different flavor profiles while maintaining the core technique that makes biryani special. Like exploring high protein slow cooker recipes, biryani benefits from understanding the fundamental principles before experimenting with variations.
Pro Tips for Perfect Results
Rice Selection and Storage: Invest in aged basmati rice—it’s worth the extra cost. Aged rice contains less moisture and produces superior results. Store rice in an airtight container away from humidity. The flavor and aroma of quality basmati significantly impact your final dish.
Meat Quality Matters: Use fresh mutton or goat meat from a reliable source. The meat should have a pleasant smell and firm texture. Avoid frozen meat if possible, as it can become mushy during marination. If using frozen meat, thaw it completely before marinating.
Yogurt Preparation: Full-fat yogurt produces the creamiest results. If your yogurt is too thin, hang it in cheesecloth for 2-3 hours to remove excess whey. This concentrated yogurt creates a richer marinade and more luxurious final dish.
Ghee Quality: Use pure ghee, preferably homemade or from a trusted source. Clarified butter provides the distinctive rich flavor that defines authentic biryani. Budget about 300ml for a proper batch—don’t skimp on this ingredient.
Fried Onions Technique: The onions must be deeply golden, not burnt. Fry them on medium-high heat, stirring constantly. If heat is too high, they’ll brown unevenly and taste bitter. If too low, they’ll absorb too much ghee and become greasy rather than crispy.
Temperature Control: After bringing the pot to medium-high heat to generate steam, the reduction to low heat is crucial. If the heat remains too high, the bottom will burn. If too low, the rice won’t cook properly. Use a heat diffuser if your stove runs hot.
Don’t Peek: This cannot be overstated. Opening the lid releases steam and disrupts the dum pukht process. If you’re concerned about burning, listen for sizzling sounds after the first 3-4 minutes. A gentle sizzle indicates proper heat; loud crackling suggests the heat is too high.
Timing Flexibility: Cooking times can vary based on pot material, stove type, and meat thickness. After 40 minutes, you can carefully lift the lid slightly and check if rice grains are tender. If not, reseal and cook for 5 more minutes. This slight flexibility accounts for equipment variations.
Resting Period: The 5-minute rest after turning off heat is essential. It allows carryover cooking to complete the process gently. This also makes the biryani easier to serve, as the grains firm up slightly and separate more cleanly.
Layering Precision: When layering, visualize the pot as a canvas. Distribute meat and rice evenly across the surface, creating a balanced structure. Uneven distribution leads to some areas cooking faster than others, resulting in inconsistent texture.
For more cooking technique guidance, explore resources from Institute of Hotel Management India, which offers professional culinary insights on traditional cooking methods.
FAQ
Can I make Hyderabadi biryani in a pressure cooker?
While pressure cookers are faster, they don’t replicate the dum pukht experience. The traditional sealed-pot method allows gentle, even cooking that pressure cookers cannot achieve. If time is limited, use a pressure cooker for 15-20 minutes, but expect slightly different texture and flavor. The low, slow heat of traditional dum pukht is superior.
What’s the difference between Hyderabadi and Kolkata biryani?
Hyderabadi biryani uses more spices and is richer in ghee, with meat pieces larger and more prominent. Kolkata biryani is lighter, uses potatoes, and incorporates egg. Hyderabadi versions emphasize spice complexity, while Kolkata versions focus on subtle flavors and visual presentation.
How do I prevent the rice from becoming mushy?
The key is cooking rice to 70% doneness before layering—it should still have a slight bite. Using aged basmati rice also helps, as newer rice contains more moisture. Finally, avoid pressing down during layering, which compacts rice and causes it to cook unevenly and become mushy.
Can I prepare biryani in advance?
Yes. You can marinate meat up to 12 hours in advance. You can also fry onions and prepare saffron milk hours before cooking. However, cook the biryani just before serving for optimal flavor and texture. Reheated biryani loses some aromatic qualities, though it remains delicious.
What if my biryani burns at the bottom?
This typically indicates heat is too high. Use a heat diffuser in future batches. If burning has already occurred, don’t stir the bottom layer into the rest—serve the biryani from the top portions, leaving the burnt layer undisturbed. The remaining biryani will still be delicious.
Is long-grain basmati rice essential?
Yes. Long-grain basmati is specifically bred to remain separate during cooking. Other rice varieties will become mushy or clump together. This is one area where substitution genuinely compromises the dish. Invest in quality basmati rice—it’s fundamental to authentic biryani.
How much biryani does this recipe yield?
This recipe serves 6-8 people as a main course. For smaller portions, halve all ingredients but maintain the same cooking times. The proportions remain consistent regardless of batch size.
Mastering Hyderabadi biryani opens doors to understanding centuries of culinary tradition and technique. The combination of patience, quality ingredients, and respect for the cooking process creates a dish that transcends simple food preparation—it becomes an expression of culinary artistry. Start with this authentic recipe, master the fundamentals, and you’ll have the foundation to explore countless variations and personal adaptations.


