Injera Recipe: Authentic Ethiopian Method
Injera is the heart of Ethiopian cuisine—a spongy, slightly tangy flatbread that serves as both plate and utensil in traditional meals. This fermented teff flour creation has been central to Ethiopian food culture for centuries, offering a unique texture that’s impossible to replicate with wheat flour alone. Learning to make authentic injera at home transforms your understanding of bread-making and opens doors to preparing complete Ethiopian feasts.
The magic of injera lies in its fermentation process and the distinctive teff grain from which it’s made. Unlike regular bread recipes that rely on commercial yeast, authentic injera develops its characteristic sour flavor and airy crumb structure through natural fermentation over several days. This method requires patience, but the results are genuinely worth the wait—you’ll create something that tastes remarkably close to what you’d find in Addis Ababa.
Understanding Teff and Its Properties
Teff is an ancient grain native to Ethiopia and Eritrea, prized for its nutritional density and unique baking properties. This tiny grain—approximately the size of a poppy seed—contains more iron, calcium, and protein than most other grains, making injera not just delicious but genuinely nutritious. When ground into flour, teff develops a slightly sweet, nutty flavor that distinguishes it from all other bread-making flours.
The structure of teff flour is crucial for injera’s success. Its starch composition allows the dough to ferment effectively while developing those characteristic holes that make injera so absorbent. You cannot substitute wheat flour or other grains and expect authentic results—teff is non-negotiable for genuine injera. Look for whole grain teff flour from specialty markets or online retailers that specialize in Ethiopian ingredients.
Teff flour comes in two varieties: ivory and brown. Ivory teff produces lighter-colored, milder-flavored injera, while brown teff creates darker bread with more pronounced earthiness. For your first attempt, ivory teff is more forgiving and produces results closer to restaurant-quality injera. The flour should feel fine and powdery, with no lumps or discoloration indicating age or improper storage.
Essential Equipment for Injera Making
While you can improvise some equipment, certain tools genuinely make injera preparation easier and more successful. The most important piece is a mitad (also spelled mitad or mitad)—a large, round, flat cooking surface traditionally made from clay or ceramic. Modern versions include non-stick electric griddles designed specifically for injera, which give you excellent temperature control and consistent results.
If you cannot source a traditional mitad, a large non-stick crepe maker or even a 14-16 inch non-stick skillet works acceptably, though you’ll sacrifice some authenticity and may struggle with even cooking. The ideal mitad has a slightly concave surface with moderate heat distribution. Electric versions eliminate the guesswork of maintaining consistent temperature.
Beyond the cooking surface, you’ll need:
- Large mixing bowls (at least 3-4 quart capacity)
- A whisk or wooden spoon for stirring
- Cheesecloth or clean kitchen towels for covering during fermentation
- A kitchen thermometer to monitor fermentation temperature
- Measuring cups and spoons
- A fine-mesh strainer for removing lumps
- Plastic wrap or shower caps to cover bowls
Temperature control during fermentation is critical—maintain 70-75°F for optimal results. If your kitchen runs cooler, place the fermentation bowl in a turned-off oven with the light on, or use a heating pad set to low underneath the bowl.
Step-by-Step Injera Recipe
Ingredients:
- 3 cups teff flour (whole grain, finely ground)
- 1½ cups water (plus more as needed)
- ½ teaspoon salt
- ¼ teaspoon fenugreek seeds (optional but traditional)
Day 1: Initial Mixing
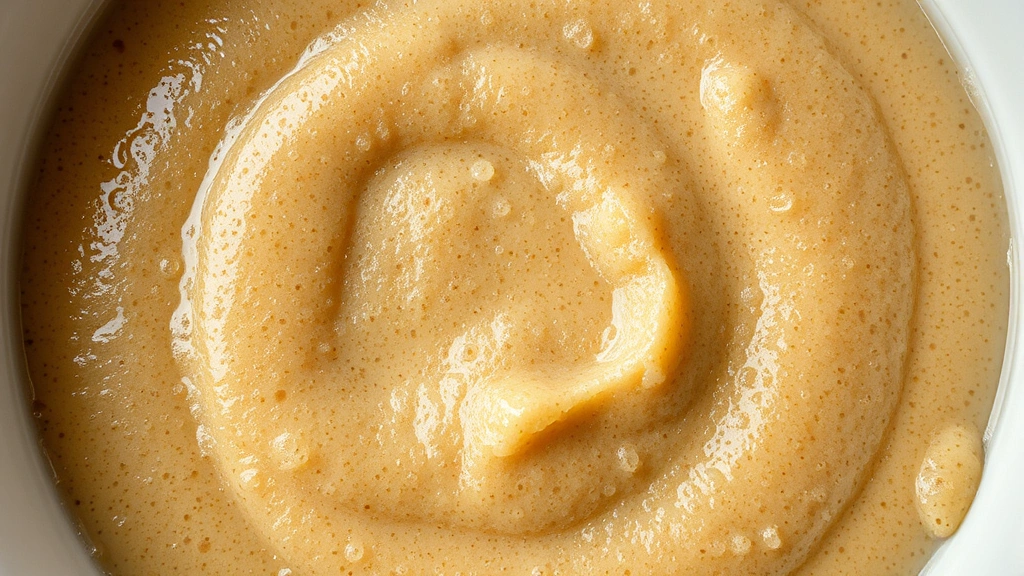
Combine 3 cups of teff flour with 1½ cups of room-temperature water in a large mixing bowl. Whisk thoroughly until you achieve a smooth batter with no lumps—this takes genuine effort as teff flour tends to clump. The consistency should resemble thick pancake batter, slightly thicker than crepe batter but thinner than traditional bread dough. If lumps persist, strain the batter through fine-mesh cheesecloth.
Add ¼ teaspoon of fenugreek seeds if using (these add subtle complexity and aid fermentation). Cover the bowl loosely with cheesecloth or a clean kitchen towel—you want airflow for fermentation but protection from dust and insects. Place in a warm location (70-75°F) and let sit for 3-5 days.
Days 2-4: Fermentation and Feeding
Check your batter daily. You should notice bubbling activity, a slightly sour aroma developing, and potentially some liquid separation on top (this is normal and called whey). On day 2 or 3, once you see active fermentation, stir the batter well and add a small amount of water if it’s become too thick—the consistency should remain pourable.
Some recipes call for “feeding” the starter by removing half and adding fresh flour and water, similar to sourdough maintenance. This is optional for single-batch injera but helpful if you plan to keep a starter alive long-term. The batter is ready when it’s bubbly throughout, smells distinctly sour and yeasty, and has a slightly tangy taste when you sample a small spoonful.
Day 5: Final Preparation
On your cooking day, stir the fermented batter well. Add ½ teaspoon of salt and whisk thoroughly for 2-3 minutes to incorporate air. The batter should be smooth, pourable, and slightly lighter in color than it was during fermentation. If the batter seems too thick, add water one tablespoon at a time until you reach the right consistency—it should flow easily but not be watery.
Let the final batter rest at room temperature for 30 minutes before cooking. This allows the salt to fully incorporate and the batter to relax slightly.
The Fermentation Process Explained
Understanding what happens during injera fermentation helps you troubleshoot problems and appreciate why this step cannot be rushed. Unlike commercial yeast fermentation, which produces carbon dioxide quickly and predictably, natural fermentation involves complex interactions between wild yeast, lactic acid bacteria, and the teff flour’s natural enzymes.
The lactic acid bacteria produce lactic acid as a byproduct of fermentation, creating injera’s characteristic sour flavor and contributing to its digestibility. These bacteria thrive in warm, moist environments—exactly what your covered bowl provides. The wild yeast present in the flour and environment creates the gas bubbles that give injera its spongy texture.
Temperature dramatically affects fermentation speed. At 70-75°F, expect 3-5 days. Cooler temperatures slow everything down, potentially requiring 7-10 days or more. Warmer temperatures (above 80°F) can lead to over-fermentation, resulting in excessive sourness and potential contamination. If your kitchen is consistently cool, creating a warm spot is essential for success.
You’ll recognize properly fermented injera batter by several signs: abundant bubbles throughout (not just on the surface), a distinctly sour smell reminiscent of sourdough, slight separation of liquid on top, and a tangy taste. The batter should be noticeably lighter in color than the raw flour mixture. If you see any pink, orange, or fuzzy mold growth, discard the batch—this indicates contamination.
The fermentation timeline varies based on flour quality, water mineral content, ambient temperature, and wild yeast populations in your kitchen. Keep detailed notes on timing and results so you can refine your process for future batches. This is where injera-making becomes as much art as science.
Cooking Injera on the Mitad
Cooking injera requires confidence and practice—the first few attempts rarely achieve restaurant perfection, but each one teaches you valuable lessons. Preheat your mitad or griddle to medium-high heat (around 375-400°F if using an electric version). The surface should be hot enough that water droplets dance and evaporate immediately, but not so hot that the batter burns before the top sets.
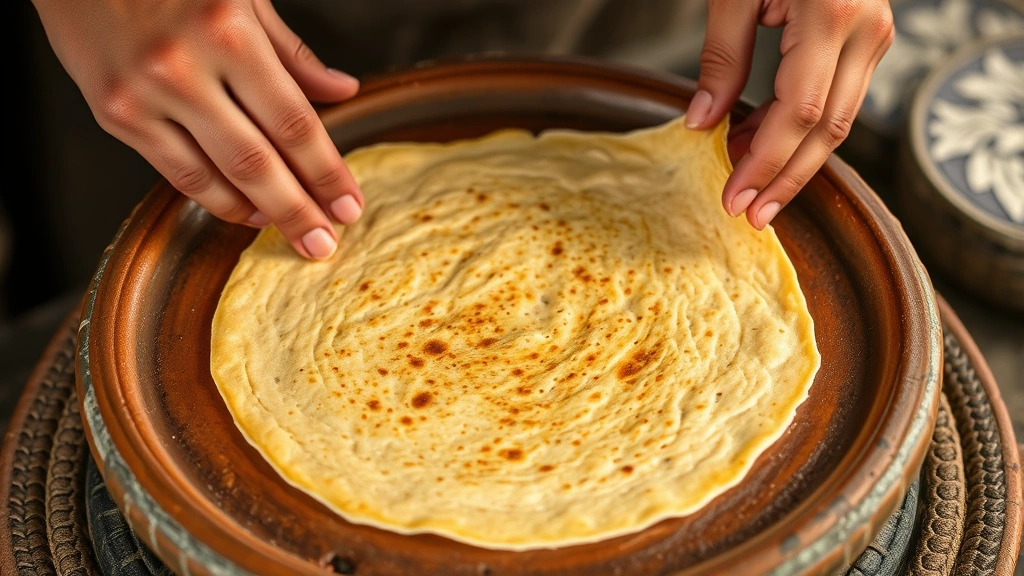
Pour approximately ¾ cup of batter into the center of the mitad, then immediately tilt and rotate the surface in a circular motion to spread the batter evenly in a thin, round sheet. This requires fluid wrist action—think of the motion you’d use to spread crepe batter. Aim for an even thickness of about ¼ inch, creating a circle roughly 12-14 inches in diameter.
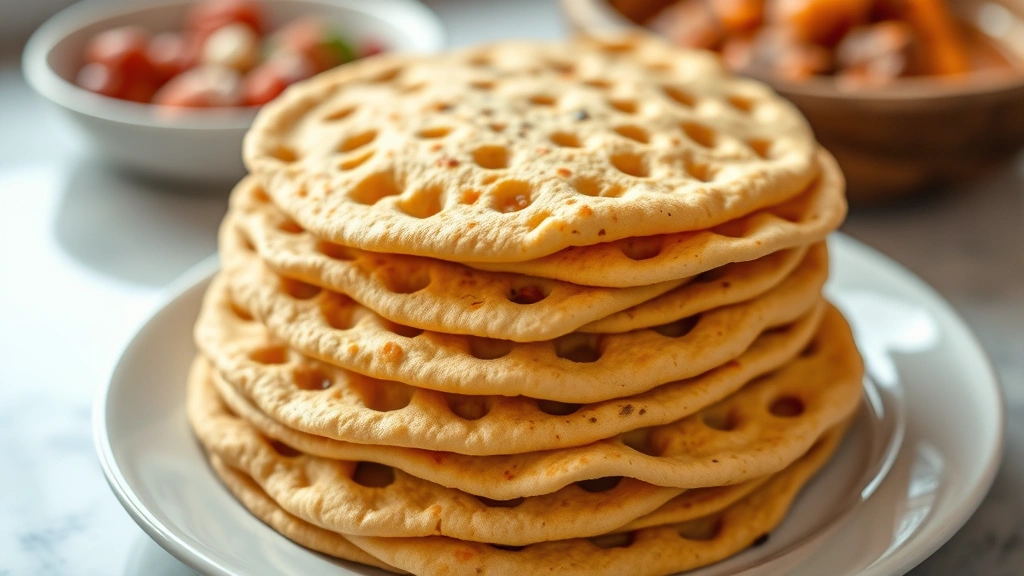
Do not flip injera. Once the batter is spread, leave it undisturbed for 2-3 minutes. The bottom should never brown or crisp—injera is steamed, not fried. You’ll notice steam rising from the surface as water evaporates, and the top will gradually set. Small holes will begin forming on the surface—these are created by steam bubbles pushing through the batter, the same mechanism that creates injera’s characteristic spongy texture.
The injera is done when the top surface looks mostly set (still slightly moist but no longer liquid), the edges have begun to pull away from the mitad slightly, and you see a network of small holes across the surface. The bottom should be pale, with perhaps a few light brown spots but no heavy browning. This entire process takes 2-4 minutes depending on your heat level and batter thickness.
Carefully slide the finished injera onto a clean kitchen towel or plate. Stack completed injeras with a towel between each one—this prevents them from sticking together while they cool slightly. The bread will continue to firm up as it cools, becoming more pliable and easier to handle.
If your first few injeras lack holes or seem too dense, your fermentation may be incomplete or your batter consistency might need adjustment. If they tear during cooking, your heat is too high or batter is too thin. If they brown heavily on the bottom, reduce heat slightly. These adjustments become intuitive with practice.
Troubleshooting Common Issues
Dense, Gummy Injera
This typically indicates insufficient fermentation. Ensure your batter ferments for the full 3-5 days and shows obvious bubbling and sour aroma. Also check that your cooking temperature isn’t too high—this can set the exterior before steam adequately develops the interior structure. Lower your heat slightly and extend cooking time by 30-60 seconds.
Batter Too Thick or Too Thin
Adjust water content one tablespoon at a time. Too-thick batter won’t spread evenly and creates dense bread; too-thin batter tears during spreading and produces overly crispy edges. The ideal consistency flows easily but holds its shape briefly when poured.
Lack of Holes
Holes require adequate fermentation and proper steam generation. Ensure complete fermentation (3-5 days minimum), don’t skip the final 30-minute rest before cooking, and make sure your mitad is adequately preheated. Some recipes add a pinch of baking soda to boost hole formation—try ¼ teaspoon stirred in just before cooking.
Injera Tears While Cooking
This indicates either too-high heat or batter that’s too thin. Reduce your temperature by 25-50°F and verify your batter consistency. The batter should flow but not be watery.
Strong Fermentation Smell
A distinctly sour aroma is normal and desirable—this is what gives injera its characteristic flavor. However, if the smell is unpleasant (like nail polish or chemicals), fermentation has gone awry. Discard and start fresh. The smell should resemble sourdough starter.
Serving and Storage Tips
Authentic injera is served as the base for Ethiopian meals. Arrange various stews and proteins (like high-protein recipes for weight loss featuring Ethiopian spices) on top of the bread, then tear off pieces and use them to scoop the dishes. A single large injera serves 2-3 people, or you can provide individual smaller injeras.
Fresh injera tastes best served warm or at room temperature on the day it’s made. However, properly stored injera keeps well for several days. Wrap cooled injeras individually in parchment paper or plastic wrap, stack them in an airtight container, and refrigerate for up to 5 days. To reheat, wrap in a damp towel and microwave for 20-30 seconds, or steam gently over boiling water.
Freezing is possible but affects texture slightly—frozen injera becomes somewhat more brittle. If freezing, wrap individually in plastic wrap and aluminum foil, then store in freezer bags for up to 3 months. Thaw at room temperature before reheating.
Leftover injera can be repurposed into other dishes. Tear into pieces and use as croutons in salads, or dice and toast until crispy for snacking. Some cooks crumble leftover injera into soups or stews for added texture and flavor.
FAQ
Can I make injera without a mitad?
Yes, though with compromises. A large non-stick skillet or crepe maker works acceptably. Electric mitads designed for injera offer the best alternative to traditional clay versions. Avoid cast iron, which creates overly crispy bottoms. The key is even heat distribution and a spacious cooking surface.
Where can I buy teff flour?
Specialty grocery stores with Ethiopian or international sections typically stock teff flour. Online retailers specializing in specialty baking ingredients offer reliable options. Ensure you purchase whole grain teff flour, not refined versions which lack the fermentation properties needed for authentic injera.
Is injera naturally gluten-free?
Yes, teff is naturally gluten-free, making injera suitable for those with celiac disease or gluten sensitivity. However, verify that your teff flour hasn’t been cross-contaminated during processing. Purchase from sources that guarantee gluten-free certification if this is a concern.
How do I know if my fermentation is complete?
Look for visible bubbles throughout the batter, a distinctly sour aroma, and slight liquid separation on top. Taste a tiny spoonful—it should be noticeably tangy. These signs typically appear after 3-5 days at 70-75°F. Temperature variations affect timing significantly.
Can I use whole wheat flour instead of teff?
No. Whole wheat creates a completely different bread that lacks injera’s characteristic holes and spongy texture. The unique starch structure of teff is essential for authentic results. Substitutions don’t produce acceptable replacements.
Why does my injera have a bitter taste?
Over-fermentation or fermentation at too-high temperatures can produce excessive sourness or bitterness. Limit fermentation to 5 days maximum and maintain 70-75°F temperatures. If bitterness persists, your teff flour may be old or improperly stored—purchase fresh flour from reputable sources.
Can I make a sourdough starter from injera batter?
Yes. If you want to maintain a continuous culture, save a portion of your fermented batter in a clean jar. Feed it regularly with equal parts teff flour and water, keeping it at room temperature. This creates a teff-based starter you can use for future injera batches, similar to maintaining sourdough.
What temperature should my mitad be?
Medium-high heat works best—around 375-400°F if using an electric version. Water should immediately dance on the surface. If batter burns before the top sets, reduce heat. If cooking takes longer than 4 minutes, increase heat. Some adjustment is normal as you learn your equipment.
How does injera compare nutritionally to regular bread?
Injera from teff flour contains significantly more iron, calcium, and protein than wheat bread. The fermentation process enhances mineral bioavailability and reduces antinutrients, making nutrients more accessible to your body. Additionally, the slow fermentation creates a lower glycemic index bread compared to regular wheat loaves. For more information on nutritional aspects, consult nutritional research resources.
What Ethiopian stews pair best with injera?
Traditional pairings include doro wat (spiced chicken), misir wat (red lentil stew), and gomen (collard greens). The bread’s slight sourness and spongy texture complement rich, spiced stews perfectly. Build a complete meal by arranging multiple dishes on a single large injera, creating what’s called a “gursha” when sharing food communally.
Can I add seasonings to injera dough?
Traditional injera relies on fermentation for flavor, but some cooks add fenugreek seeds (recommended), nigella seeds, or even a pinch of cayenne pepper. Keep additions minimal—injera should be relatively neutral to complement the stews served on top. Avoid herbs or strong spices that might overpower the bread’s subtle tang.
Learning to make authentic injera connects you to centuries of Ethiopian culinary tradition. The process teaches patience, observation, and respect for fermentation’s transformative power. Your first successful batch—with its characteristic holes, subtle sourness, and perfect spongy texture—represents genuine accomplishment. Each subsequent batch improves as you develop intuition for your specific kitchen conditions and equipment. Consider exploring other Ethiopian breads or preparing traditional stews to accompany your injera, deepening your appreciation for this remarkable cuisine.


