Instant Pot Chicken Thighs: Expert Tips for Perfectly Tender Results
Instant Pot chicken thighs represent one of the most forgiving and delicious ways to prepare this flavorful cut of poultry. Whether you’re a busy weeknight cook or someone looking to master pressure cooking, chicken thighs deliver exceptional results that keep meat juicy while developing rich, complex flavors. Unlike chicken breasts that can dry out easily, thighs thrive under the moist heat environment that pressure cookers provide, making them ideal for anyone seeking restaurant-quality meals at home.
The beauty of Instant Pot cooking lies in its ability to transform tougher, more affordable cuts into tender masterpieces in a fraction of traditional cooking time. Chicken thighs, which contain more fat and connective tissue than breasts, actually benefit tremendously from pressure cooking. The process breaks down collagen into gelatin, creating succulent, fall-apart-tender meat that absorbs surrounding flavors beautifully. This guide will walk you through everything you need to know about preparing instant pot chicken thigh recipes with confidence and expertise.
From selecting the right thighs to mastering pressure release techniques, we’ll explore professional strategies that elevate your cooking game. You’ll discover how to prevent common mistakes, create flavor-packed sauces, and prepare meals that impress family and guests alike. Whether you’re interested in simple weeknight dinners or more sophisticated preparations, these expert tips will help you unlock the full potential of this versatile ingredient.

Why Chicken Thighs Excel in Pressure Cookers
Chicken thighs possess unique characteristics that make them superior to chicken breasts for pressure cooking. The higher fat content—approximately 15% compared to 3% in breasts—creates natural lubrication that prevents drying during the cooking process. This fat also carries flavor compounds, meaning thigh meat tastes richer and more satisfying than leaner cuts. When pressure cooking breaks down the collagen and connective tissue present in thighs, it transforms into gelatin that keeps the meat incredibly moist and tender.
The structure of chicken thighs also allows them to withstand longer cooking times without becoming stringy or tough. While chicken breasts can become rubbery if cooked just minutes too long, thighs maintain their integrity and texture. This forgiving nature makes them perfect for beginners learning pressure cooker fundamentals. Additionally, the darker meat of thighs contains more myoglobin and iron, contributing to a deeper, more complex flavor profile that enhances both simple and elaborate dish preparations.
From a practical standpoint, thighs are also more economical than breasts, making them an excellent choice for families and meal-preppers. They’re readily available year-round and work seamlessly in slow cooker applications as well, providing versatility across different cooking methods. The combination of affordability, reliability, and superior flavor makes chicken thighs the go-to choice for pressure cooker enthusiasts.
Selecting and Preparing Your Chicken Thighs
Quality selection begins at the grocery store. Look for chicken thighs with skin intact when possible—the skin crisps during cooking and provides additional flavor and texture. The meat should be pink or light red, never gray or discolored. Check the package date and choose products with the furthest expiration date. Bone-in thighs offer superior flavor compared to boneless varieties because the bones contribute gelatin and mineral content to the cooking liquid, creating more flavorful results.
Pat your thighs dry with paper towels before cooking—this step is crucial for developing flavor through browning. Moisture on the surface prevents proper browning and creates steam instead of the caramelized crust that adds depth to your dish. If you prefer boneless thighs for easier eating, that’s perfectly acceptable; just reduce cooking time by 1-2 minutes. For healthy chicken preparations, you can remove excess skin before cooking to reduce fat content while maintaining moisture through the pressure cooking process.
Trimming excess fat is optional but recommended for those watching calorie intake. Leave a thin layer to protect the meat and carry flavors. If using frozen thighs, you can cook them directly from frozen by adding 50% more time to your cooking duration, though thawing first produces more even cooking. Arrange thighs in a single layer when possible, though overlapping is acceptable—just ensure the Instant Pot doesn’t exceed the maximum fill line.
Mastering Pressure Cooking Techniques
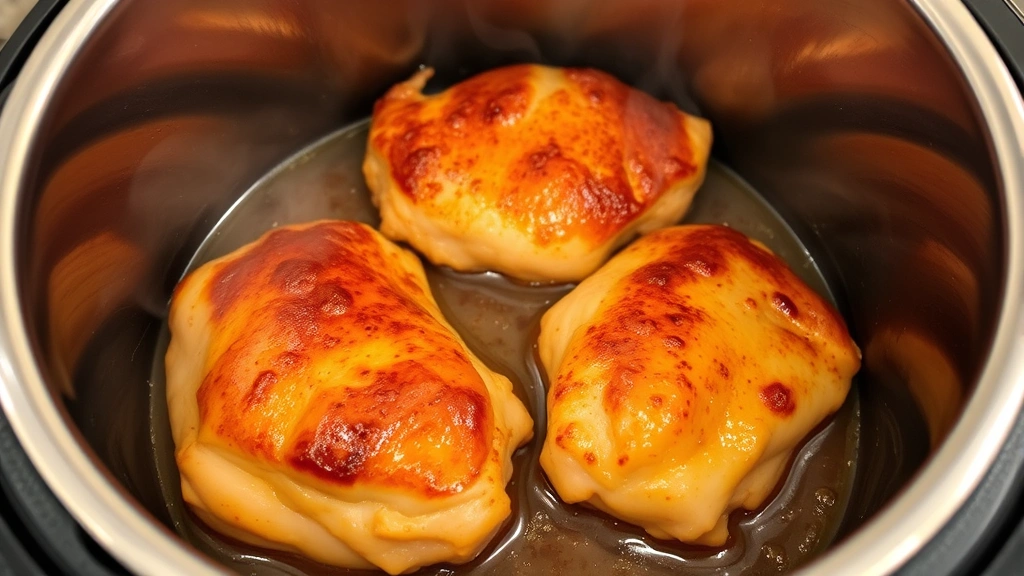
The sauté function is your secret weapon for creating restaurant-quality results. Before pressurizing, use the high sauté setting to brown thighs skin-side down for 3-4 minutes until the skin turns golden and fat renders. This browning step, called the Maillard reaction, creates complex flavor compounds that elevate the entire dish. Brown the other side for 2-3 minutes, working in batches if needed to avoid overcrowding. Remove browned thighs and set aside.
Building an aromatic base comes next. Use the rendered fat to sauté onions, garlic, and aromatics for 2-3 minutes until fragrant. This foundation layer amplifies flavors throughout the dish. Deglaze the pot with liquid—wine, broth, or juice—scraping up browned bits from the bottom. These flavorful particles, called fond, contain concentrated essence that transforms your sauce from ordinary to extraordinary. Never skip this step; it’s the difference between good and exceptional results.
Natural release versus quick release significantly impacts texture and sauce consistency. Natural release (allowing pressure to drop on its own, typically 10-15 minutes) results in more tender meat and richer sauces because flavors continue melding. Quick release (manually venting pressure) stops cooking immediately and works best when you want to add additional ingredients or when time is critical. For most instant pot chicken thigh recipes, a hybrid approach works beautifully: natural release for 5 minutes followed by quick release of remaining pressure.
Building Flavor-Packed Sauces and Seasonings
The liquid environment of pressure cooking demands bold seasonings because flavors don’t concentrate as they would in traditional braising. Season generously with salt and pepper before pressurizing—remember that salt enhances flavor perception and helps retain moisture in the meat. Layer flavors by using multiple seasoning components: aromatics, spices, herbs, and acidic elements create dimensional profiles that surprise and delight.
Acidic ingredients like lemon juice, vinegar, or tomato products brighten flavors and prevent the dish from tasting flat or one-dimensional. Add these elements strategically—some before pressure cooking for flavor integration, others after to preserve their bright character. Fresh herbs like basil, cilantro, or parsley should be stirred in after cooking to maintain vibrant color and fresh flavor notes that pressure cooking can mute.
Creating silky sauces requires understanding how pressure cooking concentrates flavors. The reduced cooking time means less liquid evaporates compared to traditional methods, so use less liquid than you would for stovetop cooking. If your sauce seems thin after cooking, use the sauté function to reduce it further—this concentrates flavors and thickens the sauce naturally. Alternatively, create a slurry by mixing cornstarch with cold water and stirring it into the sauce while sautéing for 1-2 minutes until thickened and glossy. Finish with a pat of butter or splash of cream for richness and sheen.
Essential Cooking Times and Pressure Settings
High pressure is the standard setting for chicken thighs, requiring 10-15 minutes of cooking time depending on size and whether bones are present. Bone-in thighs require approximately 15 minutes, while boneless thighs need only 10-12 minutes. Frozen bone-in thighs need 20 minutes under pressure. These times refer to the duration the Instant Pot maintains pressure, not including the time required to reach pressure or the release phase afterward.
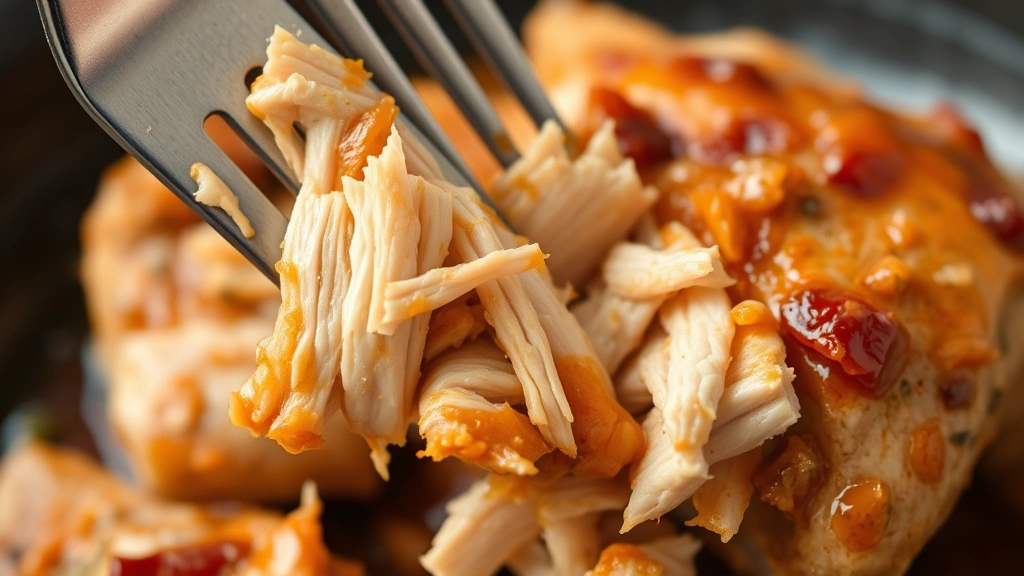
The rule of thumb: larger, bone-in thighs require the full 15 minutes, while smaller boneless thighs finish in 10 minutes. Overcooking doesn’t result in dry meat as it would with breasts—thighs become even more tender and succulent with extended cooking. If you prefer meat that shreds easily for tacos or salads, extend cooking time to 18-20 minutes. For firm, sliceable thighs, stick to the minimum recommended time.
Low pressure settings (6-8 psi) work for thighs but extend cooking time to 20-25 minutes and don’t offer significant advantages over high pressure. Most modern Instant Pots default to high pressure, making it the standard choice. Always ensure the sealing ring is properly positioned and the lid is secured before selecting pressure settings. The display will show “ON” when the pot reaches pressure and begins counting down cooking time.
Professional Tips for Perfect Results Every Time
Never fill your Instant Pot more than two-thirds full—this ensures proper steam circulation and prevents food from blocking the steam vent. If your recipe contains more ingredients than this allows, reduce liquid slightly or cook in batches. The minimum liquid requirement for pressure cooking is typically one cup, but recipes with naturally moist ingredients (like tomatoes) may need less.
Stack thighs rather than laying them flat in a single layer if space is limited. Ensure the bottom layer has adequate contact with the cooking vessel and liquid for proper heat transfer. The top layer will cook equally well because steam circulates throughout the pressurized environment. Resist the urge to open the lid during cooking—every time you do, pressure drops and cooking time extends significantly.
Temperature control matters for browning and sauce reduction. Use the “more” sauté setting for deeper browning and the “less” setting for gentle simmering when reducing sauces. Allow the pot to cool slightly before opening to prevent burns from escaping steam. If your thighs seem underdone after cooking, simply close the lid and pressure cook for an additional 2-3 minutes—the forgiving nature of thighs means you won’t overcook them.
For meal preparation, cook thighs in bulk and store in the refrigerator for up to four days or freeze for three months. The cooked meat reheats beautifully in the microwave or by gentle simmering on the stovetop. This strategy aligns with food waste reduction approaches, allowing you to prepare multiple meals efficiently.
Creative Recipe Variations
Asian-inspired preparations showcase thighs beautifully. Combine soy sauce, ginger, garlic, and a touch of sesame oil for umami-rich results. Add vegetables like bok choy or snap peas during the last minute of cooking to maintain their crunch. Serve over rice for an authentic experience that rivals takeout. Mediterranean versions incorporate olives, sun-dried tomatoes, and fresh herbs like oregano and thyme for bright, herbaceous flavors.
Creamy preparations work wonderfully with chicken thighs. After cooking, stir in heavy cream or sour cream along with fresh herbs for elegant dinner party fare. Cajun-spiced thighs with bell peppers and okra create authentic Louisiana flavors, while curry-based preparations with coconut milk and aromatic spices transport you to Southeast Asian markets. Mexican preparations featuring salsa, lime juice, and cilantro create taco-ready shredded chicken with minimal effort.
Barbecue-style thighs emerge when you combine tomato sauce, vinegar, Worcestershire sauce, and brown sugar, finishing with a sauté phase to concentrate the sauce. Wine-braised versions using red or white wine create sophisticated dinner party dishes that seem far more complicated than their simple preparation requires. The key to all variations: bold seasoning, quality liquid components, and proper browning before pressurizing.
For casserole-style preparations, cook thighs with vegetables and sauce, then transfer to a baking dish, top with breadcrumbs or cheese, and finish under the broiler for textural contrast. This hybrid approach combines pressure cooking’s speed with traditional oven finishing for restaurant-quality presentation.
FAQ
Can I cook frozen chicken thighs directly in the Instant Pot?
Yes, frozen thighs cook beautifully in the Instant Pot. Add 50% more time to your recipe—so 15 minutes becomes approximately 22-23 minutes. Thawing first produces more even cooking and better browning, but it’s not required. Ensure thighs are arranged so steam can circulate around them.
How much liquid do I need for pressure cooking chicken thighs?
The minimum is one cup of liquid to generate steam. Most recipes use 1-1.5 cups depending on desired sauce consistency. Remember that very little liquid evaporates during pressure cooking, so use less than you would for stovetop braising. You can always reduce sauce afterward using the sauté function.
Should I remove the skin before or after cooking?
The skin keeps meat incredibly moist during pressure cooking, so leave it on during cooking. If you prefer crispy skin, remove the thighs after cooking and broil them for 2-3 minutes. For lower-fat preparations, remove skin before cooking, though the meat will be slightly less moist.
What’s the difference between natural and quick release?
Natural release lets pressure drop gradually (10-15 minutes) while the pot remains closed, allowing flavors to continue melding and resulting in tender meat and richer sauces. Quick release manually vents pressure immediately, stopping the cooking process. Natural release is ideal for most instant pot chicken thigh recipes, while quick release suits time-sensitive meals.
Can I cook chicken thighs with the skin on without browning them first?
Yes, you can skip browning for time-saving meals, though you’ll miss the depth of flavor that browning provides. The thighs will still be tender and delicious, but the sauce will taste less complex. For best results, always brown thighs when time permits—it takes only 7-8 minutes and dramatically improves final flavor.
How do I prevent my chicken thighs from drying out?
Chicken thighs are difficult to dry out due to their fat content, but overcooking combined with insufficient liquid can cause issues. Ensure you have adequate liquid, use the correct cooking time for your thigh size, and employ natural release rather than quick release. The high fat content makes thighs nearly impossible to ruin through overcooking.
Can I use chicken thighs in recipes calling for chicken breasts?
Absolutely! Simply substitute equal weight of thighs for breasts and reduce cooking time by 1-2 minutes if using boneless thighs. The thighs will be more flavorful and forgiving. This works especially well in healthy chicken preparations where moisture retention is important.
What’s the best way to store cooked chicken thighs?
Allow cooked thighs to cool to room temperature, then transfer to airtight containers and refrigerate for up to four days. For longer storage, freeze for up to three months. Thaw frozen thighs overnight in the refrigerator before reheating. Reheat gently on the stovetop or in the microwave to preserve moisture and texture.


