Kani Salad Recipe: Authentic Japanese Style
Kani salad, or crab salad, is a beloved Japanese appetizer that combines crispy textures with creamy, umami-rich flavors. This elegant dish features imitation crab stick (kani), crisp vegetables, and a silky Japanese mayo-based dressing that makes it irresistible. Whether you’re preparing it for a dinner party or craving authentic Japanese cuisine at home, this kani salad recipe delivers restaurant-quality results in under 15 minutes.
The beauty of kani salad lies in its simplicity and versatility. The chilled ingredients provide a refreshing contrast to warm dishes, making it an ideal complement to hearty meals like chicken and noodles or Asian-inspired bowls. The creamy dressing coats each ingredient perfectly, creating layers of flavor that dance on your palate with every bite.
What is Kani Salad?
Kani salad originates from Japanese cuisine and has become a staple in sushi restaurants worldwide. The word “kani” (蟹) means crab in Japanese, though traditional versions typically use imitation crab sticks rather than real crab meat. This ingredient choice makes the dish more affordable and accessible while maintaining authentic flavor profiles.
The classic preparation involves shredding kani sticks and combining them with crisp vegetables like cucumber and avocado, then tossing everything in a creamy Japanese mayo dressing infused with sriracha and other seasonings. The result is a dish that balances cool, refreshing elements with rich, savory notes. This versatile salad works beautifully as an appetizer, side dish, or even as a topping for sushi rolls and rice bowls.
Unlike Western salads that rely on vinaigrette dressings, kani salad embraces the creamy texture that Japanese cuisine celebrates. The mayo-based dressing isn’t just a coating—it’s an integral component that unifies all the ingredients and creates a cohesive flavor experience. Understanding this fundamental difference helps you appreciate why kani salad tastes distinctly different from other seafood salads.
Essential Ingredients
Creating an authentic kani salad recipe requires quality ingredients that work harmoniously together. Here’s everything you’ll need:
Kani (Imitation Crab)
Kani sticks are the star ingredient. Look for Japanese-style imitation crab at Asian markets or the seafood section of your grocery store. Each stick should be firm and have a slightly sweet aroma. Avoid pre-shredded varieties, as they tend to become mushy when mixed with dressing. One package typically contains 8-10 sticks, which is perfect for serving 4-6 people.
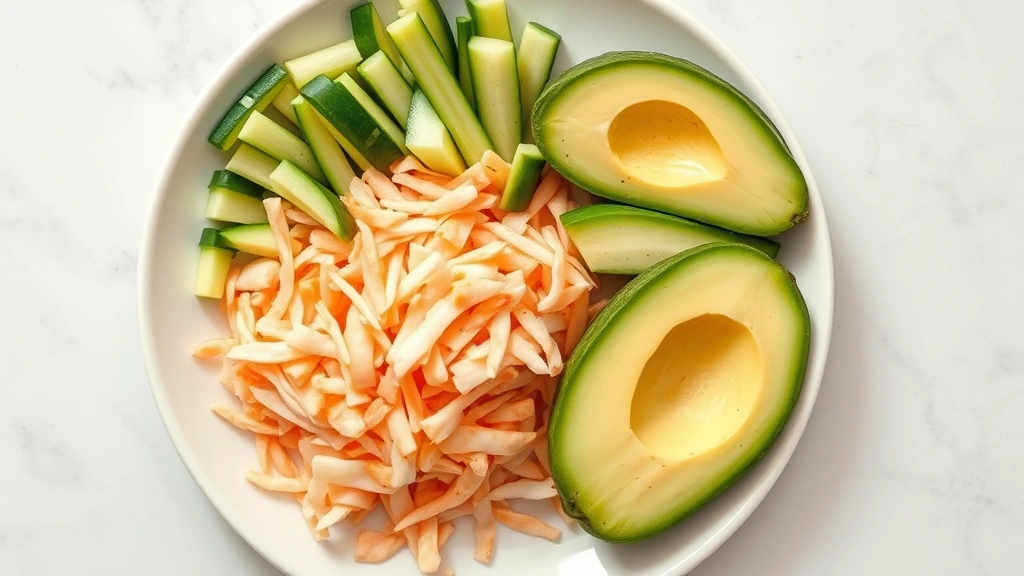
Vegetables
Cucumber provides crisp, refreshing texture. Use English cucumbers or seedless varieties for the best results. Cut them into thin matchsticks to maximize surface area for the dressing.
Avocado adds creamy richness and balances the other ingredients. Choose ripe but firm avocados that won’t turn to mush when mixed. Cut just before serving to prevent browning.
Sesame seeds (both white and black) contribute a nutty flavor and visual appeal. Toast them lightly before adding to enhance their flavor profile.
Dressing Components
- Japanese Kewpie mayo – This is non-negotiable for authentic flavor. Kewpie mayo contains egg yolks only (not whole eggs), making it richer and tangier than American mayo
- Sriracha – Adds heat and complexity without overpowering the dish
- Rice vinegar – Provides subtle acidity that brightens the dressing
- Soy sauce – Introduces umami depth
- Mirin or sugar – Balances flavors with subtle sweetness
- Wasabi – Optional, for those who enjoy extra heat
[IMAGE_1]
Making the Perfect Dressing
The dressing is what transforms simple ingredients into an exceptional kani salad. This creamy, slightly spicy sauce should coat each ingredient evenly while maintaining a smooth, pourable consistency.
Dressing Recipe
Ingredients:
- ½ cup Kewpie mayo
- 2 tablespoons sriracha
- 1 tablespoon rice vinegar
- 1 tablespoon soy sauce
- 1 teaspoon mirin
- ½ teaspoon wasabi (optional)
- 1 teaspoon sesame oil
Preparation Method
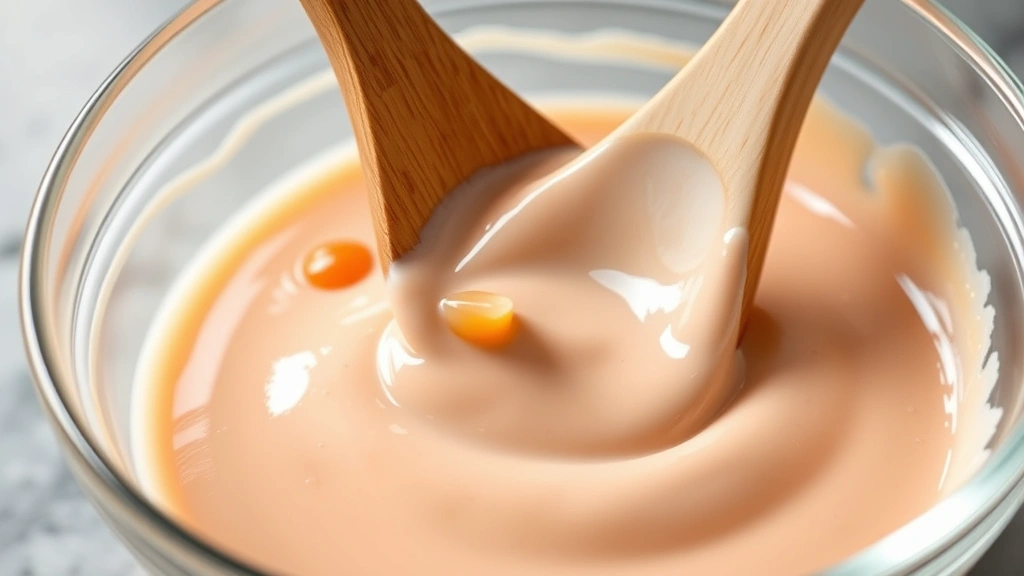
Step 1: Combine Wet Ingredients
In a small bowl, whisk together the Kewpie mayo and sriracha until fully combined. The mayo should take on a light pink hue. Kewpie mayo is thicker than regular mayo, so use a spatula or sturdy whisk to break it down smoothly.
Step 2: Add Seasonings
Pour in the rice vinegar, soy sauce, and mirin. Whisk continuously, ensuring each ingredient integrates completely. The acidity from the vinegar and soy sauce will help thin the dressing slightly, creating the perfect consistency.
Step 3: Finish with Aromatics
Add sesame oil and wasabi (if using). Sesame oil should be drizzled in slowly while whisking—its potent flavor can easily overwhelm other tastes. Taste the dressing and adjust seasonings according to your preferences. If it’s too thick, add a teaspoon of rice vinegar at a time until you reach desired consistency.
This dressing can be made up to 24 hours ahead and stored in an airtight container in the refrigerator. The flavors actually deepen as it sits, making advance preparation beneficial.
Step-by-Step Preparation
Now that your dressing is ready, let’s assemble the kani salad recipe with proper technique:
Preparing the Kani
Step 1: Remove from Packaging
Take kani sticks out of their packaging and rinse them briefly under cold water. Pat dry with paper towels—excess moisture will dilute the dressing and make the salad soggy.
Step 2: Shred the Kani
Hold each kani stick vertically and use two forks or your fingers to shred it into thin strands. Work from top to bottom, pulling the fibers apart gently. This creates the characteristic texture that makes kani salad visually appealing and easier to eat.
Step 3: Chill Before Mixing
Place shredded kani in a bowl and refrigerate for at least 10 minutes. Cold kani maintains its texture better when combined with other ingredients and helps keep the entire salad refreshing.
Preparing Vegetables
Cucumber Preparation: Wash the cucumber thoroughly and cut lengthwise into quarters. Remove the seedy center with a knife or spoon. Slice the quarters into thin matchsticks about 2 inches long. If using regular cucumbers, salt them lightly and let sit for 5 minutes, then pat dry to remove excess moisture.
Avocado Preparation: Cut avocado in half lengthwise, remove the pit, and scoop the flesh into a bowl. Slice into thin wedges or cut into cubes, depending on your preference. Do this step last, just before assembling, to prevent browning. A squeeze of lemon juice helps preserve color.
Combining Ingredients
Step 1: Mix in Large Bowl
Transfer shredded kani to a large mixing bowl. Add cucumber matchsticks and gently toss together using a rubber spatula or wooden spoon. Avoid aggressive mixing that could break down delicate ingredients.
Step 2: Add Dressing
Pour the prepared dressing over the kani and vegetables. Using a gentle folding motion, combine ingredients until everything is evenly coated. The dressing should glisten on each piece without pooling at the bottom of the bowl.
Step 3: Incorporate Avocado
Gently fold in avocado pieces just before serving. This prevents the avocado from breaking apart and browning. If you’re preparing this dish ahead, add avocado only when plating.
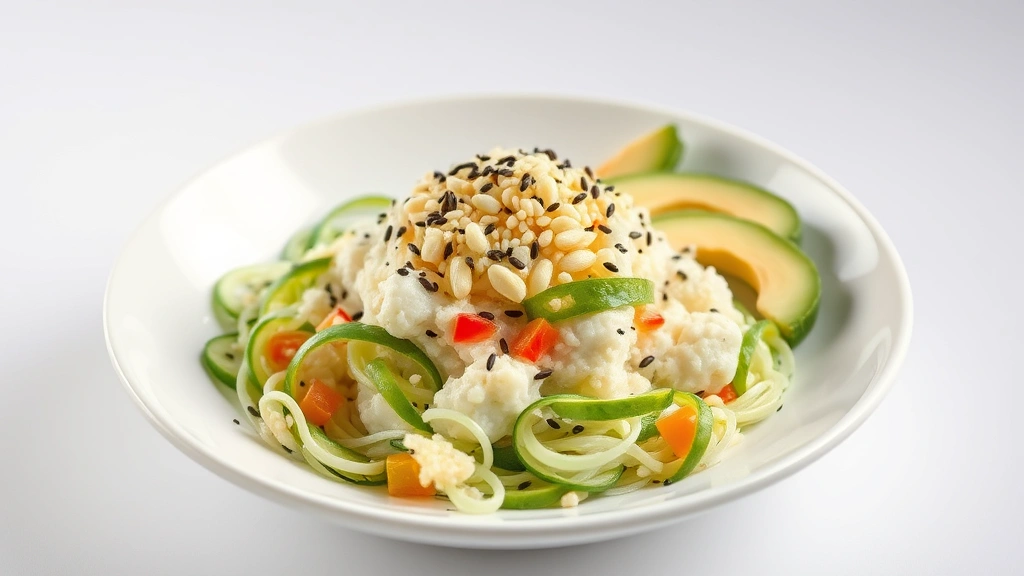
Step 4: Add Final Garnish
Sprinkle sesame seeds over the top and add a light drizzle of sesame oil if desired. Some recipes include a pinch of nori (seaweed) powder for extra umami. A few thin cucumber slices arranged on top add visual elegance.
Serving and Presentation
Presentation matters when serving kani salad, especially if you’re entertaining. Here are professional techniques:
Plating Options
Individual Servings: Use a small bowl or cup to mound the salad on a chilled plate. This creates height and visual interest. Arrange cucumber slices and avocado wedges artfully around the mound.
Family-Style: Transfer the entire salad to a decorative serving bowl. Serve with small bowls or plates, allowing guests to portion their own. This approach works well for casual gatherings and pairs beautifully with easy chicken casserole or other main dishes.
Sushi Roll Topping: Use kani salad as a filling or topping for sushi rolls. Its creamy texture works wonderfully inside rolls and as a decorative topping on nigiri.
Temperature and Timing
Kani salad should be served chilled, ideally within 30 minutes of assembly. If preparing ahead, store components separately and combine just before serving. The cold temperature enhances the refreshing quality and prevents the dressing from separating.
For optimal flavor, remove from refrigerator 5 minutes before serving if it’s been stored for several hours. This allows the dressing flavors to express themselves more fully.
Recipe Variations
Once you’ve mastered the classic kani salad recipe, experiment with these variations:
Spicy Kani Salad
Increase sriracha to 3-4 tablespoons and add ½ teaspoon of cayenne pepper. Include thin-sliced jalapeño for fresh heat. This version pairs excellently with white chicken chili for a meal with consistent heat levels.
Tempura Kani Salad
Lightly bread and deep-fry the kani sticks before shredding. This adds a crispy exterior while maintaining the tender interior. The contrast between textures elevates the dish significantly.
You can also add tempura-fried vegetables like carrots or sweet potato strips for additional crunch and visual appeal.
Mango Kani Salad
Add diced fresh mango to introduce tropical sweetness. Reduce mirin in the dressing slightly and add a touch of lime juice. This variation works beautifully as a light lunch alongside grilled fish.
Creamy Sesame Version
Replace half the Kewpie mayo with tahini for a nuttier flavor profile. Add 1 tablespoon of white miso paste to deepen umami notes. This version is particularly satisfying and works as a more substantial side dish.
With Additional Proteins
Mix in cooked shrimp, real crab meat, or seared scallops for a more luxurious version. You can also add edamame or tofu for vegetarian protein options. These additions transform kani salad into a complete light meal.
Storage and Make-Ahead Tips
Proper storage ensures your kani salad maintains quality and food safety:
Refrigerator Storage
Store fully assembled kani salad in an airtight container for up to 1 day. The salad will gradually release moisture and become softer, but remains safe and tasty. If preparing for a dinner party, assemble no more than 4 hours ahead.
For longer storage, keep components separate: shredded kani and vegetables in one container, dressing in another. Combine just before serving to maintain optimal texture and freshness.
Freezing
Kani salad doesn’t freeze well due to its vegetable content and creamy dressing. The texture deteriorates significantly upon thawing. However, you can freeze the individual kani sticks if you need to extend their shelf life beyond the package date.
Make-Ahead Strategy for Entertaining
Prepare the dressing up to 2 days ahead. Shred kani and cut vegetables the morning of serving. Assemble salads individually just before plating for restaurant-quality presentation. This approach ensures maximum freshness and allows you to focus on other dishes.
If serving buffet-style, assemble the salad 30 minutes before guests arrive. Arrange avocado on top just before service to maintain its appearance.
Leftover Management
Leftover kani salad can be repurposed creatively. Use it as a filling for yum yum sauce-drizzled sushi rolls, mix it into rice bowls, or layer it in lettuce wraps. These transformations prevent waste while creating new dishes from the same base ingredient.
FAQ
Can I use real crab instead of imitation crab?
Absolutely! Real lump crab meat creates a more luxurious version. Use about 1 pound of fresh or pasteurized crab meat instead of kani sticks. The flavor will be more delicate, so consider reducing sriracha slightly to avoid overpowering the crab’s natural sweetness. This elevated version works beautifully for special occasions and pairs well with beef and rice recipes for surf-and-turf entertaining.
What’s the difference between Kewpie mayo and regular mayo?
Kewpie mayo uses only egg yolks rather than whole eggs, creating a richer, tangier profile. Its higher fat content and slightly sweet taste make it ideal for Asian dishes. Regular mayo can substitute in a pinch, but the flavor won’t be quite as authentic. Kewpie mayo is widely available at Asian markets and many supermarkets.
How can I make kani salad less creamy?
Replace half the mayo with Greek yogurt for a lighter version with tangier flavor. Alternatively, use a vinaigrette-based dressing with sesame oil and rice vinegar as the main components. Some people prefer a 50/50 mix of mayo and ponzu sauce for reduced creaminess with enhanced umami.
Is kani salad gluten-free?
Most ingredients are naturally gluten-free, but check your soy sauce and sriracha labels. Many brands contain gluten. Use tamari or certified gluten-free soy sauce, and choose sriracha without additives. Kani sticks are typically gluten-free, but verify the packaging to be certain.
Can I make kani salad spicy without sriracha?
Yes! Use cayenne pepper, fresh jalapeño, or Thai chili paste. Some people enjoy wasabi for a different type of heat that clears the sinuses. You can also add black or white pepper for subtle spice without the flavor profile of sriracha.
What’s the best way to serve kani salad at a party?
Assemble components separately and plate individual portions just before guests arrive. Alternatively, serve in a large bowl with a small serving spoon, allowing guests to portion their own. Keep the salad on ice to maintain proper temperature. If using healthy crock pot recipes as your main course, prepare kani salad ahead since it requires no cooking.
How do I prevent the avocado from browning?
Add avocado just before serving, and squeeze fresh lemon or lime juice over it immediately. You can also place the avocado pit in the bowl—while this is more myth than science, it doesn’t hurt. If preparing ahead, cover the salad tightly with plastic wrap pressed directly onto the surface to minimize air exposure.
What drinks pair well with kani salad?
Serve with sake, crisp white wine, or Japanese beer. The salad’s creamy, umami-rich profile complements light, refreshing beverages. Sparkling water with cucumber and ginger makes an excellent non-alcoholic pairing.


