How to Bake Danish Pastry? Expert Recipe
Danish pastries are the crown jewels of breakfast baking, combining buttery, flaky layers with rich fillings and elegant glazes. These iconic pastries, despite their name, have roots in Austrian baking traditions but became perfected and celebrated in Denmark during the 19th century. Creating authentic Danish pastries at home requires patience, precision, and understanding the lamination technique that creates those signature crispy, golden layers.
Many home bakers avoid making Danish pastries because they believe the process is too complicated or time-consuming. However, with the right guidance and a structured approach, you can master this impressive pastry in your own kitchen. The key lies in understanding cold butter incorporation, proper folding techniques, and allowing adequate resting time between steps. This comprehensive guide walks you through every stage of creating restaurant-quality Danish pastries that will impress family and friends.
Whether you’re interested in comfort food recipes or exploring advanced baking techniques, Danish pastries offer the perfect balance of indulgence and craftsmanship. Let’s explore the complete process from mixing your dough to enjoying your finished pastries fresh from the oven.
Understanding Danish Pastry Dough
Danish pastry dough is fundamentally different from regular bread dough or pie crust. It’s an enriched dough that contains eggs, milk, sugar, and butter, which creates a tender crumb while maintaining the ability to hold laminated butter layers. The magic happens through a process called lamination, where cold butter is folded into the dough repeatedly, creating hundreds of thin, alternating layers of dough and fat.
When these layers bake, the moisture in the butter turns to steam, causing the dough to puff up dramatically. This creates the characteristic flaky, crispy texture that makes Danish pastries so irresistible. Unlike croissant dough, which uses only flour, water, salt, and yeast, Danish dough is enriched with dairy and eggs, giving it a slightly softer crumb and richer flavor profile.
The dough itself requires careful temperature management. Too warm, and the butter will blend into the dough rather than creating distinct layers. Too cold, and you’ll struggle to fold and shape without cracking. Understanding these temperature dynamics is crucial for success. Most professional bakers work in cool kitchens and chill their dough frequently throughout the lamination process.
Ingredients and Preparation
Creating exceptional Danish pastries starts with quality ingredients measured precisely. Here’s what you’ll need for a classic batch:
- 500g (4 cups) all-purpose flour
- 250ml (1 cup) whole milk, warmed
- 50g (¼ cup) granulated sugar
- 10g (2 teaspoons) salt
- 7g (2¼ teaspoons) instant yeast
- 2 large eggs
- 50g (3.5 tablespoons) unsalted butter, softened (for dough)
- 250g (1 cup plus 2 tablespoons) cold unsalted butter (for lamination)
- 30g (2 tablespoons) flour (for dusting between folds)
Begin by warming your milk to approximately 27-30°C (80-86°F). This temperature activates the yeast without killing it. In a large mixing bowl, combine your flour, sugar, salt, and instant yeast. Whisk these dry ingredients together to distribute the yeast evenly throughout the flour.
Create a well in the center of your dry ingredients and add the warm milk and eggs. Using a dough hook on a stand mixer, mix on low speed for approximately 3-4 minutes until a shaggy dough forms. The mixture should look rough and somewhat sticky at this stage. This is normal and expected.
Add the 50g of softened butter and continue mixing on low speed for another 5-6 minutes. The dough will gradually become smoother and more cohesive. You’re aiming for a dough that’s soft, slightly sticky, and pulls away from the bowl’s sides while still clinging slightly to the bottom. The dough should have a smooth, elastic texture.
Transfer your dough to a lightly oiled bowl, cover it with plastic wrap, and refrigerate for at least 2 hours, preferably overnight. This initial rest allows the gluten to develop and makes the dough easier to work with during lamination. Cold dough is essential for successful lamination.
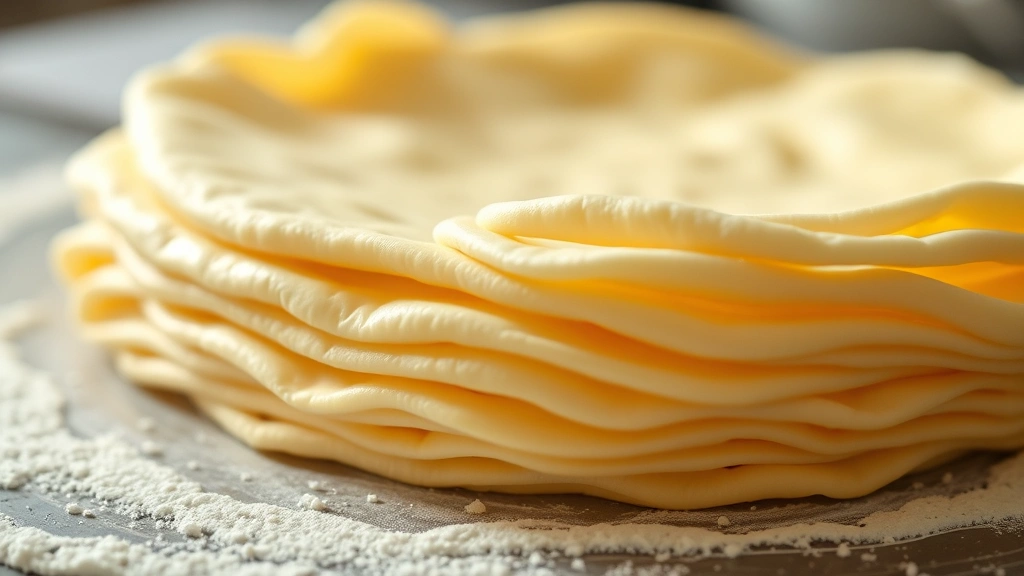
Laminating Your Dough
Lamination is where Danish pastries get their distinctive flaky layers. This technique requires precision and patience. Remove your chilled dough from the refrigerator and place it on a lightly floured work surface. Gently press it into a rectangle approximately 20cm x 30cm (8 inches x 12 inches).
Prepare your butter block: the 250g of cold butter should be pliable but still cold. If your butter is too hard, let it sit at room temperature for 5-10 minutes. Place the cold butter between two sheets of parchment paper and pound it with a rolling pin until it forms a rectangle approximately 15cm x 20cm (6 inches x 8 inches). The butter should be malleable enough to fold without cracking but still cold and firm.
Place your butter block on the lower two-thirds of your dough rectangle. Fold the uncovered third of dough over the butter, then fold the remaining third over that, creating three layers. This is your first “turn” or fold. Rotate your dough 90 degrees so the open edges face you. This prevents the lamination from becoming uneven.
Roll out your dough again to approximately 20cm x 30cm, maintaining even thickness throughout. This is crucial—uneven thickness results in uneven lamination and inconsistent baking. Perform your second turn by folding the dough into thirds again, just as before. Wrap your dough in plastic wrap and refrigerate for 30 minutes.
Repeat this process two more times: roll, fold into thirds, rotate, refrigerate. After four complete turns, your dough will have approximately 81 layers of butter and dough (3 to the 4th power). Some recipes call for six turns, which creates 729 layers, but four turns produces excellent results for home bakers.
After your final turn, wrap the dough tightly and refrigerate for at least 4 hours, or preferably overnight. This resting period allows the gluten to fully relax and helps stabilize the lamination before shaping.
Shaping and Filling Techniques
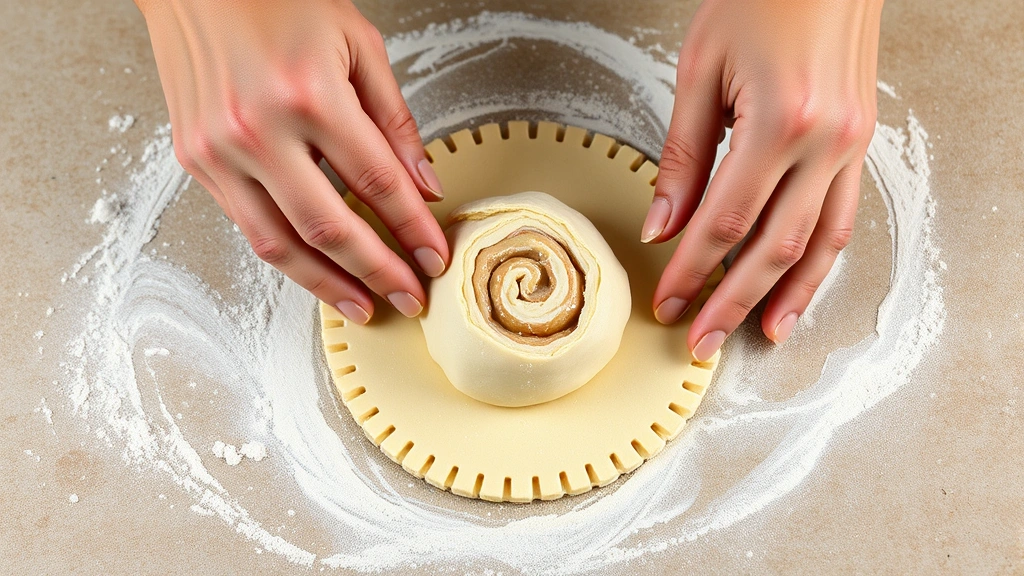
Once your dough has rested adequately, it’s time to shape and fill your pastries. Remove the dough from the refrigerator and let it sit at room temperature for 5-10 minutes to make it slightly more pliable. Roll it out to approximately 5mm (¼ inch) thickness on a lightly floured surface.
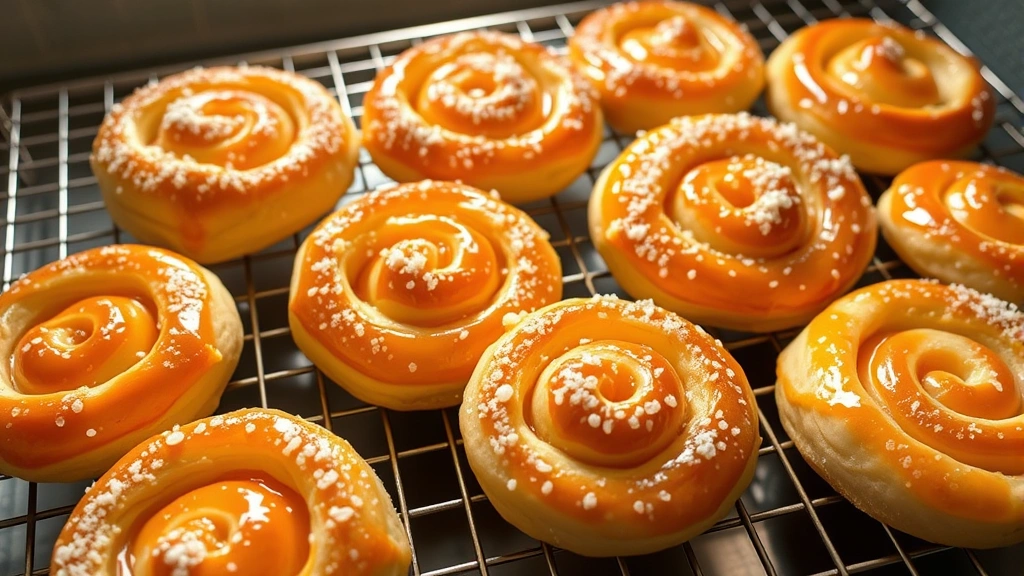
Classic Danish shapes include spirals, pinwheels, envelopes, and bear claws. For spirals, cut the dough into strips approximately 2cm (¾ inch) wide and 20cm (8 inches) long. Place a small amount of filling (about 1 teaspoon) along one long edge, then roll tightly, sealing the end with a damp fingertip. Coil the roll into a spiral and place on a parchment-lined baking sheet.
For pinwheels, cut the dough into 8cm (3-inch) squares. Place a small amount of filling in the center of each square. Make diagonal cuts from each corner toward the center, stopping about 2cm from the middle. Fold every other point toward the center, creating a pinwheel effect. This technique works beautifully with jam or pastry cream fillings.
Popular filling options include:
- Almond paste: A traditional Danish filling made from ground almonds, sugar, and egg
- Fruit preserves: Apricot, raspberry, or cherry jam provides bright color and tang
- Custard cream: A rich pastry cream flavored with vanilla or cardamom
- Cinnamon sugar: A simple yet elegant filling with butter and brown sugar
- Cheese filling: Sweetened ricotta or cream cheese mixed with sugar and lemon zest
When filling your pastries, use restraint—overfilled pastries burst during baking and lose their shape. Approximately 1-2 teaspoons of filling per pastry is ideal. Place your shaped pastries on parchment-lined baking sheets, spacing them approximately 5cm (2 inches) apart to allow for expansion during proofing.
Proofing and Baking
Proper proofing is essential for achieving light, airy pastries. Cover your shaped pastries with a damp kitchen towel or plastic wrap and let them proof at room temperature for 1.5 to 2 hours. The pastries should increase in size by approximately 50-75% and feel light and puffy when gently pressed.
Underproofed pastries will be dense and won’t rise adequately in the oven. Overproofed pastries may collapse or spread excessively during baking. To test for proper proofing, gently poke a pastry—the indentation should slowly spring back partially but not completely disappear.
While your pastries proof, preheat your oven to 200°C (400°F). Some bakers prefer 190°C (375°F) for slightly longer, gentler baking that ensures thorough cooking without excessive browning. Before baking, prepare an egg wash by beating one egg with 1 tablespoon of water. Brush this mixture lightly over each pastry, being careful not to let it pool in the creases, which can prevent proper rising.
Bake your Danish pastries for 15-20 minutes, until they’re deep golden brown. The exact timing depends on your oven’s characteristics and the size of your pastries. Smaller pastries may be done in 15 minutes, while larger ones might need 20. Rotate your baking sheet halfway through baking to ensure even browning.
Remove the pastries from the oven and let them cool on the baking sheet for 5 minutes before transferring to a wire rack. This brief resting period allows the structure to set without becoming overly crispy. Serve your Danish pastries warm or at room temperature for the best flavor and texture.
Glazes and Finishing Touches
The final glaze transforms your Danish pastries from good to exceptional. Several classic options exist, each offering different aesthetics and flavors. A simple apricot glaze involves heating apricot jam with a small amount of water and brushing it over warm pastries. This creates a glossy finish and adds subtle fruity flavor.
For a more refined appearance, prepare a fondant icing by mixing powdered sugar with milk or egg white until you achieve a thick but pourable consistency. Add vanilla extract or almond extract for flavor. Drizzle this icing over cooled pastries for an elegant presentation. You can tint the icing with food coloring to match your fillings.
A royal icing made from powdered sugar and egg whites provides a bright white finish that hardens to a crisp texture. This traditional option works beautifully for special occasions. Simply whisk powdered sugar and egg whites until stiff peaks form, then pipe or drizzle over pastries.
For additional texture and elegance, consider topping your pastries with chopped pistachios, sliced almonds, pearl sugar, or coconut flakes. Add these toppings immediately after glazing while the glaze is still tacky, ensuring they adhere properly. Pearl sugar, traditional in Scandinavian baking, creates a beautiful sparkly finish and pleasant crunch.
Storage and Make-Ahead Tips
Danish pastries are best enjoyed fresh, ideally within a few hours of baking. However, understanding proper storage extends their enjoyment. Room temperature storage works well for up to one day—keep pastries in an airtight container to prevent them from drying out. The flaky layers may soften slightly, but the pastries remain delicious.
For longer storage, freeze unbaked shaped pastries. Arrange them on a baking sheet, freeze until solid, then transfer to a freezer bag. They’ll keep for up to three months. When ready to bake, remove them from the freezer and let them thaw and proof at room temperature for 2-3 hours before baking as directed. This makes Danish pastries excellent for advance preparation.
You can also freeze baked pastries for up to two weeks. Cool them completely, wrap individually in plastic wrap, and store in a freezer bag. Thaw at room temperature for 30-45 minutes before serving, or warm in a 160°C (320°F) oven for 8-10 minutes to restore crispness.
Many bakers prepare the laminated dough in advance, storing it in the refrigerator for up to three days before shaping and filling. This allows you to have fresh Danish pastries on hand with minimal effort on the actual baking day. Simply shape, proof, and bake when desired.
For those seeking high protein low calorie recipes, consider incorporating Greek yogurt into your custard fillings for added nutrition without sacrificing flavor. Similarly, experimenting with whole grain flours can enhance nutritional value, though this requires slight adjustments to hydration levels.
The beauty of mastering Danish pastry techniques extends beyond breakfast applications. These same lamination skills and filling principles apply to creating savory variations filled with cheese, vegetables, or cured meats—perfect for brunch or light dinner options.
FAQ
What’s the difference between Danish pastry and croissants?
While both use laminated butter and dough, Danish pastries contain enriched dough with eggs, milk, and sugar, creating a softer crumb. Croissants use a simpler dough and are typically unfilled. Danish pastries tend to be less flaky and more tender, with richer flavor from the added dairy and eggs.
Can I make Danish pastries without a stand mixer?
Yes, though it requires more effort. Mix the initial dough by hand using a wooden spoon or your hands, kneading for approximately 10-12 minutes until smooth and elastic. The lamination process remains the same regardless of how you mix the initial dough. Hand-mixing actually develops gluten more thoroughly through physical effort.
Why did my Danish pastries turn out dense?
Dense pastries typically result from underproofing, insufficient lamination, or oven temperature that’s too low. Ensure your pastries proof fully until puffy, complete all four lamination turns properly, and bake at the correct temperature. Also verify your yeast is fresh and active.
How do I prevent butter from leaking out during baking?
Leaking butter usually indicates the dough wasn’t cold enough during lamination or the butter was too soft. Keep everything well-chilled throughout the process, refrigerate between each fold, and ensure your butter block is cold and firm when incorporating it. Also avoid overfilling pastries, which can cause seams to burst.
Can I use margarine instead of butter?
While technically possible, margarine produces inferior results. Butter contains water content that creates steam during baking, essential for proper puffing. Margarine also lacks butter’s rich flavor. For authentic Danish pastries, butter is worth the investment. The superior taste and texture justify using quality butter throughout.
What should my dough temperature be during lamination?
Your dough should be cool but pliable, ideally between 18-20°C (64-68°F). If it’s too warm, butter blends into the dough. If too cold, it cracks during folding. A cool kitchen and frequent refrigeration are your best tools for maintaining proper temperature throughout lamination.
For additional guidance on professional pastry techniques, consider exploring culinary education resources. The International Association of Culinary Professionals provides excellent references for advanced baking. For scientific understanding of laminated doughs, King Arthur Baking Company offers detailed explanations. To deepen your knowledge of Scandinavian pastry traditions, explore resources from Serious Eats, which covers food science and technique extensively. Finally, San Francisco Baking Institute provides professional-level pastry education.
Mastering Danish pastry baking opens doors to countless variations and applications. Whether you’re creating comfort food recipes for weekend mornings or impressing guests at special occasions, these techniques provide a foundation for pastry excellence. With practice and attention to detail, you’ll develop the intuition and skill that professional bakers possess, creating Danish pastries that rival those from the finest bakeries.


