Gluten-Free Pasta? Chef’s Secret Recipe
Creating authentic gluten-free pasta at home is easier than you might think, and once you master this chef’s secret recipe, you’ll never buy boxed pasta again. Many home cooks believe that gluten-free pasta requires specialized equipment or obscure ingredients, but the truth is that professional chefs have been perfecting this technique for years using simple, accessible pantry staples. The key lies in understanding how different flours behave and balancing moisture content to achieve that perfect al dente texture.
Whether you’re managing celiac disease, gluten sensitivity, or simply exploring new culinary horizons, homemade gluten-free pasta delivers superior flavor and texture compared to commercial alternatives. This comprehensive guide reveals the exact techniques that professional kitchens use to create pasta indistinguishable from traditional wheat versions. You’ll discover why certain flour blends work better than others, how to troubleshoot common issues, and how to store your creations for maximum freshness.
Understanding Gluten-Free Flour Blends
The foundation of exceptional gluten-free pasta begins with selecting the right flour blend. Unlike traditional wheat pasta that relies on gluten’s elasticity and binding properties, gluten-free pasta requires a strategic combination of flours that mimic these characteristics. The best blends contain a mix of starches, protein-rich flours, and binding agents that work synergistically to create structure and texture.
Professional chefs typically use a combination of rice flour, tapioca starch, and cornstarch as their base, which provides the neutral flavor and light texture essential to quality pasta. Rice flour contributes protein and a slightly sweet undertone, while tapioca starch adds elasticity and chewiness. Cornstarch provides additional binding power and helps achieve that smooth, silky mouthfeel you’d expect from premium pasta.
For enhanced nutritional value and deeper flavor, consider incorporating almond flour, buckwheat flour, or chickpea flour into your blend. These additions increase protein content, making your pasta more satisfying and nutritionally complete. Buckwheat flour, despite its name, is entirely gluten-free and adds a subtle nuttiness that pairs beautifully with robust sauces. Chickpea flour boosts fiber and creates a slightly firmer bite, which professional cooks appreciate for maintaining al dente texture during cooking.
The ideal ratio for a versatile gluten-free pasta blend is 40% rice flour, 30% tapioca starch, 20% cornstarch, and 10% specialty flour of your choice. This combination provides the best balance of structure, flavor, and cooking performance. Always sift your flour blend multiple times before using it to ensure even distribution of ingredients and to aerate the mixture, which improves dough hydration and extensibility.
Essential Ingredients and Equipment
Beyond flour, your gluten-free pasta dough requires surprisingly few ingredients. You’ll need eggs, salt, olive oil, and water—the same basic components that traditional pasta makers have used for centuries. The magic lies in precise ratios and technique rather than exotic ingredients.
Eggs serve as your primary binder, providing moisture and structure that replaces gluten’s functionality. Use room-temperature eggs, as they incorporate more smoothly into the dough and create better elasticity. The yolk contributes richness and helps create that golden color associated with quality pasta, while the whites provide additional binding power.
For every 100 grams of gluten-free flour blend, use approximately 1 large egg and 15-20 milliliters of water. This ratio creates a dough that’s firm enough to handle but hydrated enough to achieve proper gluten-free pasta texture. Extra virgin olive oil adds richness and prevents dough from becoming brittle during drying. Salt not only seasons the dough but also strengthens the structure by affecting gluten-alternative proteins in your flour blend.
Equipment-wise, you’ll benefit from investing in a pasta machine or stand mixer with pasta attachments. While hand-rolling is possible, mechanical equipment ensures consistent thickness and saves considerable time and effort. A quality pasta extruder can transform your dough into various shapes with minimal stress on the dough structure. A digital scale proves invaluable for maintaining consistent ratios, which is crucial when working with gluten-free formulations that are less forgiving than wheat-based doughs.
Additional helpful tools include a bench scraper for dough handling, a fine-mesh sieve for flour sifting, and a drying rack specifically designed for fresh pasta. Many professional chefs also use a humidity gauge to monitor environmental conditions during drying, as moisture levels significantly affect drying time and final texture.
Step-by-Step Pasta Making Process
Creating gluten-free pasta follows a methodical process that differs slightly from traditional pasta making. Begin by sifting your flour blend onto a clean work surface or into a large mixing bowl, creating a mound with a well in the center. This traditional technique, called the “fontana” method, allows you to control hydration gradually and prevents over-mixing.
Crack your eggs into the center well, add a pinch of sea salt, and begin beating the eggs with a fork, just as you would for scrambled eggs. Slowly incorporate flour from the inner walls of the well, working gradually to prevent lumps from forming. This patient approach, used by professional chefs, ensures smooth dough development and prevents the catastrophic dough breaks that plague rushed mixing.
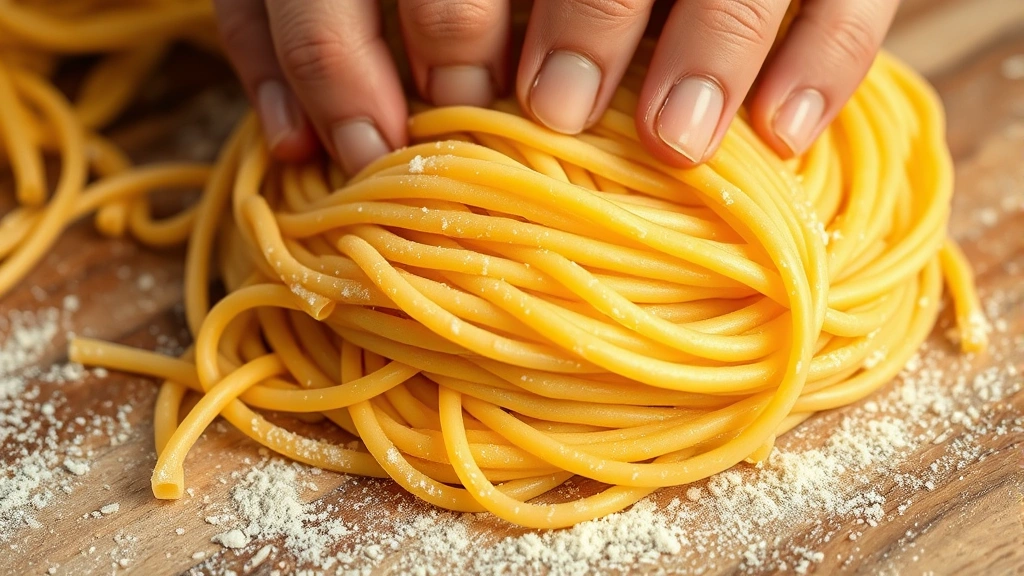
Once the dough becomes too stiff to work with a fork, switch to hand-kneading. Push the dough away from you with the heel of your hand, fold it back over itself, rotate 90 degrees, and repeat. This rhythmic motion develops the structure that gluten-free flours struggle to create naturally. Continue kneading for 8-10 minutes until the dough becomes smooth, elastic, and slightly glossy. Unlike wheat dough, gluten-free pasta dough won’t develop the same elasticity, but you should notice a significant improvement in texture and cohesion.
If your dough feels too dry and crumbly, add water one teaspoon at a time while continuing to knead. If it’s too wet and sticky, dust with small amounts of your flour blend. The goal is achieving dough that holds together firmly but isn’t so dry that it cracks at the edges. This balance is absolutely critical for gluten-free pasta success.
Once your dough reaches the proper consistency, wrap it tightly in plastic wrap and rest it at room temperature for 30 minutes. This resting period allows the flour to fully hydrate and gives the dough time to relax, making it easier to work with during rolling and shaping. Professional pasta makers often rest dough for up to 2 hours for enhanced extensibility.
After resting, divide your dough into manageable portions—typically 200-gram pieces work well for home cooks. Keep unused portions wrapped to prevent drying. Using a pasta machine set to its widest setting, run the dough through 3-4 times, folding it in half between passes. This lamination process further develops structure and creates a more uniform texture.
Gradually decrease the machine setting with each pass until you reach your desired thickness. For filled pastas like ravioli or tortellini, aim for sheets thin enough to see your hand through them but thick enough to handle without tearing. For strand pastas, slightly thicker sheets actually perform better, as they’re less prone to breaking during extrusion and cooking.
Shaping and Drying Your Pasta
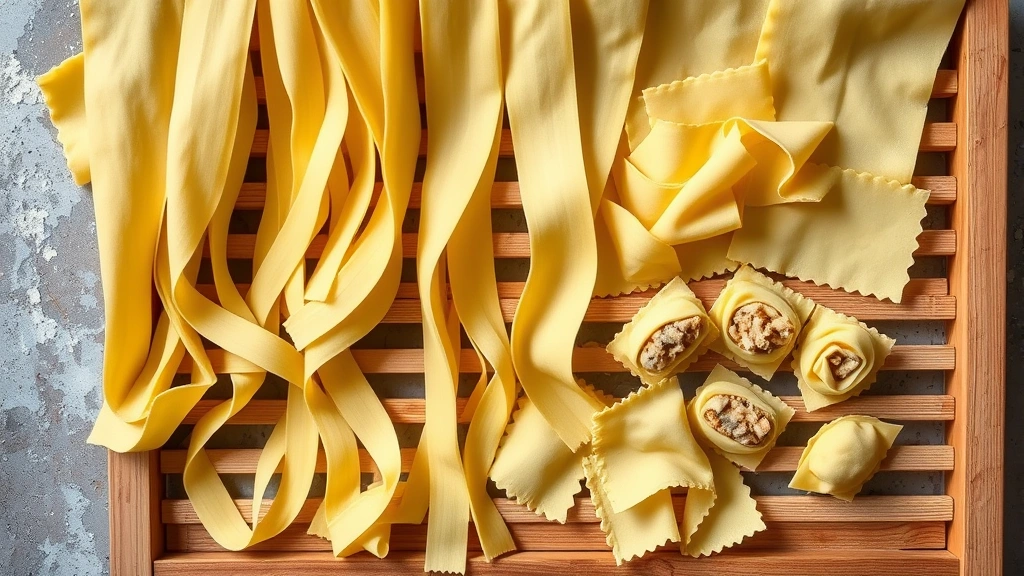
The shaping phase determines your final pasta’s character and cooking time. Sheet pasta like lasagna or pappardelle requires minimal work—simply cut your rolled sheets to desired dimensions and lay them on a lightly floured surface. For strand pastas, use your pasta machine’s cutting attachments or hand-cut with a sharp knife, keeping strands separated to prevent sticking.
Filled pastas demand more attention but reward you with impressive presentation. For ravioli, lay a sheet of pasta on your work surface, pipe or spoon filling into evenly-spaced portions, then fold the sheet in half, pressing firmly around each filling mound to seal. Use a ravioli cutter or knife to separate individual pieces. For tortellini, cut filled sheets into squares, place filling in the center of each, fold diagonally to create triangles, then wrap the triangle’s points around your finger and press to seal.
Fresh gluten-free pasta can be cooked immediately or dried for storage. Immediate cooking produces the most tender pasta with the shortest cooking time (typically 3-5 minutes in boiling salted water). If you prefer dried pasta, arrange your shaped pieces on a dedicated drying rack in a cool, dry location with good air circulation. Avoid direct sunlight, which can cause uneven drying and discoloration.
Drying time varies based on thickness, humidity, and air circulation but typically ranges from 12 to 48 hours. You’ll know pasta is properly dried when it breaks cleanly with a snapping sound rather than bending. Gluten-free pasta dries faster than traditional pasta due to lower gluten content, so monitor it carefully to prevent over-drying, which makes it brittle and prone to breaking during cooking.
For a hybrid approach favored by professional chefs, you can partially dry your pasta for 2-4 hours until the exterior firms up but the interior remains slightly moist. This “half-dried” pasta cooks faster than fresh (5-8 minutes) while maintaining superior texture compared to fully dried gluten-free pasta. This technique bridges the gap between fresh and dried, offering flexibility in your cooking schedule.
Cooking and Serving Recommendations
Cooking gluten-free pasta requires slightly different timing and technique than traditional wheat pasta. Always use abundant salted water—at least 4 quarts per pound of pasta—and maintain a rolling boil throughout cooking. Salt the water generously; it should taste like the sea. This seasoning becomes incorporated into the pasta and enhances overall flavor.
Fresh gluten-free pasta cooks remarkably quickly, often within 2-4 minutes of hitting the water. Test frequently after 2 minutes by removing a strand and biting into it. You’re looking for that perfect al dente texture—tender but with slight resistance in the center. Remove pasta from water about 30 seconds before it reaches your desired doneness, as carryover cooking continues during draining.
Dried gluten-free pasta requires longer cooking, typically 7-12 minutes depending on thickness and drying method. Start testing after 6 minutes to prevent overcooking. Unlike traditional dried pasta that can withstand vigorous boiling, gluten-free pasta benefits from a more gentle rolling boil, as excessive agitation can cause breakage.
Reserve at least one cup of pasta water before draining—this starchy liquid is liquid gold for finishing your dish. The starch helps sauces cling to pasta and creates silky, cohesive dishes. This technique, beloved by professional chefs at leading culinary institutions, transforms adequate pasta dishes into restaurant-quality meals.
Gluten-free pasta pairs beautifully with bold, flavorful sauces. Try it with tuna poke for a modern seafood pasta, or create elegant dishes with baked halibut recipes for sophisticated entertaining. For heartier options, consider pairing your homemade pasta with chicken and wild rice soup recipe components, or lighter preparations inspired by candied carrots recipe techniques. The delicate nature of gluten-free pasta actually makes it ideal for showcasing premium ingredients like fresh seafood or seasonal vegetables.
Storage and Shelf Life
Proper storage ensures your homemade gluten-free pasta maintains quality for extended periods. Fresh pasta keeps refrigerated for up to 5 days when stored in an airtight container or wrapped tightly in plastic wrap. For longer storage, freeze fresh pasta on a baking sheet until solid (about 2 hours), then transfer to freezer bags where it keeps for up to 3 months. Cook frozen pasta directly in boiling water without thawing—add 1-2 minutes to the cooking time.
Dried pasta offers superior shelf stability, lasting up to 6 months in an airtight container stored in a cool, dry place. Proper drying is crucial for longevity; any residual moisture invites mold growth and spoilage. Store dried pasta away from light and heat sources, as these factors degrade quality over time. Glass containers or paper bags work better than plastic, which can trap moisture.
Label all stored pasta with the date of preparation, especially important when experimenting with different flour blends. You’ll quickly discover which combinations you prefer and which perform best in various applications. Professional chefs maintain detailed notes on their successful batches, creating a personal reference library for future production.
FAQ
Why does my gluten-free pasta dough feel sticky compared to wheat pasta?
Gluten-free flours absorb less water than wheat flour, so dough that feels slightly stickier is actually properly hydrated. The dough should feel soft and supple rather than dry and crumbly. If it’s excessively sticky, dust lightly with flour blend rather than adding more flour to the dough itself, which can make it tough.
Can I use pre-made gluten-free flour blends instead of creating my own?
Absolutely! Quality commercial gluten-free flour blends like King Arthur Baking Company’s gluten-free blend work excellently for pasta. Follow the package’s recommended liquid ratios as a starting point, then adjust based on your dough’s feel. Pre-made blends offer convenience and consistency, though you sacrifice the customization of homemade combinations.
Why is my pasta breaking during cooking?
Breaking typically results from one of three issues: over-drying, which makes pasta brittle; insufficient hydration during dough making, which creates brittle pasta even when fresh; or vigorous boiling, which agitates the pasta excessively. Ensure your dough is properly hydrated, avoid over-drying, and maintain a gentle rolling boil rather than a violent one.
How do I achieve the perfect al dente texture with gluten-free pasta?
Since gluten-free pasta lacks gluten’s elasticity, achieving al dente requires vigilant testing. Start tasting 1-2 minutes before you expect pasta to finish cooking. You’re looking for pasta that’s tender throughout but with the slightest resistance in the very center. Remove pasta from heat slightly before reaching this point, as carryover cooking continues during draining.
Can I make gluten-free pasta without eggs?
Yes, though results differ slightly. Replace each egg with 3 tablespoons of water plus 1 tablespoon of cornstarch mixed together, or use 1/4 cup of aquafaba (chickpea liquid) per egg. Egg-free dough requires more careful handling and may benefit from an additional tablespoon of olive oil for improved texture. Results are excellent but slightly less rich than egg-based pasta.
What’s the difference between partially dried and fully dried gluten-free pasta?
Partially dried pasta (2-4 hours of drying) cooks faster than fresh (5-8 minutes) while maintaining softer texture than fully dried pasta. Fully dried pasta (12-48 hours) takes longer to cook (7-12 minutes) but stores significantly longer. Choose based on your immediate cooking plans and storage needs—professional chefs often use partial drying for optimal balance.
Can I use gluten-free pasta in dishes that call for traditional pasta?
Yes! Substitute gluten-free pasta one-to-one in virtually any recipe. The main difference is cooking time—gluten-free pasta typically cooks faster, so start testing earlier. Use the same amount of sauce and liquid ratios, and adjust cooking time based on your specific pasta’s thickness and drying method. Explore creative applications like pairing with steelhead trout recipe preparations or incorporating into fall recipes for seasonal entertaining.
Why should I make pasta from scratch instead of buying gluten-free pasta?
Homemade gluten-free pasta offers superior flavor, superior texture, and significantly lower cost compared to commercial products. You control ingredient quality, customize flavor profiles, and enjoy the satisfaction of creating restaurant-quality food in your own kitchen. Fresh pasta also cooks in minutes, making it practical for weeknight dinners despite its homemade status.


