Ultimate Bagel Recipe: Bakery-Approved Techniques for Perfect Homemade Bagels
Making bagels at home might seem intimidating, but with the right technique and understanding of the process, you can create bakery-quality bagels in your own kitchen. Unlike how to make homemade bread, bagel-making requires specific steps that distinguish these chewy, dense rounds from regular bread. The key lies in the dough composition, shaping method, and most importantly, the boiling process that gives bagels their signature crust and interior texture.
This comprehensive guide walks you through every stage of bagel production, from mixing your dough to achieving that golden-brown exterior. Whether you’re a seasoned baker or attempting bagels for the first time, these bakery-approved techniques will help you understand the science behind what makes a bagel truly exceptional. You’ll learn professional secrets that commercial bakeries use, adapted for home kitchens.
Essential Ingredients for Authentic Bagels
Creating authentic bagels starts with selecting the right ingredients. Unlike other bread recipes, bagels require specific components that contribute to their dense crumb structure and chewy texture. The ingredient list is surprisingly simple, but each element plays a crucial role in the final product.
Bread flour is non-negotiable for bagels. Its higher protein content (around 12-14%) develops strong gluten networks that create the characteristic chewy bite. All-purpose flour will produce softer bagels lacking that signature density. You’ll need approximately 3.5 to 4 cups for a standard batch of 8 bagels.
Water should be filtered or at room temperature. The water-to-flour ratio affects hydration levels, which impacts how the dough develops. Most bagel recipes use a ratio of roughly 1.3 parts water to 1 part flour by weight, creating a firmer dough than standard bread.
Salt strengthens gluten development and flavors the dough. Use fine sea salt or kosher salt at about 1.5 teaspoons per batch. Salt also controls fermentation speed, preventing over-proofing.
Sugar or honey feeds the yeast and contributes to browning. A tablespoon of honey or sugar provides enough fermentation fuel without making the bagels sweet. This ingredient is essential for proper rise and color development.
Instant yeast (about 2 teaspoons) drives fermentation. Instant yeast works faster than active dry yeast, making it ideal for bagel production. Some bakers prefer a longer cold fermentation with less yeast, which develops more complex flavors.
Malt barley powder or diastatic malt is optional but highly recommended by professional bakers. This ingredient enhances browning and adds subtle sweetness. You can find it at baking supply stores or King Arthur Baking Company.
Baking soda (for boiling water) adjusts pH levels, creating the proper environment for bagel crust development. About 1 tablespoon per quart of boiling water is standard.
Understanding Bagel Dough Chemistry
Bagel dough differs fundamentally from regular bread dough in several ways. Understanding these differences helps you troubleshoot problems and achieve consistent results. The chemistry of bagel-making involves hydration levels, gluten development, and fermentation timing.
Hydration levels in bagel dough typically range from 55-65%, making it stiffer than sandwich bread dough. This lower hydration creates the dense interior and prevents excessive spreading during shaping. The firm dough also holds toppings better and develops a tighter crumb structure.
Gluten development is crucial for bagel success. The protein networks created through mixing and kneading give bagels their chew. Bagels require more gluten development than regular bread because the boiling process partially sets the structure before baking. Professional bagel makers use intensive mixing or long fermentation periods to maximize gluten formation.
Fermentation timing affects flavor and texture. A long, cool fermentation (12-24 hours in the refrigerator) develops complex flavors and allows enzymatic activity that improves crust browning. Quick fermentation at room temperature produces milder-flavored bagels but requires careful timing to prevent over-proofing.
The boiling step is what truly distinguishes bagels from bread. When bagels are boiled, the outer starch gelatinizes, creating a moisture barrier that prevents excessive oven spring and produces the characteristic dense crumb. The boiling water’s alkalinity (enhanced by baking soda) also promotes browning through the Maillard reaction.
Understanding these chemical principles helps you appreciate why homemade bread techniques don’t always translate to bagels. Each step serves a specific purpose in creating that perfect bagel texture and appearance.

Step-by-Step Dough Preparation
Proper dough preparation sets the foundation for successful bagels. This process requires precision and attention to detail, but once you understand the steps, it becomes straightforward.
Mixing the ingredients: Combine 3.75 cups of bread flour, 1.5 teaspoons salt, 2 teaspoons instant yeast, and 1 tablespoon honey in a large bowl. Add 1.5 cups of water gradually while mixing with a sturdy spoon or dough hook. The mixture will be shaggy initially. Continue mixing until all flour is incorporated and no dry bits remain.
Kneading the dough: Transfer the dough to a work surface and knead for 10-12 minutes by hand, or use a stand mixer fitted with a dough hook for 6-8 minutes. The dough should become smooth, elastic, and slightly tacky but not sticky. Professional bakers often recommend intensive mixing to develop maximum gluten. The dough should pass the windowpane test—a small piece should stretch thin without tearing.
First rise: Place the kneaded dough in a lightly oiled bowl, cover with a damp towel, and let it rise at room temperature for 1-2 hours until it increases by about 50% (not fully doubled, as bagel dough rises slowly). Alternatively, refrigerate overnight for enhanced flavor development. Cold fermentation is preferred by many professional bagel makers.
Degassing: After the first rise, gently press down the dough to release excess gas. This step prevents large holes in the finished bagels and ensures even crumb structure. Don’t knead aggressively; simply fold the dough onto itself a few times.
Shaping and Proofing Techniques
Shaping bagels requires a specific technique that differs from shaping bread or rolls. The method you use affects the final bagel’s appearance, texture, and how toppings adhere.
Dividing the dough: Turn the dough onto a lightly floured surface and divide it into 8 equal pieces (each weighing about 100-110 grams for standard bagels). Weigh each piece for consistency, as uniform size ensures even baking. Keep unused pieces covered with a damp towel to prevent drying.
Pre-shaping: Roll each piece into a tight ball by cupping your hands around it and rolling on the work surface. This creates surface tension that helps maintain the bagel’s shape during boiling and baking. Let these balls rest for 5-10 minutes.
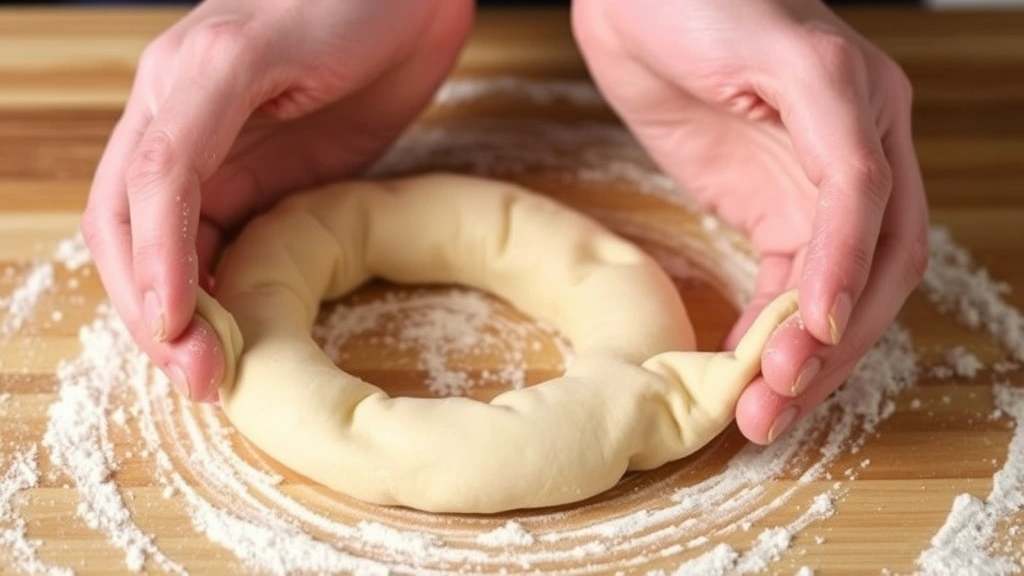
Final shaping method one (hole method): This is the traditional approach. Take a pre-shaped ball and poke your thumb through the center, creating a hole. Gently stretch the dough around your hands, expanding the hole to about 2 inches in diameter. The dough should form a ring with even thickness around the circumference. This method requires practice but produces bagels with beautiful, uniform holes.
Final shaping method two (rope method): Roll the pre-shaped ball into a rope about 8-10 inches long and roughly the thickness of your finger. Wrap the rope around your hand, overlapping the ends, and seal them together by rolling gently on the work surface. This method is often easier for beginners.
Proofing the shaped bagels: Place shaped bagels on parchment paper, spacing them 2 inches apart. Cover with a damp towel and proof at room temperature for 2-4 hours, or overnight in the refrigerator. Room temperature proofing produces airier bagels; cold proofing develops deeper flavor. The bagels should increase in size by about 50% and feel slightly puffy but still hold their shape when poked gently.
Testing for proper proofing: Perform the poke test by pressing your finger gently into a bagel. The indentation should spring back slowly, leaving a slight impression. If it springs back immediately, the bagel needs more time. If the impression doesn’t spring back at all, the bagel may be over-proofed.
The Critical Boiling Process
Boiling is what separates bagels from other bread products, and this step requires careful attention to technique and timing. The boiling process creates the bagel’s distinctive crust and prevents excessive oven spring.
Preparing the boiling water: Bring 3-4 quarts of water to a rolling boil in a large pot. Add 1 tablespoon of baking soda per quart of water. The baking soda raises the pH, promoting browning and helping the bagel exterior set quickly. Some bakers add 1 tablespoon of honey or malt syrup for additional browning and subtle flavor. The water should be at a vigorous boil, not just simmering.
Boiling technique: Carefully place 2-3 bagels into the boiling water (don’t overcrowd). They will initially sink, then float to the surface after 30-45 seconds. Once they float, boil for exactly 1 minute per side (flip them halfway through). Professional bagel shops often boil for 45 seconds per side for chewier bagels or up to 1.5 minutes per side for denser bagels. Start with 1 minute per side and adjust based on your preference.
Removing boiled bagels: Use a slotted spoon to remove bagels from the water, allowing excess water to drip back into the pot. Place boiled bagels on a wire rack or clean kitchen towel to drain and cool slightly before baking. Don’t let them sit too long, or they’ll become soggy.
Water temperature maintenance: Keep the water at a rolling boil throughout the process. If water temperature drops significantly, return it to a boil before adding the next batch. Boiling too-cool water results in bagels that absorb excess moisture and become dense rather than chewy.
Troubleshooting boiling issues: If bagels sink and don’t float, they may be over-proofed or too dense. If they float immediately, they’re under-proofed. If bagels split or tear during boiling, the dough may have been over-worked during shaping or over-proofed before boiling.
Baking for Perfect Results
After boiling, baking completes the bagel-making process. Proper oven temperature and timing create the golden crust and set the interior crumb structure.
Preparing for baking: Preheat your oven to 425°F (220°C) for at least 15 minutes. Use an oven thermometer to verify the temperature, as oven variations significantly affect results. If you have a baking stone, place it on the middle rack to heat. Line a baking sheet with parchment paper or use a preheated baking stone.
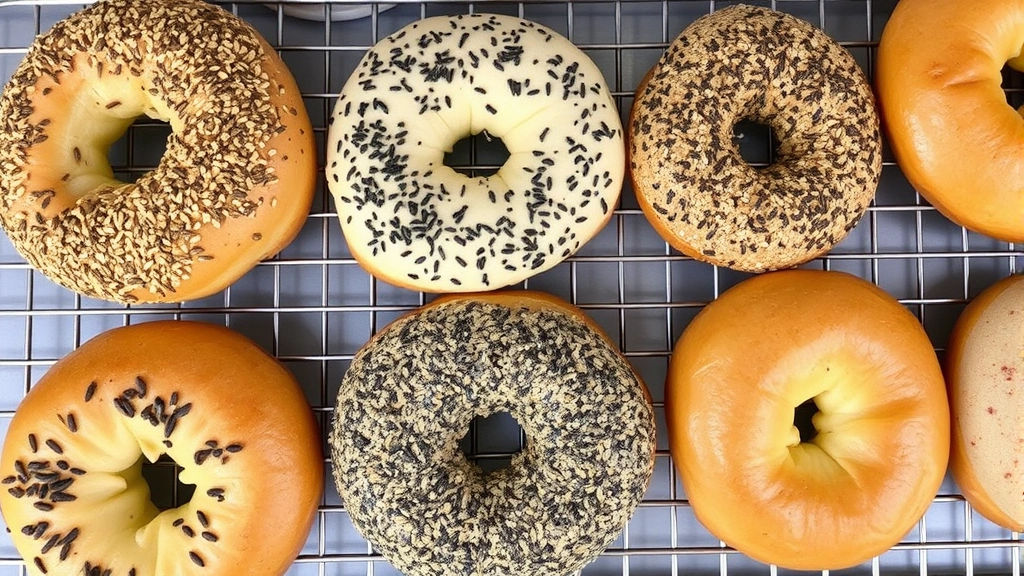
Adding toppings: Apply toppings immediately after boiling, while the bagel surface is still slightly moist. This ensures toppings adhere properly. Brush lightly with an egg white wash if desired for extra shine and better topping adhesion. Popular toppings include sesame seeds, poppy seeds, everything seasoning, coarse salt, and minced onion or garlic.
Baking process: Place bagels on the prepared baking sheet, spacing them 2 inches apart. Bake for 20-25 minutes until the exterior is deep golden brown. The bagels should sound hollow when tapped on the bottom. If using a baking stone, transfer bagels carefully using a peel. Rotate the baking sheet halfway through baking for even browning.
Cooling: Remove bagels from the oven and place them on a wire rack to cool completely before slicing. This allows the interior to set properly. Cutting into a warm bagel can make it gummy; waiting at least 30 minutes produces the best texture and makes slicing easier.
Achieving consistent results: Keep notes on your baking times and temperatures. Every oven behaves differently, so documentation helps you replicate successful batches. If bagels are too dark, lower the temperature by 25°F. If they’re too pale, increase the temperature or extend baking time.
Flavor Variations and Toppings
Once you master the basic bagel recipe, experimenting with flavors and variations keeps baking interesting. These variations use the same fundamental technique with creative additions.
Everything bagels: Combine equal parts sesame seeds, poppy seeds, dried minced onion, dried minced garlic, and coarse salt. Apply this mixture to an egg white-washed bagel before baking. This traditional New York-style variation balances savory flavors perfectly.
Whole wheat bagels: Replace 25-30% of the bread flour with whole wheat flour. Whole wheat requires slightly more water due to higher absorption rates. These bagels have a nuttier flavor and denser crumb. You might also explore healthy food recipes that incorporate whole grain bagels.
Cinnamon raisin bagels: Add 1 tablespoon of cinnamon and 0.5 teaspoon of nutmeg to the dry ingredients. Fold in 1 cup of raisins (soaked in warm water for 10 minutes and drained) after the initial mixing. These sweet bagels pair beautifully with cream cheese.
Jalapeño cheddar bagels: Add 1 cup of shredded sharp cheddar cheese and 0.5 cup of diced jalapeños (fresh or pickled, drained) to the dough after initial mixing. These savory bagels work wonderfully for breakfast sandwiches.
Pumpernickel bagels: Replace 0.75 cup of bread flour with pumpernickel flour and add 1 tablespoon of cocoa powder and 1 tablespoon of molasses. These dark, hearty bagels have complex flavors reminiscent of traditional pumpernickel bread.
Plain bagels with herb toppings: Make basic bagels and top with combinations of dried herbs. Try dried dill with sesame seeds, Italian seasoning with sea salt, or Everything But the Bagel seasoning for variety.
Storing and reheating: Cooled bagels stay fresh at room temperature for 2-3 days in an airtight container. Freeze bagels in freezer bags for up to 3 months. To reheat, slice and toast, or warm wrapped in foil at 350°F for 10 minutes. You might also consider food waste reduction tips for using older bagels in recipes like bagel bread pudding or croutons.
FAQ
Why do my bagels have large holes instead of small, even ones?
Large holes typically result from over-proofing before boiling. The dough rises too much, creating excessive gas pockets. Ensure bagels only increase by about 50% during proofing, not double. Also, degassing the dough after the first rise helps eliminate large air pockets. Using the rope-shaping method rather than the hole method sometimes produces more consistent hole sizes.
What’s the difference between bagels boiled for 1 minute versus 2 minutes per side?
Boiling time directly affects density and chewiness. One minute per side produces lighter, airier bagels with a less pronounced crust. Two minutes per side creates denser, chewier bagels with a thicker crust. Professional New York-style bagels are typically boiled 1-1.5 minutes per side. Experiment to find your preferred texture.
Can I use all-purpose flour instead of bread flour?
While possible, all-purpose flour won’t produce authentic bagels. The lower protein content (8-10% versus 12-14% in bread flour) results in softer, less chewy bagels. For best results, invest in quality bread flour. Some bakers add a small amount of vital wheat gluten to all-purpose flour to boost protein content.
How do I prevent bagels from becoming gummy inside?
Gumminess usually results from underbaking or slicing too soon. Ensure bagels bake until deep golden brown and sound hollow when tapped. Cool bagels completely on a wire rack before slicing—this allows the interior to set properly. Also, avoid boiling bagels too long, which causes excessive moisture absorption.
Why did my bagels sink and never float during boiling?
Bagels that don’t float are typically over-proofed, over-hydrated, or under-shaped. Ensure proper proofing (about 50% increase), use the correct hydration ratio, and shape bagels with adequate surface tension. If multiple bagels sink, your dough may need more gluten development through extended mixing or longer fermentation.
Can I make bagels without an overnight cold fermentation?
Yes, though cold fermentation produces superior flavor. For same-day bagels, use the full 2 teaspoons of instant yeast and allow 1-2 hours room temperature rise after mixing. However, the fermentation period is shortened, resulting in milder flavor. If time permits, at least refrigerate the shaped bagels for 4-8 hours before boiling.
What water should I use for boiling?
Tap water works fine, though filtered water produces slightly better results if your tap water is heavily chlorinated. Water hardness slightly affects boiling, but this is rarely significant for home bagel making. The most important factor is maintaining rolling boil temperature throughout the process.
How can I make bagels more like a specific bagel shop’s style?
Different bagel shops have signature styles. New York-style bagels are larger and boiled longer for chewiness. Montreal-style bagels are smaller, sweeter (with honey in the dough and boiling water), and baked in wood-fired ovens. Experiment with adjusting boiling time, final dough sweetness, and baking temperature to match your preferred style. Visit Serious Eats for detailed bagel style comparisons.
Why are my bagels pale instead of golden brown?
Pale bagels result from insufficient malt enzymes, low baking temperature, or short baking time. Add malt barley powder to your dough (available from Bob’s Red Mill), increase oven temperature by 25°F, or extend baking time by 5 minutes. Also ensure your boiling water has adequate baking soda (1 tablespoon per quart).
Can I use a bread maker for bagel dough?
Most bread makers can mix and knead bagel dough on the dough cycle. However, avoid using the full baking cycle, as bread makers are designed for lighter breads and won’t produce authentic bagels. Mix the dough in the bread maker, then proceed with shaping, proofing, boiling, and oven baking using traditional methods.


