Crispy Schnitzel at Home? Chef’s Secret!
Schnitzel is one of those dishes that seems intimidating until you understand the fundamental technique. Whether you’re craving the Wiener Schnitzel from Vienna or the lighter variations found across Central Europe, achieving that perfect golden crust at home is absolutely achievable. The secret isn’t some mysterious ingredient—it’s understanding how heat, moisture, and breading work together to create that signature crispiness that makes schnitzel so irresistible.
Many home cooks struggle with schnitzel because they approach it like a regular breaded cutlet. But restaurant-quality schnitzel requires specific attention to pounding, breading technique, and frying temperature. Once you master these chef’s secrets, you’ll create schnitzels that rival any Austrian gasthaus or German restaurant. This guide breaks down everything you need to know, from selecting the right meat to achieving that audible crunch with every bite.
Selecting and Preparing Your Meat
The foundation of great schnitzel starts with choosing the right cut. Traditional schnitzel uses veal, pork, or chicken—each offering different flavors and textures. Veal provides the most delicate, tender result and is considered the gold standard in Austrian cuisine. Pork offers a slightly richer flavor and is more economical. Chicken breast works beautifully for lighter versions, though it requires slightly more care to prevent drying out.
When selecting your meat, look for cuts that are naturally thin or can be easily pounded. For veal or pork, use cutlets from the loin or leg. For chicken, boneless, skinless breasts work perfectly. The meat should be fresh, pale pink (for pork or veal), and have minimal connective tissue. Ask your butcher to cut thin cutlets if possible—aim for approximately 1/4 inch thickness before pounding.
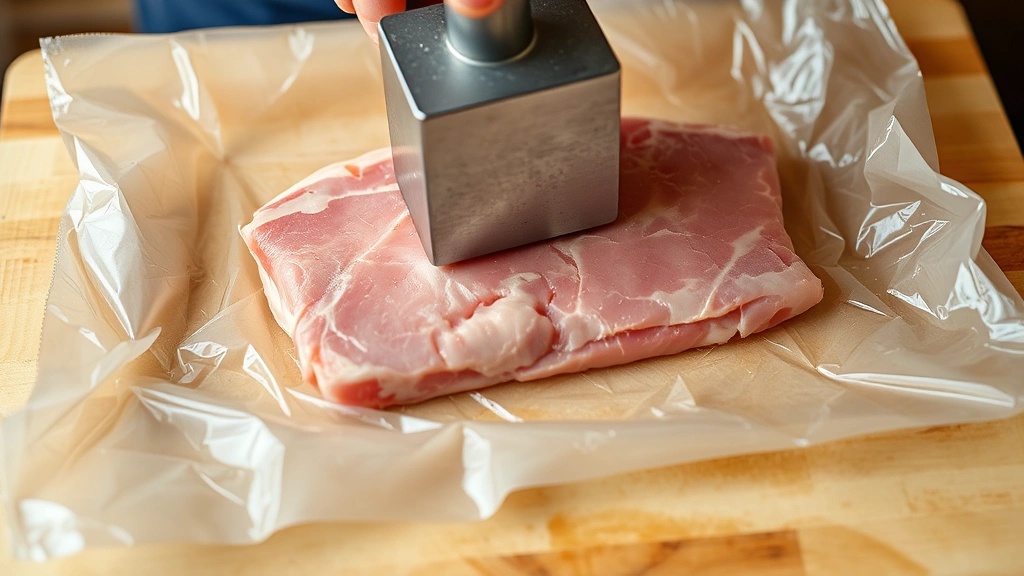
Pounding the meat is absolutely crucial and where many home cooks either skip steps or don’t pound enough. Place your cutlet between two pieces of plastic wrap or parchment paper. Using a meat mallet, pound with gentle, overlapping strokes from the center outward. The goal is to achieve even thickness throughout—approximately 1/8 inch for veal or pork, slightly thicker for chicken. This even thickness ensures uniform cooking and maximum tenderness. Don’t pulverize the meat; you’re simply breaking down muscle fibers and achieving consistency.
After pounding, pat the meat completely dry with paper towels. Moisture is the enemy of crispiness. If the meat is damp, the breading won’t adhere properly and steam will prevent browning. Some chefs even let pounded cutlets rest uncovered in the refrigerator for 15-20 minutes to ensure surface dryness. Season generously with sea salt and freshly ground black pepper on both sides, pressing the seasoning into the meat.
The Triple-Breading Method Explained
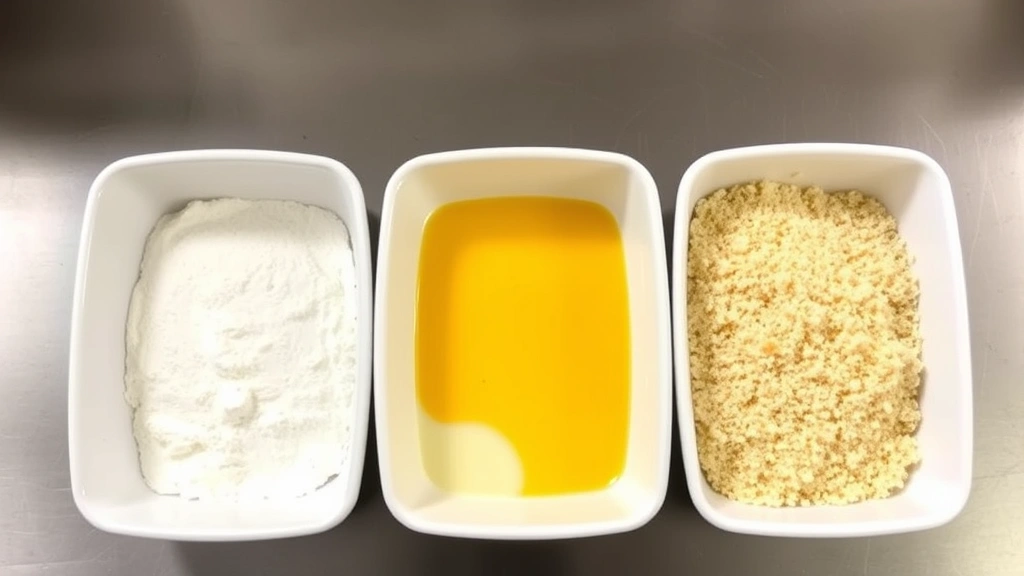
Here’s where the magic happens. Professional cooks use the three-station breading method, and this is the chef’s secret that transforms ordinary cutlets into restaurant-quality schnitzel. This technique creates multiple layers of protection that fry to an incredibly crispy exterior while keeping the meat juicy inside.
Station One: The Flour Dredge
Set up your first shallow dish with all-purpose flour mixed with a pinch of salt and white pepper. White pepper is preferred over black because it won’t leave specks on the finished schnitzel. Dredge each cutlet thoroughly in flour, coating both sides and edges. The flour acts as a base layer, helping subsequent layers adhere. Shake off excess flour—you want a thin, even coating, not a thick layer. This is why many chefs use one hand for wet ingredients and one for dry; it prevents your hands from becoming caked with breading.
Station Two: The Egg Wash
In your second shallow dish, whisk together eggs with a splash of whole milk or water and a tiny pinch of salt. Some traditional recipes use just egg yolks for a richer coating. The egg wash acts as an adhesive, binding the flour base to the breadcrumb crust. Dip each floured cutlet into the egg wash, ensuring complete coverage. Let excess drip back into the dish. Don’t linger—you want the flour layer to remain distinct from the breadcrumb layer.
Station Three: The Breadcrumb Crust
This is where texture truly matters. In your third shallow dish, place panko breadcrumbs or, for the most authentic result, finely grated day-old bread. Many chefs prefer homemade breadcrumbs from stale white bread because they create a finer, more delicate crust. If using panko, pulse it briefly in a food processor to break down the larger pieces slightly. Coat the egg-washed cutlet thoroughly in breadcrumbs, pressing gently so they adhere. Flip and coat the other side. Some chefs press additional breadcrumbs onto the edges for complete coverage.
After breading, place each schnitzel on a clean plate or parchment paper. Let them rest for at least 10 minutes—this allows the breading to set and adhere properly. This rest period is essential; if you fry immediately, the breading may separate during cooking. For best results, you can refrigerate breaded schnitzels for up to 2 hours before frying, which actually improves the final texture.
Perfecting Your Frying Technique
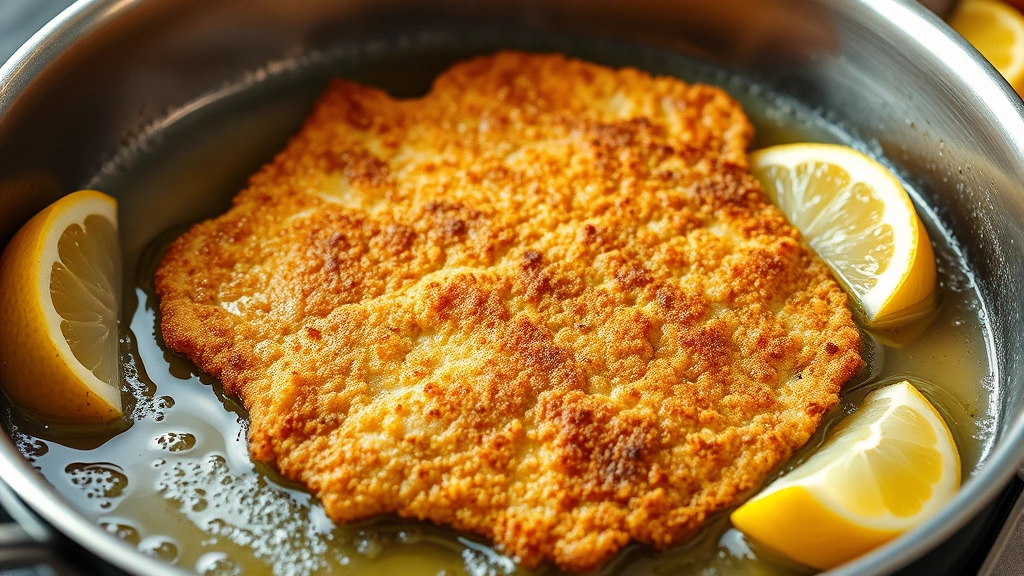
The cooking method dramatically affects your final result. Traditional schnitzel is shallow-fried in butter or a combination of butter and oil, not deep-fried. This method allows you to monitor the browning closely and creates the characteristic golden crust.
Pour enough fat into a large skillet to reach about 1/4 inch depth. Use clarified butter (ghee), whole butter, or a combination of butter and neutral oil like vegetable or light olive oil. The butter provides flavor while oil raises the smoke point. Heat the fat over medium-high heat until it shimmers and a tiny piece of breadcrumb immediately sizzles when dropped in. This indicates the temperature is approximately 350-375°F, ideal for schnitzel.
Carefully place your breaded cutlet into the hot fat. You should hear an immediate, satisfying sizzle. Don’t overcrowd the pan—cook one or two schnitzels at a time depending on pan size, leaving space between them. The fat temperature will drop when you add cold meat; resist the urge to increase heat aggressively, as this can burn the exterior before the interior cooks. Maintain medium-high heat for steady frying.
Fry for approximately 2-3 minutes on the first side without moving the cutlet. Resist the temptation to flip constantly; the schnitzel needs uninterrupted contact with hot fat to develop that golden crust. When the bottom is deep golden brown, carefully flip using tongs or a spatula. Fry the second side for 1-2 minutes until equally golden. The total cooking time varies based on meat thickness and type—thinner veal cooks faster than chicken breast.
Transfer cooked schnitzels to a plate lined with paper towels to drain excess fat. Blot the top gently with additional paper towels. This step removes surface oil while the residual heat continues cooking the interior slightly. Serve immediately while the exterior is still crackling crisp.
Temperature Control is Everything
This is genuinely the most critical factor separating mediocre schnitzel from exceptional schnitzel. Temperature control affects whether your crust becomes golden and crispy or burns before the meat cooks through. Professional kitchens use thermometers; home cooks should too.
Maintain your fat between 350-375°F throughout cooking. If your temperature drops below 340°F, the schnitzel will absorb excess fat and become greasy rather than crispy. If it exceeds 390°F, the exterior burns while the interior remains undercooked. Use an instant-read thermometer to check the fat temperature before adding each schnitzel, and adjust your heat accordingly between batches.
The meat’s internal temperature should reach 160°F for pork and chicken, 145°F for veal when measured with a meat thermometer inserted into the thickest part. However, with properly pounded thin cutlets, visual cues often suffice—the meat should be cooked through with no pink interior, visible when you cut into a test piece.
If you’re making easy dinner recipes for beginners, schnitzel is forgiving because the thin meat cooks quickly. However, consistency requires attention to temperature. Keep your stove at a steady medium-high setting rather than constantly adjusting. Some experienced cooks use a splatter screen to prevent fat from splattering while maintaining visibility of the cooking process.
Common Mistakes to Avoid
Understanding what goes wrong helps you succeed. Here are the most common schnitzel mistakes and how to prevent them:
Under-pounding the meat: If your cutlets aren’t pounded thin and evenly, they won’t cook uniformly. Thicker spots remain tough while thinner areas overcook. Pound thoroughly until you achieve even, thin cutlets.
Wet meat: Any surface moisture prevents proper browning and causes splattering. Pat meat completely dry and let breaded cutlets rest before frying.
Skipping the rest period: Breading needs time to set. Frying immediately after breading often results in the coating separating from the meat.
Overcrowding the pan: Too many schnitzels at once drops the fat temperature drastically, resulting in greasy rather than crispy schnitzel. Cook in batches.
Moving the schnitzel during cooking: Constantly flipping or adjusting prevents crust formation. Let it sit undisturbed for 2-3 minutes on the first side.
Using old oil: Reheated oil develops off-flavors and a lower smoke point. Use fresh fat for each batch or at minimum strain and replace fat between cooking sessions.
Incorrect fat temperature: This is the most common culprit. Too cool and it’s greasy; too hot and it burns. Use a thermometer.
Serving and Pairing Your Schnitzel
Schnitzel is traditionally served with simple, bright accompaniments that complement rather than overshadow the crispy coating. Classic pairings include lemon wedges for squeezing over the top, which cuts through the richness beautifully. A squeeze of fresh lemon juice also prevents the breading from absorbing residual moisture and losing crispiness.
Serve schnitzel alongside traditional sides like homemade sauces such as tartar sauce or mushroom cream sauce for dipping. A simple potato salad with vinaigrette, warm buttered egg noodles, or crispy roasted potatoes complement the schnitzel perfectly. In Austria, schnitzel often accompanies cucumber salad with sour cream or a fresh green salad with light vinaigrette.
For sauce options, consider a traditional Jäger sauce (hunter’s sauce) made with mushrooms and cream, or keep it simple with lemon butter. Some enjoy schnitzel with cast iron cooking techniques for other components of the meal, though schnitzel itself requires pan-frying in stainless steel or regular skillets for better heat distribution.
If you’re exploring low carb dinner recipes, schnitzel adapts beautifully—simply serve with cauliflower rice or zucchini noodles instead of traditional starches. The schnitzel itself remains unchanged, offering the same satisfying crispiness.
Wine pairings are equally important. Crisp white wines like Grüner Veltliner, Riesling, or Sauvignon Blanc complement schnitzel’s richness without overwhelming the palate. Austrian wine regions produce perfect matches for this national dish.
Schnitzel is best served immediately after cooking while the exterior remains maximally crispy. If you must hold it, keep finished schnitzels in a warm oven at 200°F, uncovered, so steam doesn’t soften the crust. For meal planning, best healthy food recipes often include schnitzel as a protein option—it’s relatively quick to prepare once you master the technique.
FAQ
Can I make schnitzel ahead of time?
You can bread schnitzels several hours ahead and refrigerate them unbaked, which actually improves texture. However, cook them immediately before serving for maximum crispiness. Cooked schnitzel doesn’t reheat well as the crust softens. If you must reheat, use a 400°F oven for 5 minutes on a wire rack rather than a microwave.
What’s the difference between schnitzel and cutlet?
Schnitzel is a specific preparation method—a thin, pounded cutlet breaded and shallow-fried. All schnitzels are cutlets, but not all cutlets are schnitzels. The technique matters: proper pounding, three-station breading, and shallow-frying in butter distinguish schnitzel from other breaded preparations.
Can I use boneless, skinless chicken thighs instead of breasts?
Absolutely. Thighs are more forgiving than breasts because they contain more fat, making them less prone to drying out. They may require slightly longer cooking time due to thickness, but the result is often more flavorful. Pound them to the same 1/8 inch thickness as other meats.
Is there a dairy-free egg wash alternative?
Yes. Use a mixture of cornstarch and water (1 tablespoon cornstarch to 2 tablespoons water), or aquafaba (liquid from canned chickpeas) whisked until foamy. Both create adequate adhesion for the breadcrumb coating, though traditional egg provides superior binding.
Why does my schnitzel come out greasy?
Greasiness indicates fat temperature was too low during cooking. The schnitzel absorbed oil instead of crisping. Ensure your fat reaches 350-375°F and maintain that temperature. Also verify your meat was completely dry before breading and that you didn’t skip the resting period for breaded cutlets.
Can I deep-fry schnitzel instead of shallow-fry?
While possible, traditional schnitzel is shallow-fried. Deep-frying uses excess oil and creates a heavier result. Shallow-frying in butter provides superior flavor and the characteristic texture Austrian cooks prize. If using deep-fry method, reduce oil temperature to 325°F and monitor carefully to prevent burning.
What type of breadcrumbs creates the crispiest schnitzel?
Homemade breadcrumbs from day-old white bread, finely grated, create the most delicate, crispy crust. Panko breadcrumbs work well but create a coarser texture. For the ultimate result, make breadcrumbs by drying bread in a low oven, then processing to fine crumbs. Store in an airtight container for future use.
How do I prevent the breading from separating during cooking?
Ensure your meat is completely dry before breading, follow the three-station method precisely, let breaded cutlets rest for at least 10 minutes before cooking, and don’t move the schnitzel during the first 2-3 minutes of frying. These steps allow the breading to set properly and adhere securely to the meat.


