Easy Ham and Cheese Sliders: Family Favorite Recipe
Ham and cheese sliders are the ultimate crowd-pleaser that brings families together at the dinner table. These bite-sized sandwiches pack maximum flavor into a convenient handheld package, making them perfect for weeknight dinners, game day gatherings, or casual entertaining. What makes sliders so appealing is their versatility—they’re simple enough for beginners to master, yet impressive enough to serve at special occasions. The combination of tender ham, melted cheese, and soft slider buns creates a harmonious blend of textures and tastes that appeals to both kids and adults alike.
The beauty of this ham and cheese sliders recipe lies in its straightforward approach and minimal ingredient list. Unlike complex recipes that require hours of preparation and numerous specialty items, these sliders come together in under 30 minutes. Whether you’re looking for easy dinner recipes for beginners or need to feed a large group without spending all day in the kitchen, this recipe delivers exceptional results every single time. The best part? You likely already have most of these ingredients in your pantry and refrigerator right now.
Ingredients You’ll Need
Creating delicious ham and cheese sliders starts with selecting quality ingredients. While the component list is short, each item plays an important role in the final result. Here’s everything you need to gather before you begin:
- Slider buns: 12-16 soft dinner rolls or slider-specific buns (Hawaiian rolls work wonderfully)
- Deli ham: 1 pound sliced ham from the deli counter, preferably not pre-packaged
- Cheese: 8-10 slices of your favorite cheese (Swiss, cheddar, or provolone are excellent choices)
- Butter: 4 tablespoons unsalted butter, softened
- Dijon mustard: 2 tablespoons (optional but recommended)
- Honey: 1 tablespoon
- Poppy seeds: 1 teaspoon
- Worcestershire sauce: ½ teaspoon
- Garlic powder: ¼ teaspoon
- Black pepper: To taste
The key to exceptional sliders begins at the grocery store. Visit your local deli counter and ask for freshly sliced ham rather than purchasing pre-packaged varieties. Fresh deli ham offers superior flavor and texture compared to processed alternatives. Similarly, selecting quality cheese makes a noticeable difference—avoid pre-sliced cheese in plastic when possible, as it often contains anti-caking agents that affect melting quality.
Step-by-Step Instructions
Follow these detailed steps to create restaurant-quality ham and cheese sliders in your own kitchen:
Prepare the Butter Topping
Begin by creating the signature butter topping that makes these sliders irresistible. In a small mixing bowl, combine softened butter with Dijon mustard, honey, Worcestershire sauce, and garlic powder. Mix thoroughly until all ingredients are fully incorporated and the mixture achieves a smooth, spreadable consistency. This aromatic butter will be applied to both the top and bottom of your slider buns, infusing each bite with rich, savory flavor. Set this mixture aside while you prepare the remaining components.
Assemble the Sliders
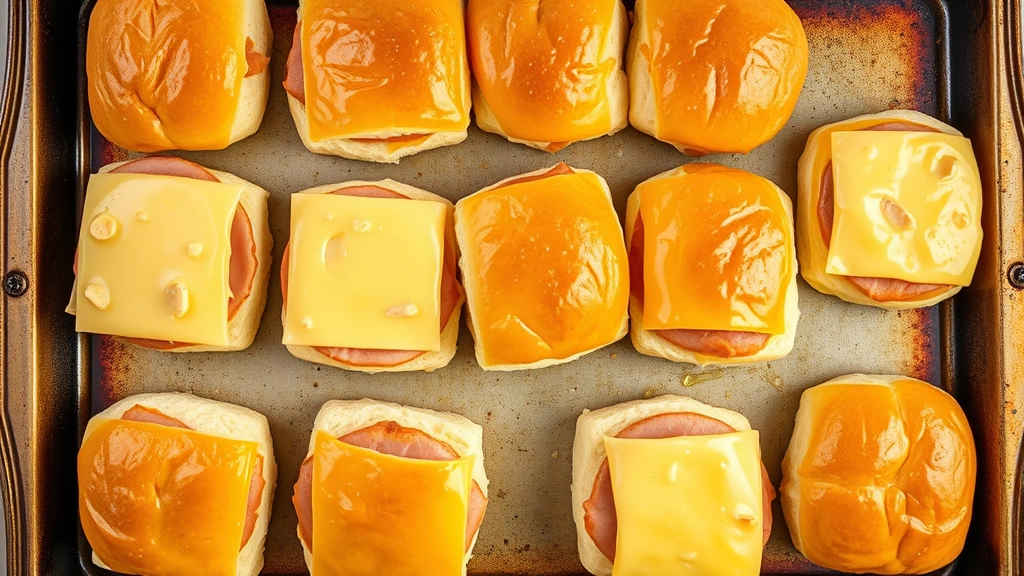
Preheat your oven to 350°F (175°C). Slice your slider buns horizontally, keeping the tops and bottoms connected if possible—this prevents them from separating during baking. Arrange the bottom halves of all buns in a single layer on a large baking sheet or in a 9×13-inch baking dish. Spread approximately ½ teaspoon of your butter mixture on each bottom bun half. Layer 2-3 slices of ham on top of each buttered bun, folding the ham to fit the slider size. Place one slice of cheese on each ham stack. Finally, spread the remaining butter mixture on the inside of each top bun half and place it over the cheese.
Bake to Perfection
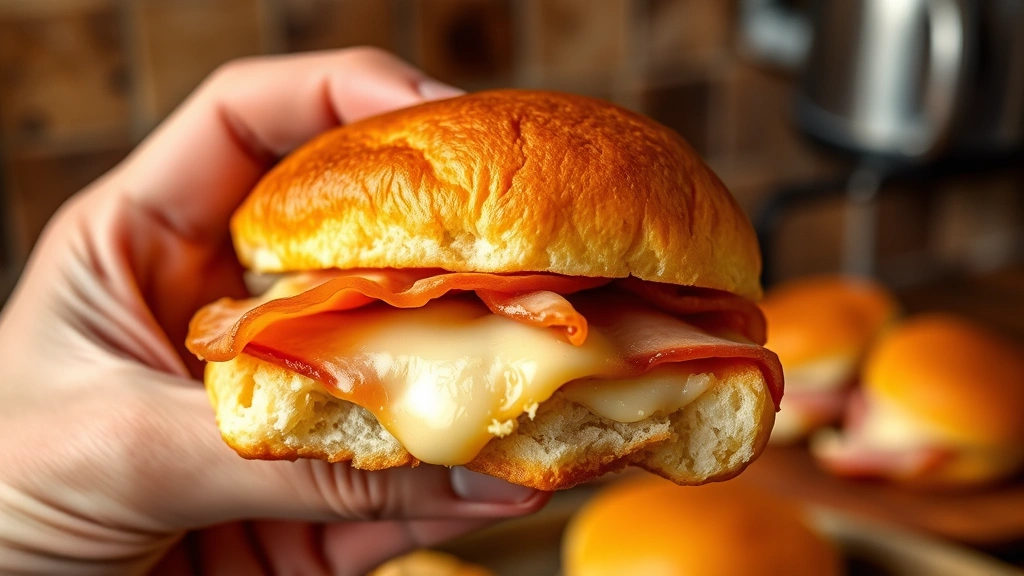
Cover the entire baking sheet with aluminum foil to trap steam and ensure even melting. Bake for 12-15 minutes until the cheese is completely melted and the buns are warm throughout. Remove the foil during the last 2-3 minutes if you prefer slightly toasted tops. The sliders are ready to serve when the cheese is bubbly and the buns have turned golden brown.
Pro Tips for Perfect Sliders
Achieving slider perfection requires attention to detail and understanding the science behind each cooking step. These professional techniques will elevate your results significantly:
Choose the Right Buns
The foundation of any exceptional slider is the bun itself. Hawaiian rolls are beloved for their slight sweetness, which complements ham and cheese beautifully. However, if you prefer a more savory profile, traditional dinner rolls or brioche buns work equally well. Avoid overly dense bread, which can overpower the delicate fillings. Look for buns with a soft crumb structure that won’t overwhelm your palate. If your buns seem dry, lightly brush them with water before assembling—this helps them steam and soften during baking.
Don’t Skip the Butter Topping
The butter mixture isn’t merely a garnish—it’s essential for flavor development and texture. The Worcestershire sauce adds depth, the honey provides subtle sweetness, and the garlic powder brings savory notes. Together, these ingredients create a complex flavor profile that transforms simple ingredients into something extraordinary. Apply the butter generously but not excessively; you want flavor without creating a greasy sandwich.
Quality Matters More Than Quantity
Using premium ham and cheese produces noticeably superior results compared to budget alternatives. High-quality deli ham contains better meat fibers and more authentic flavor. Similarly, real cheese melts more smoothly and creates a creamier texture than processed cheese products. This is one recipe where ingredient quality directly impacts the final dish, so invest in better components for best results.
Control Your Oven Temperature
Maintaining proper oven temperature ensures even cooking. If your oven tends to run hot, reduce the temperature to 325°F and extend the baking time by 5 minutes. Conversely, if your oven runs cool, increase the temperature slightly. Using an oven thermometer helps verify actual temperature and prevents guesswork.
Add Moisture Control
The foil covering traps steam, which helps cheese melt evenly and keeps buns from drying out. This technique is crucial for achieving that perfect balance between soft buns and melted cheese. Don’t skip this step, as it makes a significant difference in the final texture.
Flavor Variations to Try
Once you master the basic recipe, experiment with these creative variations to keep things interesting. These modifications maintain the simplicity of the original while introducing new flavor dimensions:
Honey Mustard Version
Increase the honey to 2 tablespoons and add 1 tablespoon of spicy brown mustard to your butter mixture. This creates a sweeter, more robust flavor profile that appeals to those who enjoy bold tastes. The mustard’s tanginess cuts through the richness of the cheese, creating better balance.
Caramelized Onion Sliders
Add a layer of caramelized onions to your sliders for sophisticated depth. Slowly cook thinly sliced onions in butter over low heat for 20-25 minutes until they’re golden and sweet. Layer these between the ham and cheese for added complexity. This variation transforms ordinary sliders into something more restaurant-worthy.
Spicy Pepper Jack Version
Substitute pepper jack cheese for your regular cheese and add ½ teaspoon of cayenne pepper to the butter mixture. Include a thin layer of jalapeño slices for additional heat. This variation appeals to those who enjoy spicy foods and adds an exciting kick to family meals.
Herb Garden Sliders
Mix fresh herbs like thyme, rosemary, or oregano into your butter topping. Use approximately 1 tablespoon of finely chopped fresh herbs per stick of butter. This creates a more sophisticated flavor profile reminiscent of gourmet restaurants. Fresh herbs brighten the overall taste and add visual appeal.
Bacon and Cheese Upgrade
Add crispy bacon strips between the ham and cheese layers. Cook bacon until perfectly crispy, then crumble or layer it for maximum flavor. This variation appeals to bacon lovers and creates a more substantial sandwich experience. The smoky bacon complements both ham and cheese beautifully.
Storage and Make-Ahead Guide
Ham and cheese sliders are excellent candidates for advance preparation, making them ideal for busy families. Understanding proper storage techniques ensures your sliders maintain quality:
Make-Ahead Preparation
You can assemble sliders several hours before baking. After assembling your sliders on the baking sheet, cover them tightly with plastic wrap and refrigerate for up to 8 hours. When ready to serve, simply remove from the refrigerator, cover with foil, and bake as directed, adding 3-5 minutes to the baking time since they’ll be starting from a cold temperature. This makes sliders perfect for entertaining or weeknight dinners when you want minimal last-minute effort.
Refrigerator Storage
Leftover cooked sliders keep well in the refrigerator for up to 3 days when stored in an airtight container. To reheat, place sliders on a baking sheet, cover with foil, and warm at 325°F for 8-10 minutes until heated through. Avoid using the microwave, which can make buns tough and rubbery. Proper reheating preserves the texture and flavor of your original sliders.
Freezing for Later
Assembled uncooked sliders freeze beautifully for up to 3 months. Prepare sliders as directed, then wrap the entire baking sheet tightly with plastic wrap and aluminum foil before freezing. When ready to bake, remove from freezer, cover with foil, and bake at 350°F for 20-25 minutes until heated through and cheese is melted. This makes sliders an excellent option for batch cooking and meal planning. Freezing allows you to enjoy homemade sliders whenever the craving strikes without starting from scratch.

Nutritional Information
Understanding the nutritional content helps with meal planning and dietary considerations. Each slider contains approximately:
- Calories: 280-320 per slider
- Protein: 14-16 grams
- Fat: 12-14 grams
- Carbohydrates: 28-32 grams
- Sodium: 650-750 milligrams
- Fiber: 1-2 grams
These sliders provide substantial protein from the ham and cheese, making them satisfying enough for a complete meal. For best healthy food recipes, consider serving sliders with a side salad to increase vegetable intake and add nutritional balance. The sodium content is moderate, though those watching salt intake can reduce the Worcestershire sauce or use low-sodium ham.
Serving Suggestions for Balanced Meals
Pair sliders with complementary sides for complete nutrition and satisfying meals. Fresh green salad with vinaigrette adds vegetables and brightens the richness of the sliders. Roasted vegetables like broccoli or carrots provide additional nutrients and fiber. Fruit sides such as watermelon or grapes offer refreshing contrast. For lighter meals, serve sliders with vegetable crudités and hummus. These combinations create balanced plates that satisfy everyone at the table.
FAQ
Can I make ham and cheese sliders ahead of time?
Absolutely! Assemble sliders up to 8 hours in advance, cover with plastic wrap, and refrigerate. Bake directly from the refrigerator, adding 3-5 minutes to the baking time. You can also freeze assembled uncooked sliders for up to 3 months. This flexibility makes them perfect for meal planning and entertaining.
What’s the best cheese for sliders?
Swiss, cheddar, provolone, and pepper jack all work beautifully. Swiss offers mild, nutty flavor. Cheddar provides classic richness. Provolone adds Italian sophistication. Pepper jack brings spicy excitement. Choose based on your flavor preferences and what complements your other ingredients best.
Can I use different types of ham?
Yes! Honey ham, Black Forest ham, or smoked ham all create delicious sliders. Each variety brings different flavor notes. Experiment to find your favorite. Avoid overly processed deli meats, which contain excessive sodium and additives. Fresh deli counter ham consistently delivers superior results.
How many sliders should I plan per person?
Plan for 2-3 sliders per person as a main course, or 1-2 sliders as an appetizer. Children typically eat 1-2 sliders, while hearty eaters may enjoy 3-4. Serving sliders with substantial sides helps with portion control and creates more balanced meals.
Can I make sliders without the butter topping?
While possible, the butter topping significantly enhances flavor and creates that signature restaurant quality. If avoiding butter, try brushing buns with olive oil infused with garlic instead. The topping transforms basic ingredients into something exceptional, so I recommend including it.
What’s the difference between sliders and regular sandwiches?
Sliders are miniature sandwiches designed for easy eating and entertaining. Their smaller size makes them perfect for appetizers, casual meals, or when you want variety without heavy portions. The compact format also allows for more creative assembly and serving presentations compared to full-sized sandwiches.
How do I prevent sliders from getting soggy?
The foil covering during baking creates steam that softens buns without making them soggy. Don’t assemble sliders more than 8 hours in advance, as this gives moisture time to absorb into bread. Storing cooled sliders in airtight containers also prevents moisture loss that would dry them out.
Can I double this recipe?
Absolutely! Double or triple the recipe easily by multiplying ingredient amounts. Use additional baking sheets if needed, arranging sliders in single layers. Baking time remains the same since the oven temperature and slider thickness don’t change. This makes sliders perfect for large gatherings and meal prep.
What beverages pair well with sliders?
Cold beverages like lemonade, iced tea, or cola complement sliders nicely. For adult gatherings, light beers or crisp white wines work well. The richness of ham and cheese pairs beautifully with beverages that offer refreshing contrast. Choose drinks that balance rather than overwhelm the slider flavors.
Are sliders suitable for potlucks and parties?
Sliders are excellent potluck and party foods! They’re easy to transport, simple to serve, and appeal to diverse tastes. Assemble and bake at home, then transport in an insulated container. Alternatively, assemble at the party location and bake in the host’s oven. Their versatility and crowd-pleasing nature make them ideal entertaining options.
Can I use leftover ham?
Yes! Leftover ham from holiday dinners or roasts works perfectly for sliders. Chop or shred the ham finely before using. Leftover ham often contains more moisture, so pat it dry with paper towels before assembling to prevent soggy buns. This is an excellent way to use holiday leftovers creatively.
How do I know when sliders are done baking?
Sliders are done when the cheese is completely melted and bubbly, and the buns are warm and golden brown. Check by lifting foil carefully after 12 minutes—if cheese isn’t fully melted, recover and bake another 2-3 minutes. The buns should feel soft but not damp when touched.
Ham and cheese sliders represent the perfect intersection of simplicity and satisfaction. This easy dinner recipe delivers impressive results with minimal effort, making it ideal for busy families seeking quick meals without sacrificing quality. Whether you’re preparing weeknight dinners, hosting casual gatherings, or looking for make-ahead options, these sliders consistently deliver. The combination of tender ham, melted cheese, and flavorful butter topping creates something greater than the sum of its parts. Start with the basic recipe, then explore variations once you’re comfortable with the technique. Your family will request these sliders regularly, and you’ll appreciate how effortlessly they come together. From culinary education resources to home cooking blogs, ham and cheese sliders appear frequently as a staple comfort food. Master this recipe and you’ll have a reliable go-to meal that never fails to impress.


