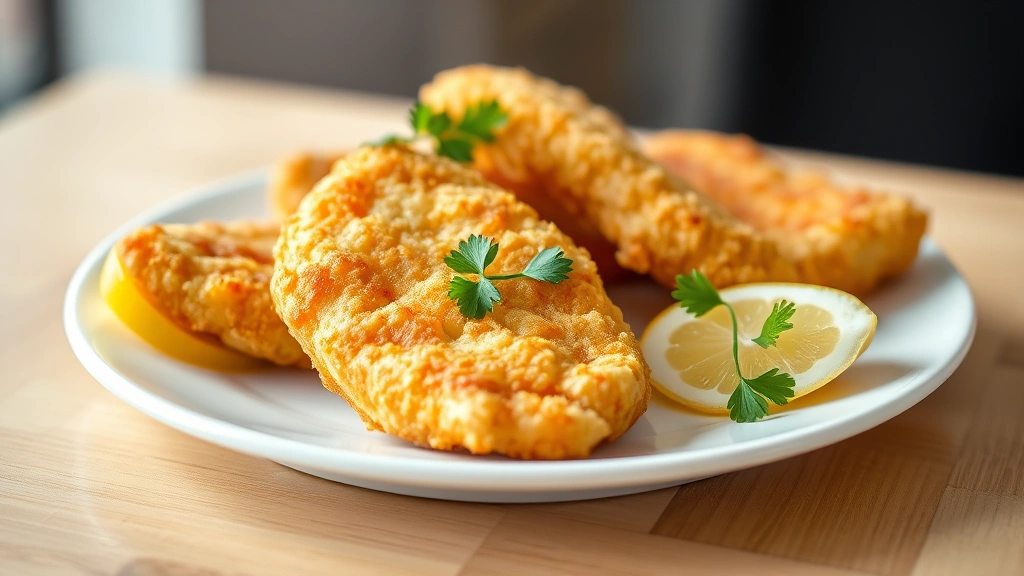
Crispy Beer Batter Recipe: Chef’s Favorite Method for Perfect Results
There’s something magical about a perfectly crispy beer batter—the kind that crackles between your teeth, shatters into golden shards, and reveals tender, juicy meat or vegetables inside. This isn’t accidental; it’s the result of understanding the chemistry behind the batter and mastering a few key techniques that professional chefs have perfected over decades. Whether you’re coating fish for fish and chips, preparing chicken wings recipe favorites, or frying vegetables, the right beer batter method transforms ordinary ingredients into restaurant-quality appetizers and main courses.
The secret to achieving that coveted crispiness lies in three fundamental elements: the right beer selection, proper ingredient ratios, and precise cooking temperatures. Many home cooks struggle with soggy, heavy batters that absorb oil like sponges, but once you understand why certain beers work better than others and how to structure your batter mixture, you’ll achieve results that rival your favorite fish fry restaurant. This guide walks you through the chef-approved method that consistently delivers crispy, golden exteriors while keeping the interior tender and flavorful.
Why Beer Works in Batter
Beer is far more than just a flavoring agent in batter—it’s a functional ingredient that fundamentally improves texture and crispiness. The carbonation in beer creates tiny bubbles throughout the batter, which expand when exposed to hot oil, creating an airy, delicate crust. These bubbles are larger and more stable than those created by baking powder or baking soda alone, resulting in a lighter, crunchier exterior.
Beyond carbonation, beer contains natural enzymes and proteins that interact with flour to create a more tender crumb structure. The alcohol in beer also evaporates quickly during frying, which actually helps create crispiness by reducing moisture in the final product. Additionally, the slight bitterness and subtle sweetness of beer complement fried foods naturally, enhancing overall flavor without requiring extra seasoning.
The acidity in beer (typically pH 4.0-4.5) also affects gluten development differently than water alone. This means less gluten formation occurs, resulting in a more delicate, less chewy batter—exactly what you want for crispy coatings. Professional chefs understand these chemical interactions and leverage them to create batters that are simultaneously crispy and light.
Selecting the Right Beer
Not all beers are created equal when it comes to battering. The type of beer you choose dramatically affects both the texture and flavor of your final dish. Light lagers and pilsners are the gold standard for beer batter because they have moderate carbonation levels, mild flavor profiles that don’t overpower the main ingredient, and lower alcohol content that evaporates efficiently during frying.
Best Beer Options:
- Light Lager: The classic choice for fish and chips. Its clean, crisp character won’t compete with delicate fish flavors, and the carbonation level is ideal for creating an airy crumb structure.
- Pilsner: Slightly more hoppy than light lager but still mild enough for most applications. Excellent for chicken and vegetable batters.
- Blonde Ale: A slightly sweeter option that works well with richer proteins and adds a subtle caramel note to the crust.
- Wheat Beer: Contains additional proteins that enhance crispiness. Works beautifully for vegetables and lighter proteins.
Beers to Avoid: Heavy stouts, porters, and imperial IPAs will overwhelm delicate ingredients. Their robust flavors and lower carbonation levels don’t contribute to the crispy texture you’re seeking. Flat or warm beer will also compromise results—carbonation is essential.
Temperature matters too. Use beer that’s been chilled but not ice-cold. Extremely cold beer will shock the warm oil, potentially causing splattering, while room-temperature beer has lost carbonation. Aim for refrigerator temperature, around 35-40°F.
Essential Ingredients and Ratios
The architecture of a great beer batter relies on precise ratios and understanding what each ingredient contributes. Here’s the chef-approved formula:
Chef’s Crispy Beer Batter Formula (serves 4-6):
- 1 cup all-purpose flour
- 1 cup beer (cold, lager or pilsner)
- 1 egg yolk
- 1 tablespoon cornstarch
- 1 teaspoon baking powder
- ½ teaspoon salt
- ¼ teaspoon white pepper
- ½ teaspoon paprika
- Oil for frying (vegetable or peanut oil)
Ingredient Breakdown:
All-Purpose Flour: The base structure. All-purpose works better than cake flour (too soft) or bread flour (too strong). The gluten network in all-purpose flour is perfectly balanced for batter applications.
Beer: Provides carbonation, flavor, and chemical interactions with flour. The 1:1 ratio of flour to beer creates a batter that’s thin enough to coat evenly but thick enough to adhere properly.
Egg Yolk: Acts as an emulsifier and binder, helping the batter adhere to your protein or vegetable. The fat in the yolk also contributes to richness and helps create a golden color. Use only the yolk, not the white—egg whites can create a rubbery texture.
Cornstarch: This is a professional secret. Cornstarch doesn’t develop gluten, so it keeps the batter tender. It also absorbs moisture, helping create crispiness. Some chefs use rice flour for the same reason.
Baking Powder: Provides additional lift and crispiness. Non-aluminum baking powder is preferred to avoid metallic flavors. This ingredient is crucial for achieving that shattered, crispy texture.
Salt and Seasonings: Don’t skip proper seasoning. White pepper is preferred over black because it dissolves more completely in the batter. Paprika adds color and subtle flavor without altering texture.
Step-by-Step Preparation
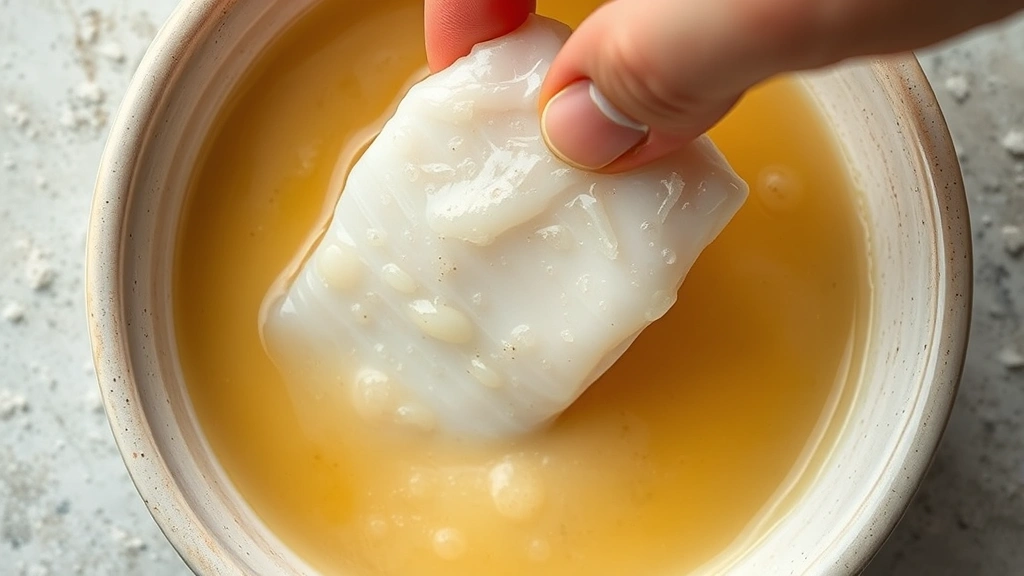
Step 1: Prepare Your Ingredients Gather all ingredients and ensure they’re at proper temperatures. Flour should be room temperature, beer should be cold from the refrigerator, and your protein or vegetables should be patted completely dry. Moisture is the enemy of crispiness—any water on the surface of what you’re battering will create steam during frying, leading to soggy results.
Step 2: Combine Dry Ingredients In a large mixing bowl, whisk together flour, cornstarch, baking powder, salt, white pepper, and paprika. Whisking ensures even distribution of leavening agents and prevents clumping. This step takes just one minute but makes a tremendous difference in final texture.
Step 3: Create the Wet Mixture In a separate bowl, whisk together the cold beer and egg yolk. Whisk vigorously for 20-30 seconds to incorporate air and begin breaking down the egg yolk. The mixture should be slightly foamy—this indicates proper incorporation.
Step 4: Combine Wet and Dry Pour the wet ingredients into the dry ingredients. Using a whisk or fork, gently combine until just barely mixed. This is critical: overmixing develops gluten, which creates a tough, chewy batter instead of a crispy one. Stop mixing as soon as you don’t see dry flour streaks. The batter should have a slightly lumpy appearance—those lumps will break down during frying.
Step 5: Rest the Batter Let the batter rest for 15-20 minutes at room temperature before using. This resting period allows the flour to fully hydrate and helps the baking powder distribute evenly. Don’t refrigerate the batter—cold batter won’t coat as smoothly.
Cooking Technique and Temperature
Temperature control separates good batters from exceptional ones. Most home cooks don’t use a thermometer, which is why their results are inconsistent. Professional kitchens maintain precise oil temperatures because they understand that even a 10-degree difference affects the final product.
Optimal Frying Temperature: 350-365°F This range is ideal for most applications. At 350°F, the batter cooks through without burning before the exterior crisps. At 365°F, you get faster crisping and a thinner crust. Go above 375°F and you risk burning the exterior before the interior cooks. Below 340°F and the batter absorbs excessive oil, becoming greasy.
Invest in a deep-fry thermometer—digital instant-read thermometers are inexpensive and invaluable. Test the oil temperature before you begin battering your protein or vegetables, and check it periodically throughout cooking. Oil temperature drops when you add cold food, so maintain heat between batches.
Battering and Frying Process:
- Heat oil to 350-365°F in a heavy-bottomed pot, Dutch oven, or deep fryer. Use enough oil that your protein will be mostly submerged—at least 2-3 inches of oil.
- Pat your protein or vegetables completely dry with paper towels. Any surface moisture will compromise crispiness.
- Working with one piece at a time, dip your protein into the batter, coating completely. Allow excess batter to drip back into the bowl for 2-3 seconds.
- Carefully place the battered item into the hot oil. Don’t drop it—use tongs or a slotted spoon to gently place it in the oil to prevent splashing.
- Fry without moving the item for the first 2-3 minutes. This initial period is when the crust sets. Moving it prematurely breaks the developing crust.
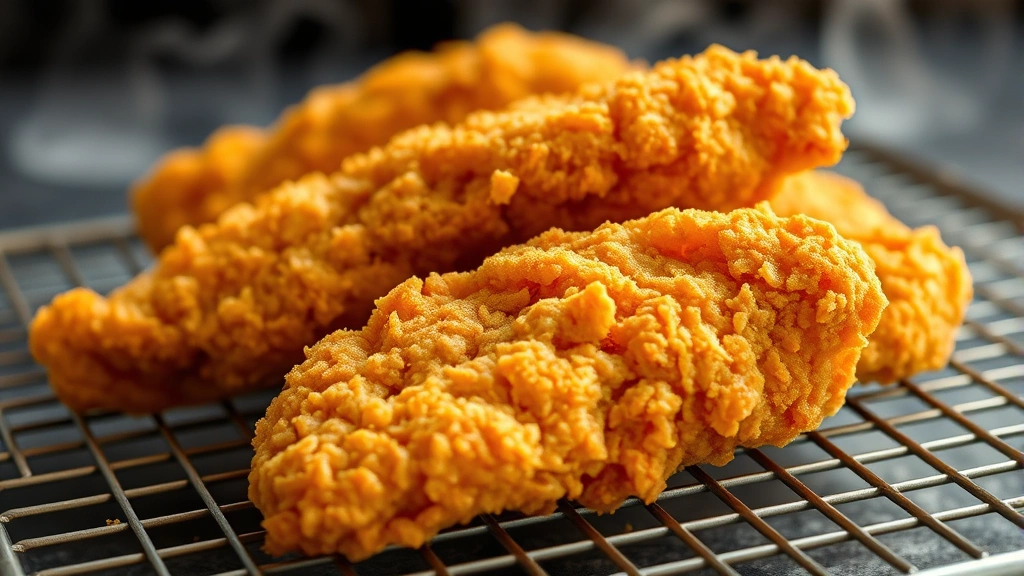
- Once the bottom is golden brown, carefully flip and cook the other side until golden and crispy. Total time is usually 4-6 minutes depending on thickness and oil temperature.
- Remove with a slotted spoon and drain on paper towels or a wire rack. A wire rack is superior to paper towels because it allows air circulation on all sides.
- Season immediately with salt while still hot. The salt adheres better to hot food than cold.
Work in small batches—overcrowding the pot drops oil temperature too much, resulting in greasy batter. Even if it takes longer, batching ensures consistent, crispy results.
Troubleshooting Common Issues
Problem: Soggy, Greasy Batter This indicates oil temperature was too low. The batter spent too long in cool oil, absorbing excess fat instead of crisping. Solution: Always use a thermometer and maintain 350-365°F. If you’re frying multiple batches, let oil temperature recover between batches.
Problem: Batter Falls Off Usually caused by wet protein or vegetables. The batter can’t adhere to a wet surface. Solution: Pat everything completely dry before battering. Also ensure you’re not overmixing the batter—a slightly thicker batter adheres better. Add 1-2 tablespoons more flour if needed.
Problem: Burnt Exterior, Raw Interior This means oil temperature was too high or cooking time was insufficient. Solution: Lower temperature to 350°F. For thicker items, consider a lower temperature and longer cooking time. For fish, 350°F usually produces perfect results. For thicker chicken pieces, 345°F is better.
Problem: Dense, Cake-like Batter Overmixing is the culprit. Excessive mixing develops gluten, creating a tough crumb. Solution: Mix only until dry flour disappears. If you’ve already made the batter, add 2-3 tablespoons more beer to thin it slightly, which can help.
Problem: Batter Doesn’t Crisp Either oil temperature is too low, or your beer was flat. Solution: Check oil temperature with a thermometer. Use fresh beer from a new bottle—opened beer loses carbonation within 24 hours. Also ensure you’re not moving the food around too much while frying.
Applications and Variations
While this beer batter recipe is perfect for fish and chips, its applications extend far beyond. Try it with chicken wings recipe variations for game-day appetizers, or experiment with shredded chicken recipes by battering and frying shredded chicken pieces for sandwiches or salads.
Fish and Seafood: The classic application. Use white fish like cod, haddock, or pollock. The mild beer flavor complements delicate fish perfectly. Try chipotle chicken recipe techniques by adding ½ teaspoon chipotle powder to the batter for a spicy seafood variation.
Chicken: Cut boneless, skinless chicken breasts into strips or nugget-sized pieces. Pound lightly to even thickness so everything cooks at the same rate. Fry at 350°F for 5-6 minutes until golden.
Vegetables: Zucchini, mushrooms, green beans, and cauliflower all benefit from beer batter. Cut into uniform pieces and fry at 350°F. Vegetables cook faster than protein—usually 3-4 minutes.
Shrimp: Pat completely dry and use jumbo or large shrimp. These cook very quickly, usually 2-3 minutes total. Watch carefully to avoid overcooking.
Onion Rings: Slice onions into thick rings, separate the layers, and batter them. Fry at 350°F for 3-4 minutes until golden and crispy.
Beer Batter Variations:
- Spicy Version: Add ½ teaspoon cayenne pepper and ½ teaspoon garlic powder to the dry ingredients.
- Asian-Inspired: Replace ¼ cup flour with rice flour and add 1 teaspoon ginger powder and ½ teaspoon wasabi powder.
- Herb-Forward: Add 1 tablespoon fresh or 1 teaspoon dried herbs like dill, parsley, or thyme.
- Lighter Version: Replace ½ cup flour with cornstarch for an even lighter, crispier batter. This works beautifully for vegetables.
For best healthy food recipes, consider air-frying your battered items at 400°F for 12-15 minutes, though this produces a different texture than traditional frying. For low carb dinner recipes, substitute almond flour for half the all-purpose flour, though texture will be slightly different.
FAQ
Can I make beer batter ahead of time?
It’s not recommended. Beer batter is best used immediately or within 1-2 hours of preparation. The carbonation diminishes over time, and the baking powder’s leavening power decreases. If you must make it ahead, store it in an airtight container in the refrigerator and bring it to room temperature before using, though results won’t be as crispy.
What if I don’t have beer or don’t want to use it?
You can substitute club soda or sparkling water for the beer. You’ll lose the subtle flavor that beer provides, but the carbonation still creates crispiness. Use the same volume of club soda as you would beer. Some cooks use a mixture of sparkling water and chicken or vegetable broth for added flavor.
Why is my batter sticking to the thermometer?
This is actually a sign your thermometer is too cool or you’re inserting it into batter rather than oil. Make sure you’re measuring the oil temperature, not the batter temperature. Keep your thermometer probe in the oil away from the pan bottom, where temperature is different.
How much oil do I need for frying?
You need enough oil so that your food is at least 75% submerged. For a large pot or Dutch oven, 2-3 quarts usually works. For a deep fryer, follow manufacturer recommendations. Never fill the pot more than halfway, as oil expands and can overflow.
Can I reuse frying oil?
Yes, but only once or twice. Strain the oil through cheesecloth or a fine-mesh strainer to remove particles. Store in a cool, dark place. Discard the oil if it smells rancid or has darkened significantly. Oil breaks down with each use and loses its ability to produce crispy results.
Why is my beer batter pale instead of golden?
Either your oil temperature was too low, or your cooking time was insufficient. Golden color indicates proper Maillard reaction, which requires adequate heat. Increase oil temperature slightly and ensure you’re cooking long enough for the exterior to brown properly.
What’s the best dipping sauce for beer-battered foods?
Traditional tartar sauce is classic for fish. For chicken, try ranch dressing, hot sauce, or a sriracha mayo. A simple lemon aioli complements seafood beautifully. Check the Fresh Plated Daily Blog for sauce recipes that pair perfectly with crispy fried foods.
Can I use self-rising flour in beer batter?
Not recommended. Self-rising flour contains salt and leavening agents in fixed ratios that you can’t control. Using all-purpose flour gives you complete control over seasoning and leavening, resulting in more consistent, better-tasting results.
How do I know when the oil is hot enough without a thermometer?
Drop a small piece of bread into the oil. If it browns in about 60 seconds, the oil is approximately 350°F. However, this method is imprecise. A thermometer is inexpensive insurance for consistent results. Digital instant-read thermometers cost under $15 and last for years.


