Hash Brown Casserole: Grandma’s Secret Recipe
There’s something magical about a hash brown casserole that brings families together around the breakfast table. This beloved comfort food has been passed down through generations, and for good reason—it’s creamy, satisfying, and absolutely delicious. My grandmother guarded her recipe like a precious heirloom, and I’m thrilled to finally share the secrets that made her version the star of every holiday gathering and weekend brunch.
Hash brown casserole is more than just breakfast; it’s a tradition. Whether you’re feeding a crowd or preparing a special meal for your loved ones, this dish delivers warmth and nostalgia in every bite. The combination of crispy hash browns, tender potatoes, savory cheese, and a creamy binding sauce creates layers of flavor that keep people coming back for seconds. What makes Grandma’s version special is the careful balance of ingredients and the techniques she used to ensure the casserole stayed moist without becoming soggy.
In this comprehensive guide, I’ll walk you through every step of creating this masterpiece, from ingredient selection to the final golden-brown finish. You’ll discover the tricks that make the difference between a mediocre casserole and one that earns compliments from everyone at your table.
What Makes This Hash Brown Casserole Special
Grandma’s hash brown casserole stands apart from typical recipes because it focuses on texture contrast and flavor depth. The secret lies in using frozen shredded hash browns rather than fresh potatoes—a surprising choice that actually delivers superior results. Frozen hash browns are already partially cooked and have the perfect moisture content to absorb the creamy sauce without turning to mush.
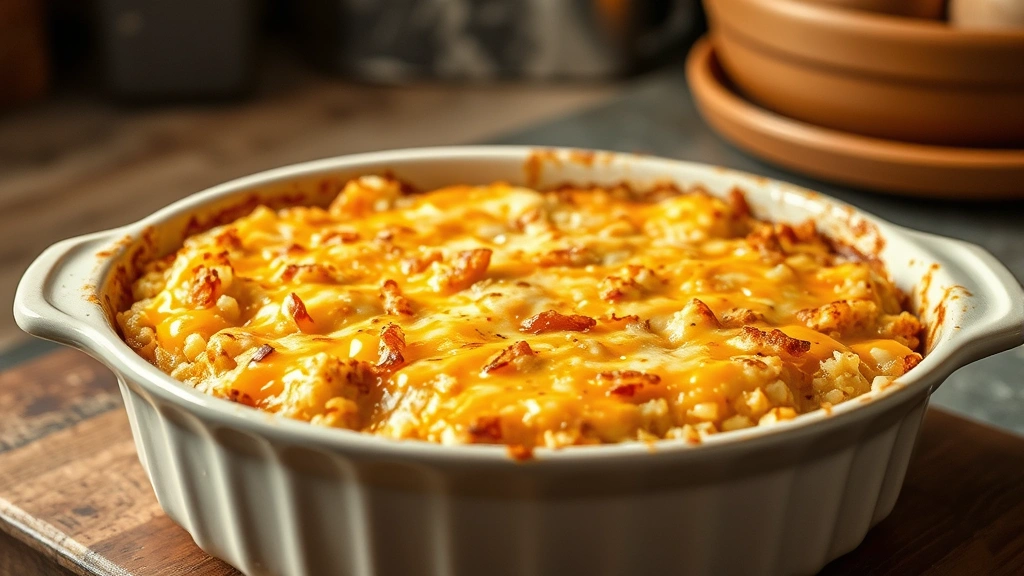
The casserole achieves its signature texture through a combination of techniques. The bottom layer of hash browns becomes slightly crispy from direct contact with the baking dish, while the middle layers absorb the creamy custard-like sauce, and the top gets a golden, bubbly crust. This three-dimensional approach to texture is what separates mediocre casseroles from exceptional ones.
Another distinguishing factor is the use of both sharp and mild cheeses. Sharp cheddar provides depth and aged complexity, while milder cheeses like Swiss or Gruyère contribute creaminess and subtle sweetness. This combination prevents the casserole from becoming one-dimensional in flavor.
If you’re looking for quick breakfast recipes that can be prepared ahead, this hash brown casserole is perfect because it can be assembled the night before and simply popped in the oven in the morning.
Essential Ingredients Explained
Hash Browns (2 pounds frozen, shredded): Don’t thaw these before using. The frozen state helps them maintain structure during baking. Grandma always bought the simple shredded variety without any added seasonings, allowing her to control the flavor profile completely. The key is ensuring your frozen hash browns don’t contain added oils or fillers.
Butter (6 tablespoons): This creates the base for your cream sauce and adds richness. Grandma insisted on using real butter, never margarine, as it provides superior flavor and browning properties. The butter will also help create the golden crust on top.
Onion (1 medium, finely diced): Yellow onions work best because they caramelize beautifully and add natural sweetness. The onion should be diced small enough to distribute evenly throughout the casserole but large enough to provide texture.
All-Purpose Flour (4 tablespoons): This acts as a thickening agent for your sauce. It’s crucial to cook the flour in butter for about one minute before adding the liquid—this eliminates the raw flour taste and ensures a smooth, lump-free sauce.
Whole Milk (2 cups): Use whole milk rather than skim for richness and better sauce consistency. The fat content helps create a velvety texture that coats the potatoes perfectly.
Heavy Cream (1 cup): This ingredient is what elevates the casserole from good to extraordinary. The cream adds luxurious mouthfeel and helps prevent the sauce from becoming too thick during baking.
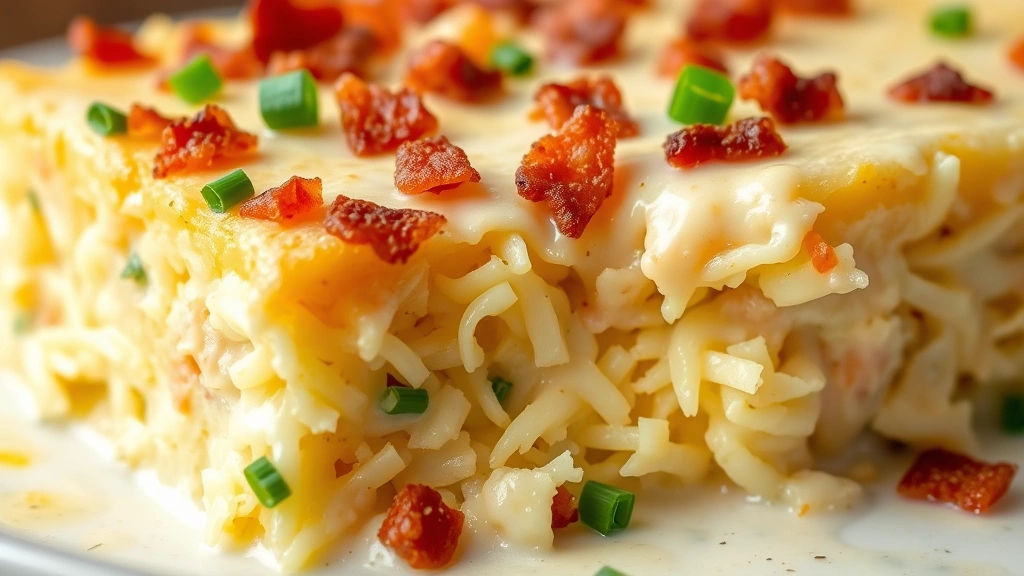
Sharp Cheddar Cheese (2 cups, shredded): Sharp cheddar provides the backbone of flavor. Shredding your own cheese from a block ensures better melting and prevents the casserole from becoming grainy due to anti-caking agents found in pre-shredded varieties.
Swiss or Gruyère Cheese (1 cup, shredded): These cheeses add complexity and creaminess. Swiss cheese has a slightly nutty flavor, while Gruyère offers a more sophisticated, earthy note.
Salt and Black Pepper: Season to taste, but remember that cheese adds saltiness, so start conservatively. Grandma preferred freshly ground black pepper for its superior flavor compared to pre-ground varieties.
Garlic Powder (1 teaspoon): This provides subtle depth without the texture of fresh garlic. Grandma sometimes added a pinch of smoked paprika for additional complexity.
Optional Additions: Crispy bacon bits, diced ham, sautéed mushrooms, or fresh chives can be incorporated based on your preferences and dietary needs.
Step-by-Step Instructions
Step 1: Prepare Your Baking Dish
Preheat your oven to 350°F. Use a 9×13-inch baking dish, which is the standard size for this recipe. Lightly butter the dish to prevent sticking. Grandma’s tip: she always used a piece of butter to coat the dish rather than cooking spray, as it prevents the casserole from browning too quickly on the edges.
Step 2: Sauté the Aromatics
In a large saucepan, melt 6 tablespoons of butter over medium heat. Add your diced onion and cook for about 5-7 minutes, stirring occasionally, until the onion becomes translucent and slightly golden. This process, called caramelization, develops deeper flavors and removes the harsh raw onion bite. The kitchen should smell incredibly aromatic at this point.
Step 3: Create the Roux
Sprinkle the flour over the cooked onions and stir constantly for about one minute. This cooking time is critical—it allows the flour to cook in the fat, which prevents lumps and removes the raw flour taste. You’ll notice the mixture becoming slightly paste-like and fragrant.
Step 4: Build the Cream Sauce
Slowly add the whole milk while whisking constantly. Start with about 1/2 cup, whisking until smooth, then gradually add the remaining milk. This gradual approach prevents lumps from forming. Once all the milk is incorporated, add the heavy cream and continue whisking until the sauce is completely smooth. Cook for another 2-3 minutes, stirring frequently, until the sauce thickens enough to coat the back of a spoon. It should resemble a thin gravy at this point.
Step 5: Incorporate the Cheese
Remove the saucepan from heat and add the shredded sharp cheddar and Swiss cheese. Stir until completely melted and smooth. The residual heat will melt the cheese beautifully without causing it to become grainy. Season with salt, pepper, and garlic powder. Taste and adjust seasonings as needed. Remember that the cheese adds saltiness, so be conservative with added salt.
Step 6: Layer the Casserole
Spread about 1/3 of the frozen hash browns evenly across the bottom of your prepared baking dish. Pour about 1/3 of the cheese sauce over this layer, spreading it evenly with a spatula. Repeat with another layer of hash browns and sauce. Top with the final layer of hash browns and finish with the remaining cheese sauce. Make sure the sauce penetrates to the bottom layers—give the dish a gentle shake and tilt it slightly to help the sauce flow through the potatoes.
Step 7: Prepare for Baking
At this point, you have two options. You can either bake immediately, or cover the casserole with plastic wrap and refrigerate overnight. If baking the next day, remove from the refrigerator 30 minutes before baking to allow it to come closer to room temperature, which ensures more even cooking.
Step 8: Bake to Perfection
Bake uncovered at 350°F for 45-50 minutes, until the top is golden brown and the edges are bubbling. You’ll know it’s done when a knife inserted in the center comes out clean and the casserole holds its shape. If the top is browning too quickly before the center is cooked through, loosely tent with aluminum foil for the final 10-15 minutes.
Step 9: Rest Before Serving
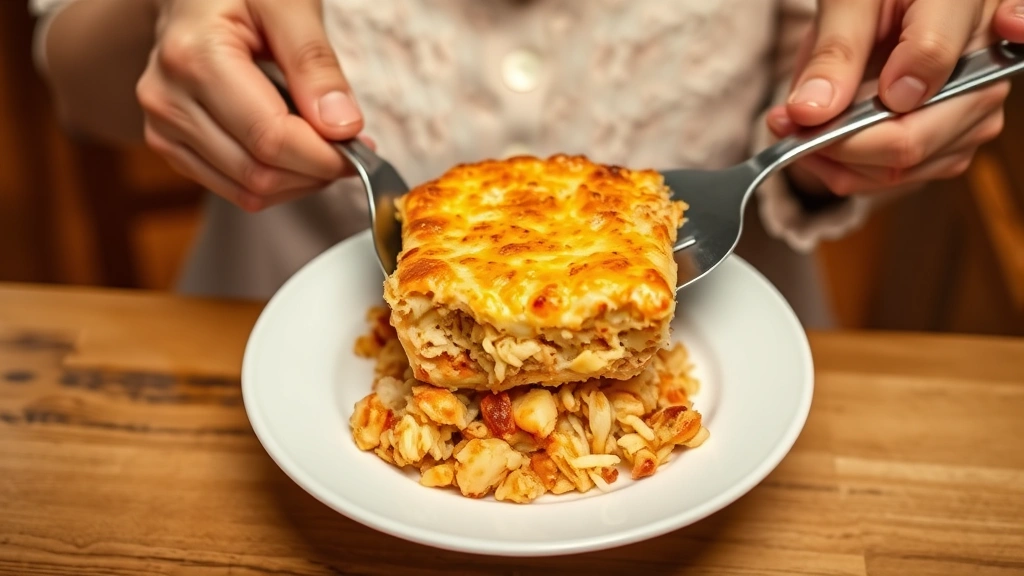
Remove from the oven and let the casserole rest for 5-10 minutes. This crucial step allows the structure to set, making it easier to cut and serve clean portions. Grandma always said that skipping this step results in a slumpy casserole that falls apart on the plate.
Pro Tips from Grandma’s Kitchen
Moisture Control: The most common mistake people make is using thawed hash browns or squeezing out excess moisture, which creates a dry casserole. Frozen hash browns contain just the right amount of water to keep the dish moist. However, if your frozen hash browns seem particularly wet, you can blot them gently with paper towels.
Cheese Selection: Visit a quality cheese counter and ask for recommendations. Pre-shredded cheese often contains anti-caking agents that prevent smooth melting. Shredding your own cheese takes five minutes and makes a significant difference in the final product. As an alternative, if you’re interested in exploring different cooking methods, check out our guide on how to cook with cast iron.
Make-Ahead Magic: This casserole is ideal for entertaining because it can be assembled completely the night before. Cover tightly with plastic wrap and store in the refrigerator. The flavors actually develop and improve overnight as the potatoes absorb the sauce.
Temperature Matters: Use an oven thermometer to ensure your oven is truly at 350°F. Many home ovens run hot or cold, which affects cooking time and browning. Grandma’s secret was investing in an inexpensive oven thermometer that paid for itself in better results.
Sauce Consistency: The sauce should be pourable but not watery when you add it to the casserole. If it’s too thick, whisk in a tablespoon or two of milk. If it’s too thin, cook it a bit longer over medium heat, stirring constantly.
Seasoning Layers: Don’t just season the sauce—Grandma also sprinkled a tiny pinch of salt and pepper between the hash brown layers. This ensures every bite is seasoned perfectly, not just the sauce portions.
Variations and Substitutions
Protein Additions: Crispy bacon is the classic addition—cook 8-10 slices until crispy, crumble, and add to the cheese sauce. Diced ham works beautifully too, adding saltiness and texture. For a vegetarian version, sautéed mushrooms provide an umami-rich depth that mimics the savory quality of meat.
Vegetable Mix-Ins: Sautéed bell peppers, caramelized onions beyond what the recipe calls for, or diced tomatoes can be incorporated. Fresh chives sprinkled on top just before serving add a bright, fresh note. Grandma sometimes added a handful of steamed broccoli florets for color and nutrition.
Cheese Variations: If you can’t find Swiss cheese, Gruyère alone works wonderfully. Smoked cheddar creates a different flavor profile. Some people love adding a small amount of blue cheese or feta for tanginess, though this significantly changes the flavor.
Dairy Substitutions: For a lighter version, you can replace the heavy cream with half-and-half, though the sauce will be slightly less rich. Sour cream can replace about 1/4 cup of the heavy cream for added tanginess. For lactose-free versions, use lactose-free milk and cream with lactose-free cheddar cheese.
Seasoning Variations: Add 1/2 teaspoon of smoked paprika for depth, a pinch of cayenne for heat, or 1/2 teaspoon of Dijon mustard for sophistication. Grandma sometimes added a tablespoon of fresh thyme when she was feeling fancy.
If you’re interested in exploring more low carb dinner recipes, you could modify this casserole by using cauliflower rice instead of hash browns for a lighter version.
Baking and Serving Guide
Fresh from the Oven: Serve immediately after resting for 5-10 minutes. The casserole will be at its creamiest and the top most crispy at this point. A crispy green salad makes an excellent accompaniment, as does fresh fruit.
Reheating Leftovers: Store in an airtight container in the refrigerator for up to three days. Reheat covered in a 325°F oven for about 20 minutes, or until warmed through. You can also reheat individual portions in the microwave, though the oven method preserves the texture better.
Freezing Instructions: This casserole freezes beautifully for up to three months. Assemble completely, cover tightly with plastic wrap and aluminum foil, and freeze. To bake from frozen, add 20-30 minutes to the baking time and cover loosely with foil to prevent over-browning.
Serving Size: This recipe serves 8-10 people as a side dish or 6-8 as a main course. It’s perfect for holiday brunches, potlucks, and family gatherings. The rich, satisfying nature of the dish means smaller portions are quite filling.
Complementary Dishes: Serve alongside scrambled eggs, turkey sausage, or ham. Fresh-baked biscuits, fruit salad, or roasted vegetables round out the meal beautifully. The casserole’s richness pairs well with lighter sides.
Presentation Tips: Use a sharp knife dipped in hot water to cut clean portions. A spatula gently slides under each piece for elegant plating. Garnish with fresh chives or crumbled bacon just before serving for visual appeal and extra flavor.
For complete meal planning inspiration, explore Fresh Plated Daily Blog for additional side dish and main course ideas.
FAQ
Can I make this casserole without thawing the frozen hash browns?
Yes, absolutely! In fact, you should not thaw them. The frozen hash browns maintain their structure better during baking and absorb the sauce more evenly. Simply spread them directly from the freezer into your baking dish.
Why is my casserole coming out dry?
The most common cause is using too little sauce or using thawed hash browns that have been squeezed dry. Ensure you’re using the full amounts of milk and cream specified, and always use frozen hash browns straight from the package.
Can I prepare this the night before?
Yes, this is one of the best features of this recipe. Assemble completely, cover with plastic wrap, and refrigerate overnight. Bake the next morning, adding about 10 minutes to the baking time if baking directly from the refrigerator.
What’s the difference between using shredded cheese versus cheese slices?
Shredded cheese melts more smoothly and evenly throughout the sauce. Cheese slices contain additives that prevent smooth melting and can create a grainy texture. Shredding your own cheese from a block is always superior.
Can I use a different size baking dish?
Yes, but it affects baking time. A 9×13-inch dish is standard. If using a larger, shallower dish, reduce baking time by 5-10 minutes. If using a deeper dish, increase by 10-15 minutes. The casserole should be about 2-2.5 inches deep for optimal texture.
Is this recipe suitable for vegetarians?
Yes, as written it’s vegetarian. Simply omit any meat additions like bacon or ham. You can enhance the umami flavor by adding sautéed mushrooms or a small amount of smoked paprika.
How do I prevent the casserole from browning too quickly on top?
If the top is browning too quickly before the center is cooked through, loosely tent with aluminum foil for the final 10-15 minutes of baking. This is normal and helps ensure even cooking throughout.
Can I double this recipe?
Absolutely. Simply double all ingredients and use two 9×13-inch baking dishes, or one 9×13-inch and one 8×8-inch. Baking time remains the same. This is perfect for feeding a larger crowd.
What external resources can help me master casserole cooking?
The Culinary Institute of America offers excellent resources on sauce-making and cooking techniques. For food science insights into how ingredients interact, check out Serious Eats, which breaks down the chemistry behind recipes. MasterClass cooking courses provide professional guidance on achieving restaurant-quality results at home. Finally, Food52 offers community-tested recipes and cooking wisdom from experienced home cooks.
How does this compare to other breakfast casseroles?
This hash brown casserole differs from egg-based breakfast casseroles by being entirely potato-focused with a creamy sauce rather than a custard base. This creates a different texture—more like a gratinée than a savory cake. It’s also more stable for make-ahead preparation and reheats beautifully.


