
How to Craft Lectern: Expert DIY Guide for Home Cooks
A lectern might seem like an unusual kitchen tool, but this elegant reading stand has become increasingly popular among home cooks who want to display recipes, cookbooks, and nutritional information while preparing meals. Whether you’re following a complex homemade pasta sauce recipe or referencing easy dinner recipes for beginners, having a dedicated stand keeps your hands free and your workspace organized. This comprehensive guide walks you through crafting your own lectern from scratch, transforming your kitchen into a more functional and professional cooking space.
Building a DIY lectern requires basic woodworking skills, affordable materials, and a few hours of dedicated work. The beauty of creating your own lectern is the ability to customize dimensions, finishes, and design elements to match your kitchen aesthetic. From selecting the right wood to applying protective finishes, this guide covers every step of the process, ensuring you end up with a sturdy, beautiful piece that enhances both your cooking experience and kitchen décor.
Essential Materials and Tools You’ll Need
Before beginning your lectern project, gather all necessary materials and tools to ensure a smooth building process. Having everything on hand prevents interruptions and allows you to maintain momentum throughout the construction. The right tools make the difference between a amateur-looking project and a professional-quality piece that looks store-bought.
Materials required:
- One 1×10 pine board (8 feet long) for the base and main structure
- One 1×8 pine board (6 feet long) for the reading surface
- One 1×4 pine board (4 feet long) for support pieces
- Wood glue rated for kitchen use
- 2-inch wood screws (box of 25)
- 1.5-inch wood screws (box of 25)
- 1-inch wood screws (box of 20)
- Polyurethane wood finish (water-based or oil-based)
- Sandpaper (80-grit, 120-grit, and 220-grit)
- Wood stain (optional, for aesthetic preference)
- Felt pads or rubber feet (4 pieces)
- Hinges for the adjustable reading surface (2 brass hinges)
Tools you’ll need:
- Power drill with bits
- Circular saw or miter saw
- Measuring tape (25-foot minimum)
- Carpenter’s square
- Clamps (at least 4)
- Orbital sander or sanding block
- Paintbrush or foam applicator
- Safety goggles and dust mask
- Work gloves
- Level tool
- Pencil for marking
Many of these tools can be rented from hardware stores if you don’t own them, making this project more affordable for beginners. Consider Wood Magazine’s woodworking tips for detailed explanations of tool usage and safety protocols.
Choosing the Right Wood for Your Lectern
Wood selection significantly impacts your lectern’s durability, appearance, and performance in a kitchen environment. Kitchens present unique challenges with humidity, temperature fluctuations, and occasional splashes, so choosing appropriate wood is crucial for longevity. Pine remains an excellent choice for beginners due to its affordability, workability, and attractive grain patterns.
Pine boards are readily available at any home improvement store and machine-cut to consistent dimensions, making them ideal for DIY projects. The wood is soft enough to cut with basic tools yet strong enough to support recipe books and tablets when properly assembled. Other suitable options include poplar, which is even softer and more budget-friendly, or oak, which offers superior durability and a more upscale appearance.
When selecting your boards, inspect them carefully for defects. Look for warping by sighting down the length of each board, checking for twists or bows. Avoid boards with large knots, splits, or deep gouges that could compromise structural integrity. Select boards with consistent grain and color if you plan to apply a natural stain. Purchase boards that are slightly longer than needed, allowing you to trim off any damaged ends.
Consider moisture content when purchasing wood. If possible, buy wood from stores with climate-controlled environments, as this ensures the wood has acclimated to indoor humidity levels. Wood that’s too dry or too wet may warp or shrink after construction, affecting your lectern’s stability. Allow purchased boards to sit in your home for 24 hours before cutting, helping them adjust to your kitchen’s humidity levels.
Cutting and Preparing Your Pieces
Accurate cutting forms the foundation of a well-constructed lectern. Measure twice and cut once—this adage exists for good reason. Imprecise cuts compound through the assembly process, resulting in misaligned pieces and structural weaknesses. Take your time during this phase, using proper measuring techniques and sharp tools.
Base and support structure cuts:
- Cut two pieces from the 1×10 board measuring 24 inches each (these form the vertical supports)
- Cut two pieces from the 1×10 board measuring 18 inches each (these form the horizontal base supports)
- Cut four pieces from the 1×4 board measuring 12 inches each (these provide additional bracing)
- Cut one piece from the 1×8 board measuring 20 inches (this becomes your reading surface)
Before making cuts, mark all measurements clearly with a pencil, double-checking each mark against your measuring tape. Use a carpenter’s square to ensure your lines are perpendicular to the board edges. When cutting, wear safety goggles and ensure your work surface is stable and secure. Keep your hands clear of the blade path, and never reach under a running blade.
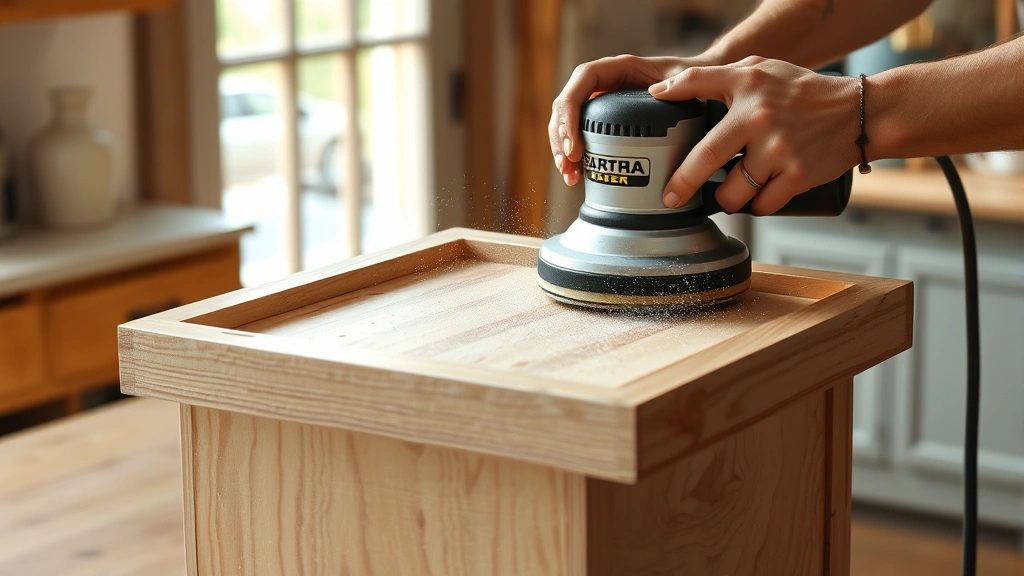
After cutting, sand all edges and surfaces with 80-grit sandpaper to remove splinters and rough spots. This initial sanding prevents injuries during assembly and preparation. Sand with the grain whenever possible to achieve a smoother finish. Pay special attention to edges that will be visible in the final product, as these require more thorough sanding.
Assembly and Structural Integrity
Assembling your lectern requires careful attention to alignment and stability. A wobbly lectern defeats its purpose and poses safety risks, especially when supporting heavy cookbooks or tablets. This section details the assembly process, ensuring your finished lectern remains stable and functional for years.
Building the base frame:
- Lay the two 24-inch vertical pieces on a flat surface, parallel to each other, spaced 16 inches apart
- Apply wood glue to the ends of the 18-inch horizontal pieces
- Position the horizontal pieces perpendicular to the vertical pieces, forming a rectangular frame
- Drill pilot holes at each corner to prevent wood splitting
- Secure with 2-inch screws, driving two screws at each corner for maximum strength
- Check for squareness using a carpenter’s square before the glue dries
Once the main frame is assembled and the glue has cured (typically 24 hours), add the bracing pieces. These diagonal supports prevent racking (the frame tilting under stress) and significantly enhance structural rigidity. Position the 12-inch bracing pieces diagonally across the frame’s interior, creating an X-pattern. Attach these with 1.5-inch screws, ensuring they’re tight and secure.
Before proceeding to the next phase, test your base assembly for stability. Place it on a flat surface and apply downward pressure at various points. The frame should not flex, wobble, or shift. If you detect any movement, reinforce the weak area with additional bracing or check that all screws are fully tightened.
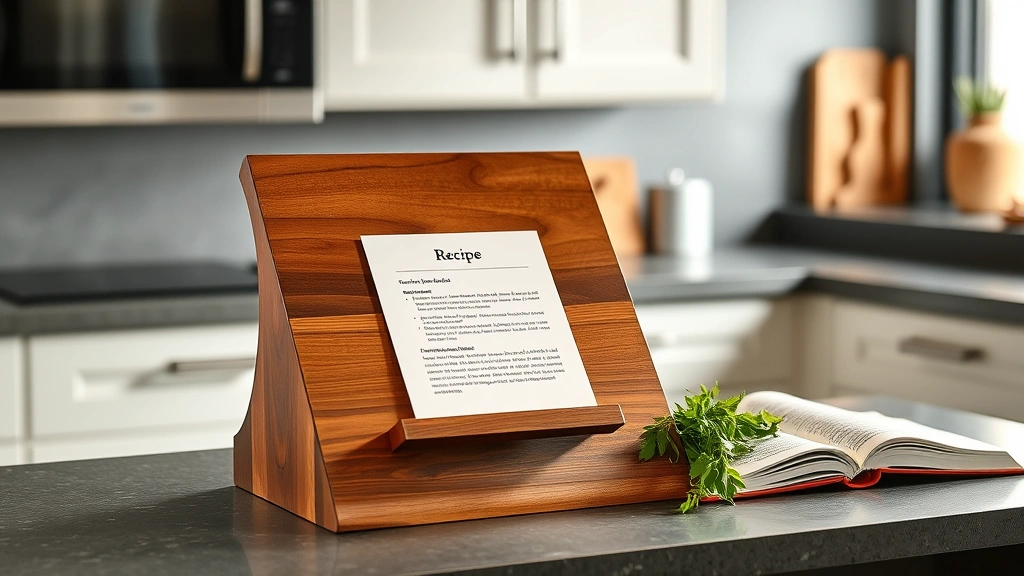
Creating the Reading Surface
The reading surface is your lectern’s most important functional component. This is where recipes, cookbooks, and tablets rest during meal preparation. The surface must be smooth, durable, and positioned at an angle that minimizes neck strain while cooking. Creating an adjustable reading surface adds versatility, allowing you to accommodate different materials and viewing preferences.
Start with your 20-inch piece of 1×8 board. Sand this piece thoroughly with 120-grit sandpaper, followed by 220-grit sandpaper, creating a smooth, splinter-free surface. This surface will directly contact your recipes and books, so smoothness is essential. Wipe away all dust with a tack cloth before finishing.
To create an adjustable surface, attach the reading board to the top of your base frame using two brass hinges. Position the hinges approximately 3 inches from each end of the reading surface. This allows the board to tilt backward, creating an optimal viewing angle for reading recipes without bending excessively. Install a support chain or prop stick to hold the reading surface at your desired angle, typically between 30 and 45 degrees.
If you prefer a fixed reading surface, attach the board permanently using pocket hole joinery or by securing it directly with screws driven through the base frame into the reading surface. A fixed surface is simpler to construct but less versatile than an adjustable design. Many home cooks prefer the flexibility of an adjustable surface, as it accommodates everything from thin recipe cards to thick cookbooks.
Finishing Touches and Protective Coatings
Finishing transforms your raw wood lectern into a polished, kitchen-ready piece. The finish protects wood from moisture, stains, and damage while enhancing its natural beauty. Kitchen environments demand durable finishes that resist water, heat, and food stains better than basic wood sealers. This section covers finishing techniques that ensure your lectern remains beautiful and functional for years.
Begin by sanding the entire lectern with 220-grit sandpaper, creating a smooth surface that accepts finish evenly. Sand with the grain, using light pressure to avoid creating scratches. After sanding, wipe the entire piece with a tack cloth to remove all dust particles. Even small dust particles create bumps in the finish, so this step is critical for a professional appearance.
Consider applying a wood stain before sealing if you desire color enhancement. Water-based stains dry quickly and have minimal odor, making them ideal for kitchen projects. Apply stain with a brush or cloth, following the wood grain, and allow it to dry completely before applying your protective finish. Test the stain on a hidden area first to ensure the color matches your expectations.
For the protective finish, polyurethane provides excellent kitchen durability. Water-based polyurethane dries quickly, has minimal odor, and resists yellowing. Oil-based polyurethane offers superior durability but requires longer drying times and adequate ventilation. Apply polyurethane with a foam brush, working in the direction of the grain. Apply at least two coats, sanding lightly between coats with 220-grit sandpaper.
After the final coat cures completely (typically 48-72 hours depending on the product), attach felt pads or rubber feet to the bottom of your lectern. These protect your kitchen floor from scratches and allow the lectern to glide smoothly when repositioning. The feet also help with leveling on uneven kitchen floors.
Customization Ideas for Your Kitchen
Your DIY lectern offers endless customization possibilities, allowing you to create a piece that perfectly matches your kitchen style and cooking needs. Consider these ideas to personalize your lectern and enhance its functionality while cooking.
Storage and organizational features:
- Add a small shelf underneath the reading surface to store frequently used recipes or kitchen timers
- Install a narrow drawer in the base for storing recipe cards, pens, and cooking notes
- Attach a small cup holder to the side for water, wine, or other beverages while cooking
- Create a magnetic strip along the side to hold metal measuring spoons or kitchen shears
When implementing storage solutions, ensure they don’t compromise your lectern’s stability or create safety hazards. Heavy drawers or shelves should be balanced and securely fastened. Keep in mind that adding too many features can make your lectern unwieldy and difficult to move or clean.
Aesthetic enhancements:
- Paint the lectern a complementary kitchen color instead of natural wood finish
- Add decorative trim or molding to the edges for a more sophisticated appearance
- Install accent lighting underneath the reading surface for evening cooking
- Create a custom-shaped reading surface that matches your kitchen’s design theme
- Apply a chalkboard finish to a side panel for writing shopping lists or meal plans
These customizations transform your functional lectern into a statement piece that enhances your kitchen’s overall design. Consider your kitchen’s existing style—modern, rustic, traditional, or eclectic—and choose customizations that complement rather than clash with your décor.
Your lectern becomes even more valuable when paired with organizational strategies. Store your preserved herbs and ingredients nearby, keeping frequently used items within arm’s reach. This reduces cooking time and prevents you from leaving your lectern unattended while searching for ingredients. For meal planning, consult easy dinner recipes for beginners or quick breakfast recipes from Fresh Plate Daily, displaying them on your custom lectern for convenient reference.
Implementing food waste reduction tips becomes easier when you have a dedicated space to reference ingredient lists and cooking instructions. Your lectern becomes a hub for efficient, organized cooking that minimizes waste and maximizes enjoyment.
FAQ
What type of wood is best for a kitchen lectern?
Pine offers an excellent balance of affordability, workability, and durability for kitchen lecterns. Oak provides superior durability if budget allows, while poplar works well for budget-conscious builders. All three woods respond well to protective finishes that resist moisture and staining.
How long does a DIY lectern project typically take?
A basic lectern can be completed in 8-12 hours of work spread over several days, accounting for drying times. More complex designs with storage features may require 15-20 hours. Most of the time involves allowing finishes and adhesives to cure properly.
Can I make a lectern without power tools?
Yes, though power tools significantly speed the process. Hand saws, hand drills, and manual sanders require more physical effort but produce equally functional lecterns. Many community maker spaces and tool libraries offer access to power tools if you don’t own them.
What’s the ideal angle for a reading surface?
Most home cooks prefer reading surfaces tilted between 30-45 degrees from horizontal. This angle minimizes neck strain while allowing clear visibility of recipes and cooking instructions. Adjustable surfaces allow you to find your personal preference.
How do I prevent my lectern from warping in a humid kitchen?
Proper finishing with polyurethane or other sealers protects wood from moisture absorption. Maintaining consistent kitchen humidity levels (ideally 30-50%) also prevents warping. Avoid placing your lectern directly against exterior walls or near windows where temperature fluctuations occur.
Can I use reclaimed wood for my lectern?
Absolutely! Reclaimed wood adds character and sustainability to your project. Ensure reclaimed wood is thoroughly inspected for nails, hardware, and structural damage before using it. Be prepared to invest extra time in sanding and finishing reclaimed materials.
What finish works best for a kitchen lectern?
Water-based polyurethane provides excellent kitchen durability with minimal odor and quick drying times. It resists moisture and staining while maintaining natural wood appearance. Apply at least two coats for maximum protection, sanding lightly between coats.
How can I make my lectern mobile?
Install heavy-duty casters (wheels) on the bottom instead of static feet. Use locking casters to prevent unwanted movement during use. Ensure your lectern’s weight is distributed evenly so it rolls smoothly and doesn’t tip when moving.


