
Perfect Almond Paste? Pastry Chef Approved
Creating homemade almond paste is one of those culinary skills that separates casual bakers from serious pastry enthusiasts. Unlike store-bought versions that often contain fillers, stabilizers, and preservatives, homemade almond paste delivers pure, unadulterated almond flavor with a texture you can control precisely. Professional pastry chefs have long known that the quality of your base ingredients directly impacts the final product, and almond paste is no exception.
Whether you’re crafting delicate French macarons, filling traditional Italian amaretti cookies, or creating the foundation for marzipan sculptures, understanding how to make almond paste from scratch transforms your baking repertoire. This guide walks you through every step, from selecting the right almonds to troubleshooting common texture issues. You’ll learn why pastry chefs insist on this homemade approach and how to achieve that signature smooth, creamy consistency every single time.
Why Homemade Almond Paste Matters
Professional pastry chefs understand that homemade almond paste offers superior flavor intensity and texture control compared to commercial alternatives. When you grind almonds yourself, you capture the natural oils that would otherwise oxidize during extended storage. These oils are essential for achieving that signature creamy mouthfeel and rich almond flavor that elevates your desserts from ordinary to extraordinary.
Commercial almond paste often contains added sugars, gums, and stabilizers that compromise the pure almond experience. By making your own, you control every element—the ratio of almonds to sweetener, the fineness of the grind, and the overall moisture content. This precision matters tremendously when you’re working on delicate pastries where texture consistency determines success.
The cost advantage is significant too. Homemade almond paste typically costs one-third the price of quality store-bought versions, making it economical even if you use it frequently. If you’re exploring other vintage grandma recipes that incorporate nuts, mastering almond paste production opens doors to traditional European pastry techniques that have been perfected over generations.
Essential Ingredients and Equipment
Ingredients You’ll Need:
- 2 cups raw, blanched almonds (skin removed)
- 1 cup granulated sugar or superfine sugar
- 1 tablespoon honey or light corn syrup
- ¼ teaspoon salt
- ½ teaspoon almond extract (optional but recommended)
- 1-2 tablespoons neutral oil if needed for consistency
The choice between raw and roasted almonds depends on your desired flavor profile. Raw almonds provide a delicate, slightly sweet taste, while roasted almonds deliver deeper, more pronounced almond flavor. Blanched almonds—those with skins removed—are essential because the skins can create a grainy texture and darker color that interferes with the paste’s smooth consistency.
Equipment Essentials:
- Food processor with S-blade attachment (not a blender)
- High-powered blender as alternative (Vitamix or similar)
- Measuring cups and spoons
- Rubber spatula for scraping
- Airtight glass containers for storage
- Parchment paper for work surface
A quality food processor is non-negotiable for almond paste production. The S-blade’s design allows for continuous circulation, ensuring even grinding and oil distribution. Some bakers successfully use high-powered blenders, though they require more patience and frequent stopping to scrape down sides. A standard blender won’t work—it will create juice rather than paste.
Step-by-Step Recipe
Step 1: Prepare Your Almonds
Begin with 2 cups of blanched, raw almonds measured by weight (approximately 200 grams) rather than volume for consistency. Spread almonds on a baking sheet and inspect carefully for any debris or discolored nuts. Some bakers prefer a light toast at 325°F for 8-10 minutes to enhance flavor, though this is optional. If you choose to toast, allow almonds to cool completely before processing—warm almonds release oils too quickly and can clump unpredictably.
Step 2: Combine Dry Ingredients
Add blanched almonds to your food processor bowl along with 1 cup granulated sugar and ¼ teaspoon salt. For the finest texture, use superfine sugar if available, as it dissolves more readily into the almond oils. The sugar serves dual purposes: it extracts moisture from the almonds through osmosis, and it provides sweetness and structure to your final paste.
Step 3: Begin Processing
Pulse the mixture 10-15 times to break down the almonds into smaller pieces. You’ll notice the mixture becoming coarser and slightly clumpy. This initial phase is crucial—you’re creating surface area for the almond oils to distribute evenly. Pulse rather than running continuously, as this gives you better control and prevents overheating.
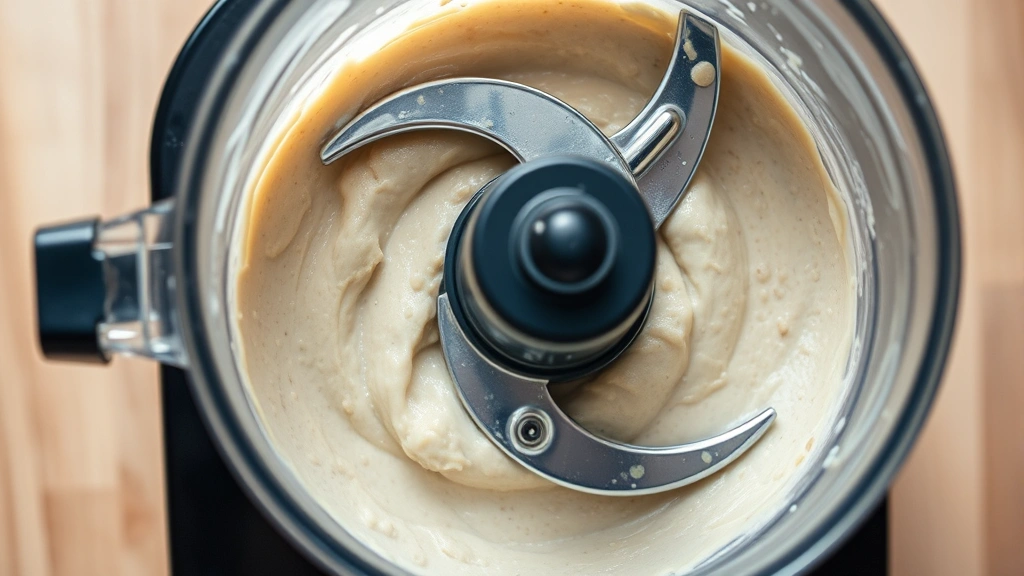
Step 4: Extended Processing (The Critical Phase)
Now run the food processor continuously for 10-15 minutes. This is where patience becomes essential. The mixture will progress through distinct stages: coarse powder → fine powder → slightly clumpy texture → creamy paste. During the first 5 minutes, you’ll see what appears to be fine flour. Around minute 6-8, the paste will look crumbly and slightly dry. This is normal—the almond oils are beginning to release.
Continue processing without stopping. Around minute 10-12, the mixture suddenly transforms as released oils bind the particles together. The paste becomes noticeably smoother and creamier. If your food processor overheats (you’ll notice the motor straining or smelling warm), stop and let it cool for 5 minutes before resuming.
Step 5: Add Flavor and Sweetener
Once your paste reaches a smooth, creamy consistency, add 1 tablespoon honey or light corn syrup and ½ teaspoon almond extract if desired. Process for an additional 2 minutes to fully incorporate these ingredients. The honey adds subtle depth and helps preserve the paste’s moisture content. Almond extract intensifies the almond flavor—use sparingly as it’s potent.
Step 6: Texture Adjustment
If your paste seems too thick or grainy, add 1 tablespoon of neutral oil (almond oil, vegetable oil, or coconut oil) and process for another minute. If it’s too oily or loose, add 2-3 tablespoons powdered sugar and process briefly. The ideal consistency resembles natural peanut butter—spreadable but not runny, with no visible graininess.
Step 7: Final Refinement
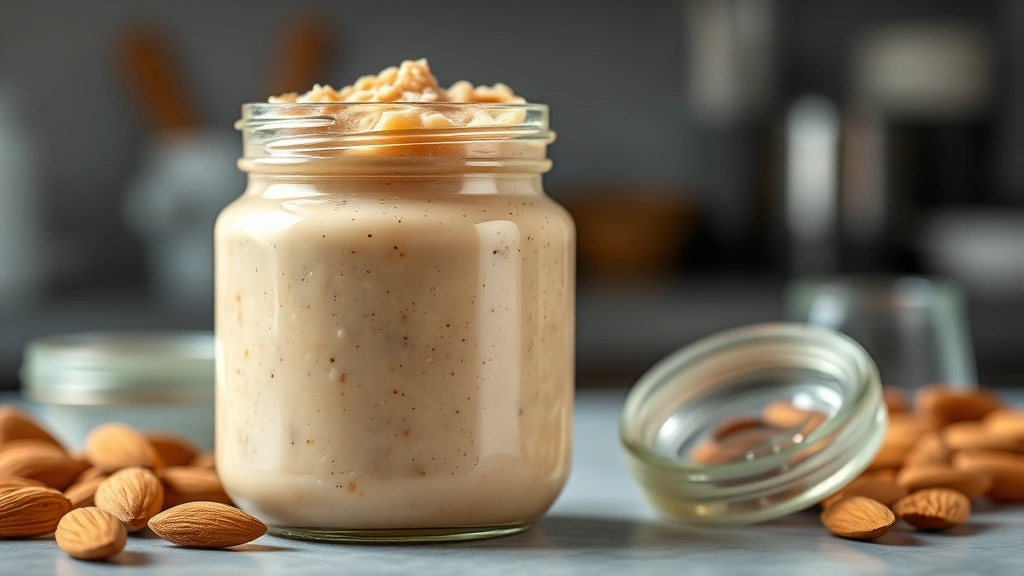
Transfer your almond paste to a clean bowl using a rubber spatula. Stir vigorously by hand for 1-2 minutes to ensure any oil separation is evenly distributed. If oil has pooled on top (completely normal), stir it back in rather than discarding it—that’s where concentrated flavor lives.
Troubleshooting Common Issues
Problem: Grainy, Gritty Texture
Graininess indicates incomplete processing or inadequate oil distribution. Return the paste to your food processor and process for an additional 5-10 minutes. If you used roasted almonds with skins intact, this could also cause graininess—blanched almonds are essential for smoothness.
Problem: Paste Remains Dry and Clumpy
This typically means you’ve stopped processing too early. The transformation from dry powder to creamy paste requires sustained processing time. Return to the food processor and continue for another 10 minutes. Some almond varieties release oils more slowly than others, so patience is critical. If processing for 20+ minutes doesn’t help, add 1 tablespoon of oil and process again.
Problem: Paste Is Too Oily or Separating
Over-processing or processing warm almonds can cause excessive oil release. While this is reversible, prevention is easier. Always use room-temperature almonds and avoid processing for more than 15-20 minutes total. To fix separated paste, add 2-3 tablespoons powdered sugar and process for 1 minute. Alternatively, refrigerate for several hours—the fat will firm up and reintegrate.
Problem: Bitter or Off Taste
This usually indicates rancid almonds or overheating during processing. Always purchase fresh almonds from reputable sources and store them in cool conditions. If your food processor overheats noticeably, let it cool between processing intervals. Never use almonds that smell musty or have visible mold.
Problem: Paste Won’t Reach Creamy Stage
Humidity and almond variety affect processing time significantly. Some batches naturally require 20-25 minutes of processing. Ensure your food processor has adequate power (at least 600 watts). If using a lower-wattage processor, you may need to add 1-2 tablespoons of oil to help the paste come together.
Storage and Shelf Life
Proper storage ensures your homemade almond paste maintains peak quality and flavor. Transfer cooled paste to airtight glass containers—glass is superior to plastic because it doesn’t absorb oils or odors. Fill containers completely, leaving minimal headspace, as this reduces oxidation.
Room Temperature Storage: Almond paste keeps for up to 2 weeks in a cool, dark pantry (below 70°F). The natural oils can become rancid if exposed to heat or light, so avoid storing near appliances or windows.
Refrigerator Storage: This is the recommended option for extended shelf life. Your almond paste will keep for 4-6 weeks when refrigerated in airtight containers. The cold slows oil oxidation significantly. Allow refrigerated paste to come to room temperature before using, as cold paste is harder to work with.
Freezer Storage: For long-term preservation, freeze almond paste for up to 6 months. Portion into ice cube trays or small containers for convenient thawing. Frozen paste thaws to perfect consistency at room temperature within 1-2 hours.
Interestingly, proper storage techniques apply across many baking projects. If you’re also preparing keto crockpot recipes or other make-ahead dishes, understanding temperature control and container selection benefits your entire cooking operation.
Creative Applications
Homemade almond paste opens countless culinary possibilities beyond basic pastry fillings. Professional pastry chefs utilize almond paste in ways that showcase its versatility and rich flavor profile.
Marzipan Creation: Combine equal parts almond paste and powdered sugar with a touch of egg white to create marzipan. This mixture can be rolled, sculpted, and painted to create decorative cake toppers and petit fours. The homemade almond paste base ensures superior flavor compared to marzipan made with commercial pastes.
Frangipane Tart Filling: Mix your almond paste with softened butter, eggs, and a splash of brandy to create classic frangipane. This luxurious filling elevates fruit tarts and puff pastry applications. The homemade paste’s superior texture creates a silkier filling than store-bought alternatives.
Macarons and Almond Flour: Process your almond paste with additional almonds to create ultra-fine almond flour for French macarons. This hybrid approach gives you precise control over particle size, crucial for achieving the characteristic macarons’ domed feet and smooth tops.
Pastry Cream Enhancement: Whisk 2-3 tablespoons of almond paste into warm pastry cream to create almond-flavored cream for eclairs, cream puffs, and layered pastries. The paste dissolves seamlessly, creating uniform flavor throughout.
Cookie Fillings: Spread almond paste between cookie layers or use it as a filling for sandwich cookies. Its natural sweetness and rich texture make it ideal for traditional Italian cookies, French macarons, and modern creative applications.
Cake Layers and Moistening: Thin almond paste with water or simple syrup to create a flavored cake soak. Brush between cake layers for added moisture and subtle almond flavor that doesn’t overpower other components.
Nut Brittle and Confections: Incorporate small amounts of almond paste into brittle, nougat, and other confections. It adds richness and complexity without requiring additional equipment.
For those exploring diverse cooking techniques, understanding how to work with specialty ingredients like almond paste complements learning about how to use a pressure cooker and other cooking methods. Different cooking approaches require different ingredient preparations, and mastering almond paste is one component of comprehensive culinary skill development.
If you’re interested in exploring international dessert traditions, almond paste appears across Mediterranean and European cuisines. Spanish turrón, French pralines, Italian biscotti, and Middle Eastern baklava all feature almond paste as a key ingredient. Making your own connects you to these rich culinary traditions.
FAQ
Can I use roasted almonds instead of raw blanched almonds?
Yes, roasted almonds work well and produce deeper, more pronounced almond flavor. However, roasted almonds with skins intact may create a slightly grainier texture. For smoothest results, use roasted blanched almonds (skins removed). Roasting time and temperature affect the final flavor profile, so experiment to find your preference.
How much processing time is actually necessary?
Processing time typically ranges from 12-20 minutes depending on your food processor’s power and the almonds’ oil content. The transformation from powder to paste isn’t linear—it happens gradually, then suddenly. Don’t judge by time alone; watch for the creamy consistency and smooth texture. If unsure, continue processing in 2-minute intervals.
What’s the difference between almond paste and almond butter?
Almond paste contains ground almonds with added sugar, creating a thicker consistency suitable for pastry work. Almond butter is typically made from roasted almonds with minimal added ingredients, creating a spreadable consistency. They’re not interchangeable in pastry applications because their sugar content and texture differ significantly.
Can I make almond paste in a blender?
High-powered blenders like Vitamix can process almond paste, though it requires more patience and frequent scraping. Standard blenders won’t work—they lack the processing capability. If using a high-powered blender, process in 30-second intervals with frequent scraping, as blender design promotes uneven processing.
Is homemade almond paste safe to eat raw?
Yes, homemade almond paste made with blanched, unblanched, or roasted almonds is safe to eat raw. Since no cooking occurs, ensure you use fresh, high-quality almonds from reputable sources. Store properly to prevent rancidity, which would make the paste unpleasant but not necessarily dangerous.
How do I know when my almond paste is finished?
Finished almond paste should be smooth, creamy, and spreadable—resembling natural peanut butter. There should be no visible graininess or separation. When you run a spatula through it, it should look uniform without clumps or dry spots. Slight oil sheen on top is normal and desirable.
Can I reduce the sugar content?
Yes, you can reduce sugar to ¾ cup or even ½ cup if you prefer less sweetness. However, sugar helps extract almond oils and provides structure, so reducing it too much may result in grainier texture. Start by reducing gradually and adjust based on your preference and the paste’s consistency.
What’s the best oil to add if needed?
Almond oil is ideal because it complements the almond flavor. Neutral oils like vegetable, canola, or light coconut oil also work well. Avoid strong-flavored oils like sesame or olive oil unless you want their flavors to dominate. Add oil sparingly—just 1 tablespoon at a time—as it’s easy to over-oil the paste.


