Apple Crisp Delight: Oat-Free Perfection!
When you crave that warm, comforting apple crisp but need to skip the oats, you might think your dessert dreams are over. Think again! This apple crisp recipe without oats delivers all the crumbly, buttery, caramelized goodness you’re looking for—without a single rolled oat in sight. Whether you’re avoiding oats due to allergies, dietary preferences, or simply what’s in your pantry, this recipe proves that traditional doesn’t mean necessary.
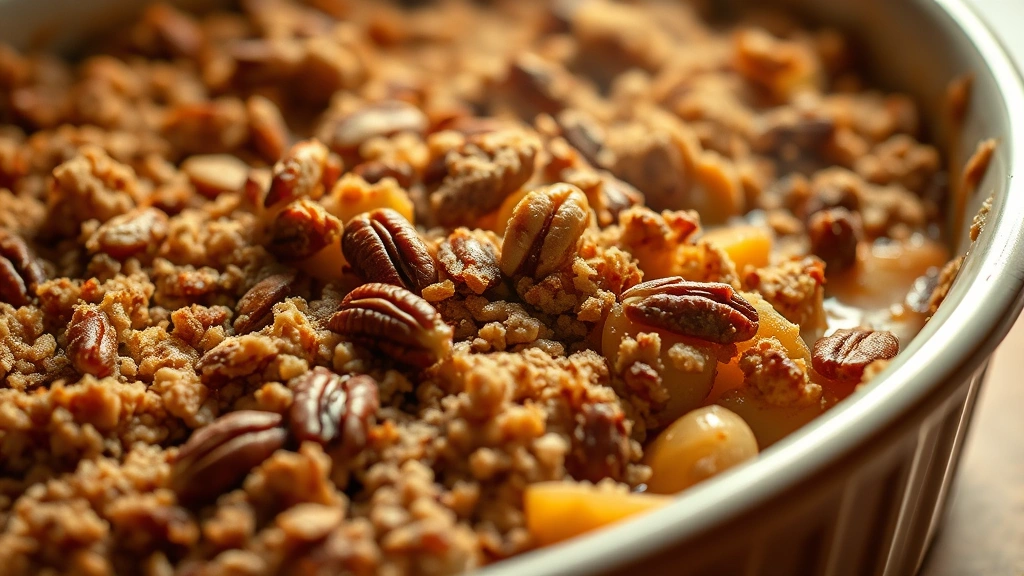
The magic happens in the topping, where a combination of nuts, flour, brown sugar, and butter creates a texture that’s arguably even better than the classic version. The filling remains pure apple perfection: tender, spiced fruit that becomes syrupy and luscious as it bakes. Serve it warm with vanilla ice cream or whipped cream, and you’ll have guests asking for your secret—which you can now proudly share!
Why Choose Oat-Free?
Many people assume oats are a non-negotiable component of apple crisp, but that’s far from true. An oat-free version opens doors for those with celiac disease or oat sensitivity, while also appealing to anyone seeking a different texture. The absence of oats actually allows you to highlight other delicious components—toasted nuts, crispy flour, and rich butter shine through without competition.
Additionally, oat-free crisps often appeal to those following paleo, keto-modified, or grain-conscious diets. The beauty of this approach is that you can customize the topping based on what you have available. Almonds, pecans, walnuts, or even a combination create different flavor profiles and textures. This flexibility makes the recipe incredibly practical for reducing food waste by using nuts you already have on hand.
Essential Ingredients
For the Apple Filling:
- 6-7 medium apples (Granny Smith, Honeycrisp, or a mix), peeled and sliced
- 1/4 cup granulated sugar
- 1/4 cup brown sugar
- 2 tablespoons all-purpose flour (or gluten-free blend)
- 1 tablespoon cornstarch
- 1 teaspoon vanilla extract
- 1/2 teaspoon ground cinnamon
- 1/4 teaspoon ground nutmeg
- 1/4 teaspoon salt
- 1 tablespoon lemon juice
For the Oat-Free Crisp Topping:
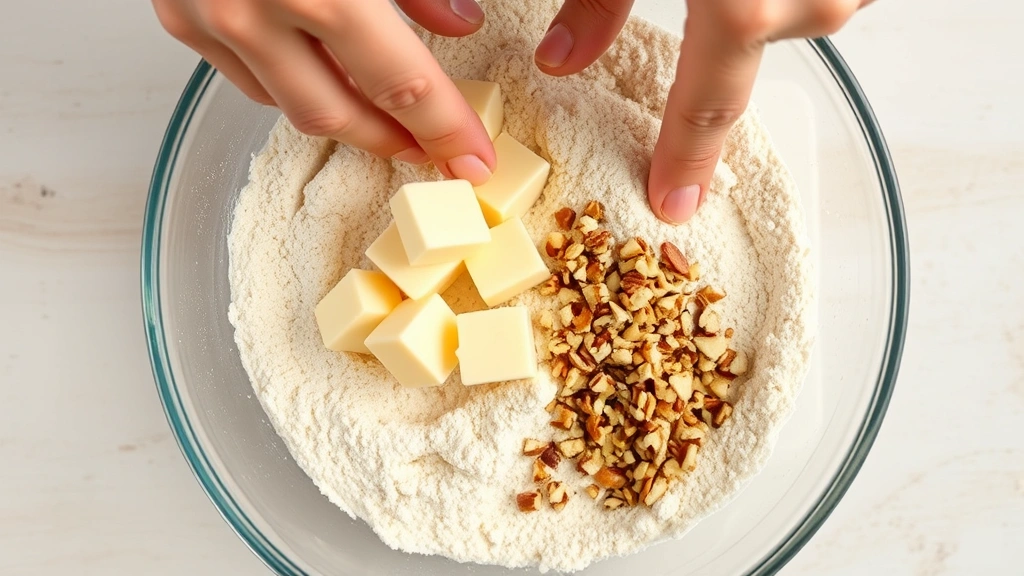
- 1 1/2 cups raw nuts (almonds, pecans, or walnuts), roughly chopped
- 3/4 cup all-purpose flour
- 1/2 cup cold unsalted butter, cubed
- 1/2 cup packed brown sugar
- 1/4 cup granulated sugar
- 1/2 teaspoon vanilla extract
- 1/4 teaspoon salt
- 1/4 teaspoon ground cinnamon (optional)
Apple Preparation Guide
The foundation of an exceptional apple crisp starts with selecting the right apples. A blend of tart and sweet varieties creates complexity and prevents the filling from becoming one-dimensional. Granny Smith apples provide tartness and hold their shape during baking, while Honeycrisp or Gala apples add sweetness and juiciness.
Begin by peeling your apples using a vegetable peeler or knife, working carefully to remove just the skin without wasting precious fruit. A helpful tip: place peeled apples in a bowl of lemon water to prevent browning while you work through the remaining fruit. Slice each apple in half, remove the core, then cut into thin, even slices—about 1/4 inch thick. Uniform slicing ensures even cooking throughout the baking process.
Once all apples are prepped, combine them in a large mixing bowl with both sugars, flour, cornstarch, vanilla, cinnamon, nutmeg, salt, and lemon juice. The cornstarch acts as a thickening agent, absorbing excess moisture released by the apples during baking. Toss everything together gently but thoroughly, ensuring every slice gets coated with the sugar-spice mixture. Let this mixture sit for 15-20 minutes, allowing the apples to begin releasing their juices—this creates a naturally syrupy filling without added liquid.
Creating the Perfect Crisp Topping
This is where your oat-free crisp truly shines. Start by roughly chopping your selected nuts—you want some texture variation, with pieces ranging from small crumbles to slightly larger chunks. Toast these nuts in a dry skillet over medium heat for 3-5 minutes, stirring frequently, until fragrant. Toasting intensifies their flavor and adds a subtle complexity that elevates the entire dessert.
In a medium bowl, combine your toasted nuts with flour, brown sugar, granulated sugar, salt, and optional cinnamon. Mix these dry ingredients together, breaking up any brown sugar clumps with your fingers. The mixture should resemble coarse sand at this point.
Remove your cold butter from the refrigerator and cut it into small cubes. Add these to the dry mixture along with vanilla extract. Using a pastry cutter, two knives, or your fingertips, work the butter into the dry ingredients until the mixture resembles coarse crumbs with some pea-sized pieces of butter remaining visible. This technique is crucial—those small butter pockets create the crispy, crumbly texture everyone loves. Don’t overmix, or you’ll end up with a dense, cake-like topping instead of a delightfully crunchy one.
Baking Instructions
Preheat your oven to 350°F (175°C). Prepare a 9×13-inch baking dish by lightly greasing it with butter or cooking spray. Pour your apple mixture into the prepared dish, spreading it in an even layer. If there’s excess liquid at the bottom, drain some off—you want moist apples, not a soupy filling.
Distribute the crisp topping evenly over the apples, using your fingers to gently spread it without pressing down too firmly. You want the topping to remain loose and crumbly so it crisps up beautifully during baking. A few gaps showing the apple filling beneath are perfectly fine and actually desirable.
Place the baking dish in your preheated oven and bake for 40-45 minutes, until the topping is golden brown and the apple filling bubbles slightly around the edges. If the topping is browning too quickly, cover it loosely with aluminum foil for the final 10-15 minutes of baking.
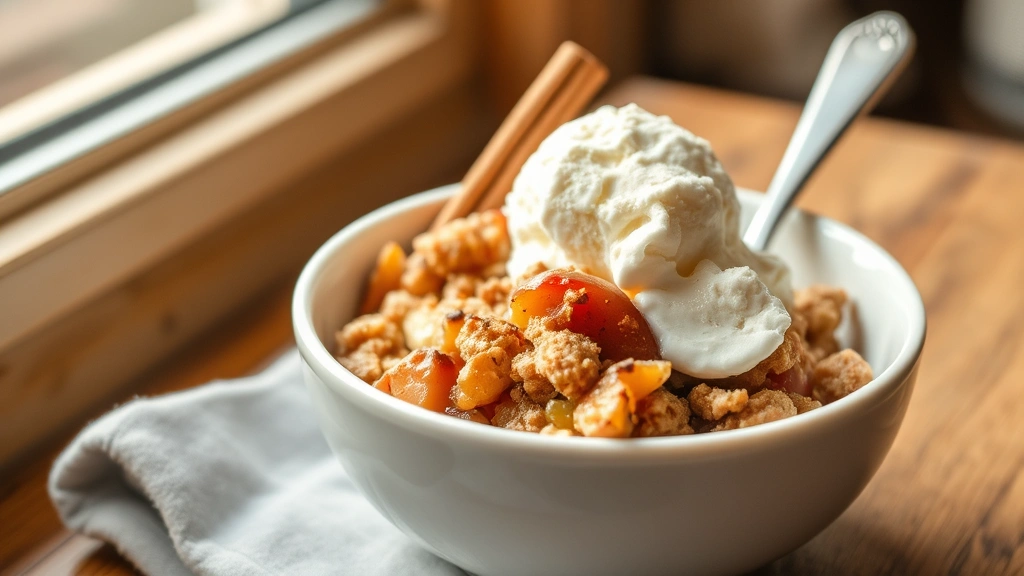
Remove from the oven and allow the crisp to cool for 10-15 minutes before serving. This resting period allows the filling to set slightly, making it easier to serve without the apples sliding around. The crisp will continue to firm up as it cools, though it’s absolutely delicious served warm with vanilla ice cream melting on top.
Delicious Variations
Spiced Apple Crisp with Cardamom
Add 1/4 teaspoon ground cardamom to both the filling and topping for an exotic twist. Cardamom pairs beautifully with apples and adds an aromatic complexity that guests will find intriguing.
Maple-Pecan Version
Replace the granulated sugar in the topping with 1/4 cup pure maple syrup, and use pecans exclusively for the nuts. This variation is particularly popular in fall and pairs wonderfully with homemade bread for brunch.
Ginger-Apple Crisp
Add 1 teaspoon ground ginger and 1/4 teaspoon ground cloves to the apple filling for warming spice notes. Fresh ginger can also be added—use 1 tablespoon minced fresh ginger for a more pronounced flavor.
Brown Butter Almond Crisp
Brown your butter before adding it to the topping mixture. Heat butter in a small saucepan over medium heat, swirling occasionally until it turns golden and develops a nutty aroma (about 5-7 minutes). Let it cool slightly before cutting into cubes and adding to your dry mixture. This adds incredible depth to the topping.
Coconut-Walnut Version
Replace 1/2 cup of the flour with unsweetened shredded coconut, and use walnuts as your nut of choice. This creates a tropical-inspired crisp that’s surprisingly complementary to apples.
Storage and Make-Ahead Tips
Apple crisp is one of the most convenient desserts for make-ahead preparation. You can assemble the entire crisp—apples and topping—up to 24 hours before baking. Cover it tightly with plastic wrap and refrigerate. Simply add 5-10 minutes to the baking time if baking from cold.
Alternatively, prepare just the topping mixture and store it in an airtight container in the refrigerator for up to 3 days, or freeze it for up to 2 months. This allows you to have a crisp topping ready whenever apples are available or you’re craving this comforting dessert.
Leftover baked crisp stores beautifully in the refrigerator for 4-5 days, covered with plastic wrap or in an airtight container. Reheat individual portions in the microwave for 30-45 seconds, or warm the entire dish covered in a 300°F oven for 10-15 minutes. The crisp will soften slightly upon reheating, but remains delicious.
For longer storage, you can freeze unbaked assembled crisps for up to 3 months. Bake directly from frozen, adding 15-20 minutes to the baking time. Baked crisp also freezes well for up to 2 months—wrap portions individually in plastic wrap and foil before freezing for easy reheating.
Serving Suggestions
While vanilla ice cream is the classic pairing, consider these alternatives: whipped cream with a touch of cinnamon, Greek yogurt sweetened with honey, or a scoop of salted caramel ice cream. For a more decadent presentation, serve with a drizzle of warm caramel sauce or a dollop of crème fraîche.
Apple crisp works beautifully as a brunch dessert when paired with morning pastries, or as an elegant finish to a dinner featuring low-carb dinner recipes. It’s also perfect for potlucks and gatherings, as it travels well and can be served at room temperature.
For a lighter presentation, serve the crisp in small bowls or glasses layered with whipped cream and topping crumbles, creating a parfait-style dessert that’s both beautiful and portion-controlled.
FAQ
Can I use different types of nuts?
Absolutely! Almonds, pecans, walnuts, hazelnuts, or macadamia nuts all work beautifully. You can even use a combination for added complexity. Just ensure they’re raw or unsalted, as salted nuts may make the topping too salty. Avoid very finely ground nuts, as they create a dense texture rather than a crispy one.
What if I don’t have cornstarch?
Substitute with 1 tablespoon of tapioca starch, arrowroot powder, or additional all-purpose flour. Note that flour may not thicken quite as effectively, so you might have slightly more liquid in your filling, which isn’t necessarily a problem.
Can I make this gluten-free?
Yes! Use a high-quality gluten-free all-purpose flour blend in both the filling and topping. Look for blends that include xanthan gum for better binding. The results will be nearly identical to the traditional version.
How do I prevent a soggy bottom crust?
This isn’t an issue with crisp since there’s no bottom crust, but if you’re concerned about excess moisture, ensure your baking dish is on a baking sheet to catch any drips. Additionally, don’t let the apple mixture sit in the dish too long before baking—assemble and bake within 30 minutes of combining ingredients.
Can I double this recipe?
Yes, easily! Double all ingredients and bake in a 9×13-inch dish and an 8×8-inch dish, or use two 9×13-inch dishes. Baking time may increase slightly—check for doneness at 45 minutes and bake up to 50 minutes if needed.
What’s the best apple variety for this recipe?
A combination of Granny Smith (tart), Honeycrisp or Gala (sweet), and Pink Lady (balanced) creates an ideal filling. However, any crisp apples work—avoid very soft varieties like Red Delicious, which become mushy during baking.
Can I reduce the sugar?
You can reduce the sugar in the filling by 1-2 tablespoons without significantly affecting the recipe, especially if your apples are particularly sweet. Reducing sugar in the topping isn’t recommended, as it affects texture and browning.
How do I know when it’s done baking?
The topping should be golden brown and the filling should bubble around the edges. A toothpick inserted into the apples should meet with slight resistance—the apples should be tender but not completely soft. Overbaking results in mushy apples.


