Ultimate Beanless Chili Recipe: A Reader-Favorite That’ll Change Your Game
When you think of chili, your mind might immediately jump to a pot brimming with kidney beans, black beans, and pinto beans. But what if we told you that some of the most beloved chili recipes skip the beans entirely? Beanless chili has exploded in popularity over recent years, and for good reason. This hearty, meat-forward version delivers intense flavor, satisfying texture, and a richness that bean-based versions simply can’t match. Whether you’re a chili purist, someone with bean sensitivities, or just looking to shake up your dinner routine, this ultimate beanless chili recipe is about to become your new go-to comfort food.
This particular recipe has become a reader favorite because it strikes the perfect balance between simplicity and sophisticated flavor development. The secret lies in layering multiple types of meat, using quality spices, and allowing the chili to simmer low and slow until every element melds into something extraordinary. We’ll walk you through every step, share pro tips from experienced home cooks, and answer all your burning questions about making the perfect beanless chili at home.
Why Choose Beanless Chili?
Beanless chili represents a departure from traditional Texas red chili, which historically never included beans at all. This style focuses on premium meat and bold spice profiles rather than using beans to stretch the recipe and add bulk. There are several compelling reasons why home cooks and chili enthusiasts have embraced this approach.
First, the texture is entirely different. Without beans, you get a more luxurious, sauce-forward consistency that clings beautifully to each chunk of meat. The chili becomes less chunky and more cohesive, creating a more refined eating experience. Second, for those with digestive sensitivities or allergies to legumes, beanless chili removes a common culprit entirely. Third, the flavor profile becomes more intense since you’re not diluting the spice mixture with neutral bean flavors. Finally, many people simply prefer the ratio of meat to liquid, finding beanless chili more satisfying and protein-rich.
If you enjoy bold, meaty dishes, you might also love our shredded chicken recipe for other comfort food applications, or explore Instant Pot chicken thigh recipes for quick weeknight proteins.
Essential Ingredients Guide
The Meat Foundation
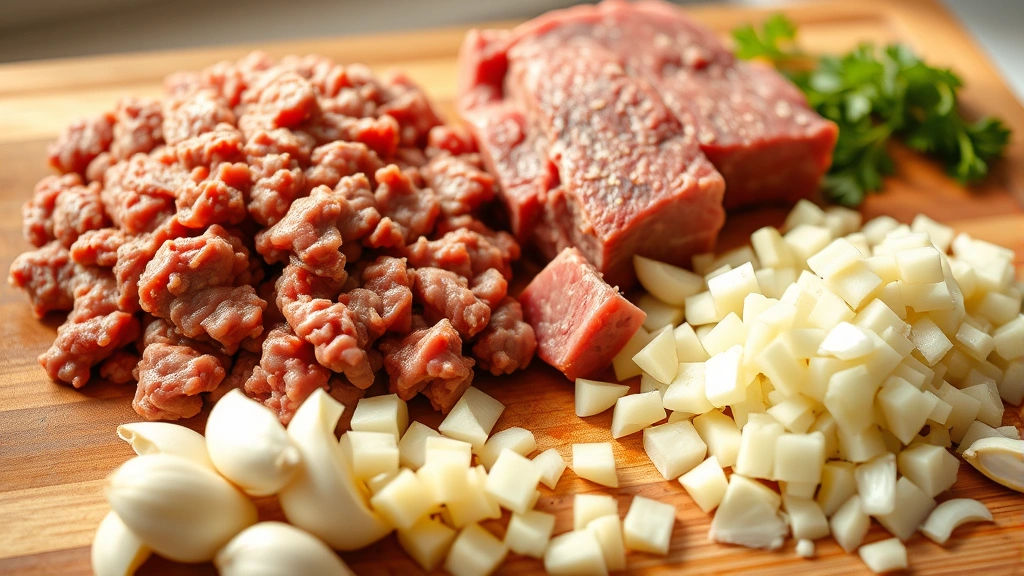
The backbone of exceptional beanless chili is quality meat. This recipe uses a combination of ground beef and diced chuck steak, which creates layers of texture and flavor. The ground beef contributes richness and helps bind the sauce, while the diced chuck breaks down into tender morsels during the long simmer. Use 80/20 ground beef for the best balance of flavor and texture. For the chuck steak, ask your butcher to cut it into half-inch cubes, which will cook perfectly without becoming stringy or falling apart completely.
Aromatics and Base
Yellow onions and garlic form the aromatic foundation. You’ll need four large onions, diced into small pieces, and eight to ten cloves of fresh garlic, minced fine. Don’t skip fresh garlic—it makes an enormous difference in the final flavor. Avoid pre-minced garlic from jars, as it lacks the punch of freshly minced cloves.
The Spice Blend
This is where beanless chili truly shines. You’ll combine chili powder, cumin, smoked paprika, oregano, cayenne pepper, and a pinch of cinnamon. The chili powder should be a quality brand—consider sourcing from Serious Eats or specialty spice shops for premium options. Cumin adds earthiness, smoked paprika brings depth and a subtle smokiness, and the cinnamon rounds out the spice profile with warmth. Start with the amounts suggested, then adjust to your heat preference.
Liquid Components
Beef broth forms the cooking liquid, providing savory depth without overwhelming the spices. You’ll use about six cups of quality beef broth. Tomato paste concentrates tomato flavor, while a combination of diced tomatoes and tomato sauce adds acidity and body. The acidity is crucial—it balances the richness of the meat and prevents the chili from tasting heavy.
Supporting Ingredients
Red pepper flakes add adjustable heat, Worcestershire sauce contributes umami depth, and a small amount of brown sugar balances the acidity from tomatoes. Salt and black pepper should be added gradually throughout cooking, tasting as you go.
Step-by-Step Preparation
Prep Your Ingredients
Before you begin cooking, gather and prepare everything. Dice the onions into small, uniform pieces—this helps them cook evenly and dissolve into the sauce. Mince the garlic finely and set it aside. Cut the chuck steak into half-inch cubes, trimming excess fat but leaving some marbling for flavor. Measure out all your spices into small bowls so they’re ready when you need them. This mise en place approach prevents scrambling and ensures even cooking.
Brown the Meat
Heat two tablespoons of neutral oil in a large, heavy-bottomed pot over medium-high heat. Working in batches, brown the diced chuck steak, about five to seven minutes per batch. Don’t overcrowd the pot—proper browning requires space for the meat to develop a crust rather than steam. Transfer the browned chuck to a plate and set aside. In the same pot, brown the ground beef, breaking it into small pieces as it cooks, about eight to ten minutes. The goal is to render the fat and develop a flavorful fond on the bottom of the pot. Transfer the ground beef to the plate with the chuck steak.
Build the Flavor Base
Reduce heat to medium and add the diced onions to the pot, scraping up the browned bits with a wooden spoon. Cook the onions for about eight minutes, stirring occasionally, until they become translucent and begin to caramelize. Add the minced garlic and cook for another minute, stirring constantly to prevent burning. The kitchen should smell absolutely incredible at this point.
Bloom the Spices
This is a crucial step that many home cooks skip. Add the chili powder, cumin, smoked paprika, and oregano to the onion mixture and cook for two to three minutes, stirring constantly. This “blooming” process releases the essential oils in the spices, intensifying their flavor dramatically. You’ll notice the mixture becoming aromatic and slightly darker.
The Cooking Method
Once your spice base is properly bloomed, return the browned meat to the pot, stirring to combine evenly. Add three tablespoons of tomato paste and cook for two minutes, stirring frequently. This step concentrates the tomato flavor and adds umami depth. Pour in the beef broth, scraping the bottom of the pot to incorporate all the flavorful fond. Add the diced tomatoes with their juice, the tomato sauce, Worcestershire sauce, and cayenne pepper. Stir in the pinch of cinnamon and brown sugar.
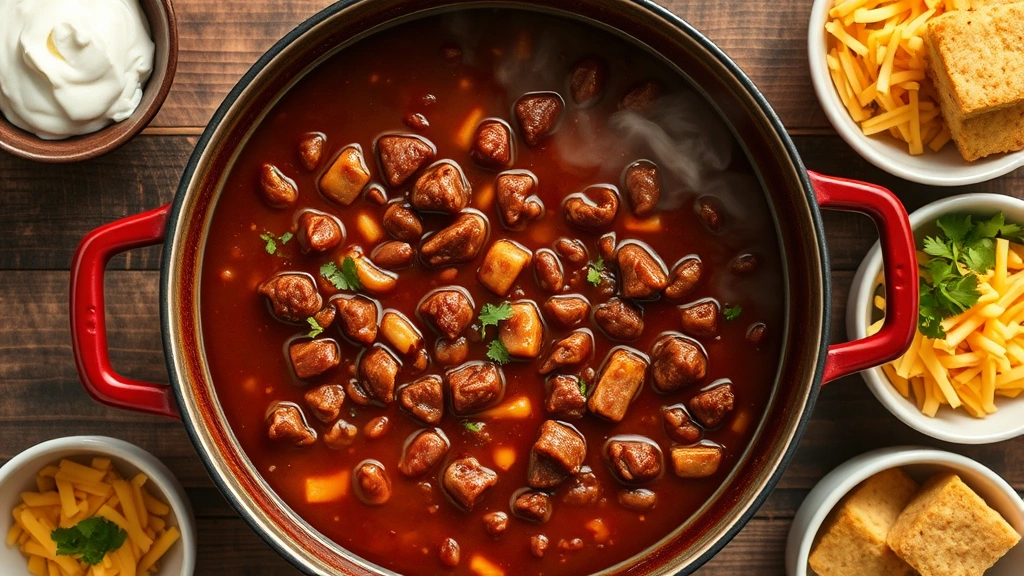
Bring the mixture to a boil, then reduce heat to low and partially cover the pot. The chili should simmer gently, not vigorously—you want a gentle bubble breaking the surface every few seconds. Simmer for at least three hours, stirring occasionally. The longer you simmer, the more the flavors develop and meld. Many experienced cooks prefer four to five hours for the deepest flavor. The meat should be extremely tender, and the sauce should have thickened considerably.
Adjusting Consistency and Flavor
About thirty minutes before you’re ready to serve, taste the chili and adjust the seasonings. Add salt and black pepper to taste. If the chili seems too thin, simmer uncovered to allow more liquid to evaporate. If it’s too thick, add beef broth a quarter-cup at a time until you reach your preferred consistency. The texture should be sauce-forward but still contain visible chunks of meat.
For additional heat, add red pepper flakes gradually, tasting after each addition. For more depth, add a pinch of smoked paprika or an extra half-teaspoon of cumin. The beauty of beanless chili is its flexibility—you can adjust it perfectly to your preferences.
Final Touches
Some cooks like to add a tablespoon of unsweetened cocoa powder in the final minutes of cooking, which adds complexity and rounds out the spice profile. Others prefer to keep it simple. Taste one final time and make any last-minute adjustments. The finished chili should have a rich, deep color and a complex aroma with prominent notes of cumin, chili, and meat.
Delicious Variations
Spicy Version
If you love heat, increase the cayenne pepper to one and a half teaspoons, add one to two jalapeños (diced with seeds for more heat), and finish with a quarter-teaspoon of ghost pepper powder. This creates a chili with serious kick that builds throughout the meal.
Smoky Chipotle Version
Replace half the chili powder with smoked chili powder and add two canned chipotle peppers in adobo sauce, chopped finely. This version has incredible depth and a subtle smokiness that evokes outdoor cooking.
White Chili Variation
For a completely different take, use ground pork and diced pork shoulder instead of beef, swap the tomato-based sauce for chicken broth, and replace the tomato products with diced white beans (yes, we know this adds beans, but hear us out). Add cumin, white pepper, and sage for an entirely different flavor profile.
Meat-Lovers Version
Add one pound of browned ground sausage (Italian or chorizo work beautifully) and four strips of bacon, cooked and crumbled. This creates an even richer, more decadent version. If you enjoy bold meat-forward dishes, you might also appreciate our lemon pepper wings recipe for game day entertaining.
Slow Cooker Method
Brown all the meat and sauté the onions and garlic as described, then transfer everything to a slow cooker. Add all remaining ingredients and cook on low for six to eight hours. The extended cooking time allows even more flavor development, though you’ll want to reduce the beef broth to five cups to account for less evaporation.
Serving and Storage
Traditional Toppings
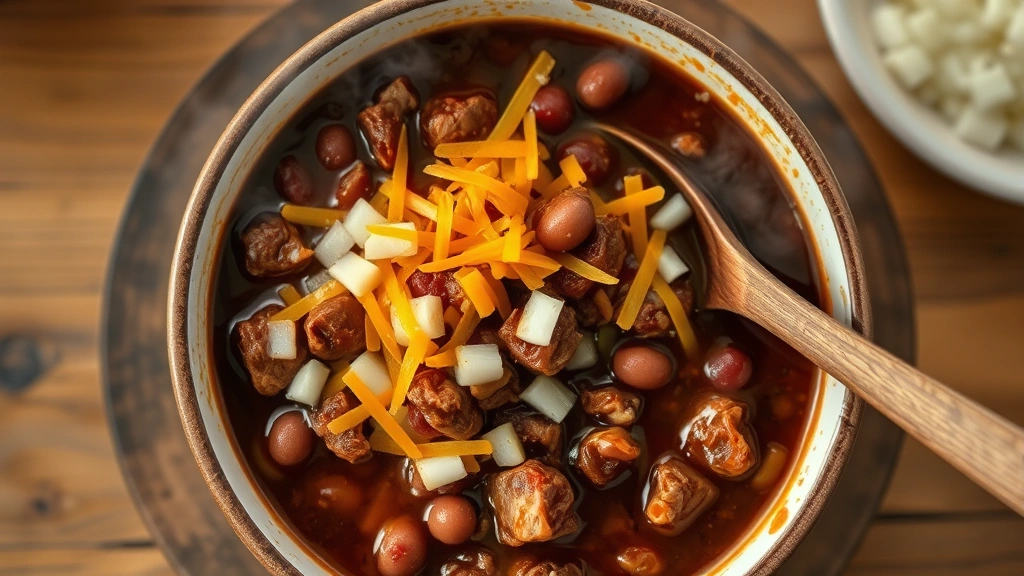
Beanless chili pairs beautifully with classic toppings. Serve with diced white onions, shredded cheddar cheese, sour cream, cornbread, and fresh cilantro. Create a topping bar so everyone can customize their bowl. Some people love adding a dollop of Greek yogurt for tang and creaminess, while others prefer traditional sour cream.
Creative Serving Ideas
Serve the chili over baked potatoes or sweet potatoes for a hearty meal. Use it as a filling for chili cheese fries or nachos. Top grilled hot dogs with chili and cheese for elevated chili dogs. You can even serve smaller portions as an appetizer in shot glasses topped with cheese and jalapeños.
Storage and Reheating
Beanless chili keeps beautifully in the refrigerator for up to five days in an airtight container. The flavors actually improve after a day or two as the spices continue to meld. To freeze, let the chili cool completely, then transfer to freezer bags or containers. It keeps frozen for up to three months. Thaw overnight in the refrigerator, then reheat gently on the stovetop over medium-low heat, stirring occasionally and adding a splash of beef broth if needed. Avoid microwaving, which can cause uneven heating.
Make-Ahead Tips
Prepare the chili completely the day before you plan to serve it. This actually improves the final product since the flavors have more time to develop. Reheat gently before serving. You can also brown the meat and sauté the aromatics up to eight hours in advance, then finish the cooking process when ready.
FAQ
What’s the difference between beanless chili and Texas red chili?
Texas red chili (also called chili con carne) traditionally contains no beans and focuses on chunks of meat in a savory, minimalist sauce. Beanless chili is a modern interpretation that often includes tomato products and additional spices for a richer, more complex flavor profile. Both styles emphasize meat over beans, but beanless chili tends to be more saucy and flavorful.
Can I make this in an Instant Pot?
Absolutely. Brown the meat and sauté the aromatics using the sauté function, then add all remaining ingredients. Cook on high pressure for thirty minutes, then allow natural pressure release for ten minutes before quick-releasing remaining pressure. The result will be slightly less developed in flavor than stovetop cooking, but still delicious and ready in about an hour.
Why does my chili taste flat?
Flat-tasting chili usually indicates insufficient salt or under-developed spice flavor. Add salt gradually and taste frequently. Ensure you’re blooming your spices properly in the oil before adding liquids. Also, check that your spices are fresh—old spices lose potency quickly. Finally, allow adequate simmering time; rushing the process prevents flavors from melding properly.
Should I use fresh or dried chili peppers?
This recipe uses chili powder, which is made from dried chili peppers. For even more depth, you can add dried whole chiles like ancho or guajillo. Toast them briefly, then soak in hot water until soft, blend into a paste, and add to your chili. This adds complexity that ground chili powder alone can’t provide. For fresh chiles, use them as toppings rather than cooking ingredients.
How do I adjust the heat level?
Start with the suggested amount of cayenne pepper and taste throughout cooking. Add red pepper flakes, diced fresh jalapeños, or minced habaneros to increase heat. For milder chili, reduce or omit the cayenne entirely. Remember that heat builds as the chili simmers, so be conservative with adjustments early on.
Can I use ground turkey or chicken instead of beef?
While possible, ground poultry will produce a lighter, less rich chili. If using poultry, increase the umami by adding extra Worcestershire sauce, soy sauce, or additional tomato paste. Ground lamb also works beautifully and creates a different but equally delicious version. For chicken-based applications, explore our shredded chicken recipe for other meal ideas.
What’s the best way to thicken my chili?
Simmer uncovered to allow liquid to evaporate naturally—this is the preferred method as it concentrates flavor simultaneously. For quicker thickening, mix one tablespoon of cornstarch with two tablespoons of cold water, then stir into the chili and simmer for five minutes. Avoid using flour as it can create a gummy texture. Some cooks prefer leaving chili slightly thinner than expected since it thickens further as it cools.
Should I use canned or fresh tomatoes?
This recipe uses both canned diced tomatoes and tomato sauce for consistency and flavor. High-quality canned tomatoes are often superior to fresh tomatoes outside of peak season, and they provide reliable acidity. If using fresh tomatoes, choose very ripe varieties and increase the amount since fresh tomatoes contain more water. You may need to simmer longer to achieve proper consistency.
How much does this recipe yield?
This recipe makes approximately ten to twelve servings, depending on portion size. It’s perfect for feeding a crowd or creating leftovers for the week. The recipe halves easily if you need less, though the flavor development may be slightly less pronounced in a smaller batch.


