Tender Beef Back Ribs? BBQ Expert’s Guide
Beef back ribs are the crown jewel of barbecue, offering succulent meat that falls off the bone when prepared correctly. Unlike spare ribs or short ribs, beef back ribs come from the rib section of the cow and deliver a robust, beefy flavor that pairs beautifully with smoky char and bold seasonings. Whether you’re a seasoned pitmaster or a backyard grilling enthusiast, mastering the art of cooking tender beef back ribs transforms your outdoor cooking game entirely.
This comprehensive guide walks you through every step of creating restaurant-quality beef back ribs at home. From selecting the perfect rack to nailing the low-and-slow cooking method, you’ll discover pro techniques that guarantee tender, juicy results every single time. We’ll explore dry rubs, marinades, smoking methods, and finishing touches that elevate your vintage grandma recipes into modern barbecue masterpieces.
Selecting Quality Beef Back Ribs
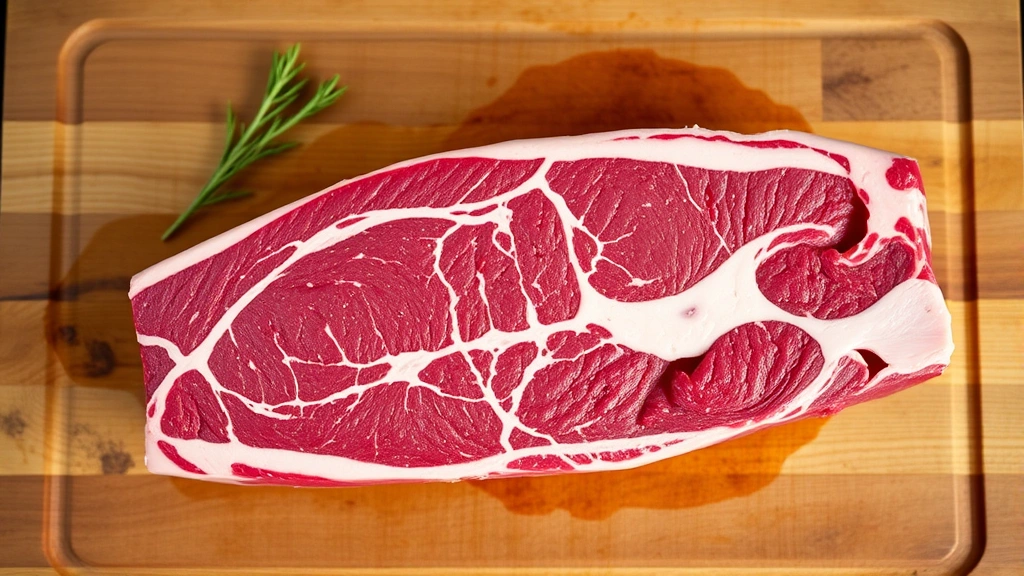
The foundation of exceptional beef back ribs begins at the butcher counter. Quality selection determines whether your final product achieves that coveted tender texture or falls short. Look for racks with a deep red color, indicating freshness and proper handling. The meat should display good marbling—those white fat lines running through the muscle—which renders during cooking and keeps the ribs moist throughout the smoking process.
Beef back ribs typically weigh between 3 to 4 pounds per rack and contain approximately 7 to 8 bones. Ask your butcher for racks that haven’t been trimmed too aggressively; some fat cap protection is crucial during the long cooking hours ahead. Avoid ribs with a grayish tint or excessive browning, as these indicate age or improper storage. If you’re buying frozen ribs, thaw them slowly in the refrigerator overnight—never at room temperature, which promotes bacterial growth.
Consider purchasing from a local butcher rather than supermarket meat counters. Butchers often source higher-quality beef and can trim the ribs exactly to your specifications. Ask them to remove the silverskin (the thin membrane on the underside) or handle this yourself at home. Building a relationship with a quality butcher ensures consistent access to premium beef back ribs and valuable cooking advice.
Essential Preparation Techniques
Proper preparation is non-negotiable for achieving tender beef back ribs. Begin by removing the meat from the refrigerator 30 minutes before cooking. This allows the ribs to reach closer to room temperature, promoting even cooking throughout. Cold meat cooks unevenly, with the exterior overcooking while the interior remains underdone.
Next, address the silverskin—that tough, translucent membrane on the back side of the ribs. Slip a thin knife blade under the membrane and work it across the entire length of the rack. Once you’ve loosened a corner, grab it with a paper towel for better grip and peel it away in one smooth motion. This membrane blocks smoke penetration and prevents proper rendering of fat.
Trim excess fat from the edges, but leave a quarter-inch fat cap intact. This protective layer shields the meat from excessive heat and drying during the 5 to 6-hour smoking process. Pat the ribs dry with paper towels—moisture on the surface prevents proper smoke ring formation and creates steam rather than smoke flavor.
For those seeking high protein recipes for weight loss, beef back ribs offer an excellent protein source when you trim visible fat and practice portion control. A 3-ounce serving provides approximately 25 grams of protein with minimal carbohydrates.
Dry Rub Secrets
The dry rub creates the flavorful bark—that delicious crust—that distinguishes exceptional barbecue. A balanced dry rub combines sweet, savory, spicy, and smoky elements in harmonious proportion. The foundation includes brown sugar for sweetness and caramelization, kosher salt for flavor enhancement and moisture retention, and black pepper for bite.
Build your signature rub with these core ingredients: one-quarter cup brown sugar, two tablespoons kosher salt, one tablespoon black pepper, two tablespoons paprika (smoked paprika adds depth), one tablespoon garlic powder, one tablespoon onion powder, one tablespoon chili powder, and one teaspoon cayenne pepper for heat. Mix these ingredients in a bowl and store in an airtight container for up to three months.
Apply the rub generously to both sides of the ribs, pressing gently so it adheres to the meat. Some pitmasters prefer applying a thin coating of mustard first—yellow mustard acts as a binder and adds subtle tang without overpowering the beef flavor. Work the rub into every crevice and bone, ensuring even coverage. Let the rubbed ribs sit uncovered in the refrigerator for 2 to 4 hours, allowing the salt to penetrate the meat and enhance moisture retention.
Experiment with additional rub components like coffee powder (adds complexity), smoked paprika (intensifies smoky notes), or fresh-ground coriander (provides subtle sweetness). Professional pitmasters often create multiple rub variations and taste-test them on small samples before committing to a full rack.
The 3-2-1 Smoking Method
The 3-2-1 method is the gold standard for tender beef back ribs, developed and perfected by competition barbecue champions. This technique divides the cooking process into three distinct phases, each optimizing different aspects of the final product. The method name reflects the cooking time: three hours unwrapped, two hours wrapped, and one hour finishing.
Phase One: Three Hours of Smoke (225°F)
Preheat your smoker to 225°F using a reliable meat thermometer. Maintain this temperature throughout the entire cook—fluctuations prevent even cooking and extend cooking time unnecessarily. Place the ribs bone-side down directly on the grates, leaving 2-3 inches between racks for smoke circulation. Smoke with your choice of wood: oak provides mild flavor, hickory delivers strong smoke, mesquite offers intense heat, or cherry adds subtle sweetness. Many pitmasters combine two woods—perhaps oak and hickory—for balanced complexity.
During this initial phase, the ribs absorb smoke flavor and begin rendering fat. Don’t open the smoker door frequently; each opening drops internal temperature and extends cooking time. Check the temperature every 45 minutes to ensure consistency. The ribs should develop a deep mahogany color by the end of three hours.
Phase Two: Two Hours Wrapped (225°F)
Remove the ribs and place them shiny-side down on heavy-duty aluminum foil. In a small bowl, combine one-quarter cup brown sugar, one-quarter cup butter, one-quarter cup honey, and one-quarter teaspoon salt. Brush this mixture generously over the meat side of each rib rack. Fold the foil tightly around the ribs, creating a sealed packet that traps steam and accelerates tenderizing.
Return the wrapped packets to the smoker and cook for two hours at 225°F. The foil creates a braise-like environment that breaks down connective tissue rapidly. At the two-hour mark, carefully open the foil (watch for escaping steam) and check for tenderness by inserting a toothpick. It should slide through the meat with minimal resistance.
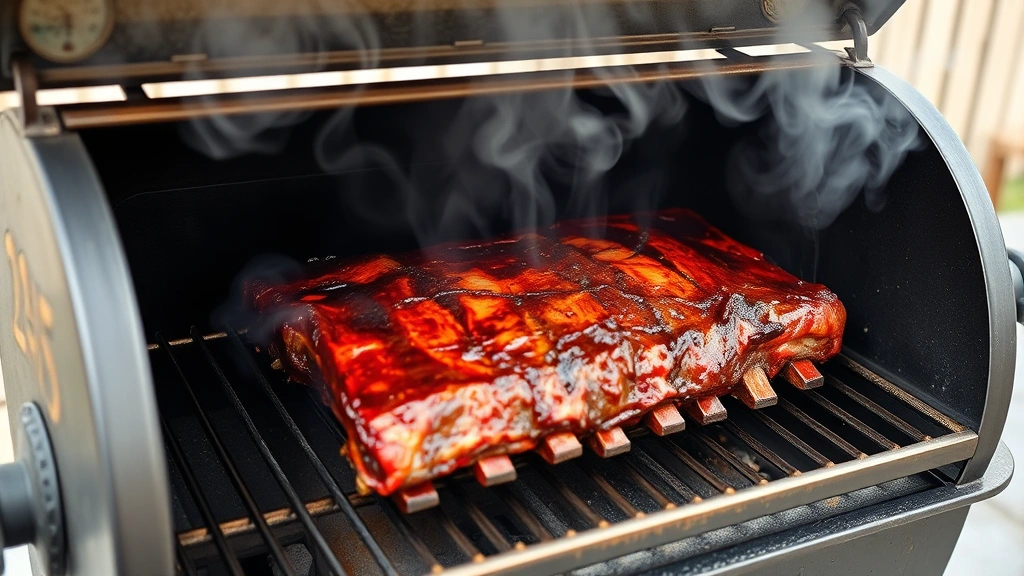
Phase Three: One Hour Finishing (250°F)
Increase the smoker temperature to 250°F. Unwrap the ribs and place them directly on the grates, bone-side down. Brush with your favorite barbecue sauce—or skip the sauce if you prefer the pure smoke flavor and bark. Cook uncovered for one final hour until the exterior caramelizes and develops a glossy finish. The meat should pull cleanly from the bones with minimal pressure.
Temperature Management
Maintaining consistent smoker temperature is absolutely critical for tender beef back ribs. Invest in a quality dual-probe meat thermometer—one probe monitors smoker temperature while the other tracks internal meat temperature. Cheap thermometers provide inaccurate readings that lead to undercooked or overcooked results.
Target an internal meat temperature of 200-203°F for optimal tenderness. This temperature range ensures complete collagen-to-gelatin conversion while preventing the meat from drying out. Use the bend test as a secondary indicator: pick up the rack with tongs at the center. Properly cooked ribs should bend and nearly break, with the meat separating slightly from the bones.
Many beginners struggle with temperature consistency. If your smoker runs hot, adjust vents to reduce airflow. If it runs cold, add fuel or adjust the firebox. Some smokers require constant monitoring and adjustment; others maintain temperature with minimal intervention. Understanding your specific smoker’s characteristics takes practice but pays enormous dividends in consistent results.
For alternative cooking methods, how to use a pressure cooker offers faster cooking times, though you’ll sacrifice the traditional smoke flavor. Pressure cooking can tenderize beef back ribs in 45 minutes, making it an option for time-constrained cooks.
Wrapping and Finishing
Strategic wrapping transforms tough ribs into fork-tender masterpieces. The wrapping phase—phase two of the 3-2-1 method—creates a moist environment that accelerates tenderizing. However, the specific wrapping technique matters significantly. Heavy-duty aluminum foil conducts heat efficiently and creates an excellent seal, though butcher paper offers a more breathable alternative that prevents excessive moisture accumulation.
Some advanced pitmasters use the Texas crutch—wrapping ribs in foil with butter and brown sugar—to accelerate cooking during the middle phase. Others prefer wrapping in butcher paper, which allows some smoke penetration while still creating a braise effect. Experiment with both methods to discover your preference.
Finishing sauce application is entirely optional. Purists skip sauce entirely, preferring the beef flavor and smoke bark. Others apply sauce during the final hour, allowing it to caramelize and create a glossy exterior. If using sauce, apply it sparingly—excessive sauce drowns out the meat’s natural flavor. Quality barbecue sauce complements rather than masks the beef.
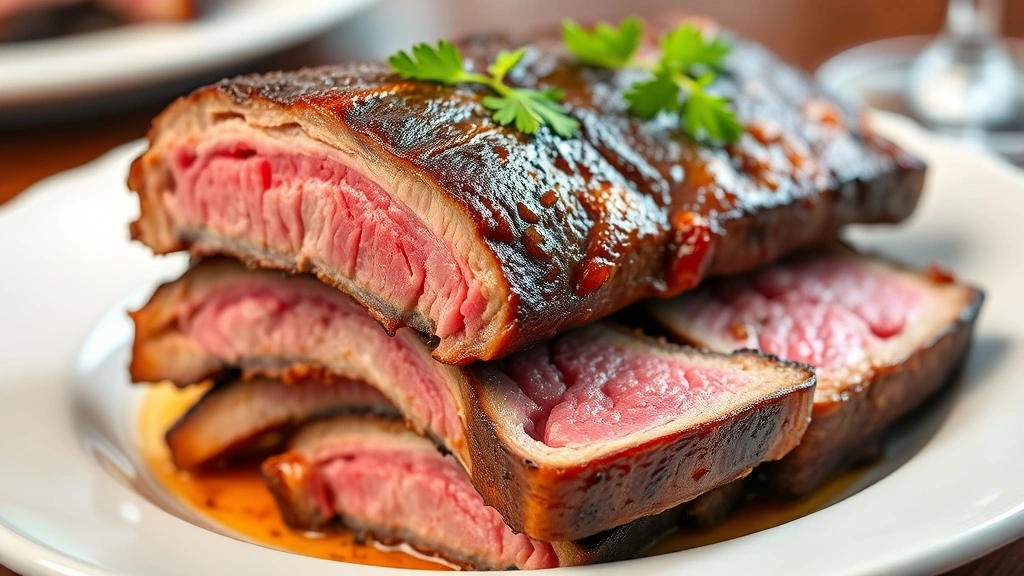
Slicing and Serving
Proper slicing technique ensures your perfectly cooked ribs are presented beautifully. Remove the ribs from the smoker and let them rest for 5 minutes. This brief rest allows juices to redistribute throughout the meat, preventing them from running out during slicing.
Place the rack bone-side down on a clean cutting board. Using a sharp knife, slice between the bones to create individual ribs. Cut perpendicular to the bones rather than parallel—this technique yields more attractive presentation and easier eating. If the meat clings stubbornly to the bones, your ribs cooked perfectly; if it falls apart, they may have overcooked slightly.
Serve immediately while the meat retains maximum heat. Arrange ribs on a large platter and garnish with fresh chopped parsley if desired. Pair with classic sides: coleslaw for cooling contrast, baked beans for complementary smokiness, or cornbread for textural variety. These sides balance the rich beef flavor while honoring traditional barbecue presentation.
For those managing dietary restrictions, gluten and dairy free recipes become relevant when selecting sauce and side dishes. Most quality dry rubs are naturally gluten-free; simply verify sauce ingredients and choose appropriate accompaniments.
Consider food waste reduction tips when planning your barbecue. Save bone broth by collecting rib bones in the freezer, then simmering them for 8-12 hours to create rich, umami-packed stock for soups and gravies.
FAQ
How long do beef back ribs take to cook?
Using the 3-2-1 method at 225°F, expect 6 hours total cooking time. This includes 3 hours of initial smoking, 2 hours wrapped in foil, and 1 hour finishing uncovered. Total time from start to serving is approximately 7-7.5 hours when accounting for resting and temperature stabilization.
What’s the difference between beef back ribs and beef short ribs?
Beef back ribs come from the rib section of the spine and are longer with less meat. Beef short ribs come from the lower rib section near the belly and contain significantly more meat. Back ribs are ideal for smoking; short ribs work better for braising or grilling. Back ribs are also more affordable and cook faster.
Can I cook beef back ribs in the oven?
Yes, though you’ll sacrifice authentic smoke flavor. Preheat to 225°F, apply dry rub, and cook uncovered for 4-5 hours, or use the 3-2-1 method with foil wrapping. Finish at 275°F for 1 hour. You won’t achieve the traditional bark, but the meat will be tender. For enhanced flavor, add liquid smoke to the wrapping liquid.
Should I remove the silverskin from beef back ribs?
Absolutely. The silverskin blocks smoke penetration and prevents proper rendering. It’s tough and unpleasant to eat. Remove it before cooking by slipping a thin knife underneath and peeling it away with a paper towel for better grip.
What wood should I smoke beef back ribs with?
Oak provides mild, balanced smoke; hickory delivers strong, traditional barbecue flavor; mesquite offers intense heat and smokiness; cherry adds subtle sweetness. Most pitmasters combine two woods—oak with hickory is a classic pairing. Avoid softwoods like pine or fir, which create bitter, acrid smoke.
How do I know when beef back ribs are done?
Target an internal temperature of 200-203°F. Alternatively, use the bend test: pick up the rack with tongs at the center. Properly cooked ribs should bend nearly in half with the meat separating slightly from bones. The toothpick test also works—a toothpick should slide through the meat with minimal resistance.
Can I prepare beef back ribs the day before?
Yes. Apply the dry rub and refrigerate uncovered overnight, which allows the rub to penetrate the meat deeper. Remove from the refrigerator 30 minutes before smoking to bring to room temperature. Refrigerating overnight actually improves flavor development and ensures even seasoning.
What temperature should beef back ribs rest before cooking?
Remove ribs from the refrigerator 30 minutes before smoking to bring them closer to room temperature. This promotes even cooking throughout the rack. Cold meat cooks unevenly, with exterior overcooking while the interior remains underdone. This resting period is crucial for consistent results.


