Ultimate Smoked Brisket: Pitmaster Approved Recipe for Tender, Juicy Perfection
Smoking a brisket is both an art and a science, requiring patience, precision, and the right technique to achieve that coveted tender, smoky bark with a perfectly rendered fat cap. This ultimate smoked brisket recipe combines traditional Texas pitmaster methods with modern smoking science to deliver restaurant-quality results in your own backyard. Whether you’re a seasoned barbecue enthusiast or a curious beginner looking to master low-and-slow cooking, this comprehensive guide will walk you through every step of creating the best smoked brisket you’ve ever tasted.
The key to exceptional smoked brisket lies in understanding the meat itself, respecting the smoking process, and knowing when to trust your instincts versus the thermometer. This recipe has been refined through countless hours of smoking experience and incorporates proven techniques from award-winning pitmasters across the country. You’ll learn how to select the perfect cut, apply the ideal seasoning, maintain consistent temperature, and execute the critical Texas crutch technique that transforms a tough cut into pure tenderness.
Selecting Your Brisket Cut
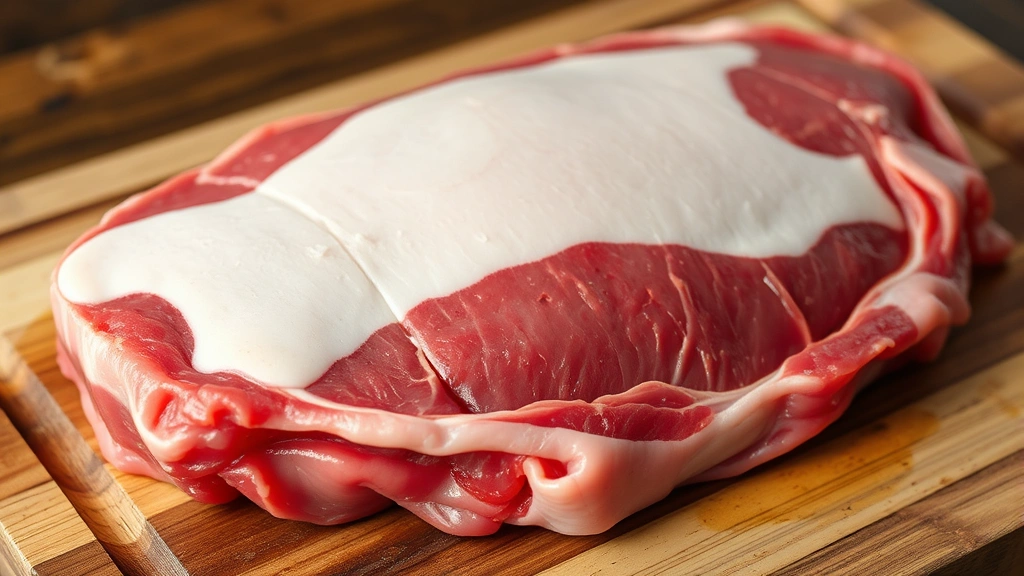
The foundation of exceptional smoked brisket starts at the butcher counter. You need a whole packer brisket, which includes both the flat and the point (also called the deckle). Look for a brisket weighing between 12 to 16 pounds with good marbling throughout the meat and a thick, white fat cap on top. The marbling is crucial because it will render during the long cooking process, keeping the meat moist and flavorful.
Quality matters tremendously when selecting beef. Visit a reputable butcher rather than settling for supermarket cuts whenever possible. Ask your butcher to trim the fat cap to approximately one-quarter inch thickness—thick enough to protect the meat but not so thick that it prevents smoke penetration. Prime grade beef is ideal, though Choice grade works well if Prime isn’t available. Avoid briskets with dark discoloration or excessive moisture in the package, as these indicate age and potential quality issues.
The point end contains more fat and is more forgiving during smoking, while the flat is leaner and requires more careful monitoring. Having both sections in one packer brisket allows you to manage different cooking rates and create a more interesting final product. Plan to cook your brisket the day before serving if possible, as this allows proper resting time and actually improves tenderness and flavor development.
Essential Equipment and Setup
Successful brisket smoking requires proper equipment and meticulous temperature control. At minimum, you need a smoker capable of maintaining 225-275°F consistently for 12-16 hours. Popular options include offset barrel smokers, ceramic kamado-style cookers, and pellet smokers. Each has advantages: barrel smokers offer traditional flavor and affordability, ceramic cookers provide superior temperature stability, and pellet smokers deliver convenience with digital controls.
Invest in reliable thermometers for both the smoker chamber and the meat itself. A quality instant-read digital thermometer is essential for monitoring internal temperatures accurately. Consider a wireless meat thermometer that allows remote monitoring, letting you check progress without opening the smoker door repeatedly. Unnecessary lid openings cause temperature fluctuations that extend cooking time and compromise the smoke ring development.
You’ll also need heavy-duty butcher paper for the Texas crutch phase, a sharp brisket knife for slicing, a sturdy cutting board, and heat-resistant gloves for handling. Have your wood selection ready before starting: oak, hickory, or mesquite work beautifully for brisket. Many pitmasters prefer a combination of oak and hickory for balanced smoke flavor without overwhelming intensity.
The Ultimate Dry Rub Recipe
This pitmaster-approved dry rub creates a flavorful bark while allowing the natural beef flavor to shine through. The recipe uses simple ingredients in precise proportions that complement rather than mask the meat’s inherent qualities.
Dry Rub Ingredients:
- 1/4 cup coarse black pepper (freshly cracked preferred)
- 1/4 cup kosher salt (Diamond Crystal or similar)
- 2 tablespoons garlic powder
- 2 tablespoons onion powder
- 1 tablespoon smoked paprika
- 1 tablespoon brown sugar
- 1 tablespoon chili powder
- 1 teaspoon cayenne pepper (optional, for heat)
- 1 teaspoon ground cumin
Mix all ingredients thoroughly in a small bowl, breaking up any clumps in the brown sugar. This rub should be applied generously to all surfaces of the brisket, creating an even coating. The beauty of this recipe lies in its simplicity—no MSG, no proprietary blends, just honest flavors that enhance rather than overpower. Store any leftover rub in an airtight container for up to three months.
The ratio of salt to pepper is intentionally high because these are the dominant flavors in traditional Texas barbecue. The garlic and onion powders provide umami depth, while the paprika adds subtle sweetness and color. Brown sugar caramelizes during smoking, creating complexity in the bark. This is not a sweet rub; the brown sugar amount is minimal and serves a specific purpose rather than making the brisket taste like dessert.
Preparation and Trimming
Proper preparation separates amateur smoking from pitmaster-level results. Remove your brisket from the refrigerator 30-45 minutes before smoking begins. This brings the meat closer to room temperature, promoting more even cooking throughout the thick sections. While waiting, prepare your smoker and bring it to the target temperature of 225°F.
Trim the fat cap to approximately one-quarter inch thickness using a sharp knife. This requires patience and a steady hand—take your time and make deliberate cuts rather than hacking away. Leave thicker fat in areas where the meat is thinner to provide insulation. Remove the hard fat and silverskin from the underside, but don’t over-trim; you need that fat for protection and flavor.
Pat the brisket completely dry with paper towels before applying the rub. Any moisture on the surface will create steam rather than allowing the rub to adhere properly and form a bark. Apply the rub generously to all surfaces, pressing it gently into the meat. Many pitmasters apply a light coat of mustard first to help the rub stick, though this is optional and primarily a matter of personal preference.
Let the seasoned brisket sit for 15-20 minutes before placing it in the smoker. This brief rest allows the salt to begin penetrating the meat and helps the rub adhere better during the initial smoking phase. Some pitmasters prefer to apply the rub the night before and refrigerate, which deepens flavor penetration, though this isn’t essential for excellent results.
Smoking Process Step by Step
Place the brisket fat-side up in your preheated smoker, positioning it on the grates away from direct heat source if possible. Insert your meat thermometer into the thickest part of the flat, being careful not to touch bone. Set your smoker to maintain 225°F, though many pitmasters prefer 250°F for faster cooking with comparable results. The lower temperature creates more smoke ring development and bark formation, while higher temperatures reduce total cooking time.
During the first 4-5 hours, resist the urge to open the smoker door. This initial phase is critical for smoke ring development and bark formation. The meat absorbs smoke most effectively during this period when the surface is still moist. Opening the door causes temperature swings that compromise results. Trust the process and let the smoke work undisturbed.
Maintain a consistent thin blue smoke throughout cooking. Thick, white smoke indicates incomplete combustion and creates acrid flavors. Adjust your wood placement and airflow to achieve clean smoke. Many pitmasters use a meat smoking reference guide to fine-tune their smoking techniques and troubleshoot common issues.
After 5-6 hours, you can begin monitoring progress more frequently, though still minimize door openings. The internal temperature should be rising gradually, approximately 1-2°F per hour during this phase. Continue smoking until the brisket reaches an internal temperature of 165°F in the thickest part of the flat, which typically occurs after 8-10 hours depending on brisket size and smoker temperature.
The Texas Crutch Technique
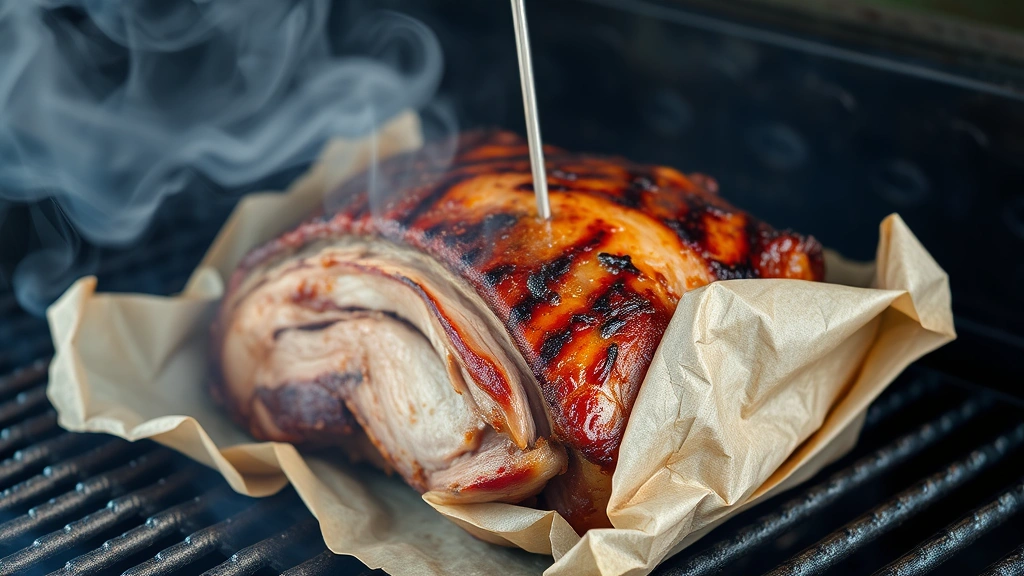
Once the brisket reaches 165°F internal temperature, it’s time to employ the Texas crutch—a technique that dramatically improves tenderness while reducing cooking time. This method involves wrapping the brisket tightly in heavy-duty butcher paper, which traps moisture and steam while still allowing some smoke penetration and bark development.
Remove the brisket from the smoker and wrap it tightly in butcher paper, keeping the thermometer in place. Some pitmasters add a liquid at this stage: a mixture of beef broth, butter, and brown sugar works beautifully. Pour this mixture into the paper wrap before sealing it completely. The liquid creates a steaming environment that breaks down connective tissue rapidly, transforming the texture from firm to fork-tender.
Return the wrapped brisket to the smoker and continue cooking at the same temperature. The internal temperature will begin rising more quickly now, typically 2-3°F per hour. Continue cooking until the brisket reaches 203°F internal temperature in the thickest part of the flat. At this temperature, the collagen has fully converted to gelatin, and the fat has rendered sufficiently for optimal texture and moisture retention.
The Texas crutch is not cheating; it’s a legitimate technique used by award-winning pitmasters nationwide. It respects the cooking process while achieving superior results through scientific understanding of meat transformation. The paper wrap allows you to control the environment while maintaining smoke exposure, creating the best of both worlds.
Testing for Doneness
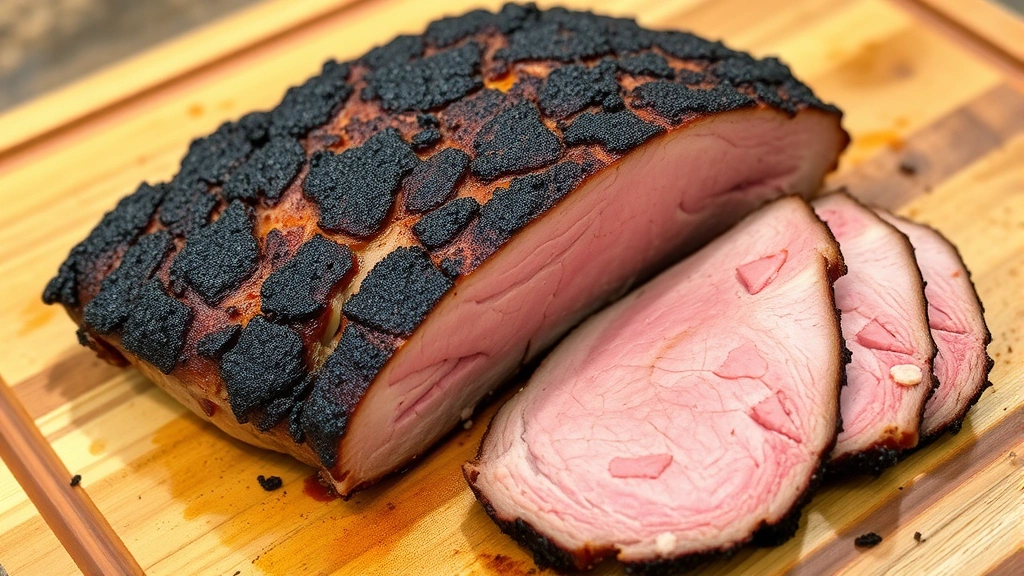
Proper doneness assessment requires understanding what happens at different internal temperatures. At 203°F, the brisket should feel probe-tender—when you insert your thermometer, it should slide through the meat with minimal resistance, almost like inserting a thermometer into warm butter. This probe test is more important than the actual temperature reading.
Test multiple locations throughout the brisket, checking both the flat and point. The flat is typically done first because it’s leaner, while the point may require an additional 30-60 minutes. Some pitmasters prefer cooking until the point reaches 205°F for even more tenderness, though 203°F is excellent for most purposes.
If you’re planning to serve the brisket immediately, you can cook slightly higher (205-208°F) to maximize tenderness. If you’re resting it overnight before serving, cooking to 203°F is ideal because extended resting continues the tenderizing process. The brisket will actually improve over 8-12 hours of proper resting, developing deeper flavors and more consistent texture throughout.
Resting and Slicing
Remove the brisket from the smoker when it reaches proper doneness and place it in a cooler wrapped in towels or a blanket. This resting phase is absolutely critical and non-negotiable. A minimum 30-minute rest is required, though 1-2 hours is ideal. During resting, carryover cooking continues slightly, and more importantly, the meat fibers relax and reabsorb moisture that was released during cooking.
If resting overnight, keep the brisket wrapped and at room temperature for 2-3 hours, then refrigerate. Before serving, allow it to come back to room temperature for 30-45 minutes. You can gently reheat it in a 275°F oven wrapped in foil, or simply slice cold and serve at room temperature for a different but equally delicious experience.
Slicing requires a sharp knife and proper technique. Always slice against the grain, which shortens the muscle fibers and creates more tender bites. The flat and point have different grain directions, so you’ll need to rotate the knife angle as you move between sections. Aim for slices approximately one-quarter inch thick—thick enough to hold together but thin enough to showcase tenderness.
Smoked brisket pairs beautifully with various sides and accompaniments. Consider serving alongside street tacos for a casual meal, or create a full barbecue spread with sides like baked beans, coleslaw, and cornbread. For something different, incorporate sliced brisket into recipes with hamburger substituting brisket for ground beef, or use it as a protein base in Mexican salad recipes for a smoky twist.
Store leftovers properly by keeping them in an airtight container in the refrigerator for up to four days. Smoked brisket freezes beautifully for up to three months when wrapped tightly in plastic wrap and foil. Reheat gently in a 275°F oven wrapped in foil with a splash of beef broth to restore moisture.
FAQ
How long does smoked brisket take to cook?
Total cooking time typically ranges from 12-16 hours depending on brisket size, smoker temperature, and individual variation. A general rule is 1-1.5 hours per pound at 225°F, though the Texas crutch technique can reduce this significantly. Cooking at 250°F instead of 225°F reduces time by approximately 20-25% with minimal quality compromise.
What wood is best for smoking brisket?
Oak, hickory, and mesquite are the traditional choices for brisket. Oak provides clean, balanced smoke flavor without overwhelming intensity. Hickory adds sweetness and moderate smoke strength. Mesquite delivers intense, bold flavor best used sparingly. Many pitmasters combine oak and hickory for complexity. Avoid softwoods like pine or cedar, which create acrid, unpleasant flavors.
Should I use a water pan in my smoker?
Water pans help stabilize smoker temperature and add humidity, which can improve bark formation. However, they’re not essential if your smoker maintains temperature well. If using one, fill it with water initially and add beef broth during the Texas crutch phase for added flavor. Some pitmasters skip water pans entirely and achieve excellent results through proper smoker maintenance.
Can I smoke brisket at higher temperatures?
Yes, brisket can be smoked successfully at 275-300°F, reducing total cooking time to 8-10 hours. Higher temperatures produce slightly less smoke ring but still deliver excellent flavor and tenderness. The Texas crutch becomes even more important at higher temperatures to prevent excessive moisture loss. Experiment to find your preferred balance between cooking time and results.
What’s the difference between the flat and the point?
The flat is leaner, less forgiving, and benefits from careful monitoring. It reaches proper doneness first and can dry out if overcooked. The point contains more fat and marbling, making it more forgiving and actually improving with longer cooking. Many pitmasters separate them partway through cooking to manage different cooking rates, though keeping them together is traditional and easier for beginners.
How do I know when brisket is done without a thermometer?
The probe test is the most reliable method: insert a meat thermometer or even a toothpick into the thickest part, and it should slide through with minimal resistance. The brisket should also have a beautiful dark bark and slight jiggle when moved. Experienced pitmasters develop instinct through practice, but thermometer confirmation is always recommended for consistency.
Can I wrap brisket in foil instead of butcher paper?
Yes, foil works for the Texas crutch and actually traps slightly more moisture than paper. However, butcher paper allows some smoke penetration and continued bark development during the wrapping phase. Foil creates a more steamed environment. Both methods work; choose based on your preference for final bark texture and smoke intensity. Many pitmasters prefer butcher paper for superior final results.


