Blackberry Pie Perfection? Grandma’s Secret Recipe
There’s something magical about a homemade blackberry pie that transports you back to simpler times. My grandmother’s blackberry pie recipe has been passed down through three generations, and after years of perfecting it in my own kitchen, I’m finally ready to share the secrets that make this dessert absolutely unforgettable. This isn’t just any blackberry pie—it’s a labor of love that combines the tartness of fresh blackberries with the perfect balance of spices and a buttery, flaky crust that melts on your tongue.
What makes this recipe truly special is the combination of techniques and ingredient choices that elevate it from ordinary to extraordinary. From selecting the perfect blackberries at peak ripeness to understanding the science behind pie crust construction, every step matters. Whether you’re a seasoned baker or someone who’s intimidated by pie-making, this comprehensive guide will walk you through the entire process with confidence and clarity.
Selecting and Preparing Blackberries
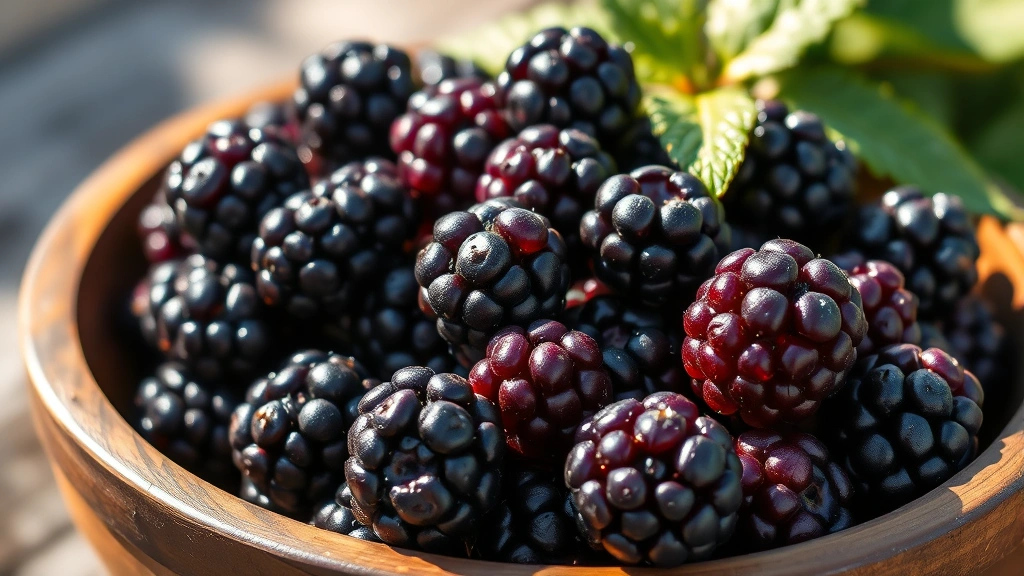
The foundation of an exceptional blackberry pie starts with choosing the right berries. Blackberries are delicate fruits that require careful selection and handling. When shopping for blackberries, look for berries that are uniformly dark, almost black in color, with a slight glossy sheen. Avoid any berries that appear red or dull, as these indicate they haven’t reached full ripeness and will lack the deep, complex flavor you’re seeking.
Fresh blackberries are best used within two to three days of purchase. If you’re buying them at a farmers market during peak season (typically June through August), you’re in luck—these will have superior flavor compared to those shipped from distant locations. However, frozen blackberries work beautifully in this recipe as well. The key difference is that frozen berries should be thawed and drained thoroughly before using, as excess moisture can result in a soggy pie.
When you bring your blackberries home, gently inspect them and remove any that show signs of mold or deterioration. Rinse them lightly under cool water and pat them dry with paper towels. This step is crucial because excess moisture on the berries will seep into your filling during baking. For this grandma’s secret blackberry pie recipe, you’ll need approximately 5 to 6 cups of fresh blackberries, which typically equals about 2 pounds.
One insider tip from my grandmother: if your blackberries seem particularly juicy, you can macerate them with a tablespoon of sugar for 15 minutes, then drain off some of the excess liquid before adding them to your filling. This prevents the pie from becoming overly wet while maintaining that gorgeous berry flavor.
Creating the Perfect Pie Crust
The crust is where many home bakers struggle, but with the right technique, you’ll achieve that coveted flaky texture that makes everyone ask for your secret. Grandma always said that cold ingredients and minimal handling are the keys to success. For this recipe, you’ll need 2.5 cups of all-purpose flour, 1 teaspoon of salt, 1 tablespoon of sugar, 1 cup of cold unsalted butter (cut into small cubes), and 6 to 8 tablespoons of ice water.
Start by combining your dry ingredients in a large mixing bowl. Whisk together the flour, salt, and sugar to distribute them evenly. The sugar adds a subtle sweetness and helps with browning. Now comes the critical part: cutting the cold butter into the flour mixture. Using a pastry cutter, two knives, or your fingertips, work the butter into the flour until the mixture resembles coarse cornmeal with pea-sized pieces of butter still visible. This is essential because these butter pockets will create steam during baking, resulting in those beautiful flaky layers.
Add your ice water gradually, starting with 6 tablespoons and mixing gently with a fork until the dough just comes together. You want the dough to be moist enough to hold together but not so wet that it becomes sticky. Divide the dough in half, shape each portion into a disk, wrap in plastic wrap, and refrigerate for at least 30 minutes. This resting period allows the gluten to relax and the butter to firm up, making the dough easier to roll out.
When you’re ready to assemble your pie, remove one disk from the refrigerator and let it sit at room temperature for 5 minutes to soften slightly. On a floured surface, roll it out to approximately 11 inches in diameter, about 1/8-inch thick. Transfer it to your 9-inch pie pan, letting it settle naturally into the corners without stretching. Trim the excess dough, leaving about a 1-inch overhang.
Filling Secrets and Flavor Balance
This is where grandma’s magic truly shines. The filling for a perfect blackberry pie requires more than just berries and sugar—it requires balance and understanding of flavor layers. For the filling, combine 5 to 6 cups of fresh blackberries with 3/4 cup of granulated sugar, 1/4 cup of brown sugar, 2 tablespoons of cornstarch, 1/4 teaspoon of ground cinnamon, 1/8 teaspoon of ground nutmeg, 1/4 teaspoon of ground ginger, 1/4 teaspoon of salt, and 2 tablespoons of fresh lemon juice.
The combination of white and brown sugar creates depth—white sugar provides sweetness while brown sugar adds molasses notes that complement the blackberries beautifully. The cornstarch is your thickening agent, and two tablespoons is the perfect amount to achieve a filling that holds together without becoming gummy. Some recipes use flour or tapioca starch, but cornstarch provides the clearest, most elegant result.
The spices are what elevate this from a simple berry pie to something truly memorable. Cinnamon adds warmth, nutmeg brings earthiness, and ginger provides a subtle spice that enhances rather than overpowers the berry flavor. Lemon juice is the secret weapon—it brightens the filling and makes the blackberry flavor pop without making the pie taste citrusy. These measurements might seem precise, but they represent years of testing and refinement.
In a large bowl, gently toss all your filling ingredients together until the berries are evenly coated. Let this mixture sit for 10 minutes, which allows the sugar to begin drawing out the berry juices and helps the cornstarch distribute evenly. This step ensures consistent thickening throughout your pie.
Assembly and Baking Techniques
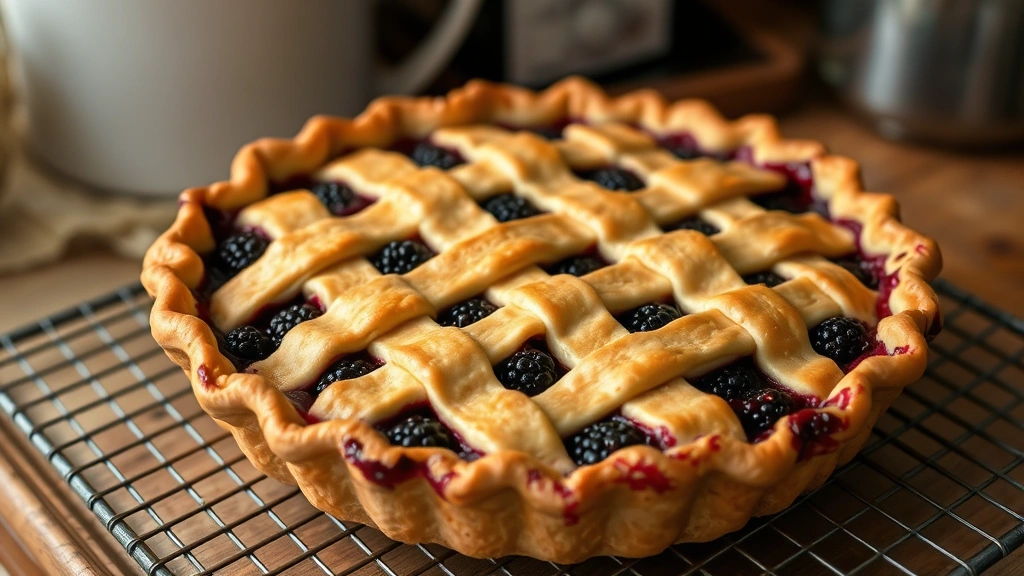
Pour your filling into the prepared pie crust, mounding it slightly in the center. Remove your second dough disk from the refrigerator and roll it out to the same thickness as the bottom crust. You have two options here: create a traditional top crust or make a lattice pattern. For a classic look, simply place the rolled dough over the filling. For a lattice, cut the dough into strips and weave them over the filling for a stunning presentation.
Trim the edges of both crusts to a 1-inch overhang, then fold this edge under itself and crimp with your fingers or a fork to create a seal. This crimped edge not only looks beautiful but also prevents the filling from leaking during baking. Brush the top crust with an egg wash (1 egg beaten with 1 tablespoon of water) to create that gorgeous golden-brown finish. Sprinkle with a small amount of coarse sugar for added texture and visual appeal.
Place your assembled pie on a baking sheet (to catch any drips) and refrigerate for at least 15 minutes while you preheat your oven to 375°F. This final chill is crucial because it prevents the crust from shrinking during baking. Bake for 50 to 60 minutes, until the crust is deep golden brown and you can see the filling bubbling slightly at the edges. If the edges brown too quickly, tent them loosely with aluminum foil after 30 minutes.
The baking time can vary depending on your oven and the moisture content of your berries. You’ll know the pie is done when the filling has set slightly but still jiggles just a bit when you gently shake the pie pan. This indicates that the cornstarch has fully thickened the filling without overcooking the berries.
Cooling, Serving, and Storage
This is the hardest part—patience. Remove your pie from the oven and let it cool on a wire rack for at least 3 hours before slicing. I know it smells incredible and you’re eager to dig in, but this cooling period is when the filling sets properly. If you cut into a warm pie, the filling will run and your slices won’t hold together beautifully.
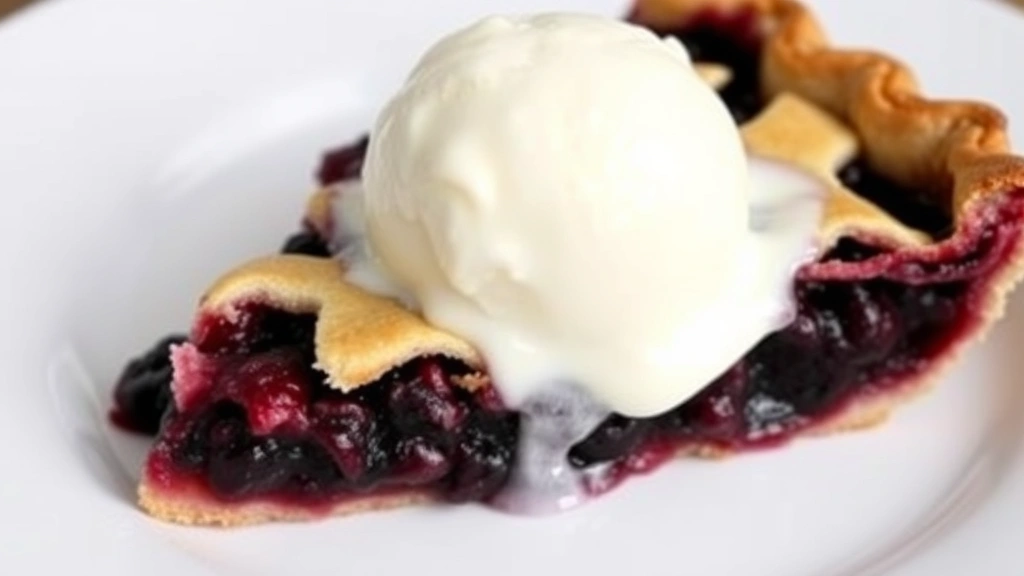
Once cooled completely, you can serve your blackberry pie at room temperature or chilled. Some people prefer it slightly warm with a scoop of vanilla ice cream, while others enjoy it cold the next day. Both presentations are absolutely delicious. A homemade whipped cream or a dollop of crème fraîche adds elegance if you’re serving this at a special gathering.
For storage, cover your cooled pie loosely with plastic wrap and keep it at room temperature for up to 2 days. After that, refrigerate it for up to 4 additional days. You can also freeze an unbaked assembled pie for up to 2 months—just add 10 to 15 minutes to your baking time if baking from frozen. This makes it perfect for preparing ahead for special occasions.
Troubleshooting Common Issues
Even experienced bakers encounter challenges, so let’s address the most common issues. If your crust is soggy, the problem usually stems from excess moisture in the filling or underbaking. Next time, try blind-baking your bottom crust for 10 minutes before adding the filling, or ensure your berries are thoroughly drained if using frozen ones.
If your filling is too runny, you either need more cornstarch or your berries contained more liquid than expected. Remember that cornstarch thickens as it cools, so a slightly loose filling when hot will firm up considerably. If your crust is browning too quickly, your oven might run hot—consider using an oven thermometer to verify the temperature, and don’t hesitate to tent with foil.
Cracks in your crust are purely cosmetic and don’t affect taste, but if you want to prevent them, ensure your dough isn’t too dry and avoid overworking it. If your pie is leaking filling, your seal might not be tight enough—press the edges more firmly next time, or use an egg wash to help the two crusts bond.
FAQ
Can I make this pie ahead of time?
Absolutely! You can prepare the pie completely and freeze it unbaked for up to 2 months. Simply bake it directly from the freezer, adding 10 to 15 minutes to the baking time. Alternatively, bake it and store the cooled pie in the refrigerator for up to 4 days.
What’s the best substitute if I can’t find fresh blackberries?
Frozen blackberries work wonderfully in this recipe. Thaw them completely and drain off excess liquid before using. You can also use a combination of blackberries with raspberries or marionberries for a different flavor profile.
Can I reduce the sugar in this recipe?
While you can reduce sugar slightly (by 2 to 3 tablespoons), be aware that sugar plays a role in thickening and structure. Reducing it too much may result in a runnier filling. I recommend keeping the sugar amounts as specified for best results.
Is there a dairy-free option for the crust?
Yes! You can substitute the butter with a dairy-free butter alternative in a 1:1 ratio. Keep it cold and follow the same technique. The results will be slightly different in texture but still delicious.
How do I know when the pie is fully baked?
The crust should be deep golden brown, and you should see the filling bubbling at the edges. The filling should jiggle slightly when you gently shake the pan—this indicates it’s set but not overcooked.
Can I use a store-bought crust?
While you can use store-bought crusts for convenience, homemade crust truly makes a difference in flavor and texture. However, if time is limited, quality store-bought options will still yield a delicious pie.
Creating the perfect blackberry pie requires attention to detail and quality ingredients, but the reward—a slice of pure nostalgia and flavor—is absolutely worth the effort. This grandma’s secret recipe has brought joy to countless family gatherings, and now it can do the same for your loved ones. Whether you’re baking for a special occasion or simply craving a taste of home, this blackberry pie recipe will not disappoint.
For additional baking inspiration, explore best breakfast food recipes that complement your pie perfectly. If you’re interested in perfecting other techniques, how to make homemade sauces can help you create beautiful accompaniments. You might also enjoy learning how to grill steak perfectly for a complete dinner experience.
For deeper insights into baking science and techniques, visit King Arthur Baking Company, which offers comprehensive guides on pie-making fundamentals. The Serious Eats website provides detailed food science explanations for why certain techniques work. For traditional baking methods, check out The Kitchn, which features tested recipes and techniques. Additionally, Cook’s Illustrated offers rigorous recipe testing and explanations, and Food & Wine provides professional chef insights into dessert preparation.


