Succulent Boneless Prime Rib? Chef-Approved Method
Prime rib is the crown jewel of holiday dinners and special occasions, yet many home cooks fear tackling this impressive cut. The good news? A boneless prime rib is actually more forgiving than its bone-in counterpart, offering even cooking and easier carving. This chef-approved method transforms a premium cut into a showstopping centerpiece with a perfectly pink interior and a caramelized crust that’ll have your guests asking for the recipe.
Whether you’re hosting an intimate dinner or feeding a crowd, mastering boneless prime rib elevates your cooking repertoire. The key lies in understanding temperature control, proper seasoning, and the reverse-sear technique that professional chefs swear by. No special equipment required—just patience, precision, and confidence.
Why Boneless Prime Rib Wins
Boneless prime rib offers distinct advantages over bone-in cuts. The absence of bone allows heat to penetrate more evenly throughout the roast, reducing hot spots and ensuring consistent doneness from edge to center. This uniform cooking makes it significantly easier for home cooks to achieve that restaurant-quality result without extensive experience.
The boneless cut also provides practical benefits: it carves cleanly into uniform slices, fits easily into standard ovens, and stores more efficiently in your refrigerator. You’ll spend less time wrestling with the meat and more time perfecting the technique. Additionally, boneless prime rib typically costs slightly less per pound than bone-in varieties while delivering identical flavor and tenderness when prepared correctly.
Professional chefs prefer boneless cuts for catering events and high-volume services precisely because of this reliability. The predictable cooking time and consistent results make menu planning simpler and execution more confident. When you pair boneless prime rib with complementary dishes like taco dip or vegetable dip as appetizers, you create a memorable dining experience.
Selecting and Preparing Your Meat
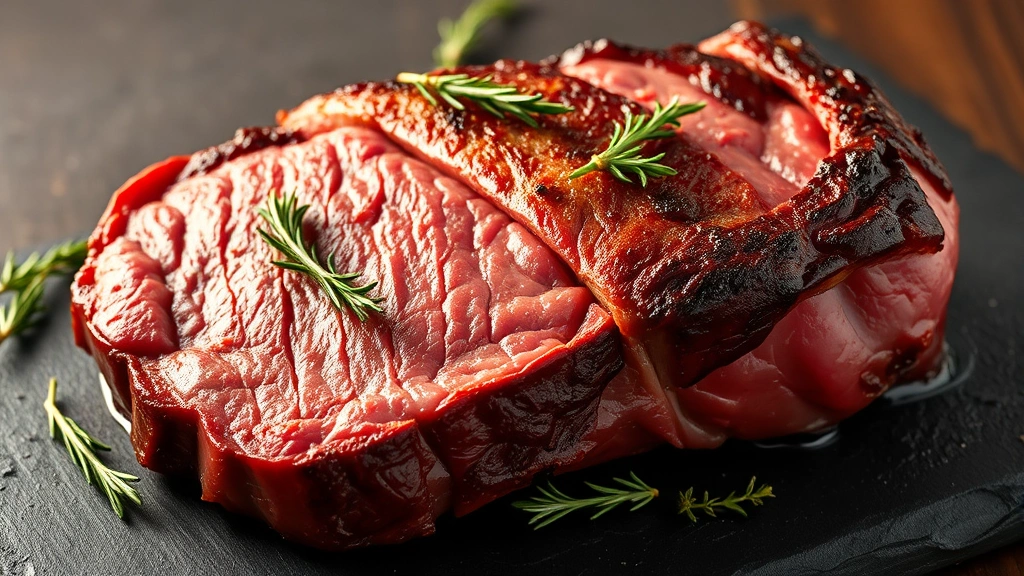
Quality begins at selection. Choose a boneless prime rib that’s well-marbled with white fat distributed throughout the muscle. Marbling is essential—it melts during cooking, basting the meat from within and creating that succulent texture that defines premium beef. Look for bright red color and avoid any cuts with brown or gray patches, which indicate age or improper storage.
Plan to purchase your prime rib 2-3 days before cooking. This advance timing allows you to apply a dry brine, which we’ll discuss next. Request that your butcher cut the roast to your desired size; a 4-6 pound boneless prime rib serves 6-8 people generously with minimal waste.
Remove the roast from refrigeration 40 minutes before cooking. This tempering step is crucial—it allows the meat’s interior to approach room temperature, ensuring even cooking throughout. Cold meat placed directly in a hot oven cooks unevenly, with the exterior overdone before the interior reaches proper temperature. Pat the surface completely dry with paper towels before seasoning; moisture prevents browning.
The Dry Brine Method
Dry brining is the secret weapon of professional kitchens, and it’s surprisingly simple. This process uses salt to draw moisture from the meat’s surface, which then reabsorbs, penetrating deep into the muscle fibers. Unlike wet brining, dry brining doesn’t waterlog the meat or dilute its natural flavors.
The Process:
- Pat your boneless prime rib completely dry with paper towels
- Season generously with kosher salt (approximately 1 teaspoon per pound)
- Place on a wire rack set over a rimmed baking sheet
- Refrigerate uncovered for 24-48 hours
- The surface will appear slightly wet—this is normal and desired
During dry brining, enzymatic activity breaks down muscle proteins, creating a more tender final product. The salt also enhances the meat’s ability to retain moisture during cooking, preventing the common problem of dry, tough prime rib. This step alone accounts for much of the difference between amateur and professional results.
Seasoning Like a Chef
After dry brining, your boneless prime rib is already seasoned internally. Resist the urge to add more salt at this stage. Instead, focus on building flavor layers with complementary seasonings that enhance rather than mask the beef’s natural taste.
The Chef’s Seasoning Blend:
- 2 tablespoons freshly ground black pepper
- 1 tablespoon garlic powder
- 1 tablespoon onion powder
- 2 teaspoons dried thyme
- 2 teaspoons dried rosemary
- 1 teaspoon smoked paprika
- 3 tablespoons high-quality olive oil
Combine all dry seasonings in a small bowl. Rub the olive oil over the entire surface of your boneless prime rib, then apply the seasoning blend, pressing gently so it adheres. This creates the foundation for a flavorful crust while the oil promotes browning through the Maillard reaction—the chemical process that creates that coveted caramelized exterior.
For enhanced depth, consider adding fresh garlic cloves and herb sprigs (thyme and rosemary) to the roasting pan. These aromatics perfume the meat as it cooks and can be used to create a pan sauce afterward.
The Reverse-Sear Technique
The reverse-sear method is what separates ordinary prime rib from exceptional prime rib. This technique, pioneered by food scientists and adopted by top chefs, involves slow roasting at low temperature followed by a quick, high-heat sear. This approach delivers edge-to-edge doneness with a perfect crust—something nearly impossible to achieve with traditional high-heat roasting.
Step-by-Step Execution:
Phase One: Low and Slow
- Preheat your oven to 275°F (135°C)
- Place boneless prime rib on a roasting pan with a wire rack
- Insert a meat thermometer into the thickest part, ensuring it doesn’t touch bone (though this cut has none)
- Roast at 275°F until the internal temperature reaches 115°F for medium-rare (120°F for medium)
- This typically takes 2-3 hours depending on roast size and oven calibration
- Maintain consistent temperature—use an oven thermometer to verify accuracy
The low-temperature phase allows heat to penetrate gradually and evenly. The meat’s proteins denature slowly, retaining moisture that would otherwise escape during high-heat cooking. This is why reverse-seared prime rib remains so succulent—the gentle heat preserves the muscle’s ability to hold water.
Phase Two: The Sear
- Remove boneless prime rib from oven when target temperature is reached
- Transfer to a cutting board and rest for 15 minutes
- Heat a cast-iron skillet over high heat until smoking (approximately 5 minutes)
- Pat the roast dry with paper towels
- Sear all sides for 60-90 seconds per side, working quickly
- The surface should develop a dark mahogany crust
The high-heat sear happens after the roast has already reached target temperature, so you’re not cooking the interior further—you’re only developing the exterior crust. This precision prevents overcooking while maximizing browning. A detailed guide to reverse-searing from culinary experts confirms this method’s reliability.
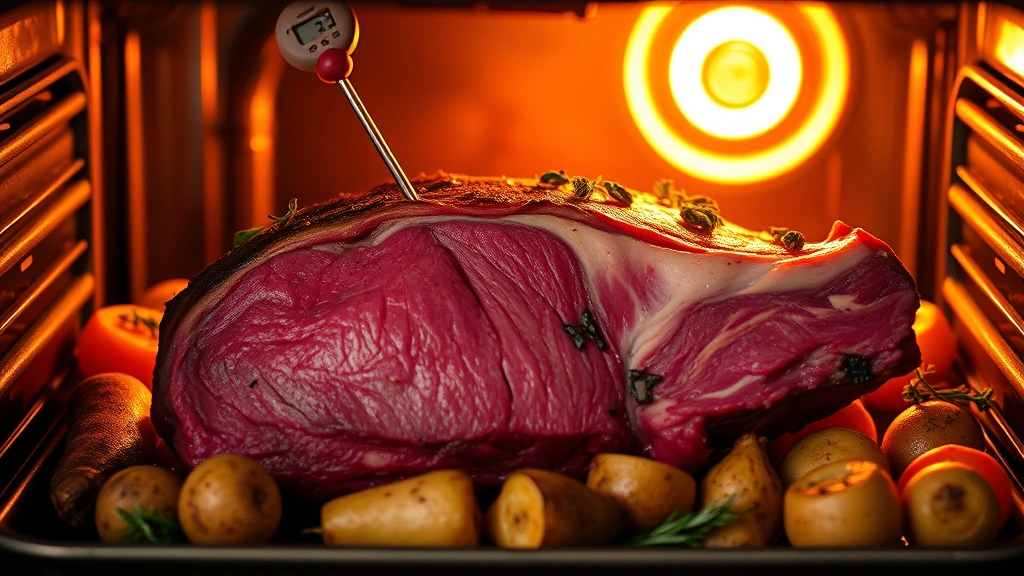
Temperature Tracking Essentials
Accurate temperature monitoring is non-negotiable when cooking boneless prime rib. The difference between rare, medium-rare, and medium is just a few degrees—without proper thermometry, you’re guessing.
Recommended Tools:
- Instant-read digital thermometer (most accurate for quick readings)
- Oven-safe meat thermometer (remains in meat during cooking)
- Oven thermometer (verifies your oven’s actual temperature)
Insert your thermometer into the thickest part of the roast, away from any fat pockets. Take multiple readings from different locations to ensure accuracy. Many chefs prefer removing the boneless prime rib at 115°F for medium-rare, knowing residual heat will bring it to 130°F during resting—the USDA’s recommendation for safe beef consumption.
An oven thermometer is essential because most home ovens run 25-50°F hotter or cooler than their settings indicate. Discovering this discrepancy mid-cook wastes time and risks overcooking your expensive roast. Mount it at eye level for easy monitoring throughout the cooking process.
Resting Your Prime Rib
Resting is not optional—it’s mandatory for premium results. When meat cooks, its muscle fibers contract and expel moisture. Resting allows fibers to relax and reabsorb that moisture, creating a juicier final product. Skipping this step results in a dry roast regardless of how perfectly you cooked it.
The Resting Protocol:
- Remove boneless prime rib from oven at target temperature
- Tent loosely with aluminum foil (don’t wrap tightly)
- Place on a warm cutting board in a draft-free location
- Rest for 15-20 minutes minimum for a 4-6 pound roast
- Larger roasts (8+ pounds) should rest 20-30 minutes
During resting, the roast’s residual heat continues cooking the exterior while the interior cools slightly, equalizing temperature throughout. This creates that ideal edge-to-edge pink color. The loose foil tent retains heat without trapping steam that would soften your carefully developed crust.
You can prepare side dishes while your boneless prime rib rests—this timing works perfectly with easy mocktail recipes for appetizers or final touches on vegetables and starches.
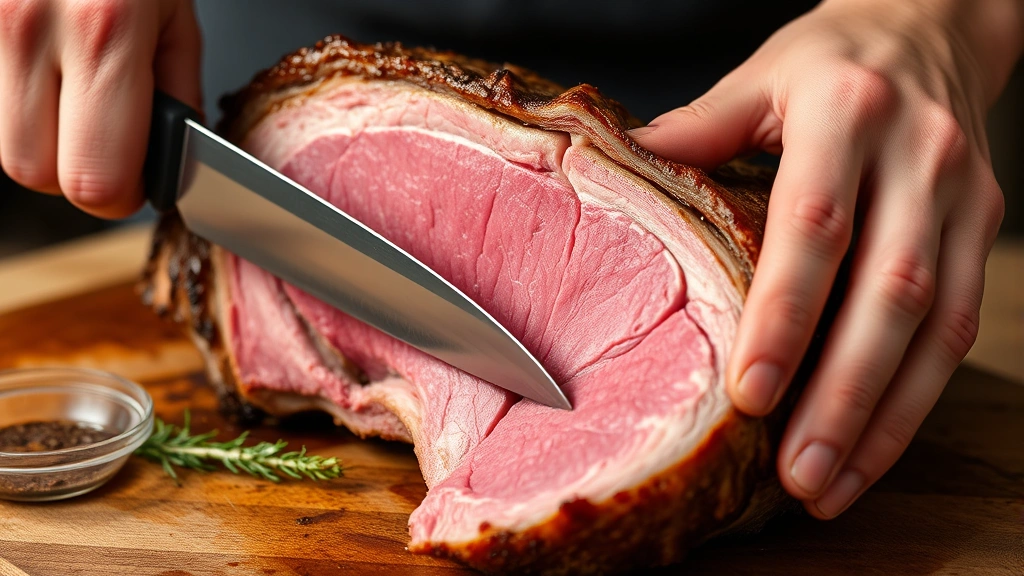
Carving and Serving
Proper carving technique preserves the beautiful pink interior and presents your boneless prime rib professionally. A dull knife tears muscle fibers and creates an unappealing appearance, while a sharp knife produces clean, uniform slices.
Carving Steps:
- Use a sharp carving knife (10-12 inches) and carving fork
- Position the roast with the grain running left to right
- Make thin, even slices perpendicular to the grain (approximately ½-inch thick)
- Use the fork to steady the meat—don’t pierce it repeatedly
- Arrange slices slightly overlapping on a warm serving platter
- Drizzle with pan juices or prepared sauce
Cutting against the grain shortens muscle fibers, creating a more tender bite. If you’re uncertain about grain direction, make a small test cut before committing to full carving. The first and last slices are often thinner due to the roast’s shape—reserve these for the chef’s perks.
Pairing Suggestions
Your beautifully prepared boneless prime rib deserves complementary sides and beverages. Classic pairings include creamed horseradish sauce, Yorkshire pudding, roasted root vegetables, and loaded baked potatoes. For lighter accompaniments, consider chipotle guac as an unexpected but delicious complement to the rich beef.
Wine pairing is equally important. Cabernet Sauvignon, Bordeaux blends, and Burgundy wines have the structure and tannins to stand up to prime rib’s richness. For non-alcoholic options, explore slow-cooked vegetable preparations that enhance the meal’s overall balance.
Consider preparing a pan sauce from the roasting liquid: deglaze the pan with red wine, add beef stock, reduce by half, and finish with cold butter. This sauce elevates each slice and uses every bit of flavor from the cooking process.
FAQ
How long does boneless prime rib take to cook?
Using the reverse-sear method at 275°F, expect approximately 30-35 minutes per pound. A 4-pound roast typically takes 2-2.5 hours to reach 115°F. Actual time varies based on oven accuracy and roast shape, so rely on thermometer readings rather than time estimates.
Can I cook boneless prime rib at higher temperatures?
Yes, but results suffer. Traditional high-heat roasting (425-450°F) creates a smaller temperature gradient between exterior and interior, making it harder to achieve a pink center with a brown crust. The reverse-sear method’s low-temperature phase solves this problem, which is why chefs prefer it.
What’s the difference between prime rib and ribeye?
Prime rib is a large roast cut from the rib section, while ribeye is an individual steak from the same section. Prime rib refers to the cooking method (roasting) and cut size, not the beef grade. Both can be prime grade beef, though the term “prime rib” has become colloquial for any high-quality rib roast.
Should I season boneless prime rib the night before?
Absolutely. The dry brine process requires 24-48 hours, during which salt penetrates the meat. Add your flavor seasonings (garlic, herbs, pepper) 2-4 hours before cooking, or immediately before if you prefer fresher herb flavors.
How do I know when boneless prime rib is done?
Use a meat thermometer. Rare is 120-125°F, medium-rare is 130-135°F, and medium is 140-145°F. Remove the roast 5°F below your target, as carryover cooking during resting will increase temperature by approximately 5°F.
Can I prepare boneless prime rib ahead of time?
Yes. Complete the dry brine and seasoning up to 48 hours ahead. Bring the roast to room temperature 40 minutes before cooking. You cannot safely hold a cooked boneless prime rib for extended periods; cook it as close to serving time as possible, then rest it covered loosely with foil.
What pan is best for roasting boneless prime rib?
Use a heavy-bottomed roasting pan with a wire rack. Stainless steel or dark aluminum conducts heat evenly. The wire rack elevates the meat, allowing heat to circulate underneath and promoting even cooking. Avoid glass pans, which heat unevenly and can cause hot spots.


