Ultimate Cherry Cheesecake Recipe: Proven Steps for Bakery-Quality Results
Cherry cheesecake represents the pinnacle of dessert craftsmanship, combining a buttery graham cracker crust, creamy filling, and vibrant cherry topping into one showstopping creation. This cherry cheesecake recipe has been tested countless times to deliver consistent, restaurant-quality results that will impress your guests and satisfy even the most discerning palates. Whether you’re preparing dessert for a special occasion or simply craving something indulgent, mastering this classic will elevate your baking repertoire.
The key to achieving the ultimate cherry cheesecake lies in understanding the science behind each component. From preventing cracks in the filling to achieving the perfect crust texture, every detail matters. This comprehensive guide walks you through professional techniques used by pastry chefs, ensuring your homemade version rivals any bakery offering. You’ll learn insider secrets that transform a good cheesecake into an exceptional one.
Essential Ingredients and Preparation
Before you begin, gather all ingredients at room temperature—this is non-negotiable for achieving a smooth, lump-free filling. For the crust, you’ll need two cups of graham cracker crumbs, one-third cup of granulated sugar, and six tablespoons of melted butter. The filling requires 32 ounces of cream cheese (four 8-oz packages), one cup of granulated sugar, one cup of sour cream, two teaspoons of vanilla extract, four large eggs, and three tablespoons of cornstarch. For the cherry topping, use two cans (21 ounces each) of cherry pie filling or prepare your own with fresh cherries, sugar, and lemon juice.
Temperature control is absolutely critical. Remove cream cheese from the refrigerator 30-45 minutes before mixing. Cold cream cheese creates lumps that won’t incorporate smoothly, resulting in a grainy texture. The same applies to eggs and sour cream. Room-temperature ingredients blend seamlessly, creating that coveted silky consistency. Additionally, prepare a springform pan by wrapping the outside with heavy-duty aluminum foil to prevent water from seeping into your crust during the water bath process.
Consider exploring best healthy food recipes if you’re interested in lighter dessert variations. You might also appreciate learning about how to preserve herbs for creating fresh garnishes.
Crafting the Perfect Crust
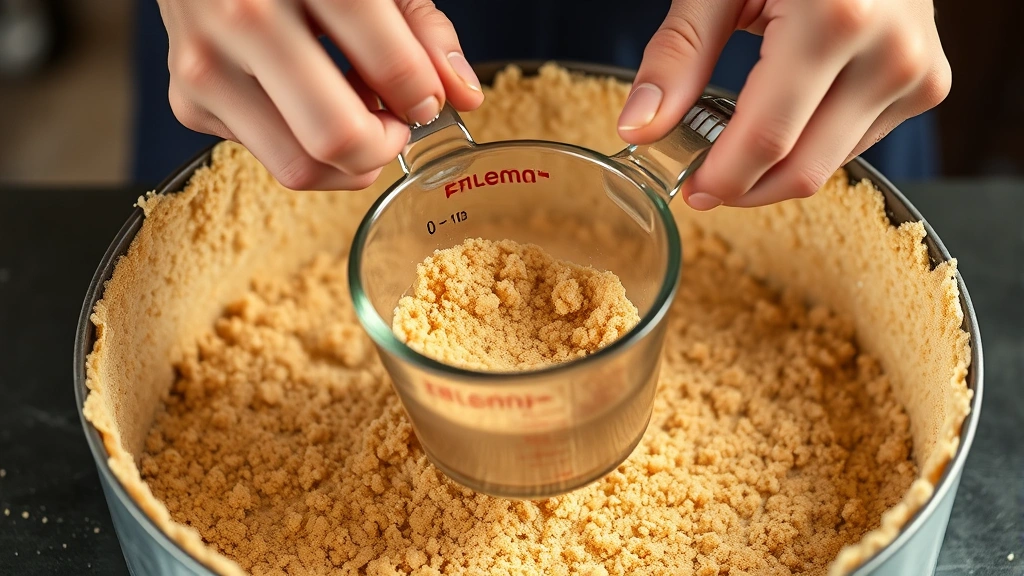
The foundation of any exceptional cheesecake is a sturdy, flavorful crust that provides textural contrast to the creamy filling. Begin by combining two cups of graham cracker crumbs with one-third cup of sugar in a medium bowl. The sugar adds subtle sweetness that complements the tartness of the cherries. Mix thoroughly to ensure even distribution.
Pour six tablespoons of melted butter over the crumb mixture and stir until the texture resembles wet sand. Every crumb should be lightly coated with butter. Press this mixture firmly into the bottom of your prepared springform pan, using the bottom of a measuring cup to create an even, compact layer. This prevents a crumbly crust that might separate from the filling.
For added depth, consider adding one tablespoon of finely ground almonds to the crust mixture, or substitute one-quarter cup of the graham crackers with crushed vanilla wafers. These variations add complexity without overwhelming the classic flavor profile. Bake the crust at 325°F for 8-10 minutes until lightly golden and fragrant, then remove and let cool while you prepare the filling.
Creating a Silky Cheesecake Filling
This is where precision matters most. Using an electric mixer on low speed, beat 32 ounces of softened cream cheese for approximately three minutes until completely smooth and creamy. Scrape down the bowl frequently to ensure no lumps remain. Overbeating incorporates excess air, which causes the surface to crack during baking.
Combine one cup of granulated sugar with three tablespoons of cornstarch in a separate bowl. This mixture prevents the filling from becoming too dense while adding stability. Gradually add this mixture to the cream cheese while mixing on low speed, beating only until combined—typically 1-2 minutes. Overmixing at this stage is the primary cause of cracks in the finished cake.
In a small bowl, whisk together one cup of sour cream and two teaspoons of vanilla extract. Add this to the cream cheese mixture and blend on low speed for about one minute until just combined. The sour cream adds tanginess that balances the sweetness and creates a more complex flavor profile.
Finally, add four large eggs one at a time, mixing on low speed after each addition and scraping down the bowl between additions. Add each egg completely before adding the next. This slow incorporation prevents overmixing and ensures even distribution. The batter should be smooth, glossy, and homogeneous with no visible egg white streaks.
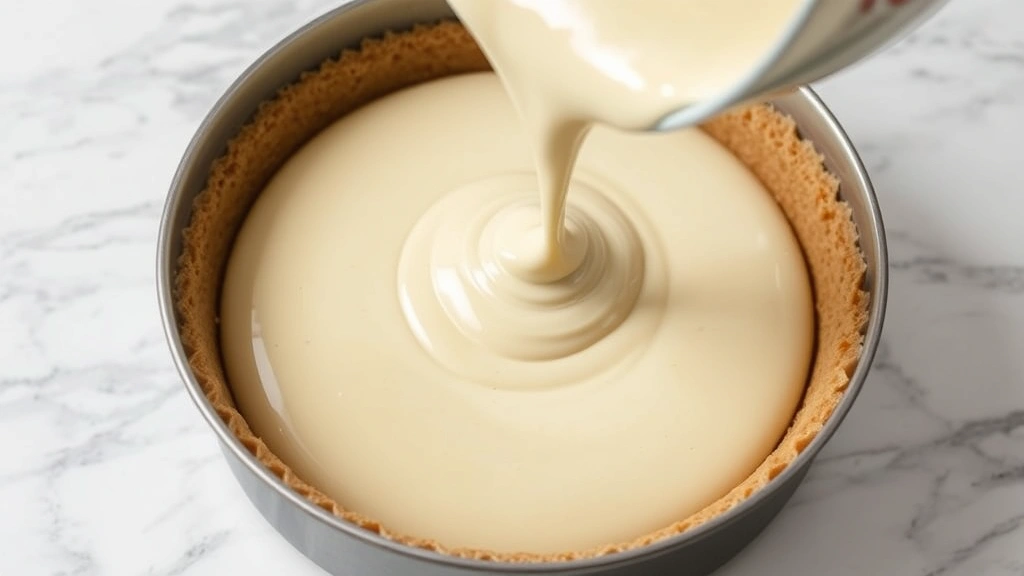
Pour the filling into your prepared crust and smooth the top with a spatula. Tap the pan gently on the counter several times to release air bubbles trapped in the batter—these become cracks during baking.
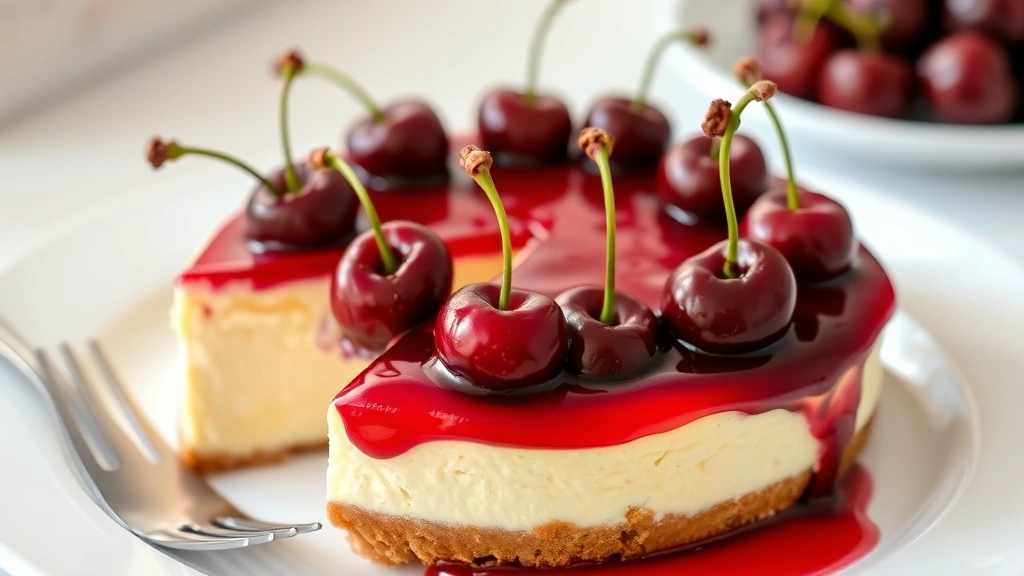
Cherry Topping Mastery
The cherry topping provides the visual appeal and flavor burst that makes this dessert memorable. If using canned cherry pie filling, simply transfer it to a bowl and let it reach room temperature. For a homemade version that offers superior flavor and control, combine two pounds of fresh cherries (pitted), three-quarters cup of sugar, two tablespoons of cornstarch, one tablespoon of fresh lemon juice, and one-quarter teaspoon of almond extract in a saucepan.
Cook the cherry mixture over medium heat, stirring frequently, until the cherries release their juices and the mixture thickens—approximately 8-10 minutes. The cornstarch thickens the liquid without creating a gelatinous texture. The lemon juice brightens the cherry flavor and prevents the topping from tasting one-dimensional. Cool the cherry topping completely before applying it to the baked cheesecake; warm topping can cause the cake to crack.
For a professional presentation, reserve some whole cherries with stems and arrange them decoratively on top of the cheesecake before adding the sauce. This creates visual interest and indicates premium quality to anyone enjoying your creation.
Baking and Cooling Process
Place the filled springform pan into a larger roasting pan. Pour hot water into the roasting pan until it reaches halfway up the sides of the springform pan. This water bath (or bain-marie) ensures gentle, even heat distribution, preventing cracks and promoting even cooking throughout the filling. The water should be hot but not boiling when you place the pan in the oven.
Bake at 325°F for 55-70 minutes. The cheesecake is done when the edges are set but the center still jiggles slightly when you gently shake the pan—approximately a 2-inch diameter circle in the very center should wobble. The internal temperature should reach 150°F when measured with an instant-read thermometer inserted 2 inches from the edge.
Turn off the oven and crack the door open about 4 inches. Leave the cheesecake in the oven for one hour. This gradual temperature change prevents the dramatic shrinking and cracking that occurs with rapid cooling. After one hour, remove the cheesecake from the oven and let it cool at room temperature for another hour, then refrigerate for at least 6 hours, preferably overnight.
This extended cooling period allows the filling to set completely and develop its signature creamy texture. The flavors also meld and intensify during this resting period, making the cheesecake taste even better the next day.
Troubleshooting Common Issues
Cracks in the surface: These occur from rapid temperature changes or overmixing the batter. Ensure you’re using room-temperature ingredients, mixing on low speed, and cooling gradually. A water bath is essential. A thin layer of sour cream spread over the top before chilling masks minor cracks beautifully.
Dense or gluey texture: This results from overmixing the filling or baking at too high a temperature. Mix only until ingredients are combined, never until fluffy. Use an oven thermometer to verify your oven’s actual temperature—many run hot or cold. Overbaking also creates density; remove the cake when the center still jiggles slightly.
Soggy crust: Ensure your crust is fully wrapped with foil on the outside of the springform pan, and verify the water isn’t leaking in. Some bakers place the springform pan inside a large freezer bag before wrapping with foil for extra protection.
Grainy texture: This indicates lumpy cream cheese or insufficient mixing of ingredients. Always soften cream cheese at room temperature and beat it thoroughly before adding other components. Use a quality cream cheese brand for superior results.
Uneven baking: Position the oven rack in the lower-middle position to ensure gentle, even heat. If your oven has hot spots, rotate the pan halfway through baking. Use an oven thermometer to verify accurate temperature.
If you’re interested in mastering other baking techniques, explore how to cook with cast iron for developing fundamental kitchen skills. You might also enjoy learning how to make homemade pasta to expand your cooking repertoire.
FAQ
Can I make cherry cheesecake ahead of time?
Absolutely. Cheesecake actually improves when made 1-2 days ahead. The flavors develop and intensify during refrigeration. Store it covered in the refrigerator for up to five days. You can also freeze cheesecake (without topping) for up to three months; thaw slowly in the refrigerator before serving.
How do I remove the cheesecake from the springform pan?
Run a thin-bladed knife around the edges between the cake and pan to loosen it. Remove the springform ring carefully. If serving on the crust, leave it on the pan base. For a cleaner presentation, slide a thin metal spatula under the cake to separate it from the base, then transfer to a serving plate.
Can I substitute the cherries with other fruits?
Yes. Strawberries, blueberries, raspberries, or a mixed berry topping work beautifully. Prepare them using the same method as the cherry topping. Fruit coulis (strained fruit sauce) also provides an elegant presentation.
What if my oven doesn’t have an accurate temperature?
Invest in an oven thermometer—they’re inexpensive and invaluable. Position it on the oven rack at the same level as your cheesecake. Adjust your oven temperature up or down based on the thermometer reading to ensure accurate baking.
Why is my cheesecake leaking from the springform pan?
The foil wrapping likely has a hole or gap. Ensure the entire outside is wrapped securely with heavy-duty foil, extending up the sides and folded over the rim. Some bakers use plastic wrap under the foil for extra protection.
Can I use a regular cake pan instead of a springform pan?
A springform pan is strongly recommended because it allows easy removal without damaging the cake. If you must use a regular pan, line the bottom with parchment paper and oil the sides, then run a knife around the edges and invert onto a serving plate (risky but possible).
How should I slice the cheesecake for serving?
Use a long, thin-bladed knife dipped in hot water and wiped clean between each slice. This prevents the cake from sticking and tearing. A sharp chef’s knife works better than a serrated knife for cheesecake.
External Resources:
- Culinary Schools International – Professional baking techniques and certifications
- Serious Eats – Food science explanations and detailed recipe testing
- King Arthur Baking Company – Professional baking ingredient recommendations and tutorials
- ChefSteps – Advanced cooking techniques and precision baking methods
- Journal of Food Science – Research on baking chemistry and ingredient interactions


