How to Make Chicken Crust Pizza: Pro Tips Inside
Chicken crust pizza has revolutionized the way home cooks approach this beloved classic. By replacing traditional dough with seasoned ground chicken, you create a protein-packed, low-carb alternative that delivers incredible flavor and texture. This innovative recipe combines the crispy, golden exterior you crave with the juicy, tender interior that makes pizza irresistible. Whether you’re following a carnivore diet or simply looking to boost protein intake, chicken crust pizza offers a game-changing solution for pizza night.
The beauty of this recipe lies in its simplicity and versatility. With just a few quality ingredients and basic kitchen techniques, you can create restaurant-quality pizza at home. The chicken crust holds up beautifully to your favorite toppings, from classic pepperoni to gourmet combinations. Learn the professional secrets that separate mediocre chicken crust from exceptional pizza that will impress family and friends.
Understanding Chicken Crust Pizza Basics
Chicken crust pizza represents a significant departure from traditional bread-based pizzas, offering unique advantages for modern home cooks. The fundamental concept involves mixing ground chicken with binding agents and seasonings to create a moldable dough-like mixture. This mixture is then pressed into a pizza pan, baked until firm, and topped with your favorite sauce and ingredients.
The texture profile of chicken crust differs notably from wheat flour crusts. Rather than achieving a yeasty, airy crumb structure, chicken crusts develop a more compact, meat-forward texture similar to a well-cooked meatloaf. This denser consistency actually provides superior structural integrity for supporting heavier toppings. Professional chefs at culinary institutes increasingly recognize chicken crust pizza as a legitimate cooking technique that demonstrates protein-handling expertise.
Understanding the science behind this recipe enhances your ability to troubleshoot and innovate. Ground chicken contains approximately 65% water content, which means managing moisture is critical. The binding agents you incorporate—typically eggs and breadcrumbs or grated cheese—work to stabilize the mixture and create a cohesive structure. When heat is applied, proteins denature and cross-link, creating the firm foundation necessary to support pizza toppings.
Essential Ingredients and Preparation
Creating an exceptional chicken crust pizza begins with sourcing quality ingredients. The foundation of your recipe requires approximately two pounds of ground chicken, preferably a blend of white and dark meat. Dark meat provides superior moisture and flavor compared to white meat alone, resulting in a more succulent final product. If your grocery store only stocks all-white ground chicken, consider purchasing chicken thighs and grinding them yourself using a food processor.
Core Ingredients:
- 2 pounds ground chicken (preferably 70% white, 30% dark meat)
- 3 large eggs
- 1/2 cup grated Parmesan cheese
- 1/3 cup almond flour or breadcrumbs
- 2 teaspoons Italian seasoning
- 1 teaspoon garlic powder
- 1 teaspoon onion powder
- 1/2 teaspoon black pepper
- 1 teaspoon salt
- 1/4 teaspoon red pepper flakes
- 2 tablespoons fresh parsley, finely chopped
When selecting ground chicken, examine the color carefully. Fresh chicken should appear pale pink with no gray undertones. Purchase your ground chicken the same day you plan to cook, or freeze immediately if preparing in advance. If grinding chicken yourself, ensure all equipment is clean and cold. Warm equipment can cause the chicken to warm excessively, leading to texture degradation.
The binding components deserve special attention. Eggs serve dual purposes: they provide moisture and create a protein matrix that holds the mixture together. Parmesan cheese adds umami depth while contributing to browning and crust development. For those avoiding dairy, nutritional yeast offers similar flavor benefits. Almond flour provides binding without the carbohydrate load of traditional breadcrumbs, though both options work effectively.
Step-by-Step Preparation Guide
Step 1: Prepare Your Workspace
Begin by preheating your oven to 400°F (200°C). Line a 14-inch pizza pan or large rectangular baking sheet with parchment paper. This prevents sticking and simplifies cleanup. If using a traditional pizza stone, oil it lightly with neutral cooking oil.
Step 2: Combine Dry Ingredients
In a medium mixing bowl, whisk together the Parmesan cheese, almond flour, Italian seasoning, garlic powder, onion powder, black pepper, salt, red pepper flakes, and fresh parsley. This preliminary mixing ensures even distribution of seasonings throughout the chicken mixture. Properly distributed seasonings prevent pockets of bland chicken in your finished crust.
Step 3: Prepare Wet Ingredients
In a separate small bowl, beat the eggs until fully incorporated. Slightly beaten eggs distribute more evenly throughout the mixture compared to whole eggs. This step is crucial for achieving consistent texture in your finished crust.
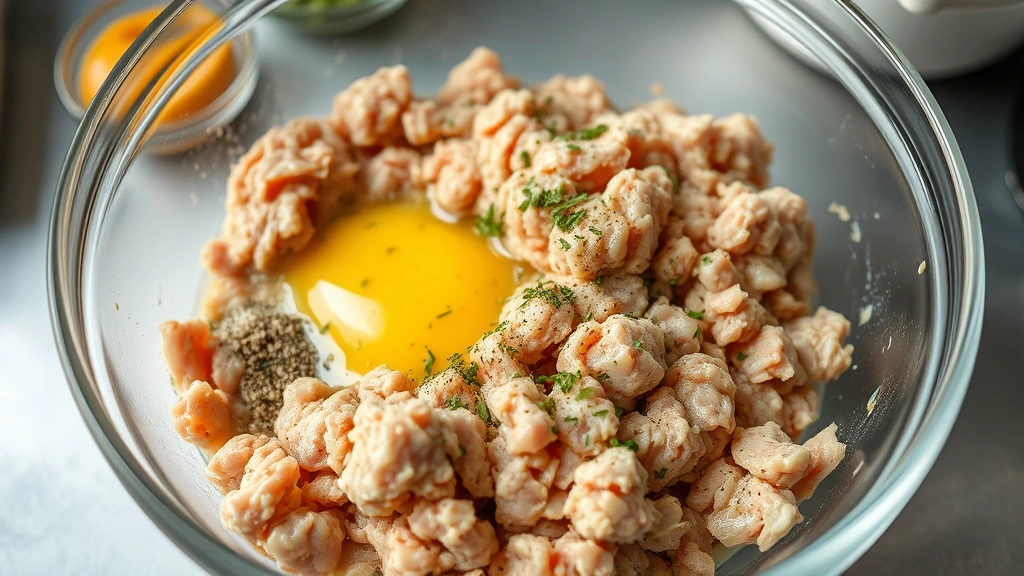
Step 4: Combine All Ingredients
Place the ground chicken in a large mixing bowl. Add the beaten eggs and gently fold to combine. Avoid aggressive mixing, which can develop gluten-like networks in the chicken proteins, resulting in a tough, rubbery texture. Use a spatula or your hands (clean hands work best) to fold ingredients together until just combined. The mixture should appear homogeneous without being overworked. Typically, 30-45 seconds of gentle folding suffices.
Add the dry ingredient mixture to the chicken and fold gently until evenly distributed. This final combination should take approximately 30 seconds. Overworking at this stage is the most common mistake home cooks make.
Step 5: Press Into Pan
Transfer the chicken mixture to your prepared pan. Wet your hands slightly with cold water to prevent sticking. Press the mixture firmly and evenly into the pan, creating an approximately 1/4-inch thick layer. Work from the center outward, ensuring even thickness throughout. An even crust bakes uniformly and provides consistent structural support for toppings. Take your time with this step—rushing results in uneven cooking and texture problems.
Shaping and Cooking Techniques
Proper shaping and cooking technique separates exceptional chicken crust pizza from mediocre attempts. After pressing your mixture into the pan, dock the surface lightly with a fork. Docking involves creating small perforations across the surface, which allows steam to escape during the initial baking phase. This prevents large air pockets from forming and ensures even cooking.
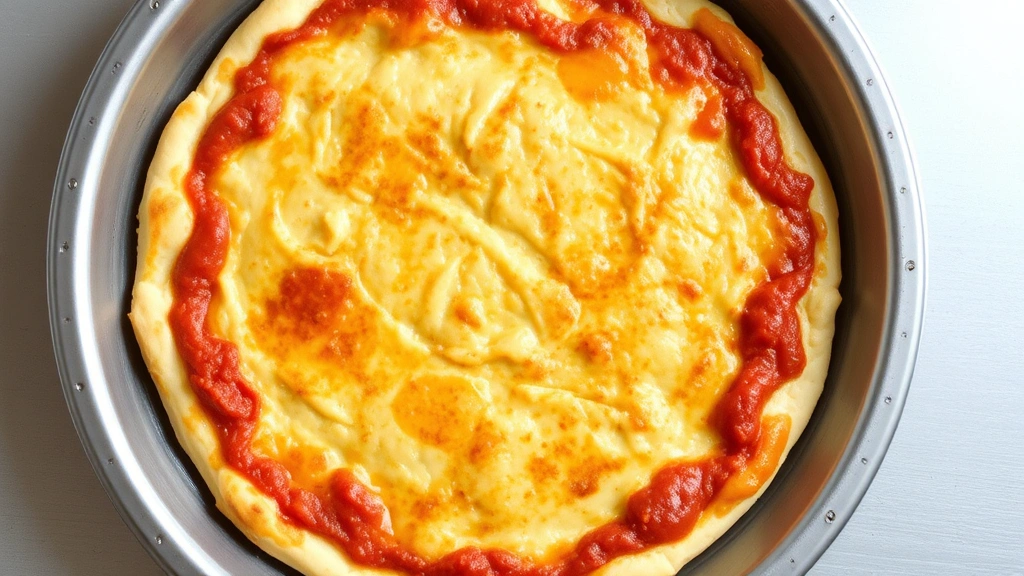
Pre-baking the Crust
The critical step that many home cooks skip involves pre-baking the chicken crust before adding toppings. Transfer your prepared pan to the preheated 400°F oven and bake for 12-15 minutes. The crust should develop a light golden-brown color and feel firm to the touch. This pre-baking accomplishes several objectives: it sets the structure, renders excess moisture, and prevents your finished pizza from becoming soggy.
Remove the crust from the oven and inspect it carefully. The edges should appear slightly darker than the center, indicating proper browning. If the crust appears pale, return it to the oven for an additional 2-3 minutes. This preliminary baking step is non-negotiable for achieving professional results.
Adding Sauce and Cheese
Once the crust has pre-baked, spread your pizza sauce evenly across the surface, leaving approximately 1/2 inch around the edges. Use approximately 1/2 to 3/4 cup of sauce for a 14-inch pizza. Excessive sauce saturates the crust, while too little results in a dry final product. Professional pizzerias typically use a light hand with sauce.
Distribute your cheese evenly across the sauce. A combination of mozzarella and Parmesan creates superior flavor and browning compared to mozzarella alone. Use approximately 1.5 to 2 cups of shredded cheese total.
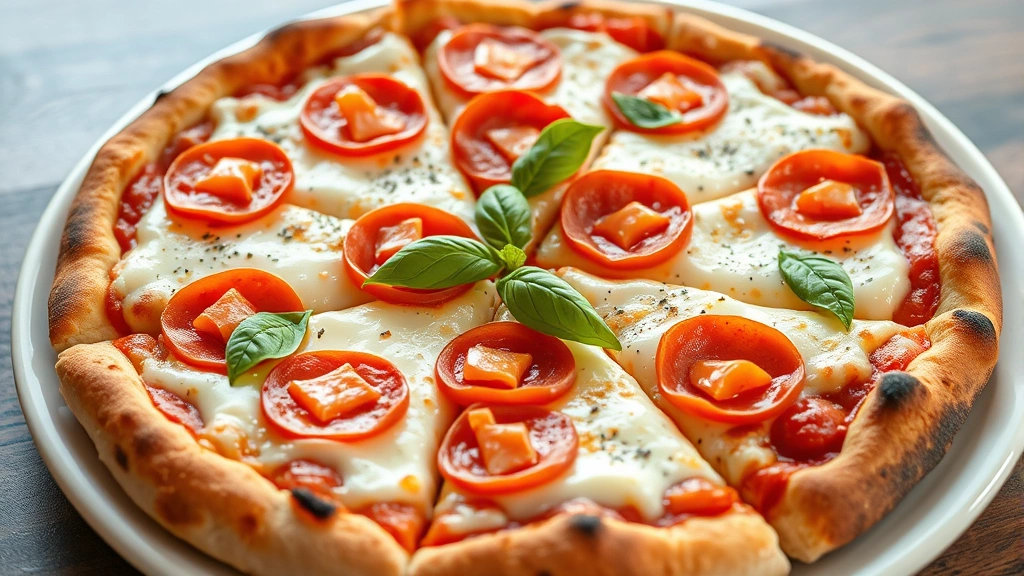
Final Baking
Return the topped pizza to the 400°F oven for 8-10 minutes, until the cheese melts completely and develops light golden-brown spots. The cheese should appear bubbly and slightly browned at the edges. This second baking phase completes the cooking process while preventing the crust from drying out.
Topping Strategies for Success
The structural integrity of chicken crust pizza differs from traditional dough, requiring thoughtful topping selection. The denser crust can support heavier toppings without structural failure, unlike some traditional pizzas. However, excessive moisture-laden toppings can still compromise texture.
Optimal Topping Categories
- Proteins: Pepperoni, Italian sausage, bacon, ham, anchovies, and cooked chicken all work excellently. Layer these on top of cheese to prevent them from sinking into the crust.
- Vegetables: Use pre-cooked or moisture-reduced vegetables. Fresh tomatoes should be sliced thin and patted dry. Mushrooms benefit from brief sautéing to remove excess moisture. Bell peppers, onions, and garlic work well both raw and cooked.
- Herbs and Aromatics: Fresh basil, oregano, and parsley add brightness. Add delicate herbs during the final minute of baking or immediately after removal from the oven to preserve their flavor.
- Cheese Varieties: Beyond mozzarella, consider feta, goat cheese, ricotta, or fresh burrata. These specialty cheeses elevate your pizza from standard to gourmet.
Consider your pizza as you would approach chicken pad thai recipe development—balance flavors and textures thoughtfully. Too many competing flavors obscure the unique qualities of your chicken crust. A simple combination of quality ingredients often outperforms complex topping combinations.
Pro Tips from Professional Chefs
Professional chefs who specialize in alternative pizza crusts recommend several techniques that elevate results significantly. These insights come from experienced culinary professionals who have perfected this technique through countless iterations.
Temperature Control
Maintain your oven temperature precisely at 400°F. Oven temperature fluctuations cause uneven cooking and browning issues. If your oven lacks temperature accuracy, use an oven thermometer to verify the actual temperature. Many home ovens run 25-50°F hotter or cooler than indicated. Understanding your oven’s characteristics allows you to adjust timing accordingly.
Moisture Management
Ground chicken releases moisture during cooking. Some home cooks add extra breadcrumbs or flour to compensate, but this dilutes flavor. Instead, ensure proper pre-baking allows excess moisture to evaporate. If your crust appears overly wet after pre-baking, return it to the oven for an additional 2-3 minutes before adding toppings. This prevents a soggy final product.
Flavor Enhancement
Consider adding 1-2 tablespoons of grated onion or minced garlic to your mixture for additional depth. These aromatics distribute throughout the crust, creating complex flavor layers. Alternatively, brush the pre-baked crust lightly with garlic-infused olive oil before adding sauce and cheese. This technique, borrowed from how to make homemade bread preparation, adds restaurant-quality sophistication.
Structural Integrity
Ensure your crust achieves complete firmness before serving. Allow the finished pizza to rest for 3-5 minutes after removing from the oven. This resting period allows the internal structure to set, preventing the toppings from sliding off during cutting. Using a sharp pizza cutter or knife ensures clean cuts without dragging toppings.
Seasoning Excellence
Taste a small portion of your raw mixture before baking. This allows you to adjust seasonings while you still can. The chicken mixture should taste slightly over-seasoned at this stage, as seasoning perception dulls during cooking. This professional technique prevents under-seasoned finished pizzas.
Troubleshooting Common Issues
Crust Too Dry and Crumbly
This typically indicates insufficient binding or overworking the mixture. Ensure you’re using fresh eggs and that you’re not over-mixing. If this occurs, reduce pre-baking time by 2-3 minutes. Additionally, verify you’re using the correct ratio of chicken to binding agents. Too much almond flour relative to chicken creates a dry texture.
Crust Too Wet and Soggy
Extend pre-baking time by 3-5 minutes to allow more moisture to evaporate. Alternatively, increase the binding agents slightly—add an additional tablespoon of almond flour or breadcrumbs. Ensure you’re not overloading toppings with high-moisture ingredients like fresh tomatoes or mushrooms.
Uneven Browning
Rotate your pizza pan halfway through both the pre-baking and final baking phases. This compensates for oven hot spots that cause uneven browning. If browning remains problematic, lower your oven rack position for more intense heat exposure.
Crust Separating from Pan
This occurs when the crust isn’t pressed firmly enough into the pan initially. Ensure you’re applying adequate pressure when pressing the mixture into the pan. Additionally, verify you’re using adequate fat—lightly oil your pan or use parchment paper to prevent sticking that can cause separation.
Toppings Sliding Off
This indicates insufficient pre-baking or over-generous topping application. Extend pre-baking time to 15 minutes and allow the crust to cool for 2-3 minutes before adding toppings. Use a lighter hand with sauce and cheese. Remember, less is often more with pizza.
For additional protein-focused cooking inspiration, explore thin cut pork chop recipes and venison burger recipe for complementary techniques. These recipes share similar protein-handling principles that enhance your overall cooking capabilities.
If you’re looking for convenient ingredient sourcing, Trader Joe’s recipes often feature pre-portioned ingredients that simplify preparation. Many specialty grocery stores now carry quality ground chicken that works perfectly for this recipe.
FAQ
Can I make chicken crust pizza ahead of time?
Yes, you can prepare the crust mixture up to 24 hours in advance. Store it in an airtight container in the refrigerator. The mixture may appear slightly more separated when cold, but gentle folding will recombine it. Pre-baked crusts can be refrigerated for up to 3 days or frozen for up to 3 months. Thaw frozen crusts in the refrigerator before topping and finishing.
What’s the nutritional profile of chicken crust pizza?
A typical slice (1/8 of a 14-inch pizza) contains approximately 200-250 calories, 25-30 grams of protein, 10-12 grams of fat, and 3-5 grams of carbohydrates, depending on toppings. This makes it an excellent option for high-protein, low-carb diets. The protein content significantly exceeds traditional pizza, making it satisfying in smaller portions.
Can I use ground turkey instead of chicken?
Ground turkey works well as a substitute, though it tends to be leaner than chicken. Add an extra egg or 1-2 tablespoons of olive oil to compensate for the reduced fat content. Turkey offers a slightly more robust flavor that pairs well with bolder toppings and seasonings.
What equipment do I need?
Minimal equipment is required: a mixing bowl, whisk, spatula, 14-inch pizza pan or baking sheet, and an oven. A pizza cutter simplifies serving, though a sharp knife works equally well. Parchment paper prevents sticking and simplifies cleanup but isn’t essential if using a well-oiled pan.
How do I store leftover chicken crust pizza?
Store leftover pizza in an airtight container in the refrigerator for up to 4 days. Reheat in a 350°F oven for 5-7 minutes until warmed through. Avoid using a microwave, which creates a soggy crust. For longer storage, freeze slices individually wrapped in plastic wrap and aluminum foil for up to 3 months.
Can I make this recipe gluten-free?
This recipe is naturally gluten-free when using almond flour instead of breadcrumbs. Verify all seasonings and other ingredients lack hidden gluten. Use gluten-free pizza sauce and ensure your cheese contains no additives. This makes chicken crust pizza an excellent option for those managing celiac disease or gluten sensitivity.
What external resources help master pizza-making techniques?
The Institute of Culinary Education offers comprehensive courses on pizza preparation and dough development. Serious Eats provides detailed food science explanations of cooking techniques. Food & Wine magazine features expert recipes and professional chef insights. Bon Appétit offers innovative recipe variations and troubleshooting guidance. King Arthur Baking Company provides detailed ingredient science information beneficial for understanding binding agents and flour alternatives.


