Achieve Crispy Pork Belly? Chef’s Secret Guide
Crispy pork belly represents one of the most coveted textures in cooking—a golden, shatteringly crisp exterior that gives way to tender, succulent meat beneath. Whether you’re preparing this delicacy for a special dinner or mastering a foundational cooking technique, understanding the science and method behind achieving that perfect crackle separates amateur cooks from culinary professionals. This comprehensive guide reveals the chef-tested secrets that transform ordinary pork belly into an extraordinary dish.
The challenge with pork belly lies in its dual nature: the skin must become impossibly crispy while the meat remains juicy and flavorful. This requires precise temperature control, proper preparation, and timing—elements that many home cooks overlook. By following this step-by-step approach, you’ll unlock the professional techniques that have made crispy pork belly a restaurant favorite worldwide.
Understanding Pork Belly Structure
Before diving into cooking methods, comprehend what you’re working with. Pork belly consists of multiple layers: a thick skin (epidermis), a layer of subcutaneous fat, meat marbling, and ribs. The skin contains collagen and elastin that, when properly rendered, transforms into crispy crackling. The fat layer beneath provides insulation and flavor, while the meat requires gentle cooking to remain tender.
The key to crispiness lies in moisture removal. Skin contains water molecules trapped within its structure. When you apply heat, these molecules must evaporate completely. If steam remains trapped beneath a sealed fat layer, the skin becomes chewy rather than crisp. This is why preparation methods that expose the skin to dry air are crucial. Understanding this foundation explains why certain techniques work better than others.
Essential Preparation Steps
Proper preparation determines your success rate more than any other factor. Begin by selecting high-quality pork belly from a trusted butcher who can remove the rind cleanly while leaving adequate fat underneath. Pat the skin completely dry using paper towels—this is non-negotiable. Any surface moisture will steam rather than crisp.
Place your dried pork belly skin-side up on a wire rack set over a baking sheet. Refrigerate uncovered for at least 24 hours, preferably 48 hours. This extended drying period is where the magic happens. The refrigerator’s dry environment pulls residual moisture from the skin through evaporation. Many home cooks skip this step, wondering why their pork belly never achieves restaurant-quality crispness. This single preparation technique accounts for approximately 40% of your final result.
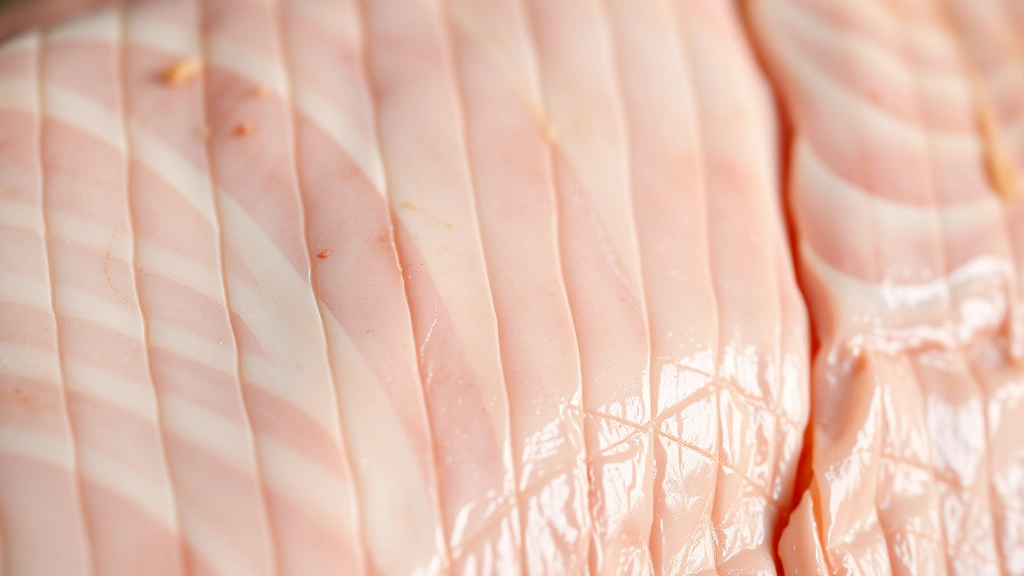
If your pork belly has an uneven surface, trim it slightly to create a relatively flat piece. This ensures even heat distribution during cooking. Check that the skin is completely free of hair—use a sharp knife to gently scrape away any stubble.
The Scoring Technique
Scoring creates the distinctive pattern you see on restaurant-quality crispy pork belly while serving a functional purpose. Use a sharp knife or specialized scoring tool to cut parallel lines through the skin at approximately ¼-inch intervals, cutting only through the skin and into the fat layer without reaching the meat. Space your lines about ¼ inch apart in one direction, then repeat perpendicular lines to create a crosshatch pattern.
This technique accomplishes several objectives: it increases surface area for crisping, allows seasonings to penetrate deeper, and creates stress points where the skin naturally separates into individual crackling pieces. The cuts should be shallow—approximately ⅛ to ¼ inch deep. Cutting too deeply compromises the structural integrity of the piece and allows fat to escape during cooking.
After scoring, pat the surface again with paper towels to remove any debris created by the scoring process. Some chefs rub the scored skin with a small amount of vinegar or lemon juice at this point, as the acidity helps dissolve collagen and promotes browning through the Maillard reaction.
Seasoning and Flavor Building
Salt is your primary tool for crispy pork belly. Apply kosher salt generously to the skin surface immediately after scoring. The salt draws additional moisture to the surface through osmosis, which then evaporates, further drying the skin. This seems counterintuitive but is scientifically sound. Leave this salt on the surface for at least 30 minutes before cooking—many chefs apply it during the drying phase and leave it throughout.
For the meat side, season with salt, freshly ground black pepper, and your choice of aromatics. Consider garlic powder, dried thyme, rosemary, or Chinese five-spice depending on your intended flavor profile. Some chefs create a spice rub for the underside, while others prefer simplicity to let the pork’s natural flavor shine. If preparing an Asian-inspired version, soy sauce, ginger, and star anise work beautifully.
Don’t season the fat layer heavily—the skin’s salt crust is sufficient. Over-seasoning the fat can result in an unpleasantly salty final product. The salt on the skin will season the fat layer as it renders during cooking.
Cooking Methods Compared
Multiple cooking methods achieve crispy pork belly, each with distinct advantages. The most reliable home method combines low-temperature braising followed by high-temperature roasting.
Low-Temperature Braising Phase: Preheat your oven to 275°F. Place the seasoned pork belly skin-side up in a roasting pan. Add a small amount of liquid to the bottom—chicken stock, water, or a combination works well. The liquid should not touch the skin. Roast for 2-3 hours depending on thickness. A 3-pound piece typically requires 2.5 hours. During this phase, the meat becomes tender while the skin remains relatively dry because it’s positioned away from steam.
The braising liquid helps the meat cook gently and evenly. You can add aromatics to this liquid—onions, garlic, ginger, or herbs—to infuse additional flavor into the meat. Some chefs prefer roasting without liquid, using the pork’s own rendered fat, which intensifies flavor but requires more careful monitoring.
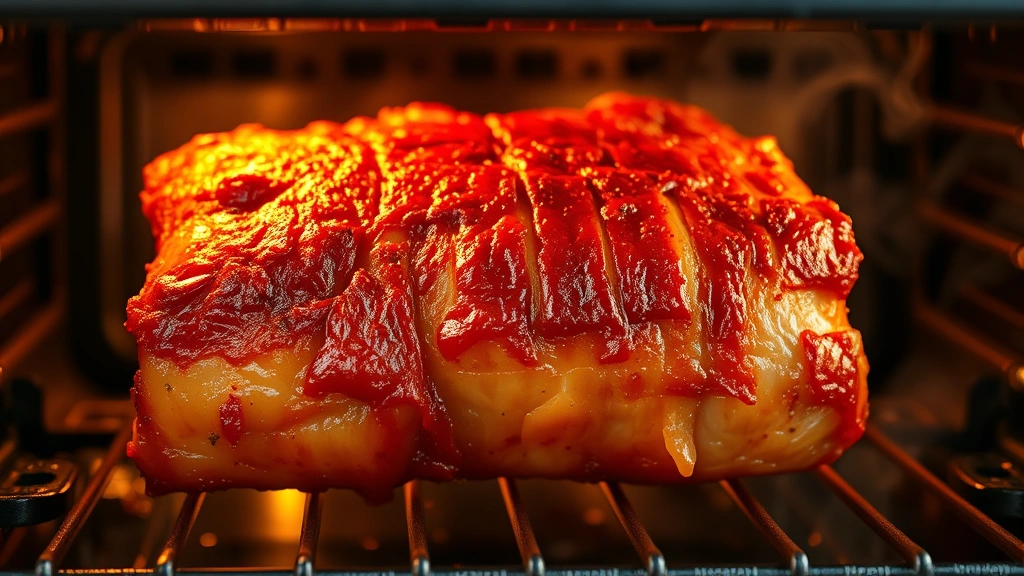
High-Temperature Crisping Phase: After braising, remove the pork belly and let it rest for 15 minutes. Pat the skin completely dry once more—this is essential. Increase oven temperature to 450-500°F. Return the pork belly skin-side up and roast for 20-40 minutes until the skin achieves deep golden-brown color and sounds crispy when tapped. Watch carefully during this phase, as the final minutes determine success or burnt failure.
An alternative method gaining popularity involves sous vide cooking followed by searing. Cook the pork belly in a water bath at 160°F for 24-48 hours, then plunge into ice water to stop cooking. Pat completely dry and sear skin-side down in a very hot cast-iron skillet for 3-5 minutes until the skin crisps dramatically. This method offers exceptional control and consistency but requires specialized equipment.
Temperature Control Mastery
Using an instant-read meat thermometer transforms guesswork into precision. The meat should reach an internal temperature of 190-200°F for optimal tenderness—this high temperature allows collagen to convert to gelatin, creating silky texture. This differs from typical pork cooking guidelines because pork belly’s high fat content and braising method make it forgiving regarding slightly elevated temperatures.
Monitor the skin temperature separately if possible using a thermal imaging camera or by visual assessment. The skin should reach approximately 350-400°F for proper crisping. This dramatic temperature difference is why the two-phase cooking method works so effectively—the low-temperature phase brings meat to perfect tenderness while preventing the skin from burning, then the high-temperature phase crisps the skin without overcooking the meat.
Invest in a quality oven thermometer, as many home ovens have significant temperature variations. A 25-degree difference can dramatically affect your results. Place the thermometer in the location where your pork belly sits to ensure accuracy.
Finishing Techniques
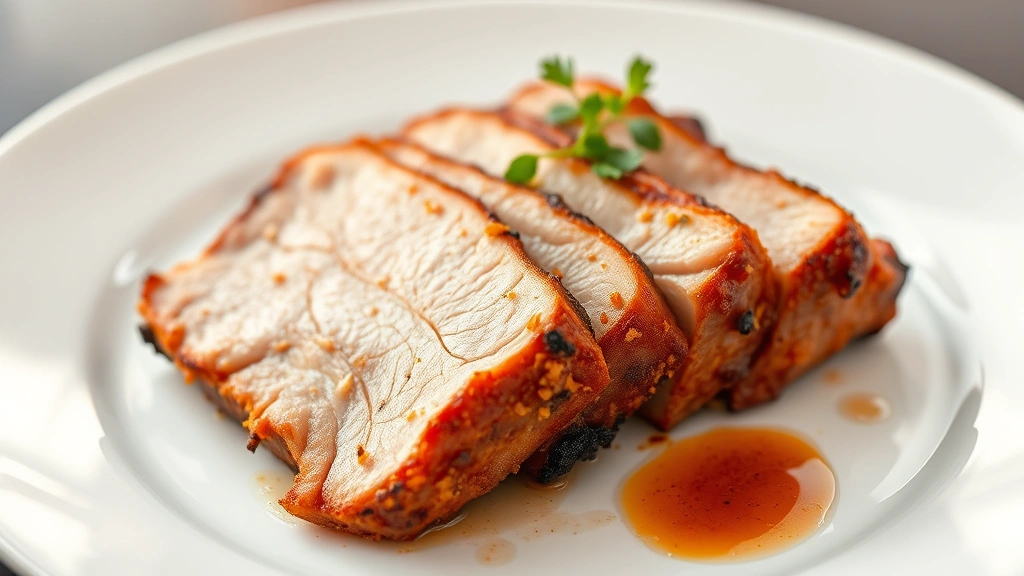
After achieving golden-brown crispy skin, several finishing techniques elevate your pork belly further. Immediately after removing from the oven, brush the skin lightly with a glaze if desired—a combination of honey and soy sauce, or maple and mustard works beautifully. The residual heat will set the glaze without compromising the crispiness.
Allow the pork belly to rest for 10-15 minutes before carving. This resting period lets the meat reabsorb juices, ensuring maximum tenderness and juiciness. During this time, the skin remains crispy as it cools slightly.
For serving, slice the pork belly between the scoring lines to create individual crackling pieces. A sharp serrated knife works better than a regular chef’s knife for cutting through the crispy skin without shattering it excessively. If the skin does crack, this is actually desirable—it indicates proper crispiness.
Common Mistakes to Avoid
Understanding what goes wrong prevents disappointment. Inadequate drying ranks as mistake number one. Rushing the preparation and skipping the 24-48 hour refrigeration phase almost guarantees chewy skin. Plan ahead and allow proper time.
Insufficient scoring prevents proper crisping and prevents the skin from developing the desired texture. Shallow, timid scores result in tough skin rather than crispy crackling. Be confident with your scoring knife.
Allowing steam contact with skin during the braising phase ruins crispiness. Ensure the liquid stays below the skin level and consider tenting with foil if steam seems excessive. Some chefs place a wire rack under the pork belly to keep it elevated above any liquid.
Inconsistent oven temperature creates uneven cooking. Verify your oven temperature with a separate thermometer and adjust accordingly. Avoid opening the oven door frequently during cooking, as this causes temperature fluctuations.
Over-salting creates an inedible product. Remember that salt applied to the skin during preparation will season the entire piece. Resist the urge to add additional salt during cooking.
Insufficient resting time before the high-temperature phase allows residual surface moisture to remain. Always pat dry immediately before the final crisping stage.
Serving and Pairing Ideas
Crispy pork belly pairs beautifully with multiple cuisines and side dishes. For Asian preparations, serve alongside steamed bok choy, jasmine rice, and a soy-ginger sauce. The crispy exterior contrasts wonderfully with tender vegetables and aromatic rice.
Western preparations might feature crispy pork belly with quick and easy pasta recipes incorporating the rendered pork fat as a sauce base, or alongside roasted root vegetables and a red wine reduction. The richness of pork belly demands lighter side dishes to balance the plate.
For high protein recipes for weight loss applications, pair crispy pork belly with substantial vegetable sides and skip heavy starches. The protein content and satisfying richness of properly prepared pork belly means smaller portions feel luxurious and complete.
Consider serving as an appetizer, sliced thin and arranged on a platter with mustards, pickled vegetables, and bread. The crispy skin makes excellent finger food. Some chefs crumble the skin over soups or salads for textural contrast and rich, porky flavor.
Beverage pairings matter significantly. The richness of pork belly demands wines with good acidity—Rieslings, Albariño, or crisp Sauvignon Blancs cut through the fat beautifully. Beer enthusiasts should choose crisp pilsners or hoppy IPAs rather than heavy stouts. For non-alcoholic options, sparkling beverages with acidity work well.
Leftover crispy pork belly can be reheated gently in a low oven (300°F for 10-15 minutes) to restore some crispiness, though it’s delicious cold in sandwiches or salads. Store covered in the refrigerator for up to 4 days.
FAQ
How long does it take to cook crispy pork belly?
Total time from start to finish typically requires 3-4 hours active cooking time, plus 24-48 hours preparation drying time. The braising phase takes 2-3 hours depending on thickness, while the crisping phase requires 20-40 minutes. Plan accordingly for special occasions.
Can I use a slow cooker for pork belly?
Slow cookers create excessively moist environments that prevent skin crisping. While slow cookers excel at creating tender meat, they’re incompatible with achieving crispy skin. Stick with oven braising followed by high-temperature roasting.
What temperature should pork belly reach internally?
Aim for 190-200°F internal temperature for optimal tenderness. This high temperature allows collagen conversion to gelatin. Unlike typical pork guidelines recommending 145°F, pork belly’s composition and preparation method benefit from slightly higher temperatures.
Why is my pork belly skin still chewy?
Chewy skin indicates inadequate drying or insufficient high-temperature crisping. Ensure you’ve completed the full 24-48 hour drying phase and that your oven reaches 450-500°F during the final crisping stage. Pat skin completely dry immediately before the final roasting phase.
Can I score the pork belly the night before cooking?
Yes, scoring during the drying phase is ideal. This allows moisture to escape from the cut areas and helps seasonings penetrate deeper. Score early in your preparation process.
What if my oven doesn’t reach 500°F?
Most home ovens reach 450-475°F maximum, which works well. Use the highest temperature your oven achieves and extend the crisping time slightly if needed. Monitor closely to prevent burning. An alternative is finishing under the broiler for 2-3 minutes if you’re comfortable with this high-heat technique.
Should I remove the skin before cooking?
Absolutely not. The skin is the most desirable component when properly prepared. If you remove it, you’re eliminating the crispy crackling that makes pork belly special.
Can I prepare pork belly ahead of time?
Yes, complete the braising phase up to 2 days ahead. Refrigerate the braised pork belly covered. When ready to serve, pat the skin dry and proceed with the high-temperature crisping phase. This advance preparation is excellent for entertaining.


