Ezekiel Bread Recipe: Nutritionist-Approved Ancient Grain Loaf
Ezekiel bread stands apart from conventional wheat bread as a nutrient-dense creation inspired by biblical origins. This sprouted grain bread combines multiple legumes and grains—including millet, barley, lentils, soybeans, and spelt—creating a complete protein profile that makes it exceptionally valuable for health-conscious bakers. Unlike refined white bread, Ezekiel bread delivers sustained energy, improved digestive function, and superior micronutrient absorption.
Nutritionists consistently recommend Ezekiel bread for its exceptional amino acid composition and lower glycemic index compared to traditional loaves. The sprouting process activates enzymes that break down anti-nutrients, making minerals like zinc, iron, and magnesium more bioavailable. Whether you’re seeking to elevate your breakfast toast or create sandwiches with nutritional integrity, mastering this Ezekiel bread recipe transforms your kitchen into a wholesome bakery.
Why Ezekiel Bread Matters for Your Health
The biblical book of Ezekiel describes a bread formula combining six grains and legumes—a recipe that modern nutritionists have validated through scientific analysis. This ancient combination creates what nutritionists call a “complete protein,” containing all nine essential amino acids your body cannot synthesize independently. Traditional wheat bread lacks adequate lysine, an amino acid abundant in legumes; Ezekiel’s formula bridges this gap naturally.
The sprouting phase—where grains and legumes are soaked and allowed to germinate—unlocks tremendous nutritional advantages. Sprouting increases vitamin C content by up to 600%, enhances B-vitamin availability, and reduces phytic acid by 50-80%, allowing your digestive system to absorb minerals more efficiently. This transformation explains why easy vegan dinner recipes frequently incorporate sprouted grains for maximum nutritional density.
Compared to commercial whole wheat bread, Ezekiel bread exhibits a significantly lower glycemic index, meaning it releases glucose more gradually into your bloodstream. This steady energy supply prevents blood sugar spikes and crashes, supporting sustained focus and appetite regulation. For individuals managing diabetes or seeking weight management, this metabolic advantage proves invaluable.
Essential Ingredients and Sourcing
Creating authentic Ezekiel bread requires sourcing quality sproutable grains and legumes. Your ingredient list should include:
- Whole spelt berries (1 cup)—an ancient grain rich in protein and magnesium
- Whole wheat berries (1 cup)—provides gluten structure and nutty flavor
- Whole rye berries (½ cup)—adds earthy complexity and fiber
- Whole barley (½ cup)—contributes beta-glucans for cardiovascular health
- Whole millet (½ cup)—delivers essential minerals and alkalizing properties
- Whole lentils (¾ cup)—provides iron, folate, and lysine for protein completeness
- Whole soybeans (½ cup)—supplies additional complete protein compounds
- Filtered water (for sprouting and dough)—chlorine-free prevents enzyme inhibition
- Sea salt (2 teaspoons)—enhances flavor and regulates fermentation
- Honey or dates (2 tablespoons)—optional; feeds yeast during fermentation
Source these ingredients from reputable suppliers specializing in organic, non-GMO grains. Online retailers, farmers’ markets, and natural food stores typically stock sproutable varieties. Avoid pearled or processed versions, as these have had nutrient-dense bran layers removed. The investment in quality ingredients directly translates to superior bread nutrition and flavor.
[IMAGE_1]
Step-by-Step Sprouting Process
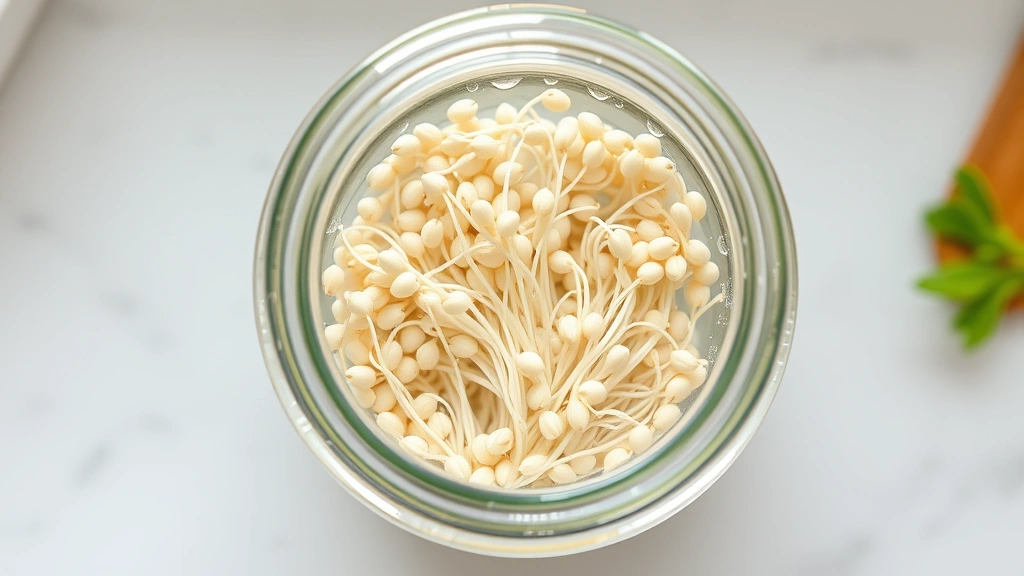
Sprouting forms the foundation of authentic Ezekiel bread. This 3-4 day process activates dormant enzymes and dramatically improves nutrient bioavailability. Begin by combining all dry grains and legumes in a large glass bowl, rinsing thoroughly under filtered water until the water runs clear.
Day 1: Initial Soak — Cover grains with filtered water (use approximately 3 times the volume of grains). Allow them to soak for 8-12 hours at room temperature. This hydration triggers enzymatic activity and initiates germination. Drain completely using a fine-mesh strainer, reserving no water for the next phase.
Days 2-3: Sprouting Phase — Transfer drained grains to a sprouting jar (or improvise with cheesecloth secured over a mason jar). Rinse twice daily with filtered water—morning and evening—ensuring thorough drainage each time. This prevents mold development while maintaining optimal moisture for sprouting. You’ll observe tiny white tails emerging from grains, indicating successful germination. Continue until sprouts reach ¼-inch length, typically requiring 2-3 days depending on room temperature (65-75°F is ideal).
Day 4: Drying Phase — Once sprouts achieve appropriate length, spread them on dehydrator trays or a baking sheet lined with parchment paper. Dry at low temperature (105-115°F in a dehydrator, or your oven’s lowest setting with door slightly ajar) for 12-18 hours until completely moisture-free. This halts further sprouting and prepares grains for grinding. Properly dried sprouts should snap cleanly when bent.
Alternatively, if you lack sprouting equipment or time, purchase sprouted grain flour from specialty suppliers, which provides equivalent nutritional benefits without the multi-day process.

Mixing and Dough Development
Once your sprouts are completely dried, grind them into flour using a high-powered grain mill or food processor. Process in batches, creating a coarse flour texture—avoid over-processing into fine powder, as this generates excessive heat and damages heat-sensitive nutrients. Sift your sprouted flour to remove any larger particles, collecting approximately 4-5 cups of finished flour.
In a large mixing bowl, combine your sprouted flour with 1¼ cups filtered water and 2 teaspoons sea salt. Mix thoroughly using a sturdy wooden spoon or stand mixer with dough hook attachment. The dough will appear wetter and stickier than conventional bread dough—this is normal. Sprouted grains absorb more water due to their activated state, requiring higher hydration percentages (typically 65-70% water-to-flour ratio).
Knead for 8-10 minutes by hand (or 5-6 minutes in a stand mixer), developing gluten networks that provide structure. The dough should become increasingly smooth and elastic. Unlike yeast-risen breads, Ezekiel bread relies on natural fermentation rather than commercial yeast, so your mixing phase establishes the foundation for extended fermentation benefits.
If incorporating honey or chopped dates, add these during the final 2 minutes of mixing. These additions provide subtle sweetness and feed beneficial bacteria during fermentation, similar to how shrimp recipes with rice benefit from flavor layering through ingredient sequencing.
Fermentation and Rising Techniques
Natural fermentation distinguishes Ezekiel bread from commercial loaves. Place your mixed dough in a lightly oiled bowl, covering with a damp kitchen towel or plastic wrap. Allow it to ferment at room temperature for 12-24 hours. During this extended fermentation, naturally occurring lactobacillus bacteria and wild yeasts develop, creating complex flavors and further breaking down anti-nutrients.
After initial fermentation, the dough undergoes a series of “stretch and fold” movements. Every 30 minutes for the first 2-3 hours, wet your hand and gently stretch one side of the dough, folding it over itself. Rotate the bowl and repeat this process four times. These movements develop strength without aggressive kneading, distributing yeast cultures evenly throughout.
The dough should roughly double in volume after 12-24 hours, displaying visible bubbles throughout. Cooler environments (65-68°F) extend fermentation time but develop more complex flavors; warmer kitchens (72-75°F) accelerate rising. This flexibility accommodates various schedules—you can refrigerate dough overnight to slow fermentation, then continue at room temperature the following day. Such flexibility mirrors the adaptability found in preparing beef stew recipe stove top methods, where timing adjusts to your lifestyle.
Shaping, Proofing, and Baking
Once fermentation completes, transfer your dough to a lightly floured work surface. Gently shape it into a round or oval loaf, being careful not to deflate accumulated gas. Place it seam-side up in a flour-dusted banneton basket (or improvise with a colander lined with a linen towel). This proves the final rise.
Cover your shaped dough and allow it to proof for 4-8 hours at room temperature, or overnight in the refrigerator. Cold proofing (overnight refrigeration) develops deeper flavors through extended fermentation and makes scoring easier. Remove from refrigeration 30 minutes before baking to allow the dough to reach optimal temperature.
Preheat your oven to 475°F with a Dutch oven inside for 45 minutes. This creates steam, essential for developing a crispy crust. Carefully transfer your proofed dough onto parchment paper, then into the preheated Dutch oven. Score the top with a sharp knife or lame (a specialized bread-scoring tool), creating a ½-inch deep slash pattern. This controls expansion and creates the characteristic artisan appearance.
Bake covered for 30 minutes, trapping steam. Remove the lid and bake an additional 20-25 minutes until the crust achieves deep golden-brown color. The internal temperature should reach 205-210°F when measured with an instant-read thermometer inserted into the loaf’s center. This temperature ensures complete starch gelatinization and proper crumb structure.
For comparison, healthy food recipes with chicken breast similarly require precise internal temperatures to ensure food safety and optimal texture—bread baking applies identical precision principles.
Cooling and Storage Guidelines
Resist the urge to slice your finished loaf immediately. Place it on a wire cooling rack for at least 1-2 hours, allowing the crumb structure to set completely. Cutting too early releases steam and creates a gummy interior. Properly cooled Ezekiel bread develops a beautiful, open crumb structure with distinct holes—a sign of successful fermentation.
Once fully cooled, store your Ezekiel bread in a paper bag at room temperature for 2-3 days. For extended storage, slice the loaf and freeze portions in an airtight container for up to 3 months. Toast frozen slices directly from the freezer for quick breakfast options. The dense nutrition and natural preservatives from sprouted grains provide superior shelf stability compared to refined bread.
This bread pairs exceptionally well with Greek recipes featuring hummus, feta, and olive oil—the complete protein profile complements Mediterranean ingredients beautifully. It also serves as an excellent foundation for cherry cobbler recipe bread pudding variations, transforming yesterday’s loaf into sophisticated desserts.
FAQ
Can I make Ezekiel bread without sprouting?
While sprouting provides maximum nutritional benefits, you can substitute with sprouted grain flour purchased from specialty retailers. However, sprouting yourself ensures ingredient freshness and allows you to control the sprouting duration for optimal enzyme activation.
Why is my Ezekiel bread dense?
Density results from insufficient fermentation or over-mixing dough. Ensure you complete the full 12-24 hour fermentation period and avoid aggressive kneading during stretch-and-fold movements. Dense bread still provides excellent nutrition but lacks the open crumb structure of properly fermented loaves.
How do I know if my grains are sprouting properly?
Successful sprouting produces visible white tail shoots emerging from grain hulls. If you observe mold (fuzzy white or colored growth) instead, discard the batch and ensure better drainage during the sprouting phase. Mold indicates insufficient air circulation or excess moisture.
Can I add commercial yeast to speed fermentation?
Yes, though it contradicts traditional Ezekiel bread philosophy. Adding ¼ teaspoon instant yeast reduces fermentation time to 6-8 hours. However, extended natural fermentation develops superior flavor complexity and maximizes nutrient bioavailability. The slower process rewards patience with exceptional results.
Is Ezekiel bread suitable for gluten-free diets?
Traditional Ezekiel bread contains gluten from wheat, barley, and spelt. For gluten-free versions, substitute these with certified gluten-free oats, buckwheat, and quinoa, though the nutritional profile changes. Consult culinary education resources for specialized gluten-free sprouted grain techniques.
What’s the shelf life of sprouted grains before baking?
Properly dried sprouted grains remain viable for 6-12 months when stored in airtight containers away from light and moisture. Grind flour as needed rather than preparing large batches, preserving nutritional integrity and preventing rancidity from exposed oils.


