Crispy Fingerling Potatoes? Chef’s Secret Technique
Fingerling potatoes are a chef’s dream ingredient—small, waxy, and naturally buttery with thin, edible skin. Yet most home cooks struggle to achieve that restaurant-quality crispiness that makes these potatoes truly irresistible. The difference between soggy, pale fingerlings and golden, crunchy ones lies in a few professional techniques that seem simple once you know them, but remain hidden secrets in most kitchens.
After years of watching chefs transform humble potatoes into crispy perfection, I’ve discovered that the magic isn’t about fancy equipment or exotic ingredients. It’s about understanding the science of starch, moisture, and heat. This guide will walk you through every step of the professional method that guarantees crispy, golden fingerling potatoes every single time—whether you’re serving them alongside ham steak or as a standalone side dish.
Why Fingerling Potatoes Are Different
Fingerling potatoes are an entirely different beast from russets or yukon golds. These small, elongated potatoes typically measure 2-4 inches long and contain more moisture and waxy starch than their larger cousins. This composition makes them naturally suited for crispy cooking methods, but also means they require a different approach than standard potato recipes.
The key difference is their starch profile. Fingerlings contain about 16-17% starch compared to russets’ 20%, but their texture is fundamentally different due to higher moisture content and cell structure. When cooked properly, this means they can achieve a crispy exterior while maintaining a creamy, buttery interior—the holy grail of potato cooking.
Professional chefs prefer fingerlings for roasting and frying because the thin skin crisps beautifully and adds visual appeal. The waxy nature of the potato means it won’t dry out as easily as a russet, making it more forgiving for home cooks. Understanding this fundamental difference is your first step toward consistent success.
The Pre-Cook Preparation Method
Before any heat touches your potatoes, preparation is absolutely critical. This is where most home cooks go wrong, rushing through steps that professional kitchens treat as sacred.
Step 1: Selection and Inspection
Choose fingerlings that are uniform in size—this ensures even cooking. Look for firm potatoes without soft spots or sprouting eyes. Smaller fingerlings (about 2 inches) cook more evenly than larger ones. If you only have larger fingerlings available, cut them in half lengthwise to create more uniform pieces.
Step 2: Thorough Washing
Place your fingerlings in a colander and scrub them under cool running water with a vegetable brush. Don’t skip this step—soil and debris prevent even browning and can create burnt spots. The thin skin of fingerlings means any dirt will be visible in your final dish. Scrub firmly but gently to avoid damaging the delicate skin.
Step 3: Patting Completely Dry
Use paper towels or a clean kitchen towel to pat each potato completely dry. Moisture is the enemy of crispiness. This single step separates amateur cooks from professionals. Wet potatoes create steam instead of browning, resulting in pale, soft potatoes. Take your time here—it’s worth the extra minute.
Step 4: Optional: Soaking
For maximum crispiness, some chefs soak peeled potatoes in cold water for 30 minutes to remove excess surface starch. However, with fingerlings’ thin skin, I recommend skipping this step to preserve the skin’s integrity and the potatoes’ natural flavor.
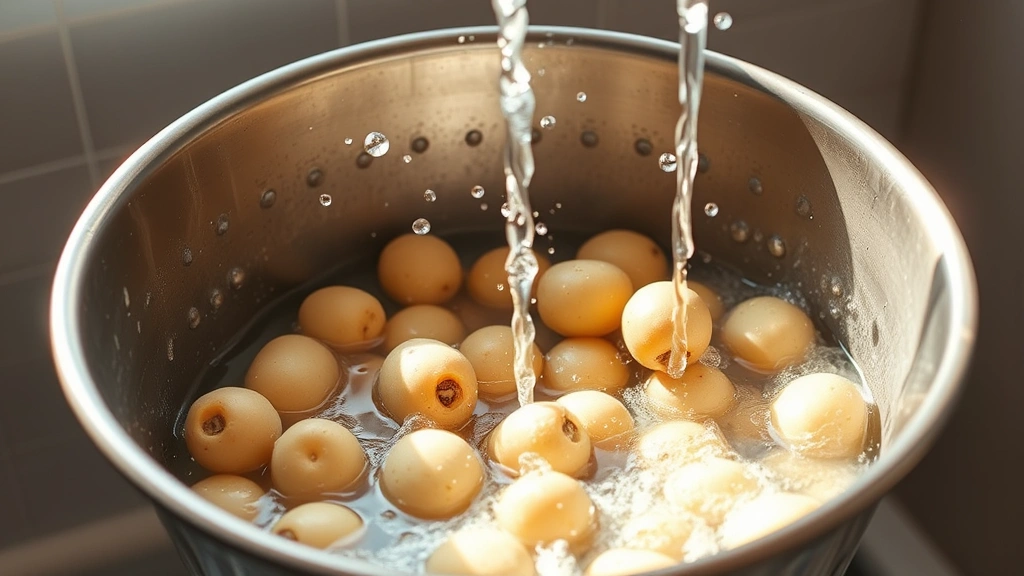
Parboiling: The Critical Step
This is the secret technique that separates crispy fingerling potatoes from all others. Parboiling—partial cooking in boiling water—is absolutely essential and cannot be skipped. This step gelatinizes the interior starch and sets the structure, allowing the exterior to crisp without the interior becoming mushy.
The Parboiling Process
Fill a large pot with cold, salted water. Use about 1 tablespoon of salt per gallon of water—the water should taste like seawater. Add your prepared fingerlings and bring to a boil over high heat. The cold-start method ensures even cooking throughout the potato.
Cook for exactly 8-12 minutes, depending on size. Smaller fingerlings need 8 minutes; larger ones need 10-12. You’re looking for a specific doneness level: the potatoes should be just beginning to soften but still completely firm in the center. A fork should pierce the skin easily but meet resistance in the middle.
This is where patience and attention matter. Undercooked potatoes won’t achieve the creamy interior; overcooked ones will break apart during the crisping stage. If you’re unsure, remove one potato at 8 minutes and test it. Better to be slightly underdone than overdone.
Cooling and Drying After Parboiling
Drain the potatoes immediately in a colander. Let them steam for 2-3 minutes to allow residual moisture to evaporate naturally. Then spread them on a clean kitchen towel in a single layer. This cooling period is crucial—hot potatoes will steam and reabsorb moisture. Let them cool to room temperature, about 15-20 minutes. Pat them dry again with fresh towels before proceeding.
Drying and Seasoning Technique
After parboiling and cooling, your potatoes are ready for the transformation to crispiness. This stage involves proper seasoning and a special drying technique that professionals use.
The Starch Activation Method
Toss the cooled potatoes with 2 tablespoons of cornstarch per pound of potatoes. This seems counterintuitive, but cornstarch creates an incredibly crispy exterior. The starch particles absorb any remaining surface moisture and create a textured surface that browns beautifully. Toss gently to coat all sides evenly.
Seasoning Application
Add your seasonings before cooking, not after. This ensures flavors penetrate during the cooking process. Use 1 teaspoon of sea salt and ½ teaspoon of freshly ground black pepper per pound of potatoes. Add ½ teaspoon of garlic powder and ¼ teaspoon of paprika for depth. Toss thoroughly, ensuring every potato is coated.
If you’re serving these with grilled pork chop recipes, consider adding fresh rosemary or thyme at this stage. Fresh herbs should be added after cooking to prevent burning.
Oil Application
Use a high-heat oil with a smoke point above 400°F. Extra virgin olive oil, despite its popularity, has a lower smoke point and can burn. Instead, choose refined avocado oil, grapeseed oil, or clarified butter. Use 3 tablespoons of oil per pound of potatoes. Toss the potatoes thoroughly, ensuring each piece is lightly but completely coated. Insufficient oil results in uneven browning; excess oil creates greasy potatoes.
The Crispy Cooking Process
Now comes the actual cooking—the moment where all your preparation pays off. There are two primary methods: oven roasting and stovetop pan-frying. Each produces excellent results with slightly different techniques.
Oven Roasting Method (Most Reliable)
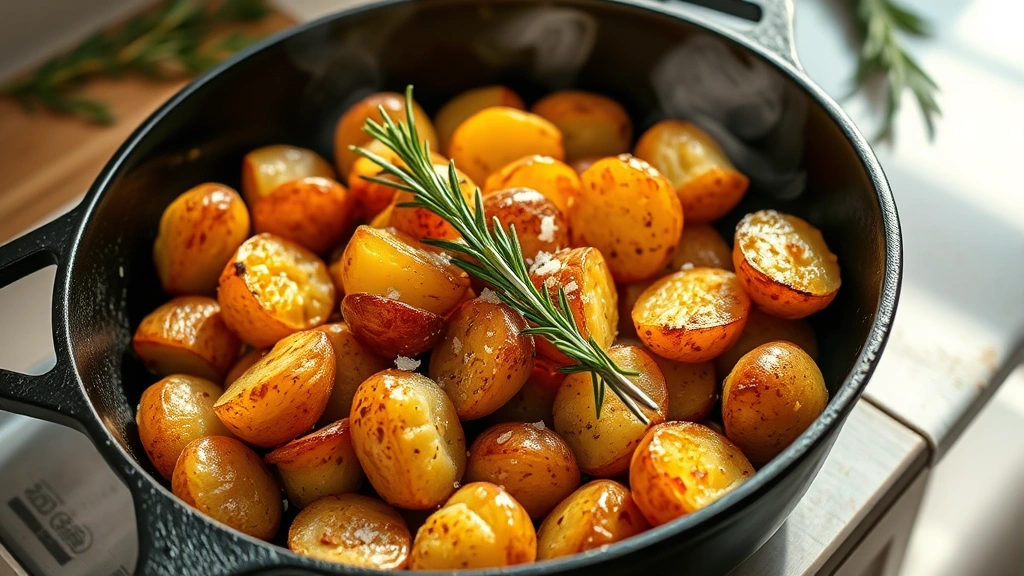
Preheat your oven to 425°F. Use a large baking sheet, preferably a cast-iron skillet or heavy-duty sheet pan. Arrange the seasoned, oiled potatoes in a single layer, cut-side down if halved. This positioning is critical—the cut side makes direct contact with the hot pan, creating the crispiest surface.
Roast for 20-25 minutes without moving them. Resist the urge to stir—movement prevents proper browning. After 20 minutes, check one potato. The cut side should be deep golden brown, almost caramelized. If it’s still pale, continue roasting for another 5 minutes.
Once the bottoms are properly browned, stir the potatoes to brown the remaining sides. Return to the oven for another 8-10 minutes until all surfaces are golden and crispy. The total cooking time is usually 28-35 minutes from this point forward.
Stovetop Pan-Frying Method (Faster Results)
Heat a large cast-iron skillet or heavy-bottomed pan over medium-high heat for 3 minutes. Add your oiled, seasoned potatoes in a single layer, cut-side down. Don’t overcrowd the pan—potatoes should have space between them for proper air circulation.
Cook without moving for 6-8 minutes until the bottoms are deep golden brown. Flip each potato and cook for another 4-6 minutes on the second side. Continue flipping and cooking, rotating every 4-5 minutes, until all surfaces are crispy and golden. Total stovetop time is approximately 15-20 minutes.
This method gives you more control and faster results, but requires more attention. The advantage is you can achieve even crisper exteriors through direct contact with the hot pan.
Combination Method (Professional Choice)
Start potatoes in a hot cast-iron skillet on the stovetop for 5 minutes to develop initial browning, then transfer to a 425°F oven for 15-20 minutes. This combines the best of both methods: initial browning from direct heat and even finishing from oven heat. Many professional chefs prefer this technique for consistency.
Finishing and Serving
Your potatoes are now crispy and golden, but the final steps determine whether they’re simply good or truly exceptional.
Immediate Finishing Touches
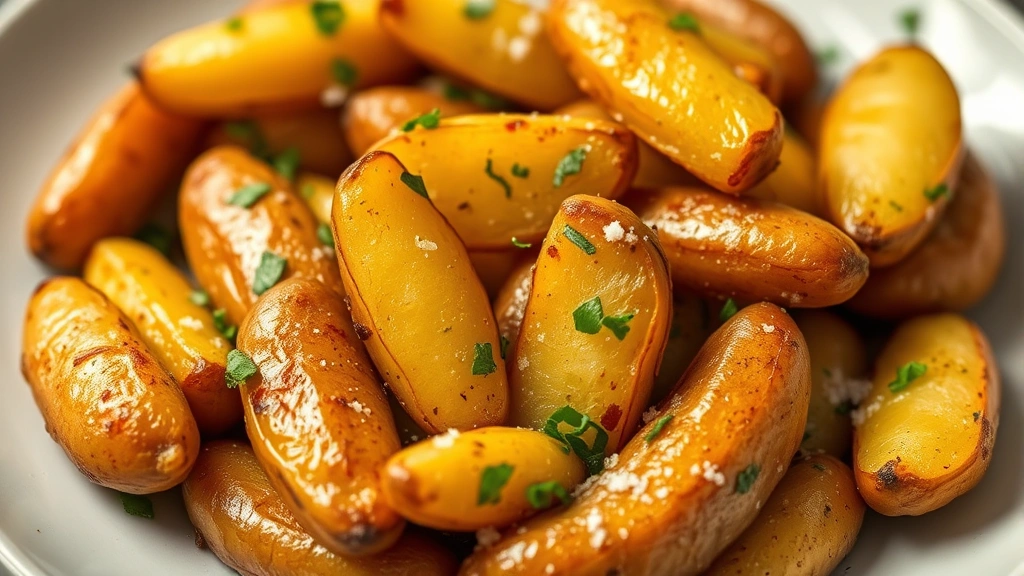
Remove potatoes from heat and immediately transfer to a clean bowl. While still hot, add fresh herbs like chopped parsley, chives, or dill. The residual heat releases aromatic oils in fresh herbs, infusing the potatoes with maximum flavor. Toss gently to distribute herbs evenly.
Add fleur de sel or finishing sea salt—regular table salt is too fine and won’t provide texture. A light sprinkle of fleur de sel creates pleasant crystalline texture and enhances flavor perception. Taste and adjust seasonings as needed.
Serving Suggestions
Serve crispy fingerling potatoes immediately while still warm. They lose their crispiness as they cool, so timing your cooking with your main dish is essential. These potatoes pair beautifully with country ribs recipe preparations or virtually any protein.
For entertaining, you can prepare potatoes up through the seasoning stage several hours ahead. Store them covered in the refrigerator and roast or pan-fry them 30 minutes before serving. This advance preparation reduces last-minute kitchen stress while maintaining quality.
Common Mistakes to Avoid
Mistake 1: Skipping the Parboil
Some recipes claim you can roast raw fingerlings to crispiness. This is technically possible but results in inconsistent doneness—crispy exteriors with hard centers. Parboiling ensures creamy interiors with crispy exteriors.
Mistake 2: Insufficient Drying
Moisture is crispiness’s greatest enemy. Invest time in thorough drying at every stage. Many failed attempts result from insufficient drying after parboiling or washing.
Mistake 3: Crowding the Pan
Potatoes need space for air circulation and direct heat contact. Crowded pans create steam, which prevents browning. Work in batches if necessary—quality matters more than speed.
Mistake 4: Moving Potatoes Too Frequently
Constant stirring prevents proper browning. Let potatoes sit undisturbed for several minutes to develop that crucial golden crust. Patience is a secret ingredient.
Mistake 5: Using Low-Heat Oil
Low smoke point oils burn at roasting temperatures, creating acrid flavors. Always use refined oils suitable for high-heat cooking. Clarified butter (ghee) is excellent and adds richness.
Mistake 6: Overseasoning
Season conservatively during cooking; you can always add more salt at the table. Over-seasoning creates unpleasantly salty potatoes that overshadow their natural flavor.
Mistake 7: Cooking Too Far in Advance
Crispy potatoes begin losing their texture within 15 minutes of cooking. Plan your timing so potatoes finish cooking just before serving. This is especially important when preparing leftover steak recipes that require precise timing.
FAQ
Can I use this technique with other potato varieties?
Absolutely. While fingerlings are ideal, this method works well with baby potatoes, small red potatoes, or even cubed larger potatoes. Adjust parboiling time based on size—smaller pieces need less time.
What’s the best oil for crispy potatoes?
Refined avocado oil, grapeseed oil, or clarified butter are excellent choices. They have high smoke points (above 400°F) and won’t burn during roasting. Avoid extra virgin olive oil, which has a lower smoke point and can create bitter flavors.
Can I prepare fingerlings the day before?
Yes. Parboil, cool, and store in the refrigerator up to 24 hours ahead. Before cooking, bring them to room temperature and pat dry. The final roasting or pan-frying should happen within 30 minutes of serving.
Why are my potatoes still soft inside?
Your parboiling time was too long. Reduce it by 2-3 minutes next time. The potatoes should be just beginning to soften, not fully cooked. Also ensure your oven temperature is accurate—use an oven thermometer to verify.
Can I make crispy fingerlings in an air fryer?
Yes! Parboil as directed, then air fry at 400°F for 12-15 minutes, shaking the basket halfway through. The results are excellent and use less oil, though texture may be slightly less crispy than oven-roasted.
What if my potatoes are unevenly sized?
Cut larger potatoes in half lengthwise to match smaller ones. Uniform sizing ensures even cooking. A potato that’s twice the size will need significantly longer to cook through, creating uneven results.
How do I store leftover crispy potatoes?
Store in an airtight container in the refrigerator for up to 3 days. Reheat in a 375°F oven for 8-10 minutes to restore crispiness. Microwaving will make them soft and soggy.
Can I add cheese or bacon?
Absolutely. Toss finished potatoes with grated Parmesan, crispy bacon bits, or sharp cheddar. Add these garnishes after cooking to prevent burning. Pair with griddle recipes featuring cheese for a cohesive menu.
What’s the difference between roasting and pan-frying?
Roasting provides even, consistent results with less attention required. Pan-frying creates slightly crisper exteriors but requires more monitoring and flipping. Both methods produce excellent results—choose based on your preference and available time.
Should I peel fingerlings before cooking?
No. The thin skin is edible, nutritious, and becomes delightfully crispy. Peeling removes valuable nutrients and texture. Thorough washing is all that’s needed.


