Gluten-Free Sourdough Bread? Baker’s Secret
Making gluten-free sourdough bread has long been considered one of baking’s greatest challenges. Unlike traditional wheat sourdough, which relies on gluten’s elasticity and strength, gluten-free versions require a completely different approach to achieve that coveted tangy flavor and chewy crumb structure. But here’s the baker’s secret: it’s absolutely achievable with the right technique, patience, and understanding of how gluten-free flours behave.
For years, gluten-free bread enthusiasts have struggled to replicate the authentic sourdough experience—the complex fermentation, the open crumb, the crispy crust, and that distinctive sour tang. The good news is that modern baking science has unlocked the mysteries of gluten-free sourdough, and you can create exceptional loaves at home. This comprehensive guide will walk you through everything you need to know to master gluten-free sourdough bread baking.
Understanding Gluten-Free Sourdough Basics
The foundation of gluten-free sourdough bread success lies in understanding how gluten-free flours differ fundamentally from wheat flour. Gluten provides structure, elasticity, and strength to traditional doughs. Without it, you need alternative strategies to build structure and achieve that desirable open crumb texture.
Gluten-free sourdough relies on several key principles. First, the long fermentation process breaks down starches and proteins, creating digestibility and flavor complexity. Second, the sourdough starter’s wild yeast and bacteria produce gases that create rise and volume. Third, the selection of flour blends is crucial—you cannot simply substitute one-to-one with wheat flour.
The acidity developed during fermentation serves multiple purposes in gluten-free sourdough. It strengthens the dough structure, improves flavor, enhances digestibility, and extends shelf life. This is why the sourdough method works beautifully for gluten-free baking: the extended fermentation does much of the structural work that gluten would normally handle.
When you’re learning how to make homemade bread, understanding fermentation timing becomes critical in gluten-free versions. The dough will behave differently at each stage, and you’ll need to trust the process rather than relying solely on timing.
Building Your Gluten-Free Sourdough Starter
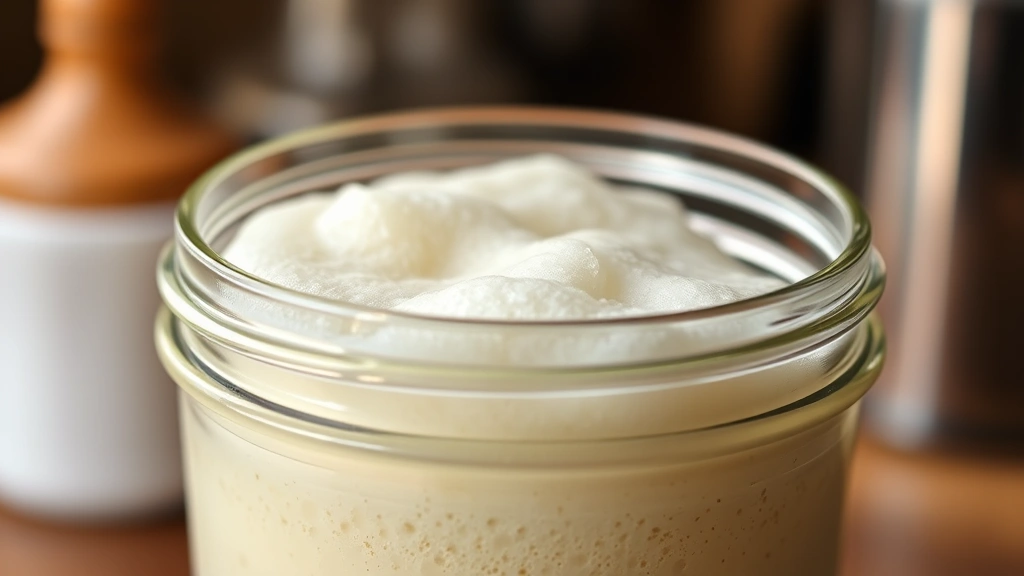
Your sourdough starter is the heart of gluten-free sourdough bread. A healthy, active starter makes the difference between success and disappointment. The good news: creating a gluten-free sourdough starter is virtually identical to creating a wheat-based one.
Creating Your Starter from Scratch:
- Use a blend of gluten-free flours (brown rice flour, sorghum flour, or buckwheat flour work well)
- Mix equal parts flour and filtered water by weight (50g each works for beginners)
- Place in a clean jar at room temperature
- Feed daily, discarding half the starter and adding equal parts flour and water
- By day 5-7, you should see consistent bubbling and a pleasant sour smell
The fermentation process in your starter creates the wild yeast and lactic acid bacteria necessary for sourdough. Feed your starter consistently—ideally once or twice daily—until it doubles reliably within 4-8 hours of feeding.
Maintaining Peak Performance:
An active starter should double in volume within 4-8 hours of feeding at room temperature (68-72°F). If your starter is sluggish, try feeding it with a warmer water temperature or moving it to a warmer location. Some bakers find that using recipe cards to track starter activity helps identify patterns and optimal feeding times.
Store your starter at room temperature if you bake frequently (2-3 times weekly), or in the refrigerator if you bake less often. Refrigerated starters need feeding once weekly and should be brought to room temperature and fed 4-8 hours before baking.
Essential Ingredients and Equipment
Success with gluten-free sourdough bread requires both proper ingredients and appropriate equipment. Each component plays a specific role in developing the final loaf’s structure and flavor.
Flour Blends for Gluten-Free Sourdough:
The flour blend is your most important ingredient decision. A successful blend typically combines starches with protein-containing flours:
- Brown rice flour: Mild flavor, fine texture, provides structure
- Sorghum flour: Slightly sweet, adds moisture retention
- Buckwheat flour: Nutty flavor, adds complexity (despite the name, it’s gluten-free)
- Tapioca starch: Improves elasticity and chewiness
- Cornstarch: Lightens crumb, improves texture
- Psyllium husk powder: Binds moisture, creates structure, improves crust
A proven blend: 30% brown rice flour, 25% sorghum flour, 20% tapioca starch, 15% buckwheat flour, 10% cornstarch. Adjust based on your preferred flavor and texture profile.
Additional Ingredients:
- Filtered water (chlorine can inhibit fermentation)
- Sea salt (enhances flavor and controls fermentation speed)
- Psyllium husk powder (optional but highly recommended for structure)
Essential Equipment:
- Dutch oven or covered baking vessel (traps steam for crust development)
- Banneton or proofing basket (supports dough during final rise)
- Kitchen scale (essential for gluten-free baking precision)
- Thermometer (monitors dough and water temperature)
- Bench scraper (handles wet gluten-free dough)
- Spray bottle (for steam and moisture)
Precision with measurements is non-negotiable in gluten-free sourdough baking. Invest in a reliable kitchen scale and measure by weight, not volume.
Step-by-Step Recipe and Process
Basic Gluten-Free Sourdough Recipe (Makes 1 loaf):
- 500g gluten-free flour blend (as described above)
- 350ml filtered water
- 100g active sourdough starter (fed 4-8 hours prior, at peak activity)
- 10g sea salt
- 15g psyllium husk powder
Day 1: Mixing and Bulk Fermentation
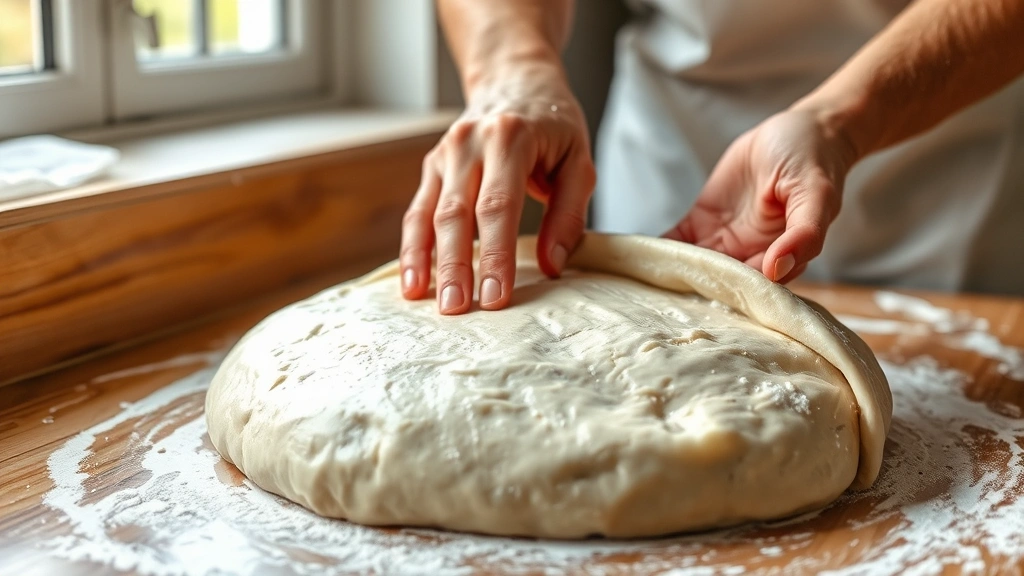
Combine flour blend, water, starter, and psyllium husk powder in a large bowl. Mix thoroughly until all dry flour is incorporated—the dough will be quite wet and sticky, much wetter than traditional sourdough. Let this mixture rest for 30 minutes (autolyse phase). This allows gluten-free flours to fully hydrate and begin developing structure.
After the autolyse, add salt and mix thoroughly using a bench scraper or your hand, folding the dough over itself repeatedly. The dough should become slightly more cohesive.
Perform stretch-and-folds every 30 minutes for 2 hours (4 sets total). Wet your hand, grab one side of the dough, stretch it up and fold it over the center. Rotate the bowl and repeat from all four sides. These folds build strength without kneading.
After stretch-and-folds are complete, let the dough rest undisturbed for 4-6 hours at room temperature (68-72°F). The bulk fermentation is complete when the dough has increased 50-75% in volume and shows visible bubbles on the surface and sides.
Shaping and Final Proof
Turn the dough onto a wet work surface (wet, not floured—gluten-free dough sticks to flour). Using a wet bench scraper, gently shape the dough into a round by folding edges toward the center. This is gentler than traditional shaping and prevents degassing.
Place the shaped dough seam-side up in a floured banneton basket. Cover with plastic wrap or a damp towel. You have two options:
- Cold overnight proof: Refrigerate for 12-16 hours (recommended for flavor development)
- Room temperature proof: Let rise at room temperature for 2-4 hours until it jiggles slightly when the basket is gently shaken
Cold proofing develops deeper sour flavor and makes scoring easier, as cold dough is less sticky.
Day 2: Baking
Preheat your oven to 500°F with a Dutch oven inside for 45 minutes. Remove your proofed dough from the refrigerator (if using cold proof) and let it sit at room temperature for 15-20 minutes while the oven preheats.
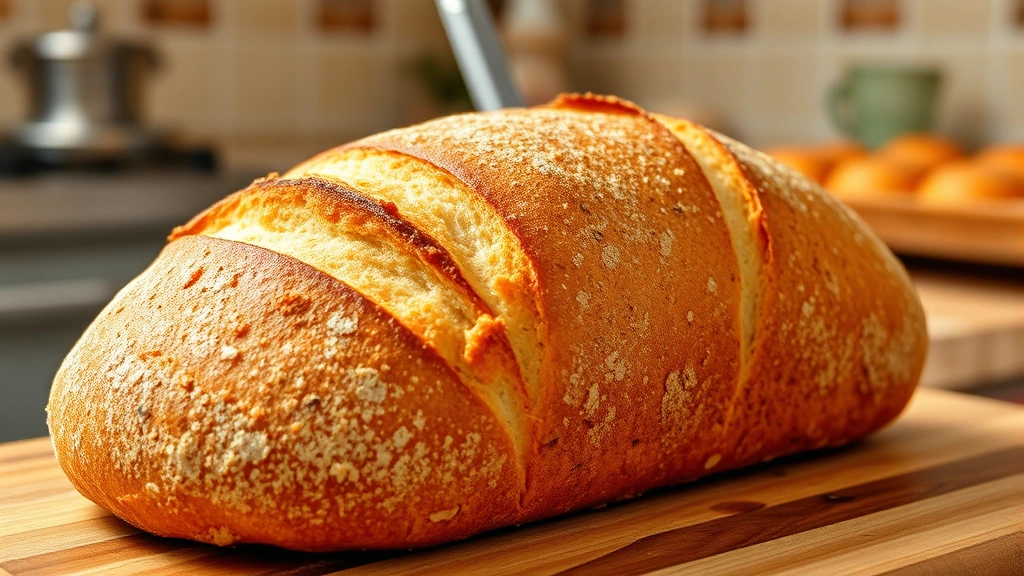
Carefully turn the dough onto parchment paper. Using a sharp blade, score the top with a single slash or decorative pattern—this controls where the dough expands and creates the “ear” (the crispy lip that forms along the score).
Reduce oven temperature to 450°F. Transfer the dough on parchment into the hot Dutch oven. Cover and bake for 25 minutes, trapping steam inside.
Remove the lid and bake uncovered for 25-35 minutes until the crust is deep golden brown. The internal temperature should reach 205-210°F when measured with a thermometer in the center of the loaf.
Cool completely on a wire rack for at least 1 hour before slicing. Gluten-free sourdough bread continues to set as it cools, and cutting too early results in a gummy interior.
Troubleshooting Fermentation Timing:
Gluten-free dough ferments differently than wheat sourdough. If your bulk fermentation seems too fast or too slow, adjust by:
- Reducing starter percentage (use 75g instead of 100g for slower fermentation)
- Lowering room temperature if fermentation is too fast
- Increasing starter strength by feeding it more frequently before baking day
The visual cues matter more than the clock: look for 50-75% volume increase and visible bubbles throughout the dough.
Troubleshooting Common Problems
Dense, Heavy Crumb:
This usually indicates insufficient fermentation or weak starter. Ensure your starter is doubling reliably within 4-8 hours. Extend bulk fermentation by 1-2 hours. Check that your flour blend includes adequate starch content (tapioca and cornstarch help with rise). Consider adding 5g more psyllium husk powder for additional binding strength.
Wet, Gummy Interior:
Gluten-free bread retains more moisture than wheat bread. Cool completely before slicing—at least 90 minutes. If the interior is still gummy after full cooling, you may have over-hydrated the dough or under-baked it. Reduce water by 25ml next time, or bake an additional 5-10 minutes until the internal temperature reaches 210°F.
Flat Loaf with No Oven Spring:
Over-proofing is the likely culprit. The dough may have fermented too long and exhausted its rise potential. Reduce bulk fermentation time by 30-60 minutes. If using cold proof, reduce refrigeration time from 16 hours to 12 hours. Alternatively, use a higher proportion of active starter to speed fermentation.
Pale, Soft Crust:
Insufficient steam during baking prevents proper crust development. Ensure your Dutch oven is thoroughly preheated for 45 minutes. Keep the lid on for the full 25 minutes—don’t peek! The trapped steam gelatinizes starches on the surface, creating that desirable crust.
Sour Flavor Too Mild:
Extend bulk fermentation or use cold overnight proofing. Cooler temperatures and longer fermentation times develop more acidity. Feed your starter less frequently before baking to encourage wild bacteria growth. Some bakers add 1-2g of ascorbic acid (vitamin C powder) to accelerate fermentation and flavor development.
Storage and Serving Tips
Proper storage preserves your gluten-free sourdough bread’s quality and extends its lifespan.
Room Temperature Storage:
Store cooled bread in a paper bag or cloth bag at room temperature for 2-3 days. The paper allows air circulation while preventing it from drying too quickly. Avoid plastic bags initially, as they trap steam and can make the crust soggy.
Freezer Storage:
Slice the cooled loaf and freeze in an airtight container or freezer bag for up to 3 months. Toast frozen slices directly from the freezer for quick breakfast or snacks. This is ideal for easy meal preparation throughout the week.
Refreshing Day-Old Bread:
Spritz the crust lightly with water and warm in a 350°F oven for 10 minutes to restore crispness and softness.
Using Your Gluten-Free Sourdough:
Beyond simple slices with butter, your homemade gluten-free sourdough works beautifully in sandwiches. Try making an Italian sub recipe using your fresh loaf, or serve alongside chicken and potatoes for dinner. The tangy flavor complements both savory and sweet applications—toast it for breakfast with blueberry coffee cake.
The natural acidity in sourdough bread aids digestion and nutrient absorption, making it a healthier choice than commercial gluten-free bread. Many people with gluten sensitivity tolerate sourdough better due to the extended fermentation breaking down starches and proteins.
FAQ
Can I use all-purpose gluten-free flour blend instead of making my own?
Commercial all-purpose gluten-free blends can work, though results may vary. Look for blends that include xanthan gum or psyllium husk for added binding. You may need to adjust water content slightly. King Arthur Gluten-Free blend and Bob’s Red Mill 1-to-1 are popular options, but single-blend formulas often produce denser results than custom blends.
How do I know when my starter is ready to use?
Your starter is ready when it reliably doubles in volume within 4-8 hours of feeding at room temperature. It should smell pleasantly sour and show consistent bubbling throughout. If you’re unsure, perform the “float test”: drop a small spoonful into water. If it floats, it’s active enough for baking.
Why is my gluten-free sourdough so sticky?
Gluten-free doughs are naturally stickier than wheat doughs due to the absence of gluten’s binding protein. This is normal and necessary for proper rise. Use wet hands instead of floured hands when handling the dough. A wet bench scraper helps tremendously during shaping.
Can I make gluten-free sourdough without psyllium husk?
Psyllium husk significantly improves texture and binding, but you can omit it if unavailable. Increase tapioca starch to 25% of your flour blend. The resulting bread will be slightly less chewy but still successful. Some bakers substitute ground flax seeds, though results differ.
How long should gluten-free sourdough ferment?
Bulk fermentation typically takes 5-7 hours at room temperature (68-72°F). Final proof takes 2-4 hours at room temperature or 12-16 hours cold. These times vary based on starter strength, room temperature, and flour blend. Follow visual cues: bulk fermentation is complete when dough increases 50-75% in volume.
Why is my crust not crispy?
Insufficient steam is usually the cause. Ensure your Dutch oven preheats for 45 minutes. Don’t open the oven during the first 25 minutes. Some bakers add an extra pan of boiling water to the oven for additional steam. Gluten-free bread may not develop as thick a crust as wheat sourdough.
Can I use a different starter flour than my baking flour?
Yes. Many bakers maintain starters using brown rice flour or buckwheat flour and use different blends for baking. This works fine—the fermentation process is the same regardless of flour type. You may need to adjust hydration slightly when using different flours.


