
Gluten-Free Sugar Cookies: Expert-Approved Recipe
Baking gluten-free sugar cookies doesn’t mean sacrificing the buttery, melt-in-your-mouth texture that makes traditional sugar cookies irresistible. With the right flour blend and technique, you can create cookies that rival their wheat-based counterparts—and nobody at the table will notice the difference. This expert-approved recipe combines precision, quality ingredients, and proven methods to deliver consistent results every single time.
Whether you’re baking for someone with celiac disease, gluten sensitivity, or simply exploring gluten-free baking, this guide walks you through every step. We’ll cover ingredient selection, mixing techniques, shaping tips, and troubleshooting advice from professional bakers who specialize in gluten-free confections. By the end, you’ll have a reliable recipe you’ll return to for holidays, celebrations, and everyday treats.
Why Gluten-Free Sugar Cookies Matter
Sugar cookies hold a special place in baking culture. They’re blank canvases for creativity, symbols of celebration, and comfort food in their simplest form. For the 3 million Americans with celiac disease and millions more with gluten sensitivity, traditional sugar cookies have been off-limits. But the gluten-free baking revolution has changed everything.
The challenge with gluten-free baking lies in replicating the structure that gluten naturally provides. Gluten creates elasticity and strength in dough, allowing cookies to hold their shape while baking. Without it, dough can spread too much, become crumbly, or develop an undesirable texture. That’s where science and careful ingredient selection come in.
Modern gluten-free flour blends have come remarkably far. They now combine rice flour, tapioca starch, potato starch, and other components to mimic gluten’s functionality. When paired with proper binding agents and the right baking technique, the results are indistinguishable from traditional sugar cookies. This recipe draws from food science research on gluten-free baking chemistry to ensure success.
Essential Ingredients and Substitutions
The Flour Blend (Most Critical Component)
Not all gluten-free flour blends are created equal. For sugar cookies, you need a blend specifically formulated for baking, not one designed for bread-making. Look for brands like Bob’s Red Mill 1-to-1, King Arthur Baking Company Measure for Measure, or Caputo Fioreglut. These contain xanthan gum or similar binders already mixed in, simplifying your process.
If you’re creating your own blend, combine:
- 60% white rice flour
- 20% tapioca starch
- 15% potato starch
- 5% cornstarch
This ratio creates the right balance of structure, tenderness, and browning. Add 1 teaspoon of xanthan gum per cup of flour if your blend doesn’t already contain it.
Butter and Fat
Use unsalted butter at room temperature. Butter provides flavor, helps with browning, and creates the tender crumb structure you want. Room temperature is essential—cold butter won’t cream properly with sugar, and warm butter leads to spreading. Aim for butter that’s 65-70°F, soft enough to leave a slight indent when pressed but not greasy.
Some bakers add a small amount of cornstarch to the butter mixture to reduce spread. This recipe includes a tablespoon mixed into the dry ingredients for optimal results.
Eggs and Binding
Large eggs act as a binder and provide moisture. They’re non-negotiable in this recipe. Some gluten-free bakers add an extra egg yolk to increase richness, but standard eggs work perfectly when combined with the right flour blend.
Leavening Agents
This recipe uses baking soda and cream of tartar rather than baking powder. This combination provides better lift and more even browning for gluten-free cookies. The ratio is 1 teaspoon baking soda to 2 teaspoons cream of tartar per cup of flour.
Vanilla and Flavorings
Pure vanilla extract (not imitation) makes a noticeable difference. Almond extract adds depth—use just ¼ teaspoon to avoid overpowering the delicate cookie flavor.
Complete Ingredient List
- 2¼ cups gluten-free all-purpose flour blend (with xanthan gum)
- 1 tablespoon cornstarch
- 1 teaspoon baking soda
- 2 teaspoons cream of tartar
- ½ teaspoon fine sea salt
- 1 cup (2 sticks) unsalted butter, room temperature
- ¾ cup granulated sugar
- ¼ cup light brown sugar, packed
- 1 large egg
- 1 large egg yolk
- 2 teaspoons pure vanilla extract
- ¼ teaspoon almond extract (optional)
Step-by-Step Instructions
Preparation Phase
Begin by positioning your oven rack to the center position and preheating to 325°F. Gluten-free cookies benefit from slightly lower temperature baking—this allows the centers to bake through without over-browning the edges. Line two baking sheets with parchment paper.
Measure all dry ingredients and whisk them together in a medium bowl. This distributes the leavening agents evenly and incorporates air. Sift if you have a sifter, as this prevents lumps common in gluten-free blends.
Creaming the Butter and Sugars
This step is crucial and shouldn’t be rushed. Add room-temperature butter to a large mixing bowl and beat on medium-high speed for 2-3 minutes until pale and fluffy. Add both sugars gradually, continuing to beat for another 3-4 minutes. The mixture should look like light, whipped clouds—this is where you’re incorporating air that helps create a tender crumb structure.
Scrape down the bowl sides frequently. This ensures even mixing and prevents lumps of butter from hiding in the bottom.
Adding Eggs and Flavorings
Add the whole egg first, beating on medium speed for 1 minute. Add the egg yolk, vanilla extract, and almond extract (if using), beating for another minute. The mixture should be smooth and homogeneous. If it looks slightly curdled, it’s fine—this often happens with gluten-free baking and won’t affect results.
Combining Wet and Dry Ingredients
Add the dry ingredients in three additions, mixing on low speed after each addition. Mix just until combined—overmixing develops gluten-like networks in some gluten-free flours, making cookies tough. The dough should come together without visible streaks of flour.
The dough will be slightly softer than traditional sugar cookie dough. This is normal and necessary for gluten-free baking.
Chilling the Dough
Cover the dough with plastic wrap and refrigerate for at least 2 hours, ideally overnight. Chilling is non-negotiable for gluten-free cookies. It allows the starches to fully hydrate, firms the dough for easier handling, and improves flavor development. Cold dough also spreads less during baking, maintaining better shape definition.
Shaping and Baking
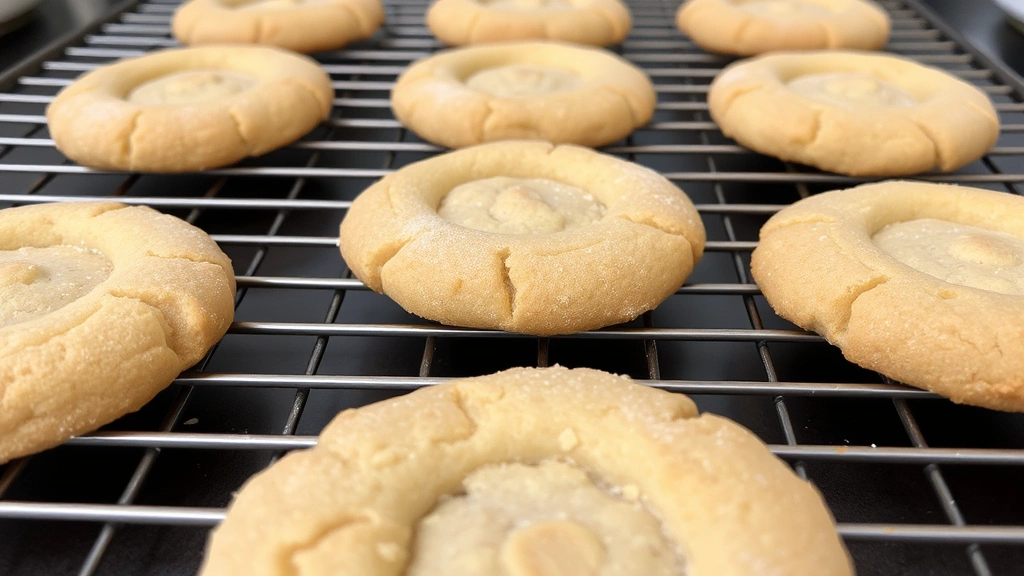
Remove dough from the refrigerator and let it sit at room temperature for 5-10 minutes—this makes scooping easier. Using a 1.5-tablespoon cookie scoop, portion dough onto prepared baking sheets, spacing cookies 2 inches apart. Gently flatten each cookie to about ¼-inch thickness using the bottom of a glass dipped in sugar for a sparkly finish.
Bake for 12-14 minutes, until the edges are set but the centers still look slightly underbaked. This is the secret to tender cookies. They’ll continue cooking on the hot baking sheet for 2-3 minutes after removal from the oven.
Cool on the baking sheet for 5 minutes, then transfer to a wire cooling rack. For crisper cookies, allow them to cool completely on the baking sheet before removing.
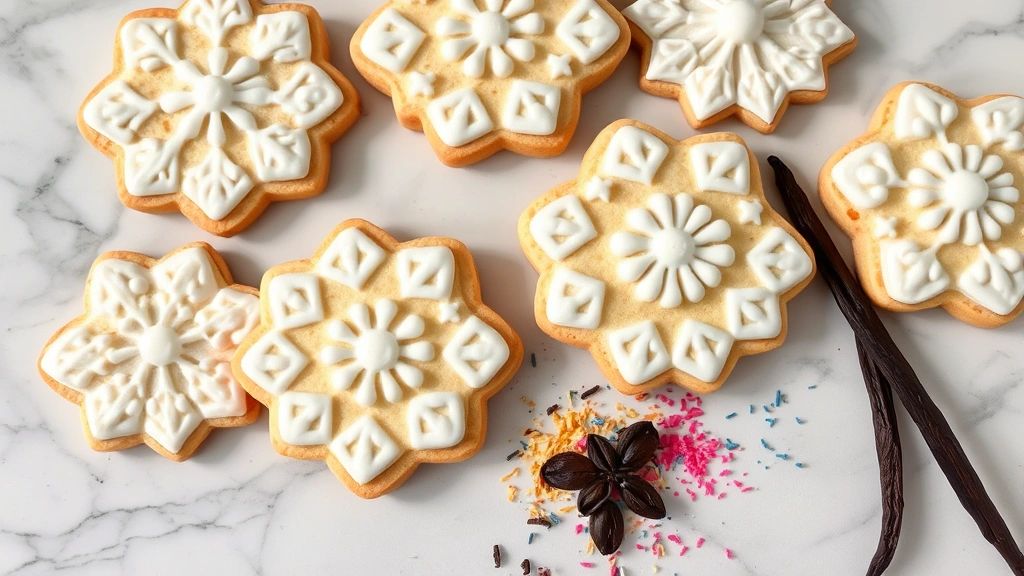
Decorating and Frosting Ideas
Plain sugar cookies are beautiful, but decorated versions make perfect gifts. The beauty of this recipe is that it holds shape well enough for detailed decorating.
Royal Icing for Detailed Designs
Royal icing is the professional choice for intricate decorations. Mix 1 egg white with 2-3 cups powdered sugar and a few drops of lemon juice until you reach piping consistency. The egg white provides shine and hardens to a smooth finish. For food safety, use pasteurized eggs.
Buttercream Frosting
A simpler option: beat 4 tablespoons softened butter with 1 cup powdered sugar, 1 teaspoon vanilla, and a pinch of salt. Add milk one teaspoon at a time until you reach spreading consistency. This tastes delicious and pipes beautifully for borders and simple designs.
Sprinkles and Toppings
Add sprinkles before the icing sets for them to adhere. Sanding sugar creates an elegant sparkle. Pearl dust mixed with vodka creates a shimmery finish (vodka evaporates, leaving no taste).
Glazing Technique
For a glossy finish without piping, make a simple glaze: 1 cup powdered sugar, 2-3 tablespoons milk, ½ teaspoon vanilla. Dip cookie tops into the glaze, let excess drip off, and place on a wire rack. This creates a professional bakery appearance.
Storage and Make-Ahead Tips
Room Temperature Storage
Store cooled, undecorated cookies in an airtight container at room temperature for up to 5 days. Gluten-free cookies tend to dry out faster than traditional ones, so proper storage is essential. Layer them between parchment paper to prevent sticking.
Freezing Dough and Baked Cookies
This recipe is incredibly freezer-friendly. Scoop dough onto a baking sheet, freeze until solid, then transfer to freezer bags for up to 3 months. Bake directly from frozen, adding 1-2 minutes to baking time. Baked cookies freeze beautifully for up to 2 months—perfect for making ahead for parties.
Decorated Cookie Storage
Royal icing-decorated cookies keep in an airtight container for 1-2 weeks. Buttercream-frosted cookies are best consumed within 3 days. Don’t refrigerate frosted cookies, as moisture can affect the icing.
Make-Ahead Strategy for Events
For maximum efficiency: bake plain cookies 1 week ahead and freeze. Decorate 1-2 days before serving. This separates the tasks and ensures fresh-tasting cookies with fresh-looking decorations.
FAQ
Can I use regular all-purpose flour in this recipe?
No. Regular flour contains gluten, which changes the baking chemistry entirely. If you need a traditional version, search for a standard sugar cookie recipe. The measurements and techniques differ significantly from gluten-free baking.
Why did my cookies spread too much?
Several factors cause spreading: butter was too warm, dough wasn’t chilled long enough, oven temperature was too low, or your flour blend was different from what’s specified. Always use a thermometer to verify oven temperature—many home ovens run 25°F off.
My cookies came out too cakey. How do I fix this?
Cakiness usually indicates too much leavening or overmixing. Use the exact measurements provided. Also, ensure you’re not sifting flour into the measuring cup (this adds too much flour). Spoon flour into the cup and level with a knife.
Is this recipe safe for celiac disease?
Yes, if you use certified gluten-free flour and ensure all other ingredients (vanilla, spices, etc.) are certified gluten-free. Check labels carefully—some butter can be cross-contaminated. When baking for someone with celiac disease, use dedicated equipment and surfaces.
Can I use butter substitutes?
Coconut oil creates a different texture (crisper, less rich). Dairy-free butter works but may produce slightly different results due to water content variations. Stick with real butter for the best outcome. If you must use an alternative, use a 1:1 replacement and accept minor texture differences.
How do I know when cookies are done?
Edges should be set and lightly golden, but centers should look slightly underbaked. They firm up as they cool. Overbaking creates dry, hard cookies. When in doubt, pull them out early—they’ll continue cooking on the hot pan.
Can I customize the recipe with flavors?
Absolutely. Add lemon zest, replace vanilla with peppermint extract, or incorporate finely chopped freeze-dried fruit. Keep additions minimal (¼ teaspoon extract or 1 tablespoon zest per batch) to maintain balance. Avoid additions with high water content, as this affects dough consistency.
Why should I use cream of tartar instead of baking powder?
Cream of tartar plus baking soda provides better rise and browning for gluten-free cookies. Baking powder alone can leave a metallic aftertaste in some people. The combination is also more reliable for achieving that perfect tender-yet-structured cookie.
What’s the difference between this and other gluten-free sugar cookie recipes?
This recipe uses a lower baking temperature (325°F instead of 350°F+), includes cream of tartar for better rise, requires chilling, and uses a specific flour blend ratio. These elements work together to produce cookies that match traditional sugar cookies in texture and appearance. Many other recipes skip these steps and produce inferior results.
Can I make this recipe vegan?
This would require significant modifications. Replace butter with vegan butter (1:1), use aquafaba (3 tablespoons per egg) or flax eggs as binders, and ensure all other ingredients are vegan-certified. Results will differ from this recipe. Search for a recipe specifically developed for vegan gluten-free baking for best results.
This expert-approved gluten-free sugar cookie recipe delivers consistently beautiful results. By understanding the science behind gluten-free baking and following these detailed instructions, you’ll create cookies that satisfy everyone at your table—whether they require gluten-free options or simply appreciate excellent baking. The combination of proper flour selection, precise technique, and adequate chilling time transforms a challenging baking project into a reliable favorite you’ll make again and again.


