Best Hopper Recipe? Grandma’s Secret Method for Crispy, Golden Perfection
Hoppers are a beloved Sri Lankan and South Indian delicacy that have captivated food lovers for generations. These bowl-shaped pancakes, with their lacy, crispy edges and soft, spongy centers, represent the perfect marriage of technique and tradition. My grandmother’s hopper recipe has been passed down through our family for decades, and it’s the secret to achieving that restaurant-quality texture that keeps people coming back for more. Whether you’re new to hoppers or looking to refine your technique, this comprehensive guide will walk you through every step of creating these magnificent treats.
The magic of a truly exceptional hopper lies not just in the ingredients, but in understanding the science behind fermentation, batter consistency, and the specialized cooking vessel required. A hopper pan—that distinctive bowl-shaped mold—creates the signature shape while the cast iron construction ensures even heat distribution. Throughout this guide, you’ll discover the techniques that have made my grandmother’s hoppers legendary at family gatherings, and you’ll learn how to troubleshoot common issues that prevent home cooks from achieving professional results.
Understanding Hoppers and Their History
Hoppers have been a staple of Sri Lankan cuisine for centuries, with roots tracing back to the Indian subcontinent. The dish represents an evolution of traditional pancake-making techniques, adapted to create a unique vessel-shaped bread that’s both functional and beautiful. The distinctive cup shape isn’t merely aesthetic—it serves a practical purpose, creating a natural well for curries, sambols, and other accompaniments.
The hopper pan, called an “appachatti” in Tamil, is a specialized cooking tool that separates authentic hoppers from inferior imitations. This cast iron or steel bowl-shaped mold with a long handle allows the batter to climb the sides as it cooks, creating those coveted crispy, lacy edges while maintaining a tender interior. Understanding the equipment is crucial because it directly impacts your success rate.
What makes my grandmother’s method distinct is her understanding of fermentation timing. While many recipes call for overnight fermentation, she discovered that 24-36 hours at room temperature creates superior results. This extended fermentation develops complex flavors and creates the perfect batter viscosity for climbing the pan’s sides.
Essential Ingredients for Authentic Hoppers
Creating exceptional hoppers requires precision with your ingredient selection. Unlike some recipes that call for all-purpose flour, authentic hoppers demand rice flour as the foundation. Rice flour creates the light, crispy texture that defines a proper hopper, and it’s the reason these treats are naturally gluten-free.
The Core Ingredients:
- Rice flour (2 cups) – Use freshly milled or high-quality store-bought versions. Older flour may have absorbed moisture and won’t yield the same results.
- Grated coconut (1 cup fresh, unsweetened) – Fresh coconut is non-negotiable. Dried or frozen coconut will produce a drier, less flavorful hopper.
- Jaggery or palm sugar (3-4 tablespoons) – This adds subtle sweetness and aids fermentation. You can substitute with brown sugar, though the flavor profile changes slightly.
- Coconut milk (½ cup) – Use full-fat, canned or freshly extracted. The fat content is essential for texture.
- Water (1½ cups) – Room temperature water helps activate the fermentation process.
- Salt (1 teaspoon) – Enhances all flavors and controls fermentation speed.
- Fenugreek seeds (methi) (¼ teaspoon) – Optional but highly recommended. These tiny seeds accelerate fermentation naturally.
- Coconut oil (2 tablespoons for batter, plus more for cooking) – For authentic flavor and proper browning.
The quality of your rice flour significantly impacts your hopper recipe’s success. Grandma always recommends sourcing flour from Indian or Sri Lankan specialty stores rather than generic supermarket brands. The difference is immediately apparent in the batter’s texture and the final product’s crispness.
The Fermentation Process: Grandma’s Secret
This is where most home cooks falter, and where my grandmother’s method truly shines. Fermentation isn’t just about waiting—it’s about creating the ideal environment for beneficial bacteria to transform your batter into something magical.
Day One – Creating the Batter:
- Combine rice flour, grated coconut, jaggery, fenugreek seeds, and salt in a large mixing bowl.
- Add coconut milk and water gradually, stirring continuously to avoid lumps. The batter should resemble thick pancake batter—thicker than crepe batter but thinner than regular pancake batter.
- Stir in coconut oil thoroughly.
- Cover the bowl with a cloth (not airtight plastic) and leave it on your kitchen counter, away from direct sunlight but in a reasonably warm location.
Days Two and Three – The Magic Happens:
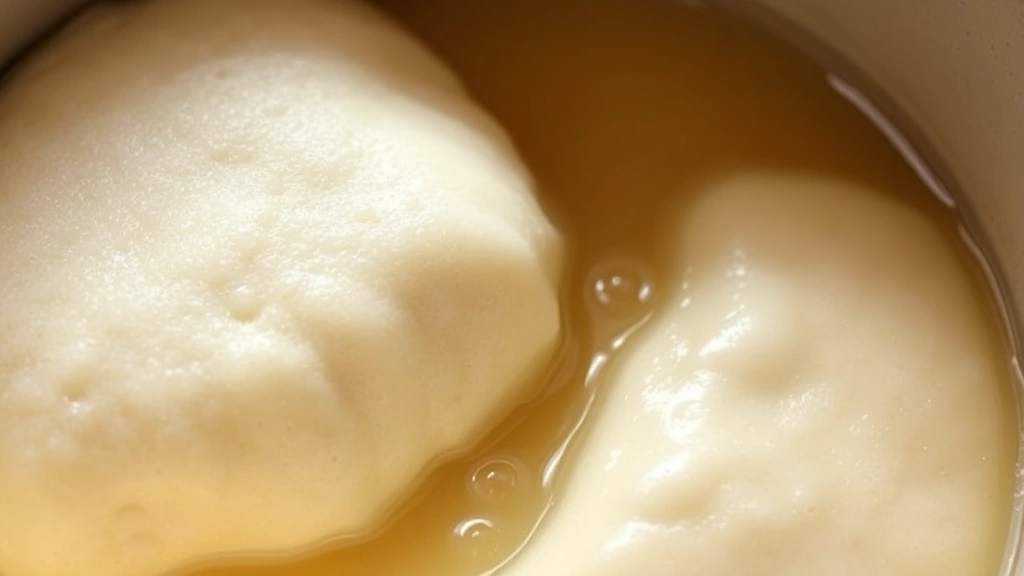
Grandma’s secret involves monitoring fermentation without interfering. After 12 hours, you’ll notice the batter beginning to bubble slightly. By 24 hours, fermentation becomes obvious—the batter rises, develops a slightly sour aroma (not unpleasant, but distinctly fermented), and becomes noticeably lighter in texture. At 36 hours, the fermentation reaches its peak. The batter should be bubbly throughout, with a slight rise at the top, and it should smell pleasantly sour and yeasty.
The critical insight Grandma shared is that fermentation timing depends on your kitchen’s temperature. In warmer climates (75-80°F), 24-30 hours suffices. In cooler kitchens (65-70°F), you need the full 36 hours. If your kitchen is particularly cold, placing the batter near (not on) a warm appliance or in an oven with the light on helps.
Never refrigerate during fermentation. Cold temperatures halt the beneficial bacterial activity that creates the ideal texture and flavor. Room temperature fermentation is non-negotiable for authentic results.

Step-by-Step Cooking Instructions
Once your batter has fermented perfectly, cooking hoppers requires attention and practice, but the technique is straightforward once mastered.
Equipment and Setup:
- A hopper pan (cast iron or steel, bowl-shaped)
- A stove burner set to medium-high heat
- Coconut oil for cooking
- A small ladle or measuring cup (¼ cup capacity)
- Paper towels for draining
The Cooking Process:
- Heat the pan properly: Place your hopper pan on the burner and let it heat for 2-3 minutes. The pan must be hot enough that a drop of water sizzles immediately. This temperature is crucial—too cool and the hopper won’t crisp; too hot and it burns before cooking through.
- Oil the pan: Add ½ teaspoon of coconut oil to the heated pan, coating the bottom and sides evenly. The oil should shimmer but not smoke.
- Pour the batter: Quickly pour ¼ cup of fermented batter into the center of the pan. Immediately begin tilting and rotating the pan in a circular motion, allowing the batter to climb the sides and coat the entire bowl surface. This tilting motion is essential—it creates the signature lacy edges and ensures even cooking.
- Watch for the magic: Within 30-40 seconds, you’ll see the batter begin to set. The bottom will develop a golden-brown color, and the edges will start crisping. The motion you’ve created causes the batter to cling to the sides, creating those beautiful, delicate, crispy edges.
- Cook the bottom: Once the edges have set (another 20-30 seconds), stop tilting and let the hopper sit still for 10-15 seconds to allow the bottom to brown completely. You’re aiming for a deep golden-brown color, not pale or burnt.
- Remove and drain: Using a spatula or the pan’s natural lip, carefully push the hopper out onto a plate lined with paper towels. The hopper should slide out easily if cooked properly.
- Repeat: Clean excess batter from the pan with a paper towel, re-oil, and repeat the process. You should be able to cook a fresh hopper every 1-2 minutes once you’ve established a rhythm.
The tilting motion during cooking is what separates mediocre hoppers from exceptional ones. Grandma demonstrated this countless times—the batter must coat the sides while still wet, creating those crispy, lacy edges as it sets. Don’t be discouraged if your first few attempts aren’t perfect. The technique becomes intuitive after 5-6 hoppers.
Achieving the Perfect Texture:
A properly cooked hopper should have crispy, delicate edges that shatter slightly when you bite them, combined with a tender, slightly spongy center. The bottom should be golden and firm, capable of holding curry or sambol without breaking. If your hoppers are too soft, increase heat slightly and extend the cooking time. If they’re too crispy or burning, reduce heat and work faster with tilting.
Flavor Variations and Serving Suggestions
While Grandma’s traditional hopper recipe is perfect on its own, numerous variations exist that honor the original while adding exciting dimensions.
Savory Variations:
For savory hoppers, reduce jaggery to 1 tablespoon and add minced green chilies, curry leaves, and grated ginger to the batter before fermentation. These hoppers pair beautifully with spicy curries and sambols. You can also prepare a poultry seasoning blend to dust over savory hoppers for added complexity.
Sweet Variations:
Increase jaggery to 5-6 tablespoons and add cardamom pods and a pinch of cinnamon to the batter. Serve these sweeter hoppers with jaggery syrup drizzled inside or with honey and fresh fruit. Some families add a warming spice blend (adapted for sweet applications) to create hoppers that taste like dessert.
Traditional Serving Methods:
- With curry: The most common serving method involves filling the hopper’s center with hot curry—chicken, lentil, or vegetable curries work beautifully. The crispy vessel contains the curry while adding textural contrast.
- With sambol: Fresh coconut sambol, onion sambol, or lime sambol complement hoppers perfectly. These sambols are tangy, spicy, and cut through the richness of the fried batter.
- With jaggery and banana: A classic sweet preparation involves placing sliced banana and melted jaggery inside each hopper. Grandma often prepared this for breakfast.
- With eggs: Spoon a raw egg into the hopper’s center and continue cooking for 2-3 minutes until the egg sets. This creates a savory, protein-rich breakfast option similar to spiced chicken preparations but in hopper form.

Troubleshooting Common Hopper Problems
Problem: Batter doesn’t climb the pan sides
This indicates insufficient fermentation or batter that’s too thick. Ensure your batter ferments for the full 24-36 hours and reaches a bubbly, risen state. If the batter is too thick, add water one tablespoon at a time until it reaches the proper consistency—it should pour slowly and coat the pan evenly when tilted.
Problem: Hoppers are too soft and fall apart
Your pan isn’t hot enough or you’re not cooking long enough. Increase burner heat slightly and extend cooking time by 10-15 seconds. The bottom should be deep golden-brown, not pale. Also ensure you’re tilting the pan continuously during the first 30-40 seconds to create structure.
Problem: Hoppers are burnt on the outside, raw inside
Your pan is too hot. Reduce burner temperature to medium and work more quickly with tilting. The entire cooking process should take 60-90 seconds total. If you’re taking longer, your pan is too cool; if you’re burning, it’s too hot.
Problem: Edges aren’t crispy and lacy
This is usually caused by insufficient tilting during cooking or under-fermented batter. The batter must coat the pan’s sides while still wet to create those delicate, crispy edges. Tilt more vigorously and continuously for the first 40 seconds. Additionally, verify your batter has fermented fully—it should smell distinctly sour and yeasty.
Problem: Batter has a sour smell that’s unpleasant
Fermentation has gone too long or the batter has gone bad. The pleasant sour smell of proper fermentation is yeasty and appetizing. If it smells like vinegar or has an off, rotten quality, discard the batter and start over. This typically happens in very warm kitchens (above 85°F) where fermentation accelerates beyond optimal.
Storage and Make-Ahead Tips
Storing Fermented Batter:
After fermentation completes, you can refrigerate the batter for up to 2 days. Remove it 30 minutes before cooking to bring it to room temperature. The fermentation slows dramatically in the cold, so the batter won’t improve further, but it won’t deteriorate either. Before cooking, stir gently to redistribute ingredients—don’t overmix, as this deflates the beneficial bubbles.
Storing Cooked Hoppers:
Fresh hoppers are best served immediately while crispy. However, you can store them in an airtight container for up to 2 days. To reheat, place them in a 350°F oven for 5-7 minutes until they regain crispness. Don’t use a microwave, as this makes them soggy.
Freezing Hoppers:
Cooked hoppers freeze well for up to 3 months. Arrange them on a baking sheet, freeze until solid, then transfer to freezer bags. Reheat directly from frozen in a 375°F oven for 8-10 minutes.
Make-Ahead Batter Strategy:
You can prepare the batter up to 3 days in advance. Mix all dry ingredients and keep them separate from wet ingredients. When ready to ferment, combine them and proceed as normal. This allows flexibility in meal planning without compromising quality. Grandma often prepared the dry mixture on Sunday and fermented the complete batter when she wanted to cook hoppers later in the week.
For a healthier curry option to serve alongside hoppers, prepare your filling in advance. Many curries improve with time as flavors meld.
FAQ
Can I make hoppers without a hopper pan?
While traditional hoppers require a hopper pan for their signature shape, you can create similar results with a small ladle in a regular skillet. The result won’t be bowl-shaped, but the flavor and texture can be comparable. Some cooks use small round bowls or even ramekins placed in hot oil, though this requires careful technique. The hopper pan is truly the ideal tool and relatively inexpensive (typically $15-25 online).
Is there a quicker fermentation method?
Some recipes suggest fermenting for just 8-12 hours, but Grandma insists this produces inferior results. The extended 24-36 hour fermentation develops the complex flavors and proper batter structure that distinguishes exceptional hoppers. If you’re short on time, adding a tablespoon of active yogurt culture can accelerate fermentation slightly, reducing the time to 18-24 hours, but this changes the flavor profile subtly.
Can I use all-purpose flour instead of rice flour?
Not if you want authentic hoppers. All-purpose flour produces a denser, less crispy result. Rice flour is essential for the light, delicate texture that defines proper hoppers. If you have a gluten sensitivity, rice flour also makes hoppers naturally gluten-free (verify your other ingredients are too).
What’s the difference between hoppers and appams?
While similar, hoppers and appams are distinct dishes. Hoppers are thinner, crispier, and more delicate, with pronounced lacy edges. Appams are slightly thicker, softer, and more cake-like. The batter recipes are similar, but cooking techniques and pan types differ. Hoppers require the bowl-shaped hopper pan and continuous tilting, while appams cook more statically in a specialized appam pan.
How do I know when fermentation is complete?
The batter should be visibly bubbly throughout, with a slight rise at the surface. It should smell pleasantly sour and yeasty—never vinegary or unpleasant. When you stir it, you should see numerous air bubbles. At 24-36 hours in room temperature (75-80°F), properly fermented batter is ready. If in doubt, wait another 6 hours. Slightly over-fermented batter is better than under-fermented batter for hopper texture.
Can I use frozen coconut instead of fresh?
Fresh coconut is strongly preferred because frozen coconut has already begun deteriorating and lacks the moisture content needed for proper texture. If fresh coconut is unavailable, use freshly opened canned coconut (not coconut cream, which is too thick). Dried coconut won’t work well—it absorbs moisture from the batter and produces dry, dense hoppers.
What’s the best curry to serve with hoppers?
Any curry works, but curries with good consistency (not too thin) work best so they don’t spill from the hopper bowl. Chicken curry, lentil curry, and vegetable curry are traditional choices. The curry should be spiced boldly to complement the mild, slightly sweet hopper batter. Rich, flavorful sauces also pair beautifully.
Why is my batter separating?
If your batter separates (liquid pools on top), stir it back together gently. This separation indicates the fermentation is complete or slightly past peak. Some separation is normal and won’t affect results. If severe separation occurs with a distinct alcohol smell, fermentation has gone too long. Stir well before cooking—the batter should be thoroughly combined.
Can I make sweet and savory batches simultaneously?
Yes! Prepare your base batter, then divide it before adding flavor components. Half can ferment with extra jaggery and spices for sweet hoppers, while the other half ferments with chilies and curry leaves for savory hoppers. This approach maximizes efficiency while accommodating different preferences.
How many hoppers does this recipe yield?
The base recipe (2 cups rice flour) yields approximately 12-15 hoppers, depending on how full you ladle each one. Each hopper uses about ¼ cup batter. If you need more, simply double the recipe—the fermentation process remains the same, just in a larger bowl.


