Table of Contents
Introduction
Have you ever tasted a scoop of homemade ice cream and wondered how you could recreate that rich, creamy delight in your own kitchen? Picture this: you’re crafting your own personalized flavors, using fresh ingredients and simple methods that bring way more satisfaction than any store-bought brand could offer. Making homemade ice cream isn’t just about learning a new recipe—it’s about creating those perfect moments of comfort and creativity, right there at your countertop.
Homemade ice cream is one of those timeless treats that never gets old. Think about it—whether you’re cooling down on a blazing summer day or serving up something special after a family dinner, being able to whip up your own ice cream opens up a world of possibilities. I get it though—many home cooks feel intimidated by the whole process. Complex recipes? Fancy equipment? Here’s the thing: making your own ice cream can be surprisingly simple once you know the basics. If you’re curious about working with fresh, simple ingredients from scratch, check out these homemade pasta techniques—they’ll give you a great foundation for this kind of hands-on cooking.
But here’s what really gets me excited about homemade ice cream: you’re in complete control. You decide exactly what goes in—rich creams, quality sugars, fresh fruits, crunchy nuts, or whatever sauces make your taste buds happy. This isn’t just about flavor (though that’s definitely a huge win). You’re also creating something healthier by skipping all those preservatives and artificial additives that sneak into commercial ice cream. Want to balance out your sweet indulgence? These healthy food recipes can help you create meals that complement your homemade treats perfectly.
Now, I know what you’re thinking—where does nutrition fit into all this ice cream talk? Well, it’s all about balance. Even when you’re treating yourself to something creamy and delicious, you can still make smart choices throughout your day. Learning about nutrient-packed foods like what you’ll find in this guide about nutrition facts about kale can inspire you to create a lifestyle where both wellness and occasional indulgence coexist beautifully. Food preparation and nutrition work together to create satisfying experiences for you and everyone you care about.
What You’ll Learn in This Guide
Ready to dive in? I’m going to walk you through everything you need to know about making homemade ice cream, from start to finish. Here’s what we’ll tackle together:
- Ingredients Needed: We’ll provide a clear list of essential ingredients required to craft ice cream from scratch, focusing on simplicity and quality.
- Equipment Required: Learn about the tools that can simplify and enhance your ice cream making process, whether you have an ice cream maker or prefer manual methods.
- Step-by-Step Recipe: Follow our easy-to-understand recipe that breaks down the process into key stages including preparing the ice cream base, churning, and freezing for the perfect texture.
- Tips and Tricks: Discover expert advice on improving texture, flavor, and consistency, along with common mistakes to avoid for flawless homemade ice cream every time.
By the time you finish reading this, you’ll have the confidence to not only make incredible ice cream but also experiment with creative variations that match your taste and dietary needs. Once you understand the ingredients and methods, ice cream making transforms from something that seems overwhelming into a genuinely fun hobby.
Coming up, we’ll also tackle those burning questions you probably have (trust me, everyone has them) and share some serving ideas that’ll make your homemade creations look and taste restaurant-worthy. Whether you’re completely new to this or just want to up your ice cream game, I’ve got you covered.
Before we jump into the good stuff, take a quick look at these food waste reduction tips—they’re game-changers for home cooking projects like ice cream making. Reducing waste saves you money and feels great for the planet too. Plus, knowing how to properly store ingredients (like these herb preservation methods) means your pantry will always be ready for your next culinary adventure without any spoiled surprises.
Alright, let’s turn your kitchen into the coolest ice cream spot in town! With simple steps and ingredients you can actually pronounce, you’ll soon be serving up scoops that make everyone smile. Ready to get started? Let’s do this!
There’s something magical about making your own ice cream at home. Maybe it’s the way your kitchen fills with the sweet aroma of vanilla, or how you get to control exactly what goes into every single scoop. No weird preservatives, no mystery ingredients—just pure, creamy goodness that tastes exactly how you want it to. Whether you’ve never made ice cream before or you’re already a kitchen wizard, the process is surprisingly straightforward once you know the basics. And here’s the best part: every batch becomes your own little masterpiece, packed with whatever flavors make you happy.
Essential Ingredients and Preparation Techniques for Homemade Ice Cream
Let’s talk ingredients first. You don’t need a shopping list as long as your arm—just a few key players that work together beautifully. Heavy cream brings the richness, whole milk keeps things from getting too heavy, sugar adds sweetness (and actually helps with texture too), and your flavorings bring the personality. Vanilla, chocolate, fresh mint from your garden—whatever makes your taste buds sing. Some recipes call for egg yolks, which might sound fancy, but they create this incredible custard base that makes your ice cream taste like it came from the best parlor in town. The secret? Learning how these ingredients dance together, like understanding how milk and cream contribute to creaminess while sugar affects both sweetness and that perfect scoopable texture.
Here’s where things get interesting. Making the base isn’t just about dumping everything together and hoping for the best. You’ll heat things up gently (no rushing here—patience pays off), especially when working with eggs. Nobody wants scrambled eggs in their ice cream, trust me on this one. Once everything’s properly mixed and dissolved, you’ll cool it down completely. This chilling step might seem tedious, but it’s actually doing important work behind the scenes, setting up the fat molecules for better texture later. Want to jazz things up? Mix-ins like crushed cookies or fresh berries are fantastic, but timing matters—add them too early and they’ll get lost, too late and they won’t distribute evenly.
Key Elements of Ice Cream Ingredients and Preparation
Get these fundamentals right, and you’ll be making incredible ice cream every time:
- Balance of Dairy and Sugar: Think of this as your foundation. Cream gives you that rich mouthfeel, milk keeps it from being too intense, and sugar does double duty—sweetening while lowering the freezing point so your ice cream doesn’t turn into a brick.
- Role of Eggs for Custard Bases: Egg yolks are like the secret weapon of ice cream making. Heat them carefully into your base, and they create this silky, luxurious texture that makes people wonder what your secret is.
- Temperature Control: This is where good ice cream separates from great ice cream. Heat gently to dissolve everything properly, then chill thoroughly before churning. Your future self will thank you when you’re eating smooth, creamy ice cream instead of an icy mess.
- Flavor Customization: Add your base flavors early so they can really meld together. Save the chunky stuff—nuts, cookie pieces, fruit—for the very end of churning so they stay intact and spread evenly throughout.
Once you’ve nailed these basics, you’ll find yourself getting creative with flavors and experimenting with different combinations. It’s addictive in the best possible way. Now let’s move on to the fun part—turning that perfectly prepared base into actual ice cream through the magic of churning and freezing.
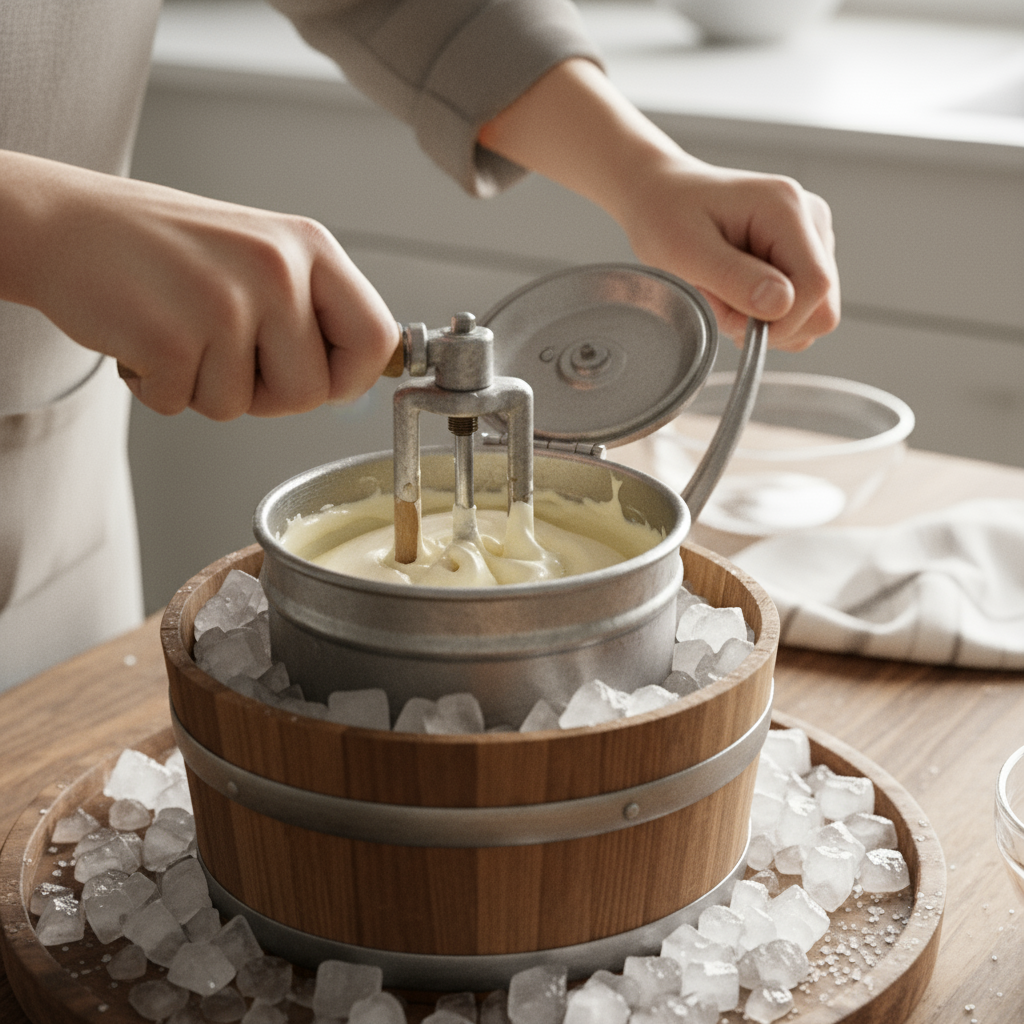
Equipment and Techniques for Perfect Churning and Freezing
This is where your ice cream base transforms from liquid to that perfect, scoopable treat we all love. If you’ve got an ice cream maker, you’re in for an easy ride—these machines do the heavy lifting by stirring and freezing simultaneously. But don’t worry if you don’t have one. There are some surprisingly effective workarounds that’ll get you there too. The key is understanding what’s actually happening during this process: you’re incorporating air while freezing, which prevents those nasty ice crystals from taking over. When you do use an ice cream maker, getting the timing and temperatures right makes all the difference between okay ice cream and the stuff that disappears from your freezer way too quickly.
After churning comes the waiting game—and yes, it’s worth it. Your ice cream will be soft-serve consistency straight from the machine, but a few hours in the freezer firms it up to that perfect scooping texture. Pro tip: press plastic wrap directly onto the surface before covering with a lid. This prevents ice crystals from forming and keeps your ice cream tasting fresh longer. No ice cream maker? No problem. You can use the freezer bag method (seriously, it works) or just stick your base in the freezer and stir it every 30 minutes. It takes more effort, but the results can be surprisingly good.
Crucial Factors in Churning and Freezing Homemade Ice Cream
Pay attention to these details, and your ice cream will rival anything you can buy:
- Consistent Agitation During Churning: Keep things moving to incorporate air and break up ice crystals as they form. Ice cream makers excel at this steady rhythm, but manual methods work too—you just need to be more hands-on.
- Freezing Speed and Temperature: Faster freezing means smaller ice crystals, which means smoother ice cream. Pre-freeze your equipment, use the coldest setting on your freezer, or try the old-school ice and salt method for quicker results.
- Proper Storage Techniques: Use airtight containers and press plastic wrap directly onto the surface. This simple step prevents that annoying layer of ice crystals and keeps your ice cream tasting amazing for weeks.
- Adaptability of No-Churn Methods: Don’t let the lack of fancy equipment stop you. Bag methods, periodic stirring, or even the good old “shake it in a coffee can” technique can produce surprisingly delicious results when you’re committed to the process.

So there you have it—homemade ice cream that’ll make you wonder why you ever bought the store-bought stuff. Sure, it takes a little patience and practice, but honestly? That’s half the fun. We’ve covered everything from picking the right ingredients (heavy cream and whole milk are your best friends here) to mastering those gentle heating techniques that keep your base silky smooth instead of chunky and weird.
The churning part is where the magic really happens. Think of it as giving your ice cream a gentle workout—all that movement creates those tiny air bubbles that make each spoonful melt perfectly on your tongue. Whether you’ve got a fancy ice cream maker or you’re going old-school with manual methods, the secret is keeping things moving and controlling how fast everything freezes. Nobody wants ice crystals the size of marbles, right?
And here’s something that’ll save you from heartbreak later: proper storage. Press that plastic wrap right onto the surface—trust me on this one. It’s the difference between creamy perfection and freezer-burned disappointment two weeks from now.
Want to level up your batch? It’s all about balance. Too much sugar and it won’t freeze properly. Too little and it’ll be hard as a rock. Timing your mix-ins is crucial too—add those chocolate chips too early and they’ll sink to the bottom like little brown pebbles. Learn from my mistakes here!
Now that you’ve got ice cream down pat, why not tackle some other homemade favorites? If you’re feeling ambitious, our guide on how to make homemade pasta will teach you those same hands-on techniques that make cooking feel less like work and more like creating something amazing.
Balance out all that creamy goodness with some lighter options from our collection of best healthy food recipes. Because let’s be real—we can’t live on ice cream alone (though wouldn’t that be nice?).
Speaking of being smart in the kitchen, check out our food waste reduction tips and how to preserve herbs guides. Your wallet will thank you, and you’ll feel pretty good about not tossing perfectly good ingredients.
For the bigger picture on eating well while still enjoying treats like homemade ice cream, our healthy nutrition plan shows you how to make it all work together without feeling deprived.
You’ve officially joined the homemade ice cream club—welcome! Every batch is a chance to try something new, perfect your technique, or just enjoy the simple satisfaction of making something delicious from scratch. Don’t be afraid to experiment. Add some lavender. Try brown butter. Go wild with mix-ins. The best part? Even your “failures” are still ice cream, and honestly, how bad can that be?
Frequently Asked Questions
-
Can I make homemade ice cream without an ice cream maker?
- Yes, there are methods such as freezer bag or no-churn recipes that can produce good results.
-
How long does homemade ice cream last in the freezer?
- Typically 1-2 weeks for best taste and texture if stored properly in an airtight container.
-
Can I add mix-ins like chocolate chips or fruit?
- Yes, mix-ins can be added during the churning or just before freezing.
-
What ingredients make homemade ice cream creamy?
- Using heavy cream, whole milk, and sometimes egg yolks helps achieve a creamy texture.
-
Is homemade ice cream healthier than store-bought?
- It can be, since you control the ingredients and can avoid preservatives and excessive sugars.