Italian Beef Sandwich: Chef’s Secret Recipe
The Italian beef sandwich stands as one of Chicago’s most iconic culinary creations, a towering monument to the art of slow-cooked perfection and bold flavors. This beloved sandwich has captured the hearts and appetites of food enthusiasts for generations, combining tender, seasoned beef with crusty bread and vibrant peppers into an unforgettable handheld meal. What makes this sandwich truly special isn’t just the quality of ingredients—it’s the technique, patience, and understanding of flavor layering that transforms simple components into something extraordinary.
Many home cooks believe that creating an authentic Italian beef sandwich requires special equipment or obscure ingredients, but nothing could be further from the truth. With the right approach and insider knowledge, you can recreate this Chicago classic in your own kitchen, impressing family and friends with restaurant-quality results. This guide reveals the chef’s secrets that elevate a good sandwich into an exceptional one, from selecting the perfect cut of beef to mastering the art of the gravy that makes this dish truly shine.
Understanding the Classic Italian Beef
The Italian beef sandwich represents more than just lunch—it’s a cultural icon rooted in Chicago’s Italian-American heritage. Originating in the 1930s, this sandwich emerged from resourceful cooks who sought to transform tougher cuts of beef into tender, flavorful meals. The technique involves slow-cooking beef with aromatic vegetables and herbs until it becomes so tender it practically melts on your tongue.
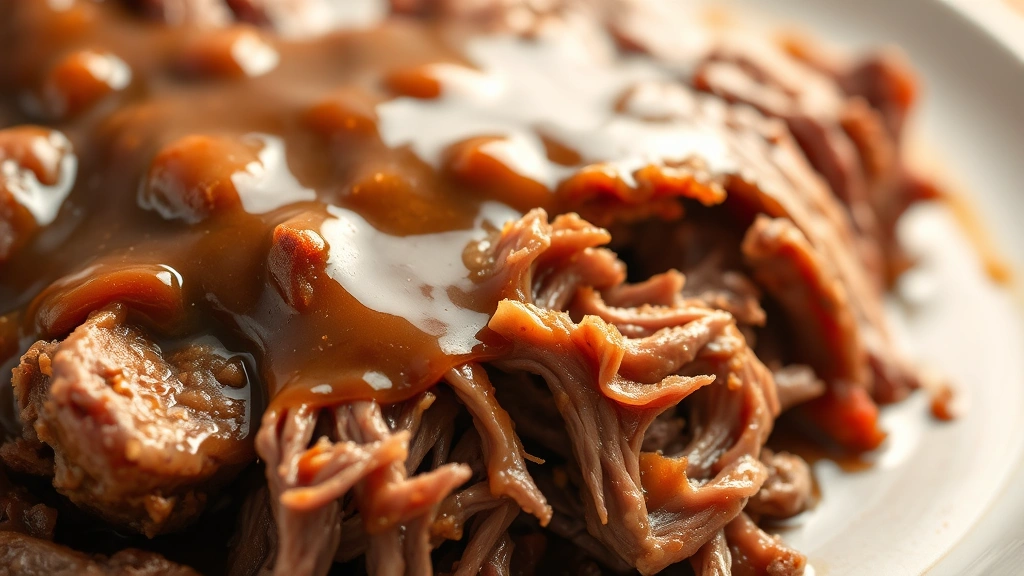
What distinguishes an authentic Italian beef sandwich from other beef sandwiches is the cooking method and the gravy. Unlike roast beef sandwiches that feature sliced meat, the Italian beef version relies on shredded or thinly sliced beef that absorbs the rich, seasoned broth. The result is a sandwich that’s impossibly moist, deeply flavored, and absolutely craveable. Understanding this fundamental approach helps you appreciate why each step in the process matters, and why shortcuts often disappoint.
The beauty of this sandwich lies in its simplicity combined with complexity. You’re working with straightforward ingredients—beef, vegetables, bread, and peppers—yet the interplay of flavors creates something remarkably sophisticated. Many chefs compare the technique to braising, which shares similarities with slow-cooking methods used in how to grill steak perfectly, though the Italian beef sandwich takes a different path toward tenderness and flavor development.
Selecting Your Beef Cut
The foundation of an exceptional Italian beef sandwich begins with choosing the right cut of meat. Many home cooks make the mistake of selecting premium cuts, but here’s the chef’s secret: tougher, fattier cuts are actually superior for this application. The extended cooking time transforms connective tissue and fat into gelatin and rich flavor compounds, creating the distinctive texture and taste that makes this sandwich special.
The most traditional choice is beef chuck roast, which contains enough marbling and connective tissue to develop incredible depth during the braising process. A three to four-pound chuck roast serves as the ideal starting point for a batch that feeds 6-8 people. Alternatively, beef brisket or beef rump roast work wonderfully, each bringing slightly different flavor characteristics to the finished sandwich.
When selecting your beef, look for pieces with visible fat distribution throughout the meat. This marbling isn’t a flaw—it’s a feature that guarantees juicy, tender results. Ask your butcher for a roast that’s roughly uniform in thickness, which promotes even cooking. Avoid pre-cut stew meat, as the small pieces lack the structural integrity needed for proper slicing or shredding after cooking.
Size matters considerably. A four-pound roast provides enough surface area to develop a flavorful crust during searing, while remaining manageable for home cooking. You can always freeze leftover cooked beef and gravy for future sandwich-making sessions, making this an excellent make-ahead recipe.
Preparing the Signature Gravy
The gravy is where magic happens. This isn’t merely a thin sauce—it’s a richly flavored broth that becomes the vehicle for all the sandwich’s complexity. Creating this gravy involves building layers of flavor through aromatics, spices, and proper technique.
Begin with the aromatics: Dice one large onion, slice four to five garlic cloves, and prepare two carrots and two celery stalks cut into chunks. These vegetables form the aromatic base, releasing their flavors during the slow cooking process. Some chefs add a bay leaf, fresh thyme, and rosemary sprigs for additional depth.
The spice profile typically includes dried oregano, Italian seasoning, garlic powder, onion powder, paprika, salt, and black pepper. Rather than guessing at quantities, start with one tablespoon of Italian seasoning, two teaspoons of dried oregano, one teaspoon each of garlic and onion powder, and half a teaspoon of paprika. You’ll adjust these based on your taste preferences, but this foundation provides authentic flavor.
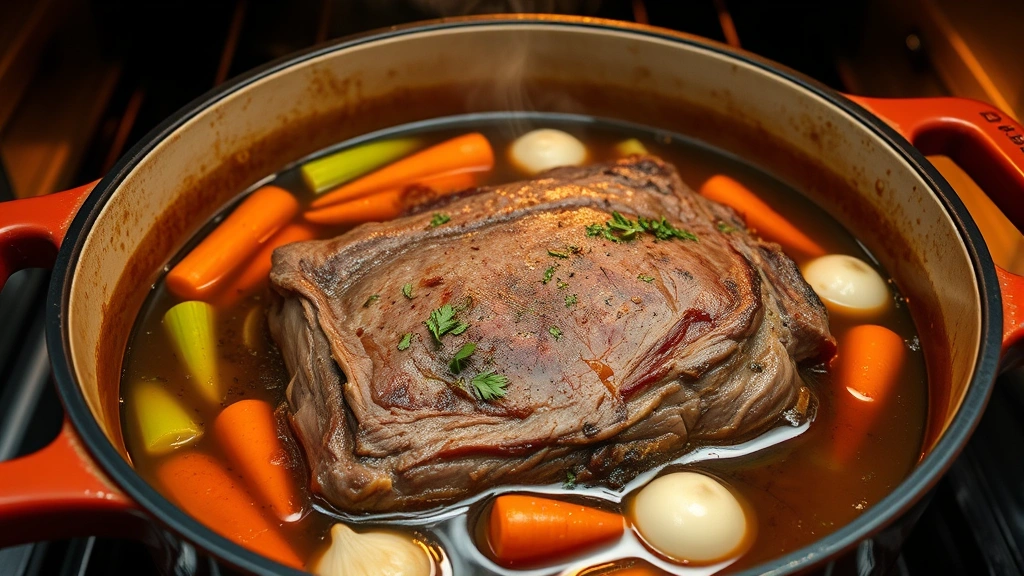
The cooking process begins with searing your beef chuck roast in a Dutch oven or heavy pot with a bit of oil. This step, called the Maillard reaction, develops a flavorful brown crust that contributes tremendous depth to the final gravy. Sear all sides until deeply browned—about 3-4 minutes per side. This isn’t rushing; take time to develop that crust.
After searing, remove the beef and add your diced onion and garlic to the same pot, scraping up all the browned bits clinging to the bottom. This technique, called deglazing, captures all the flavor compounds released during searing. Cook the aromatics for 2-3 minutes until fragrant, then add your beef broth—typically four to six cups depending on your pot size and desired gravy consistency.
Return the seared beef to the pot, add your spices and herb sprigs, and bring everything to a simmer. Cover and transfer to a preheated 325°F oven for 3-4 hours, checking occasionally to ensure the liquid maintains a gentle simmer. The beef is ready when a fork easily pierces the meat and shreds effortlessly.
Building Flavor Layers
Creating depth in your Italian beef sandwich requires understanding how flavors build and interact. This layering approach transforms a simple dish into something memorable and sophisticated.
First layer—the base: Your slow-cooked beef and gravy form the foundation. The extended cooking time allows spices to fully integrate with the meat and liquid, creating a unified flavor profile rather than individual ingredients competing for attention.
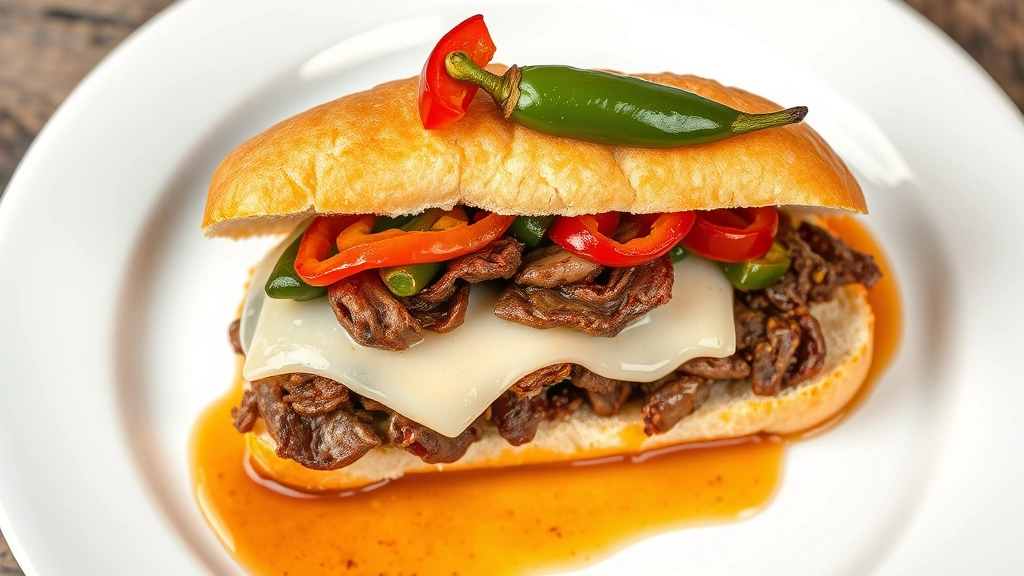
Second layer—the peppers: Sautéed bell peppers and hot peppers add brightness and complexity. Slice one green bell pepper and one red bell pepper into thin strips. In a separate skillet, sauté these with a bit of oil, salt, and pepper until they’re tender-crisp, about 5-7 minutes. Some chefs add sliced hot peppers like peperoncini for a subtle kick. These peppers will be served on top of the beef, adding textural contrast and fresh flavor that cuts through the richness.
Third layer—the bread: Your bread choice significantly impacts the final sandwich. Crusty Italian rolls or sub rolls work best, as they provide structural support and won’t disintegrate when dunked in gravy. Some devotees prefer slightly stale bread, which has better integrity when wet. Toast your rolls lightly to add textural contrast and prevent them from becoming soggy too quickly.
Fourth layer—additional toppings: Provolone cheese is traditional, though it’s optional. If using cheese, place a slice on the bottom half of your roll before adding beef. Some variations include giardiniera—a pickled vegetable mixture that adds tang and complexity. A light drizzle of the cooking gravy over the peppers adds moisture and reinforces the unified flavor profile.
The key to successful layering is balance. You want each element to contribute without overwhelming the others. The beef should be the star, with peppers and toppings providing supporting roles that enhance rather than dominate.
Assembling Your Sandwich
Assembly might seem straightforward, but technique matters here too. Proper assembly ensures every bite delivers maximum flavor and ideal texture.
Step one—prepare your workspace: Gather your toasted rolls, shredded beef with gravy, sautéed peppers, and any additional toppings. Have paper towels nearby, as these sandwiches are intentionally messy. Consider using a shallow bowl or tray to catch drips.
Step two—layer the components: Place your toasted roll on a plate or tray. Spoon a generous amount of shredded beef onto the bottom half, along with enough gravy to make it moist but not soggy. The key is moistness without falling apart—this takes practice to perfect.
Step three—add peppers and toppings: Arrange your sautéed peppers over the beef. If using cheese, it should already be on the roll, melting slightly from the warm beef. Add any other toppings—giardiniera, additional peppers, or sliced onions—creating a balanced distribution.
Step four—complete the sandwich: Place the top half of the roll on the sandwich, pressing gently to secure everything. Some traditionalists dunk the entire sandwich in the remaining gravy for a few seconds before serving. This is called “dipping” and creates an extra-moist sandwich. Only attempt this if you’re confident in your bread’s structural integrity.
Serve immediately while everything is warm. The contrast between the hot beef and any fresh toppings, combined with the textural interplay of crusty bread and tender meat, creates the complete Italian beef sandwich experience.
Chef Tips for Perfection
Beyond the basic recipe, several professional techniques elevate your results to restaurant quality.
Make ahead strategy: The beauty of this recipe is that it improves with time. Cook your beef and prepare the gravy a day in advance. The flavors develop and integrate further as it sits in the refrigerator. Simply reheat gently before serving, adding a splash of broth if the gravy has thickened too much. This approach also reduces stress when entertaining, allowing you to focus on assembly and enjoying your guests.
Similar to food waste reduction tips, you can freeze leftover beef and gravy in portions for future meals. This transforms your cooking effort into multiple sandwich opportunities.
Temperature control: Whether you’re using how to cook with cast iron or a traditional Dutch oven, maintaining consistent, gentle heat is crucial. The beef shouldn’t boil vigorously; a gentle simmer at around 180-190°F produces tender, succulent results. Boiling toughens the meat and causes excessive liquid evaporation.
Gravy consistency: Your gravy should coat the back of a spoon without being thick like stew. If it’s too thin, simmer uncovered for 20-30 minutes to reduce and concentrate flavors. If too thick, add broth in quarter-cup increments. The ideal consistency allows the beef to be moist and flavorful without the sandwich becoming soup-like.
Seasoning adjustment: Always taste your gravy before serving and adjust seasonings. Salt and pepper are usually necessary, as are additional herbs if the flavor seems flat. This final tasting ensures your sandwich reaches its full potential. Remember that flavors intensify as liquid reduces, so under-season slightly during cooking and adjust at the end.
Pepper variations: While bell peppers are traditional, don’t hesitate to experiment. Some chefs add roasted red peppers for sweetness, hot banana peppers for tang, or a combination for complexity. The peppers should complement rather than overshadow the beef, so choose varieties that enhance the overall flavor profile.
Bread selection: Visit your local bakery rather than relying on grocery store bread. Fresh, crusty rolls make a tremendous difference. The bread provides the textural foundation for your sandwich, so investing in quality ingredients here pays dividends.
Professional chefs often prepare their Italian beef sandwiches using techniques refined over years of practice. One secret involves finishing the gravy with a touch of red wine or beef broth reduction to add complexity. Another involves adding a small amount of fish sauce or soy sauce—just a teaspoon or two—to deepen the umami profile without any detectable fishiness.
Consider the summer salad recipes as a perfect complement to serve alongside your Italian beef sandwiches. The fresh, acidic salad balances the rich, savory sandwich beautifully.
For those interested in exploring related cooking techniques, understanding meat preparation methods used in recipes with shredded chicken can provide additional insights into working with slow-cooked proteins. While the proteins differ, the principles of moisture retention and flavor development translate across applications.
FAQ
Can I make Italian beef sandwiches in a slow cooker?
Absolutely. Combine your seared beef, aromatics, spices, and broth in a slow cooker. Cook on low for 6-8 hours or high for 4-5 hours until the beef shreds easily. The slow cooker method produces equally tender, flavorful results, though you’ll miss the initial browning step unless you sear the beef first in a separate pan. Many home cooks prefer the slow cooker for convenience, especially when preparing for gatherings.
What if my beef turns out tough?
Tough beef typically results from insufficient cooking time or too-high heat. Ensure you’re cooking at a gentle simmer, not a rolling boil. The beef should cook for at least 3-4 hours, depending on thickness and your oven temperature. If this happens, simply continue cooking until the beef becomes tender. Alternatively, slice the cooked beef very thinly against the grain and simmer the slices in the gravy for additional time, which can salvage the dish.
How long does Italian beef keep in the refrigerator?
Properly stored in an airtight container, cooked Italian beef and its gravy will keep for 3-4 days. The flavor actually improves as it sits. You can freeze portions for up to 3 months. Thaw overnight in the refrigerator and reheat gently on the stovetop, adding a splash of broth if needed.
Can I use a different cut of beef?
While chuck roast is traditional, brisket, rump roast, and even beef shoulder work well. Avoid lean cuts like tenderloin or strip steak, which become dry during extended cooking. Fattier cuts with connective tissue develop the best flavor and texture for this application.
What’s the best way to reheat Italian beef?
Transfer your beef and gravy to a saucepan and heat gently over medium-low heat, stirring occasionally. Avoid high heat, which can cause the gravy to break or the beef to toughen. The reheating process takes 10-15 minutes and allows flavors to meld further. Add broth if the gravy has thickened too much during storage.
Should I include the vegetables from cooking?
The aromatic vegetables—onions, carrots, and celery—serve primarily as flavor contributors during cooking. Most cooks strain them out before serving, though some prefer to leave them in for added texture and nutrition. This is a matter of personal preference. If you leave them in, ensure they’re tender and well-integrated into the gravy.


