Jello Poke Cake Delight: Grandma’s Favorite Recipe That Never Fails
There’s something magical about a jello poke cake that takes you straight back to childhood gatherings and family celebrations. This beloved dessert combines the nostalgia of classic American baking with the refreshing sweetness of gelatin, creating layers of flavor and texture that keep everyone coming back for seconds. Whether you’re preparing this for a potluck, holiday dinner, or simply want to recreate those cherished memories, this jello poke cake recipe delivers consistent, delicious results every single time.
The beauty of a poke cake lies in its simplicity and versatility. Unlike more complicated desserts that require specialized equipment or advanced baking techniques, this recipe welcomes home cooks of all skill levels. The method is straightforward: bake a tender cake, poke holes throughout while it’s still warm, pour flavored jello mixture over the top, and let the magic happen as the liquid soaks into every crevice. The result is a moist, flavorful cake with pockets of fruity jello goodness that make every bite memorable.
What makes this particular version special is how it honors traditional recipes while allowing for creative variations. You can customize the jello flavor, frosting style, and toppings to match your preferences or dietary needs. Some people love pairing it with healthy dessert recipes by using lighter frosting options, while others stick with the full-fat indulgence of their childhood versions.
Understanding the Poke Cake Concept
The poke cake emerged as a beloved American dessert in the mid-20th century, gaining popularity through community cookbooks and family recipe collections. The technique involves creating small holes in a warm cake layer, then saturating those holes with a liquid mixture—traditionally jello or fruit juice. This method ensures that flavor penetrates deep into the cake rather than sitting only on the surface.
The name “poke” comes directly from the action of poking holes into the cake. This simple technique transforms an ordinary cake into something extraordinary by creating moisture pockets and flavor bursts throughout. The jello or liquid soaks into the spongy cake crumb, creating a texture that’s tender, juicy, and incredibly satisfying. Unlike frosting that sits on top, the poke method distributes flavor and moisture evenly from top to bottom.
Understanding why this technique works helps you master the recipe. When you poke holes into a warm cake, you’re creating pathways for liquid absorption. The warm cake is more receptive to soaking up the liquid than a cooled cake would be. The gelatin-based mixture then sets as it cools, locking in moisture and flavor. This is why timing is crucial—poking and adding jello while the cake is still warm ensures maximum absorption and the best final texture.
Essential Ingredients for Success
Creating an authentic jello poke cake requires quality ingredients that work together harmoniously. Let’s break down what you’ll need and why each component matters.
For the Cake Base: You’ll need all-purpose flour, sugar, eggs, butter, vanilla extract, baking powder, salt, and milk. Some recipes use buttermilk for added tang and tenderness. The cake should be tender enough to absorb the jello without falling apart, yet sturdy enough to hold its shape. A standard white or yellow cake works perfectly, though chocolate variations are equally delicious.
For the Jello Layer: The star ingredient is flavored gelatin—typically strawberry, raspberry, lime, or orange for classic versions. You’ll need boiling water to dissolve the gelatin and cold water or fruit juice to create the soaking liquid. Some cooks use fruit juice instead of water for deeper flavor. A 3-ounce package of gelatin is standard for most poke cake recipes.
For the Frosting: Whipped cream, cream cheese frosting, or whipped topping work beautifully. Traditional recipes often call for Cool Whip or homemade whipped cream stabilized with a bit of powdered sugar. Cream cheese frosting adds richness and prevents the frosting from weeping as the cake sits.
Optional Toppings: Fresh fruit, toasted nuts, sprinkles, or additional whipped cream finish the presentation. These additions provide textural contrast and visual appeal.
For anyone exploring easy instant pot recipes, you might appreciate knowing that some cooks use pressure cookers to speed up cake baking, though traditional oven baking remains the standard method for poke cakes.
Step-by-Step Preparation Guide
Proper preparation sets the foundation for cake success. Begin by gathering all ingredients and allowing them to reach room temperature—this ensures even mixing and better cake texture. Room temperature eggs emulsify more effectively with butter, creating a lighter, airier crumb structure.
Prepare Your Pan: Preheat your oven to 350°F (175°C). Grease a 9×13-inch baking pan thoroughly with butter or cooking spray, then lightly dust with flour. Tap out excess flour to prevent a thick, dry crust on the cake edges. Some bakers line the pan with parchment paper for easier removal, though this isn’t necessary.
Mix the Dry Ingredients: In a medium bowl, whisk together 1¾ cups all-purpose flour, 1½ teaspoons baking powder, and ½ teaspoon salt. Whisking combines these ingredients evenly and incorporates air, which helps the cake rise. Set this mixture aside.
Cream Butter and Sugar: In a large mixing bowl, beat ½ cup softened butter with 1 cup granulated sugar for 3-4 minutes until light and fluffy. This step is crucial—creaming incorporates air into the batter, which helps the cake rise and creates a tender crumb. The mixture should look pale and airy, not dense and glossy.
Add Eggs and Vanilla: Add 2 large eggs one at a time, beating well after each addition. Pour in 1 teaspoon vanilla extract and mix until combined. The batter should look smooth and creamy.
Alternate Dry and Wet Ingredients: Add the flour mixture in three additions, alternating with ½ cup milk in two additions. Begin and end with flour. Mix on low speed just until combined—overmixing develops gluten, creating a tough cake. The batter should be smooth but not overworked.
Pour and Bake: Transfer the batter to your prepared pan, spreading it evenly. Bake for 30-35 minutes until a toothpick inserted in the center comes out clean or with just a few moist crumbs. The cake should spring back when lightly touched.
Baking and Poking Techniques
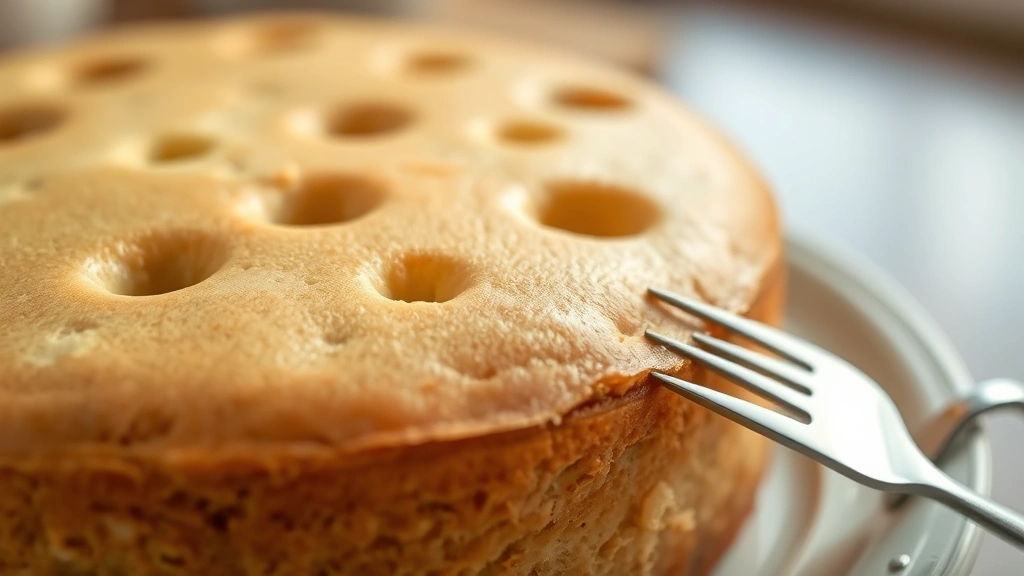
The poking stage is where your poke cake becomes truly special. Remove the cake from the oven and let it cool for just 5 minutes—it should still be warm to the touch but not piping hot. This timing is critical for optimal jello absorption.
The Poking Method: Using a fork, toothpick, or wooden skewer, poke holes all over the cake surface. Space holes about ½ inch apart, creating a uniform pattern. Push the utensil about halfway through the cake’s depth—you want holes that reach into the cake without piercing all the way through to the bottom. Aim for 50-75 holes depending on your pan size. This might seem like many holes, but each one is a pathway for the jello to penetrate.
Some bakers prefer using a fork to create larger openings that accept more jello. Others use a fine skewer for smaller, more delicate holes. Both methods work; choose based on your preference and the texture you desire. The key is consistency—evenly distributed holes ensure that every slice contains jello pockets.
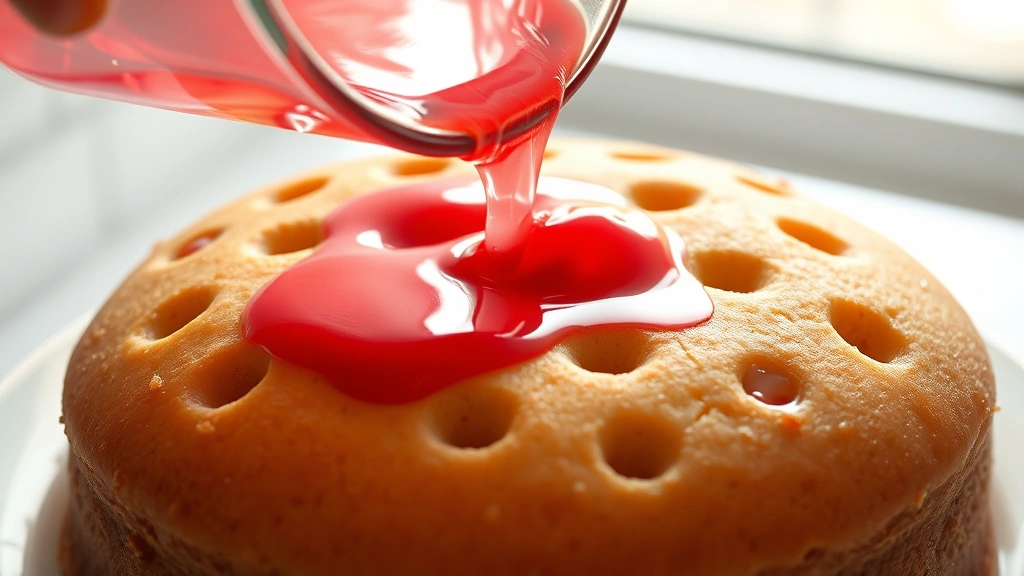
Preparing the Jello Mixture: While the cake cools slightly, prepare your jello. Dissolve one 3-ounce package of flavored gelatin in 1 cup boiling water, stirring for about 2 minutes until completely dissolved. Add 1 cup cold water (or fruit juice for deeper flavor). The mixture doesn’t need to be completely cooled, but it shouldn’t be piping hot when poured over the cake.
Pouring the Jello: Carefully pour the jello mixture evenly over the warm cake, allowing it to flow into the holes you’ve created. Pour slowly so the liquid has time to soak in rather than pooling on the surface. If you see pooling, wait a minute for absorption, then continue pouring. Use all the jello mixture—it will seem like a lot, but the warm cake will absorb most of it.
Cooling Process: Allow the cake to cool completely at room temperature for about 1 hour, then refrigerate for at least 4 hours or preferably overnight. The jello needs time to set and the cake needs to chill before frosting. This resting period also allows flavors to meld beautifully.
Creating the Perfect Jello Layer
The jello layer is what distinguishes a poke cake from ordinary layer cakes. This component requires understanding gelatin behavior and timing to achieve the ideal texture and flavor distribution.
Choosing Your Jello Flavor: Classic combinations include strawberry jello with vanilla cake, raspberry with chocolate cake, or lime with white cake. The jello flavor should complement rather than overpower the cake. Lighter jello colors look beautiful against white or yellow cake, while darker colors create striking contrast with chocolate cake.
Gelatin Strength Matters: Standard flavored gelatin packets contain about 2½ teaspoons of gelatin powder. This amount sets properly at the ratio of 1 cup boiling water to 1 cup cold liquid. If you substitute fruit juice for water, ensure it’s not acidic enough to prevent setting—very acidic juices can interfere with gelatin’s gelling ability. Pineapple and papaya contain enzymes that break down gelatin, so avoid these unless using canned versions where enzymes have been deactivated by heat.
Temperature Considerations: The jello should be warm enough to pour easily but cool enough that it won’t dry out the cake. If your mixture starts to set before you’ve poured it all, gently reheat it. Conversely, if it’s too hot, wait a few minutes for it to cool slightly. The ideal temperature is around 110-120°F when poured.
Absorption Optimization: The more holes you create and the warmer the cake, the better the absorption. Some experienced bakers poke holes in multiple layers if making a two-layer cake, ensuring jello reaches all the way through. This technique creates more consistent moisture throughout the entire dessert.
If you’re interested in high protein slow cooker recipes for other occasions, you might appreciate how poke cakes can be modified with protein-enriched cake bases for a nutritional boost.
Frosting and Finishing Touches
Once your cake has chilled and the jello has completely set, it’s time to add frosting and toppings that complete this delightful dessert.
Whipped Cream Frosting: The most traditional choice is homemade whipped cream. Whip 2 cups heavy cream with 3 tablespoons powdered sugar and 1 teaspoon vanilla extract until stiff peaks form. To prevent weeping in warm conditions, add 2 tablespoons of cream cheese or 1 tablespoon of cornstarch to stabilize the whipped cream. Spread this frosting evenly over the chilled cake, creating swirls and peaks for visual appeal.
Cream Cheese Frosting: For a richer option, beat 8 ounces softened cream cheese with ½ cup softened butter, 2 cups powdered sugar, and 1 teaspoon vanilla extract. This frosting is more stable than plain whipped cream and won’t weep as the cake sits at room temperature. It pairs particularly well with fruit-flavored jello cakes.
Cool Whip Alternative: Many traditional recipes use Cool Whip or similar whipped topping products. While not homemade, these products offer stability and convenience. Use them straight from the container or fold them gently into a small amount of cream cheese for added flavor and structure.
Topping Ideas: Fresh berries create stunning visual contrast and add freshness. Toasted nuts provide textural interest and subtle flavor. Sprinkles appeal to children and add festive color. Some bakers garnish with additional jello pieces cut into decorative shapes, creating a cohesive design. Shredded coconut offers tropical flair, while chocolate shavings add elegance.
Application Technique: Spread frosting gently over the cake using an offset spatula or knife. Don’t press too hard—the cake layers are delicate and can break. Chill for 30 minutes after frosting to allow it to set slightly before adding toppings. Toppings should be added just before serving to maintain their texture and prevent them from sinking into soft frosting.
Storage and Make-Ahead Tips
One of the best aspects of poke cake is how well it stores and how far in advance you can prepare it. This makes it perfect for party planning and busy schedules.
Refrigerator Storage: Cover your frosted cake loosely with plastic wrap or store it in an airtight cake container. The cake will keep for 3-4 days refrigerated. The jello layer actually improves slightly as it sits—flavors meld and the texture becomes more uniform. The cake will become slightly more moist each day as jello continues to distribute throughout.
Make-Ahead Strategy: Bake the cake and add the jello layer up to 2 days before serving. Refrigerate uncovered until the jello sets completely, then cover. Add frosting and toppings no more than 4 hours before serving to keep frosting fresh and toppings at peak texture. If you must frost earlier, add fresh fruit toppings just before serving.
Freezing Considerations: The unfrosted, untopped cake with jello can be frozen for up to 2 months. Wrap it carefully in plastic wrap and then foil. Thaw completely in the refrigerator before frosting. Frosted cakes don’t freeze as successfully because frosting texture changes during freezing and thawing. If you must freeze a frosted cake, use stabilized whipped cream or cream cheese frosting rather than regular whipped cream.
Transporting Tips: For potlucks or gatherings, transport the unfrosted cake in its pan covered with foil, then frost on-site if possible. If frosting at home, use a cake carrier designed for transport, or carefully place the cake on a flat surface in a car. Keep the cake cool during transport by placing it on a cooler with ice packs underneath, being careful that ice doesn’t touch the cake directly.
Popular Flavor Combinations
While the classic strawberry jello with vanilla cake is timeless, countless delicious variations exist. These combinations have been tested by countless home bakers and consistently deliver excellent results.
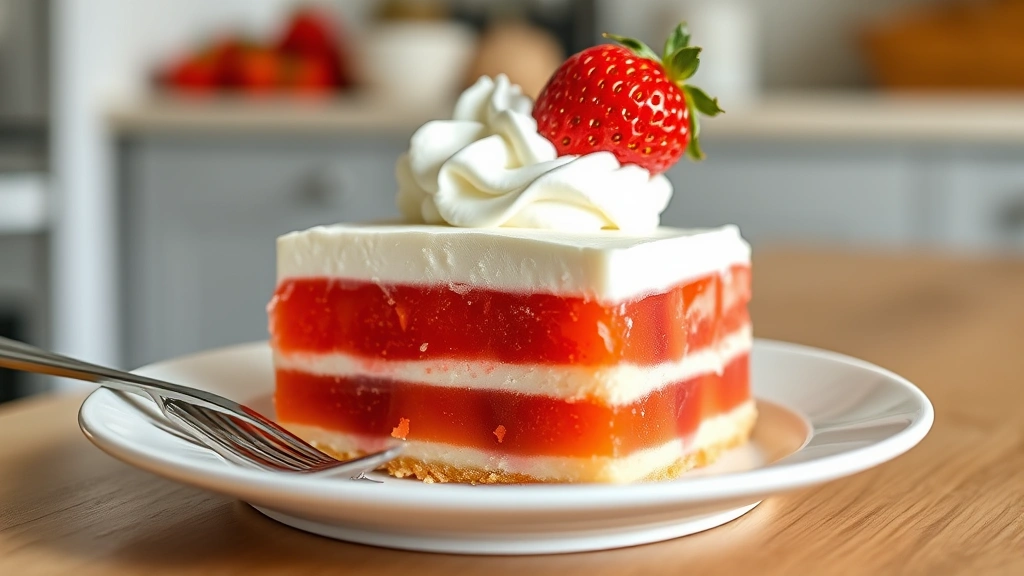
Strawberry Shortcake Style: Pair strawberry jello with vanilla cake, then top with whipped cream frosting and fresh strawberry slices. This combination is light, refreshing, and perfect for spring and summer gatherings. The strawberry jello flavor harmonizes beautifully with fresh berries.
Raspberry Chocolate Elegance: Combine raspberry jello with devil’s food or chocolate cake, topped with cream cheese frosting. Add fresh raspberries and chocolate shavings for a sophisticated dessert that feels special enough for dinner parties. The tartness of raspberry balances chocolate richness perfectly.
Lime Coconut Tropical: Use lime jello with vanilla cake, then top with whipped cream frosting and toasted coconut. This combination evokes tropical vacation feelings and works wonderfully at summer cookouts. The lime flavor is bright and refreshing without being overwhelmingly citrusy.
Orange Creamsicle Dream: Combine orange jello with vanilla cake, then frost with vanilla-flavored whipped cream. This creates a flavor profile reminiscent of classic orange creamsicles. It’s particularly popular with children and nostalgic adults.
Lemon Blueberry Sunshine: Pair lemon jello with vanilla cake, then top with whipped cream and fresh blueberries. The tartness of lemon combined with sweet blueberries creates a sophisticated flavor combination that’s light and summery.
Cherry Chocolate Richness: Use cherry jello with chocolate cake for a combination that feels indulgent and festive. Top with chocolate frosting and maraschino cherries for a classic presentation that works beautifully during holidays.
For those exploring recipes with shredded chicken, you might appreciate how poke cake variations can be adapted for different dietary preferences and occasions, creating desserts suited to any meal.
Exploring Greek recipes might inspire you to create Mediterranean-inspired poke cake variations using Greek yogurt in the frosting for added tang and nutrition.
Understanding how to preserve herbs might interest bakers who want to experiment with herb-infused jello layers, such as basil with strawberry or mint with lemon, for unique flavor combinations.
FAQ
Can I use sugar-free jello for my poke cake?
Yes, absolutely. Sugar-free jello works perfectly in poke cakes and creates the same absorption and flavor results as regular jello. The preparation method remains identical—dissolve in boiling water, add cold liquid, and pour over the warm cake. This variation is excellent for those watching sugar intake while still enjoying this classic dessert.
What if my cake breaks when I poke it?
Breaking happens when the cake is either too hot (causing structural weakness) or too cool (becoming brittle). The ideal poking time is 5-10 minutes after removing the cake from the oven when it’s warm but has set slightly. If breakage occurs, don’t worry—the frosting and toppings will hide imperfections, and the cake will still taste delicious. For future batches, ensure your cake is fully baked (a toothpick should come out clean) and poke at the right temperature.
Can I make this cake without jello?
While possible, you’d lose the signature element that makes this dessert special. However, you could substitute fruit juice or fruit puree mixed with a thickening agent like cornstarch if you prefer to avoid gelatin. Simply prepare the liquid, cool it to room temperature, then pour over the poked warm cake. The result will be similar but with different texture characteristics.
How far in advance can I make this cake?
You can bake the cake and add jello up to 2 days in advance, storing it covered in the refrigerator. Add frosting no more than 4 hours before serving for best results. Fresh fruit toppings should be added just before serving. This timeline allows for significant advance planning while maintaining quality and freshness.
Why is my jello not setting properly?
Several factors can affect jello setting: using boiling water that’s too hot can break down gelatin, very acidic fruit juices can interfere with gelling, and insufficient chilling time prevents proper setting. Ensure you use the correct water-to-gelatin ratio, avoid pineapple and papaya unless canned, and refrigerate for at least 4 hours. The cake itself should be cold when you add the jello mixture.
Can I use homemade cake instead of box mix?
Absolutely, and many bakers prefer it. A quality homemade cake often absorbs jello better and has superior flavor and texture. Any tender cake recipe works well—vanilla, yellow, chocolate, or even almond cake. The key is creating a cake with a tender crumb that will absorb the jello without falling apart. Avoid dense cakes or those with lots of oil, as these don’t absorb jello as effectively.
What’s the best way to serve this cake?
Serve directly from the refrigerator or at cool room temperature. Use a sharp knife dipped in hot water and wiped clean between cuts for neat slices. The cold temperature helps the cake hold together and keeps the frosting firm. Allow each slice to sit for a minute before plating to ensure clean presentation.
Can I double this recipe for a larger cake?
Yes, you can make two cakes and stack them, or double the ingredients for a thicker single cake. If doubling ingredients for one pan, increase baking time by 10-15 minutes and check for doneness with a toothpick. You’ll need to double the jello mixture as well. Ensure your pan is large enough to accommodate the extra batter—a 9×13-inch pan works for single-recipe amounts, but doubling requires either two pans or a larger pan like a half-sheet pan.


