
Create the Creamiest Latte? Barista-Approved Recipe
A truly exceptional latte transcends the ordinary morning coffee ritual. It’s a delicate balance of espresso intensity, silky microfoam, and perfectly steamed milk that creates a beverage worthy of your favorite café. Whether you’re a seasoned coffee enthusiast or just beginning your specialty coffee journey, mastering the art of the creamiest latte recipe will elevate your daily routine and impress anyone fortunate enough to sip your creation.
The secret to achieving that coveted creamy texture isn’t about luck—it’s about understanding the fundamental principles of milk steaming, espresso extraction, and temperature control. Professional baristas spend months perfecting their technique, but with the right guidance and practice, you can replicate their expertise in your own kitchen. This comprehensive guide reveals the exact methods, equipment recommendations, and troubleshooting tips that separate mediocre lattes from extraordinary ones.
Understanding the Perfect Latte Foundation
A latte consists of three essential components working in perfect harmony: espresso, steamed milk, and microfoam. The ratio traditionally follows a 1:3 to 1:4 espresso-to-milk proportion, though personal preference allows for slight variations. Understanding what makes each component special is crucial before you even begin heating your milk pitcher.
The espresso serves as your foundation—rich, concentrated, and full of complexity. Microfoam, which is velvety steamed milk with tiny, uniform bubbles, creates the signature creamy texture that defines an excellent latte. This isn’t the thick, chunky foam you might see on cappuccinos; instead, it’s a seamless integration of air and milk that feels luxurious on your palate. When you combine these elements properly, the result is a beverage that feels indulgent while remaining balanced and drinkable throughout.
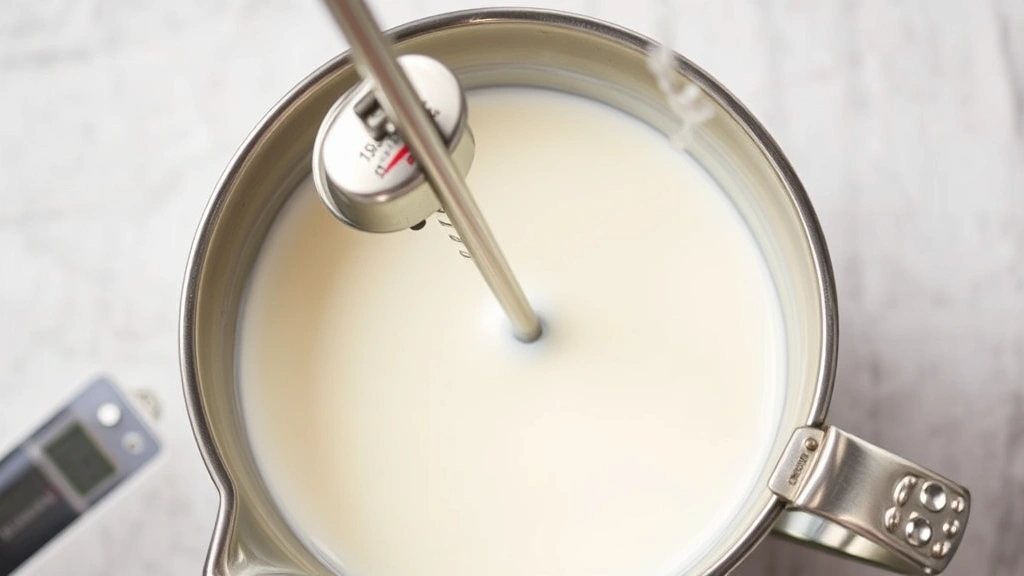
Temperature plays an equally important role in the final product. The ideal serving temperature ranges between 150-155°F (65-68°C). Too hot, and you’ll scald the milk, destroying its natural sweetness and creating a burnt flavor. Too cool, and the drink loses its comforting warmth and the flavors won’t properly develop. This precision is what separates barista-quality lattes from amateur attempts.

Essential Equipment for Creamy Latte Success
You don’t need an expensive espresso machine to create a delicious latte, though quality equipment certainly helps. At minimum, you’ll need:
- An espresso machine or alternative brewing method: True espresso requires 9 bars of pressure, which only espresso machines provide. However, Moka pots and AeroPress devices can create concentrated coffee that works in lattes when properly prepared
- A milk frother or steam wand: This is non-negotiable for achieving microfoam. Handheld frothers work for casual use, but a steam wand provides superior control and consistency
- A stainless steel milk pitcher: Choose one with a narrow spout and capacity of 12-20 ounces for optimal steam wand control
- A thermometer: Digital instant-read thermometers eliminate guesswork and ensure you’re hitting that perfect temperature range every time
- A kitchen scale: Precise measurements of coffee grounds and milk weight ensure reproducible results
- High-quality espresso beans: Freshly roasted beans (within 2-4 weeks of roast date) make an enormous difference in flavor
Investing in a decent Specialty Coffee Association-certified espresso machine will dramatically improve your results. However, even basic home setups can produce excellent lattes with proper technique and attention to detail.
The Step-by-Step Barista Technique
Creating the creamiest latte requires following a precise sequence. Professional baristas repeat these steps hundreds of times daily, developing muscle memory that ensures consistency.
Step 1: Prepare Your Espresso
Begin by grinding your espresso beans to a fine, consistent texture—slightly finer than table salt but coarser than powder. Tamp the grounds firmly and evenly into your portafilter with approximately 30 pounds of pressure. For a double shot, use about 18-20 grams of ground coffee. Insert the portafilter and start your shot immediately. Proper extraction takes 25-30 seconds and should yield approximately 2 ounces of espresso. If your shot runs too quickly (under 20 seconds), your grind is too coarse. If it runs too slowly (over 35 seconds), your grind is too fine.
Step 2: Begin Milk Steaming Simultaneously
While your espresso extracts, fill your milk pitcher approximately one-third full with cold milk. Position the steam wand just below the milk surface at a slight angle. This positioning is critical—too high, and you’ll create excessive foam; too low, and you won’t incorporate enough air. Turn on the steam and listen for a gentle, continuous hissing sound. This indicates you’re incorporating the right amount of air.
Step 3: Create the Microfoam
During the first 3-5 seconds of steaming, the milk should expand slightly as you incorporate air. You’re listening for that distinctive hissing sound that tells you air is entering the milk. Once the pitcher becomes too hot to hold comfortably, lower the steam wand deeper into the milk and position it off-center to create a gentle whirlpool. This circulation ensures even heating and proper texture development. Continue steaming until the milk reaches approximately 150-155°F (65-68°C).
Step 4: Combine and Pour
Turn off the steam immediately when you reach the target temperature. Tap the pitcher gently on the counter to break any large bubbles, then swirl the milk to create a uniform, glossy texture. By now, your espresso should be ready in a pre-warmed cup. Pour the milk slowly and deliberately, holding the pitcher at a 45-degree angle. Start from the side of the cup, gradually lowering the pitcher as the cup fills. This technique creates proper integration between the espresso and milk while building a thin layer of microfoam on top.
Milk Selection and Temperature Mastery
The type of milk you choose dramatically affects your latte’s creaminess and final flavor profile. Whole milk contains approximately 3.5% fat, which creates the richest, most luxurious mouthfeel. It froths beautifully and creates stable microfoam that lasts throughout consumption. This is the professional barista’s choice for classic lattes.
Two-percent milk works well as a lighter alternative, though it produces slightly less dense microfoam. Skim milk can be used but requires more careful technique, as it froths more aggressively and produces larger, less stable bubbles. Many specialty baristas actually prefer whole milk for its superior texture and flavor-carrying capacity.
Plant-based milk alternatives have become increasingly popular. Oat milk performs exceptionally well, creating creamy microfoam comparable to dairy milk. Almond milk and soy milk require more finesse, as they foam differently and can separate if overheated. Coconut milk produces excellent results but imparts distinct flavor that may or may not complement your espresso choice.
Temperature control cannot be overstated. The milk’s proteins denature and develop sweetness between 140-155°F (60-68°C). Exceeding 160°F (71°C) creates a scalded, bitter flavor that ruins even excellent espresso. Using a thermometer during your first dozen lattes builds the muscle memory needed to judge temperature by touch alone—a skill professional baristas develop through repetition.
Espresso Extraction Excellence
Your espresso quality determines your latte’s flavor foundation. Even the creamiest microfoam cannot rescue poorly extracted espresso. Understanding extraction variables ensures consistency.
Grind Size
Espresso requires a fine, consistent grind. Invest in a burr grinder rather than a blade grinder, as burr grinders produce uniform particle size. Blade grinders create inconsistent sizes that extract unevenly. Your grind should feel slightly grainy but hold together briefly when squeezed—finer than sand but coarser than flour.
Dose and Tamp
Use 18-20 grams of ground coffee for a double shot. Distribute the grounds evenly in your portafilter basket, then tamp with firm, perpendicular pressure. Inconsistent tamping creates uneven extraction and weak shots. Many baristas use a calibrated tamper that applies consistent pressure automatically.
Shot Time
The ideal extraction time is 25-30 seconds for a double shot. This timing extracts the pleasant flavors while leaving bitter compounds behind. Keep detailed notes about your grind adjustments until you achieve this timing consistently. Water temperature should be between 195-205°F (90-96°C)—most machines maintain this automatically, but older models may require verification.
Consider exploring resources from Perfect Daily Grind for deeper espresso science knowledge and advanced extraction techniques that will refine your understanding further.
Advanced Latte Variations
Once you master the classic latte, explore these sophisticated variations that build on the same foundational techniques. Consider pairing them with your quick breakfast recipes for complete morning experiences.
Flavored Lattes
Add vanilla syrup, caramel, hazelnut, or cinnamon to your cup before pouring espresso. The heat dissolves the syrup while the milk incorporates it evenly. Use 0.5-1 ounce of quality syrup per latte, adjusting to your sweetness preference.
Temperature Variations
Create iced lattes by pouring chilled milk over espresso shots in ice-filled glasses. The cold milk prevents microfoam formation, so aim for a smooth, creamy texture instead. Alternatively, make cortados by using equal parts espresso and steamed milk for a bolder, more concentrated drink.
Specialty Milk Infusions
Experiment with honey-sweetened milk, maple-infused versions, or milk warmed with cinnamon sticks. These additions create complexity that elevates your latte beyond standard preparations. Heat these infusions gently to preserve delicate flavors before steaming with your espresso.
These variations work beautifully as part of a comfort food recipes collection, offering cozy beverages that complement various occasions and moods.
Common Mistakes and Solutions
Even experienced home baristas encounter challenges. Understanding common pitfalls prevents frustration and accelerates your learning curve.
Thin, Watery Microfoam
This typically results from insufficient air incorporation during steaming. Position your steam wand higher in the milk initially to create more aggressive air intake. Listen for a louder hissing sound during the first 3-5 seconds. If your pitcher is too full, empty some milk before steaming—a one-third full pitcher provides optimal space for foam development.
Thick, Chunky Foam
Excessive air incorporation creates large, unstable bubbles that separate from the milk. Reduce initial air intake by positioning the steam wand lower and angling it more subtly. Ensure you’re creating that gentle whirlpool in the second phase of steaming rather than aggressive churning.
Burnt, Scalded Milk Flavor
You’ve exceeded the ideal temperature range. Use a thermometer to monitor heating, aiming for 150-155°F (65-68°C). Turn off the steam immediately when reaching this temperature. Professional baristas develop a feel for this, but thermometers eliminate guesswork during your learning phase.
Weak, Thin Espresso
Your grind is too coarse or your tamp is insufficient. Adjust your grinder to a finer setting incrementally, then verify extraction time. Increase your tamp pressure to ensure even water contact throughout the grounds. Ensure your machine’s water temperature is adequate—older machines sometimes run cool.
Espresso and Milk Separate Visibly
This occurs when espresso is too hot or milk temperature is too low. Allow your espresso to cool for 5-10 seconds before pouring milk, or heat your milk slightly hotter (up to 160°F if necessary). Proper integration requires balanced temperatures between both components.
When these challenges arise, remember that professional baristas train for months to achieve consistency. Your dedication to technique refinement will yield noticeable improvements within weeks of regular practice.
FAQ
What’s the difference between a latte and a cappuccino?
Lattes contain a higher milk-to-espresso ratio (approximately 3:1 or 4:1) with thin microfoam, while cappuccinos use roughly equal parts espresso, steamed milk, and thick foam (approximately 1:1:1). This makes cappuccinos more espresso-forward and less creamy than lattes. Lattes provide that luxurious, silky drinking experience throughout, while cappuccinos deliver bolder espresso flavor with pronounced foam texture.
Can I make a latte without an espresso machine?
Technically yes, though results won’t be identical. Moka pots produce concentrated coffee that approximates espresso when used properly. AeroPress devices also create concentrated brews suitable for lattes. However, you’ll lose the pressure-driven extraction that gives true espresso its distinctive crema and body. For the best results, invest in an entry-level espresso machine or visit a café for espresso shots to combine with home-steamed milk.
How long does microfoam last?
Properly created microfoam remains stable for 5-10 minutes, though it begins separating immediately after steaming stops. This is why professional baristas serve lattes immediately after preparation. The longer your drink sits, the more the foam integrates into the milk, eventually becoming indistinguishable from steamed milk. Consume your latte within a few minutes of creation for optimal texture.
Should I use filtered water in my espresso machine?
Absolutely. Hard tap water causes mineral buildup that damages espresso machines and affects extraction quality. Filtered water removes chlorine and excessive minerals while maintaining beneficial minerals for proper extraction. Use either a quality pitcher filter or install a whole-house system. This simple step extends your machine’s lifespan and noticeably improves espresso flavor.
What espresso beans work best for lattes?
Medium to medium-dark roasts generally pair best with milk in lattes. These roasts develop chocolate, caramel, and nutty notes that complement milk’s sweetness without being overwhelmed. Light roasts often taste thin when diluted with milk, while very dark roasts can taste ashy. Choose beans from reputable specialty coffee roasters roasted within 2-4 weeks for optimal freshness and flavor.
Can I make lattes ahead of time?
Not really. Espresso begins losing its volatile flavor compounds within 10-15 minutes, and microfoam separates quickly. Lattes are best consumed immediately after preparation. However, you can prepare components ahead: brew espresso shots and refrigerate them for up to 24 hours, or steam milk and keep it warm in an insulated container for an hour. Combine them just before serving for best results.
Why is my latte sometimes grainy or gritty?
This usually indicates improperly steamed milk where larger bubbles have formed and partially separated. It can also result from milk that’s been heated too aggressively or allowed to sit too long after steaming. Ensure your steam wand positioning creates that gentle whirlpool rather than violent churning. Serve immediately after steaming, and tap your pitcher gently to break large bubbles before pouring.


