Dreamy Pokémon Sleep Treats: Sweet Success with Easy Dessert Recipes
Pokémon Sleep has captured the hearts of trainers everywhere, and what better way to celebrate your sleep-tracking adventures than with themed desserts? These whimsical Pokémon sleep dessert recipes bring the cozy, dreamy aesthetic of the game directly to your kitchen. Whether you’re a casual player or a dedicated Pokémon enthusiast, creating adorable edible tributes to your favorite characters adds a delightful layer of fun to snack time.
The beauty of Pokémon-inspired treats lies in their versatility. From simple no-bake options perfect for busy weeknights to elaborate showstopper cakes that’ll impress any gathering, these recipes combine accessibility with creativity. You don’t need professional pastry skills to craft treats that capture the essence of Pokémon’s signature charm and the peaceful, sleepy vibes that define the Sleep experience.
Let’s explore how to transform basic ingredients into magical creations that would make even Snorlax proud. These treats celebrate the game’s most beloved sleeping Pokémon while remaining genuinely delicious and shareable with friends and family.
Understanding Pokémon Sleep Aesthetic Design
The Pokémon Sleep game revolves around peaceful, dreamy imagery with soft colors and cozy vibes. Understanding this visual language helps create desserts that authentically capture the game’s essence. The primary color palette features pastels—soft purples, gentle blues, warm creams, and muted pinks. These colors appear throughout the game’s interface and creature designs, making them perfect inspiration for your dessert creations.
Key design elements include rounded shapes (reflecting Pokémon’s cute proportions), starry night motifs, cloud patterns, and peaceful expressions on characters’ faces. When designing your treats, incorporate these elements through frosting details, color choices, and overall composition. The goal isn’t photorealism but rather capturing the gentle, sleep-inducing atmosphere that defines the game.
Consider how professional bakers approach cake decorating techniques when planning your designs. Simple techniques like piping, fondant shaping, and strategic color placement can elevate even basic desserts into recognizable Pokémon tributes. The most successful Pokémon treats often combine basic baking with thoughtful decoration rather than overly complex techniques.
Essential Ingredients for Themed Treats
Before diving into specific recipes, stock your pantry with versatile ingredients that work across multiple Pokémon dessert projects. These foundational items create a flexible base for experimentation and adaptation.
- Buttercream bases: All-purpose flour, butter, powdered sugar, and vanilla extract form the foundation of most decorative elements. Buttercream holds color beautifully and remains workable for extended periods.
- Chocolate varieties: Dark, milk, and white chocolate chips offer different flavor profiles and melting properties. Quality chocolate makes a noticeable difference in taste and appearance.
- Food coloring: Gel food coloring provides vibrant hues without thinning your batters or frostings like liquid versions do. Invest in a comprehensive palette for accurate Pokémon color matching.
- Binding agents: Cornstarch, gelatin, and marshmallow fluff help create specific textures and hold decorative elements in place.
- Flavor extracts: Vanilla, almond, and lemon extracts add depth without adding moisture. These are particularly useful for customizing basic recipes.
- Edible decorations: Sprinkles, pearl dust, and edible glitter create sparkle and visual interest that mirrors the game’s magical aesthetic.
When preparing chocolate-based desserts, quality matters significantly. The same applies to all your core ingredients—investing in good butter, real vanilla, and quality chocolate elevates the entire project.
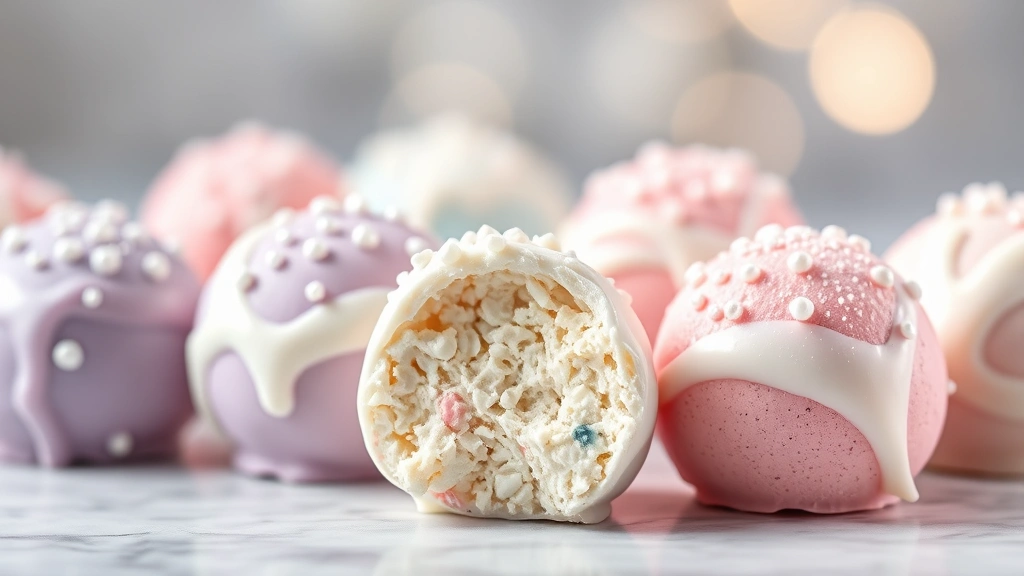
No-Bake Dreamy Puffball Bites
These adorable no-bake treats capture the essence of Pokémon Sleep’s dreamy atmosphere without requiring an oven. They’re perfect for beginners or when you need quick results.
Ingredients:
- 1 cup cream cheese, softened
- ½ cup powdered sugar
- ½ teaspoon vanilla extract
- 1 cup white chocolate chips
- Pastel gel food coloring (purple, blue, pink)
- Coconut flakes or sprinkles for coating
- Edible pearl dust for shimmer
Instructions:
- Beat softened cream cheese with powdered sugar until fluffy (approximately 2-3 minutes). Add vanilla extract and mix thoroughly.
- Divide mixture into three portions. Tint each with different pastel colors using gel coloring—add color gradually, mixing well after each addition.
- Melt white chocolate chips in a microwave-safe bowl in 30-second intervals, stirring between each, until completely smooth.
- Roll colored cream cheese mixture into small balls (roughly walnut-sized). Refrigerate for 15 minutes to firm up.
- Dip each ball into melted white chocolate using a fork, allowing excess to drip off. Place on parchment paper.
- Before chocolate sets, roll in coconut flakes or sprinkles to create texture. Refrigerate until firm.
- Dust lightly with edible pearl dust for a dreamy, magical finish.
These treats taste like sweet, creamy truffles and store beautifully in the refrigerator for up to one week. They’re ideal for party platters, gift boxes, or personal snacking.
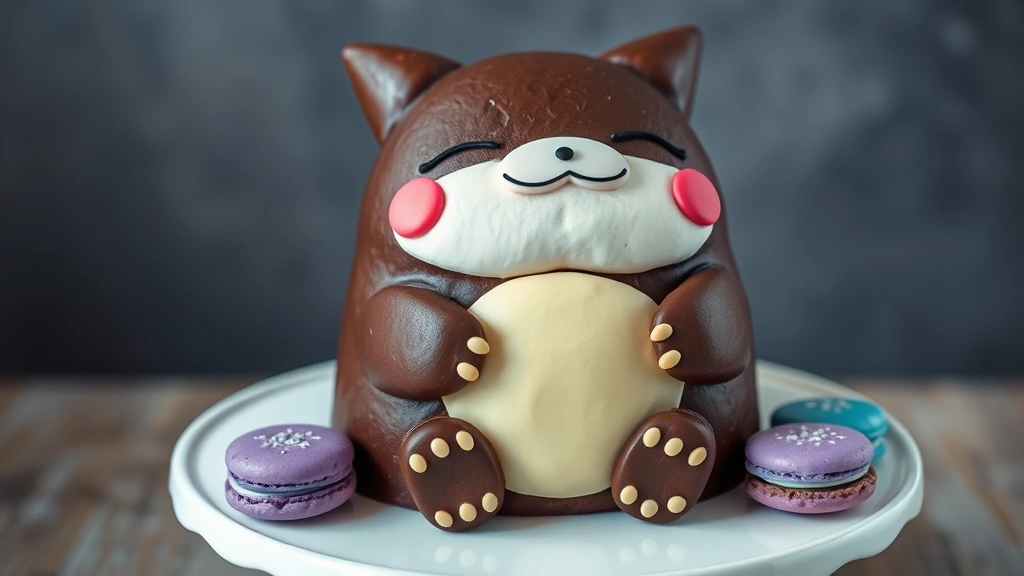
Sleepy Snorlax Chocolate Cake
This show-stopping cake brings everyone’s favorite sleeping Pokémon to delicious life. While it requires a bit more effort than no-bake options, the results impress any audience.
Cake Ingredients:
- 1¾ cups all-purpose flour
- 2 cups sugar
- ¾ cup cocoa powder
- 2 teaspoons baking soda
- 1 teaspoon baking powder
- 1 teaspoon salt
- 2 eggs
- 1 cup strong black coffee (cooled)
- 1 cup buttermilk
- ½ cup vegetable oil
- 1 teaspoon vanilla extract
Frosting and Decoration:
- 1 pound butter, softened
- 4 cups powdered sugar
- ½ cup cocoa powder
- ⅓ cup milk
- Vanilla extract to taste
- Cream-colored fondant for belly details
- Black frosting or edible marker for facial features
Cake Preparation:
- Preheat oven to 350°F. Grease and flour two 9-inch round cake pans.
- Combine flour, sugar, cocoa powder, baking soda, baking powder, and salt in a large bowl.
- Add eggs, cooled coffee, buttermilk, oil, and vanilla. Beat on medium speed for approximately 2 minutes until well combined.
- Divide batter evenly between prepared pans. Bake for 30-35 minutes until a toothpick inserted in the center comes out clean.
- Cool in pans for 10 minutes, then turn out onto wire racks to cool completely.
Assembly and Decoration:
- Level cake layers if needed for even stacking. Place first layer on your cake board or serving plate.
- Prepare frosting by beating softened butter until pale and fluffy. Add powdered sugar and cocoa powder gradually, alternating with milk.
- Spread frosting between layers and over entire cake. Crumb coat first (thin layer) and refrigerate 15 minutes before final frosting layer.
- Roll cream-colored fondant into an oval shape and place on cake’s front to represent Snorlax’s belly.
- Use black frosting or edible marker to draw peaceful closed eyes and a gentle smile. Add small details like claws or spots as desired.
- Chill until serving time to ensure frosting sets properly.
This cake pairs wonderfully with quick breakfast recipes for birthday celebrations or special occasions. The rich chocolate flavor satisfies any dessert craving.
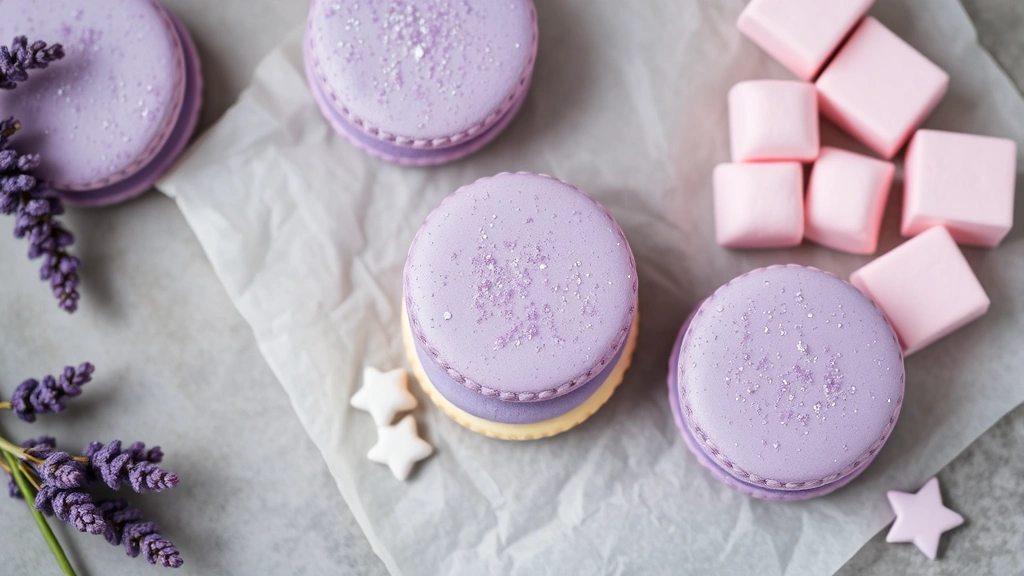
Drowzee Dream Eater Cookies
These whimsical sandwich cookies feature a dreamy purple exterior and sweet filling that captures Drowzee’s dream-eating mystique.
Cookie Dough Ingredients:
- 2¼ cups all-purpose flour
- 1 teaspoon baking soda
- ½ teaspoon salt
- 1 cup butter, softened
- ¾ cup granulated sugar
- ¾ cup brown sugar
- 2 eggs
- 2 teaspoons vanilla extract
- Purple gel food coloring
Filling Ingredients:
- ½ cup butter, softened
- 2 cups powdered sugar
- 2 tablespoons milk
- 1 teaspoon vanilla extract
- Lavender or vanilla flavoring (optional)
Cookie Instructions:
- Mix flour, baking soda, and salt in a bowl. Set aside.
- Beat softened butter with both sugars until light and fluffy (3-4 minutes). Add eggs one at a time, beating well after each addition.
- Add vanilla extract. Gradually incorporate flour mixture, mixing until just combined.
- Divide dough in half. Tint one half with purple gel coloring, kneading until color is evenly distributed.
- Roll both doughs between parchment paper to ¼-inch thickness. Refrigerate for 30 minutes.
- Cut shapes using cookie cutters. Arrange on parchment-lined baking sheets.
- Bake at 375°F for 9-11 minutes until edges are lightly golden. Cool on baking sheet for 5 minutes before transferring to wire racks.
Assembly:
- Beat softened butter with powdered sugar until smooth and fluffy.
- Add milk and vanilla extract, mixing until spreadable consistency.
- Sandwich filling between two cooled cookies, pressing gently.
- Optional: Dust with edible pearl dust or add piped details on top.
These cookies stay fresh in an airtight container for up to 5 days, making them perfect for advance preparation.
Jigglypuff Marshmallow Puffs
Light, fluffy, and pink—these marshmallow treats perfectly embody Jigglypuff’s round, bouncy charm. They’re surprisingly simple to create with impressive results.
Ingredients:
- 1 cup granulated sugar
- ¾ cup light corn syrup
- ¼ teaspoon salt
- 2 egg whites
- 2 teaspoons vanilla extract
- Pink gel food coloring
- Cornstarch and powdered sugar mixture for dusting
- Optional: edible glitter for magical effect
Equipment Needed:
- Electric mixer
- 9×13 baking dish
- Parchment paper
- Candy thermometer (helpful but not essential)
Instructions:
- Line baking dish with parchment paper, extending beyond edges for easy removal. Dust lightly with cornstarch mixture.
- Combine sugar, corn syrup, and salt in a saucepan. Heat over medium, stirring occasionally until mixture reaches 240°F (soft ball stage) on a candy thermometer, approximately 8-10 minutes. If without thermometer, test by dropping small amount into cold water—it should form a soft ball.
- While syrup cooks, beat egg whites until stiff peaks form using an electric mixer.
- Carefully pour hot syrup into egg whites while beating on high speed. Continue beating for approximately 10-12 minutes until mixture becomes thick, fluffy, and pale.
- Add vanilla extract and pink gel coloring during the final minutes of beating. Mix until color is evenly distributed.
- Pour mixture into prepared baking dish, smoothing the top with an oiled spatula.
- Dust generously with cornstarch-powdered sugar mixture. Let set uncovered for 4-6 hours or overnight.
- Cut into squares or use round cutters for Jigglypuff shapes. Roll cut edges in additional cornstarch mixture. Add edible glitter if desired.
Store these marshmallow puffs in an airtight container with parchment between layers. They last up to two weeks and make wonderful gifts.
Pro Tips for Perfect Results
Color Matching Success: Photograph official Pokémon Sleep game screenshots on your phone while decorating. This reference ensures accurate color representation. Gel food coloring creates the most vibrant, game-accurate hues. Add color gradually—you can always add more, but removing excess is difficult.
Temperature Management: Most frosting and fondant work best at room temperature (68-72°F). If your kitchen is warm, work quickly and refrigerate frequently. Cold ingredients are harder to work with; allow items to reach room temperature before decorating.
Piping Techniques: Invest in quality piping bags and a variety of tips. Practice basic techniques on parchment paper before decorating your actual treats. Consistent pressure and steady hand movements create professional-looking details. Piping technique guides offer valuable visual demonstrations.
Timing and Planning: Prepare components in advance when possible. Baked goods can be made days ahead and frozen. Frostings and fillings often taste better after resting in the refrigerator overnight. Assemble and decorate closer to serving time for maximum freshness and visual appeal.
Ingredient Quality: Similar to how professionals approach seasoning recipes, quality ingredients make measurable differences in desserts. Use real butter, quality chocolate, and fresh eggs. These investments noticeably impact flavor and texture.
Troubleshooting Common Issues: If buttercream breaks or becomes grainy, warm it slightly (over a bowl of warm water) and re-beat. If fondant cracks, knead in a tiny amount of shortening. If cookies spread too much, ensure dough is properly chilled and oven temperature is accurate using an oven thermometer.
Scaling Recipes: These recipes work well at half or double quantities. When doubling, increase baking time slightly and monitor carefully. When halving, use smaller baking vessels and reduce baking time.
Consider exploring food science resources to understand why recipes work. Knowledge about ingredient interactions helps troubleshoot problems and adapt recipes creatively.
FAQ
Can I make these treats ahead for a party?
Absolutely! Most components can be prepared 2-3 days in advance. Baked goods freeze beautifully for up to one month. Frostings and fillings often taste better after resting overnight. Assemble and decorate 1-2 hours before serving for optimal freshness and appearance.
Are these recipes suitable for beginners?
Yes! Start with no-bake options like Dreamy Puffball Bites if you’re new to dessert making. These require minimal baking skills while delivering impressive results. Graduate to baked treats as your confidence grows. All recipes include detailed step-by-step instructions.
What if I don’t have gel food coloring?
Liquid food coloring works, though it may slightly thin batters and frostings. Use less liquid coloring than gel and add gradually. Alternatively, purchase gel coloring—it’s inexpensive and dramatically improves results. Natural colorings from beets, turmeric, and spirulina offer alternatives, though colors may be less vibrant.
How long do these treats stay fresh?
No-bake treats last 5-7 days refrigerated in airtight containers. Baked cookies last 5-7 days at room temperature or up to 3 weeks refrigerated. Cakes last 3-4 days covered at room temperature or up to one week refrigerated. Most treats freeze well for 1-3 months.
Can I customize these recipes for dietary restrictions?
Yes! Substitute all-purpose flour with gluten-free flour blends (use 1:1 ratio in most cases). Replace butter with dairy-free alternatives for vegan versions. Use sugar substitutes like erythritol or monk fruit in most recipes, though results may vary slightly. Egg replacers work in no-bake recipes but may affect texture in baked goods. Test new adaptations before making large batches.
Where can I find specialized decorating supplies?
Craft stores, baking supply shops, and online retailers like Amazon carry piping tips, fondant tools, and food coloring. Local baking supply stores often provide expert advice and unique items. Serious bakers appreciate kitchen confidence resources for equipment recommendations.
Can I combine multiple recipes for a themed dessert table?
Definitely! Mix and match these recipes for variety. A tiered display featuring Snorlax cake as the centerpiece with surrounding Jigglypuff puffs, Drowzee cookies, and Puffball bites creates an impressive Pokémon Sleep-themed dessert experience. This approach accommodates different preferences and dietary needs while celebrating the game’s aesthetic.


