Ultimate Pork Shoulder Roast: Chef’s Guide to Mastering This Classic Cut
Pork shoulder roast stands as one of the most forgiving and rewarding cuts of meat in any kitchen. Whether you’re preparing a casual weeknight dinner or impressing guests at a gathering, understanding how to properly roast this humble cut transforms it into something extraordinary. The beauty of pork shoulder lies in its marbling—the interspersed fat throughout the meat keeps it incredibly moist during long cooking times, making it nearly impossible to overcook when using proper techniques.
This comprehensive guide takes you through everything you need to know about pork shoulder roast recipes, from selecting the perfect cut at the market to carving and serving your finished masterpiece. We’ll explore traditional methods, modern techniques, flavor variations, and troubleshooting tips that professional chefs use to achieve consistently outstanding results. By the end, you’ll have the confidence and knowledge to create restaurant-quality pork shoulder roasts in your own kitchen.
Understanding Pork Shoulder: Anatomy and Selection
Pork shoulder roast comes from the front leg and shoulder area of the pig, a region that gets significant exercise, resulting in well-developed muscle fibers and excellent fat distribution. This cut is sometimes labeled as Boston butt (the upper shoulder) or picnic shoulder (the lower part), and both work beautifully for roasting. The key difference lies in the bone structure and fat content—Boston butt typically contains more intramuscular fat, making it slightly more forgiving for beginners.
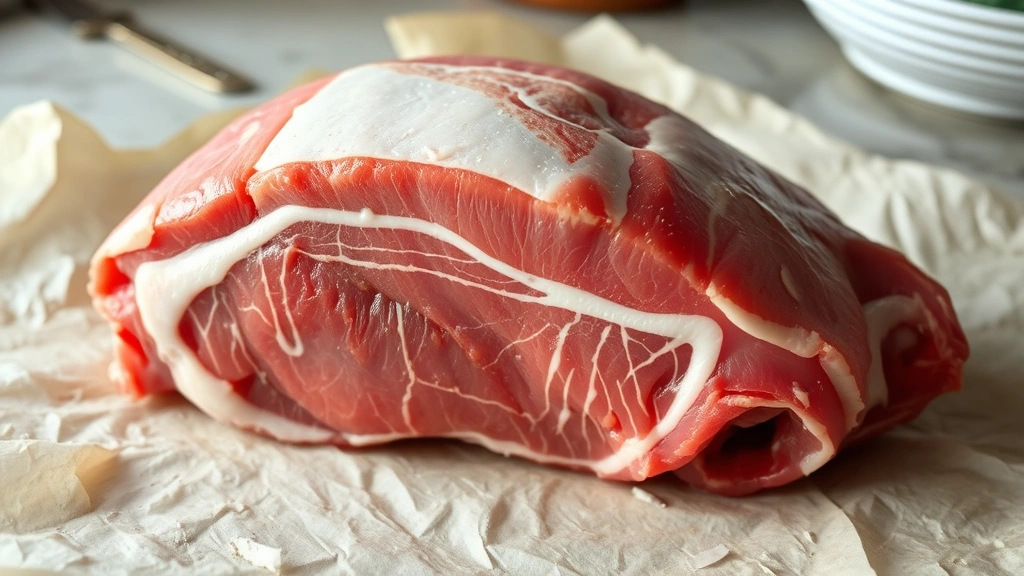
When selecting your pork shoulder roast at the butcher counter, look for meat with a pinkish color and visible marbling throughout. Avoid pale or gray meat, which indicates poor quality or improper storage. The fat cap should be creamy white and about quarter-inch thick—this protective layer bastes the meat during cooking. Ask your butcher to score the skin if you want crispy crackling, or request it removed entirely if you prefer a different texture. Most quality pork shoulders weigh between 8 and 16 pounds, with a 10 to 12-pound roast serving approximately 8 to 10 people generously.
Purchase your pork shoulder 2 to 3 days before cooking when possible. This allows time for the meat to develop more complex flavors through enzymatic activity and helps dry the surface slightly, which promotes better browning. Store it on the lowest shelf of your refrigerator, away from other foods, to prevent any cross-contamination.
Preparation: The Foundation of Great Roasts
Proper preparation separates good pork shoulder roasts from exceptional ones. Begin by removing your roast from the refrigerator 1 to 2 hours before cooking—bringing meat to room temperature ensures even cooking throughout. While the roast rests at room temperature, pat it completely dry with paper towels. Moisture on the surface prevents proper browning and creates steam rather than a flavorful crust.
If your roast has a skin or thick fat cap, score it in a crosshatch pattern using a sharp knife, cutting only through the fat layer without penetrating the meat beneath. Space your cuts about half-inch apart in both directions. This scoring allows seasonings to penetrate deeper and helps render the fat more effectively. For those preferring blackened seasoning techniques or other dry rubs, a scored surface provides better adhesion and more flavorful results.
Trim any excessively thick areas of fat (anything thicker than one inch), but preserve the marbling and the protective fat cap. Using a sharp boning knife, carefully remove any silverskin—the thin, tough membrane that prevents seasoning penetration and can remain chewy even after cooking. This meticulous preparation takes about 15 minutes but dramatically improves your final result.
Consider injecting your roast with a flavorful liquid 4 to 8 hours before cooking. Many chefs inject a mixture of broth, butter, and seasonings deep into the meat using a meat injector, distributing flavor throughout the interior. This technique is particularly valuable for leaner cuts or if you prefer extra moisture and tenderness.
Classic Roasting Methods
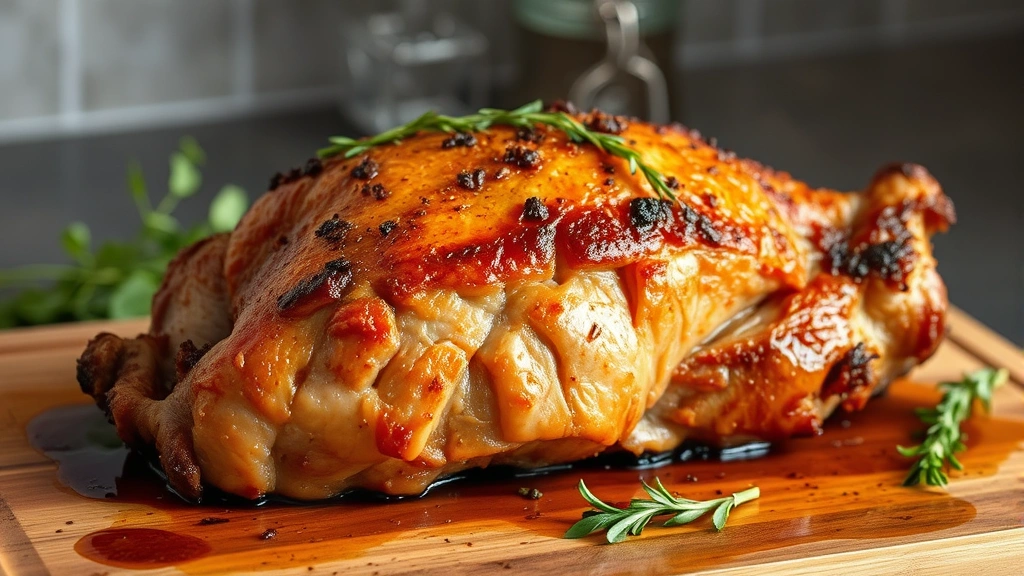
The traditional low-and-slow method remains the gold standard for pork shoulder roasts. Preheat your oven to 325°F (163°C). Place your prepared roast fat-cap up on a roasting rack in a heavy-duty pan, allowing air circulation underneath. This positioning allows the fat to render and baste the meat naturally while the heat cooks the bottom evenly.
Add one cup of liquid to the bottom of the pan—this might be apple juice, stock, wine, or water. The liquid creates steam that keeps the environment moist while the meat cooks. During the first 30 minutes at 325°F, the roast won’t brown much; this is normal. After 30 minutes, increase the heat to 400°F (204°C) for 20 to 30 minutes to develop a golden-brown crust. Then reduce heat back to 325°F for the remainder of cooking.
Alternatively, the reverse-sear method offers excellent results for those with time. Cook your roast at 275°F (135°C) for most of the cooking time, then finish with a high-temperature sear at 450°F (232°C) for 15 to 20 minutes to develop color and crust. This method provides more control over internal temperature and prevents the exterior from overcooking while waiting for the interior to reach the target temperature.
Many chefs prefer the low-temperature method throughout: cook at 275°F (135°C) for the entire duration, skipping the high-heat finish. This produces incredibly tender, evenly cooked meat, though you won’t achieve as much color. If using this method, consider finishing under the broiler for 5 minutes for browning.
Seasoning and Flavor Profiles
Pork shoulder’s mild flavor profile provides a blank canvas for countless seasoning approaches. A basic dry rub of kosher salt, black pepper, garlic powder, and paprika works beautifully, but don’t stop there. Consider your final destination—are you planning pulled pork sandwiches, carved slices with gravy, or something more adventurous?
For traditional comfort food applications, combine equal parts brown sugar and salt with smoked paprika, garlic powder, onion powder, cayenne pepper, and black pepper. This sweet-savory combination caramelizes beautifully during roasting. Apply this generously to all surfaces, then let the roast sit uncovered in the refrigerator overnight. The salt penetrates the meat through osmosis, and the dry environment helps develop better browning.
Mediterranean-inspired approaches use fresh rosemary, thyme, sage, and oregano combined with minced garlic, lemon zest, and olive oil to create a flavorful paste. Rub this under the skin if possible, getting it directly onto the meat. This method pairs wonderfully with comfort food recipes when finished with pan sauces made from the roasting liquid.
Asian-influenced roasts benefit from five-spice powder, star anise, ginger, soy sauce, and sesame oil. These aromatic spices create an entirely different flavor profile while still respecting the meat’s natural qualities. Consider basting with a mixture of soy sauce, honey, and rice vinegar during the final hour of cooking for complex, glossy results.
For those interested in more adventurous seasoning, blackened chicken recipe spice blends can be adapted for pork shoulder, creating a bold, peppery crust that contrasts beautifully with the tender, juicy interior.
Temperature Control and Cooking Times
Internal temperature is your most reliable indicator of doneness, far more accurate than cooking time alone. Pork shoulder reaches optimal tenderness and food safety at 190°F (88°C) to 205°F (96°C) internal temperature. At these temperatures, collagen converts to gelatin, creating that prized tender texture that makes pork shoulder ideal for shredding or slicing.
Use an instant-read meat thermometer or even better, a leave-in probe thermometer that alerts you when the target temperature is reached. Insert the probe into the thickest part of the meat without touching bone. Check temperature in multiple locations, as thicker sections cook more slowly than thinner areas.
Cooking time varies significantly based on roast size, oven accuracy, and starting temperature. As a general guideline, plan for 30 to 40 minutes per pound at 325°F (163°C). A 12-pound roast typically requires 6 to 8 hours, but some ovens may cook faster or slower. Start checking internal temperature after 5 hours for smaller roasts or 6 hours for larger ones.
The stall phenomenon often occurs around 160°F (71°C) to 170°F (77°C), where the temperature plateaus for extended periods. This is normal—the meat is converting collagen and doesn’t require intervention. Patience is essential; resist the urge to increase heat dramatically. Some chefs wrap the roast tightly in foil at this point to push through more quickly, while others embrace the extended cooking time for even more tender results.
Resting and Carving Techniques
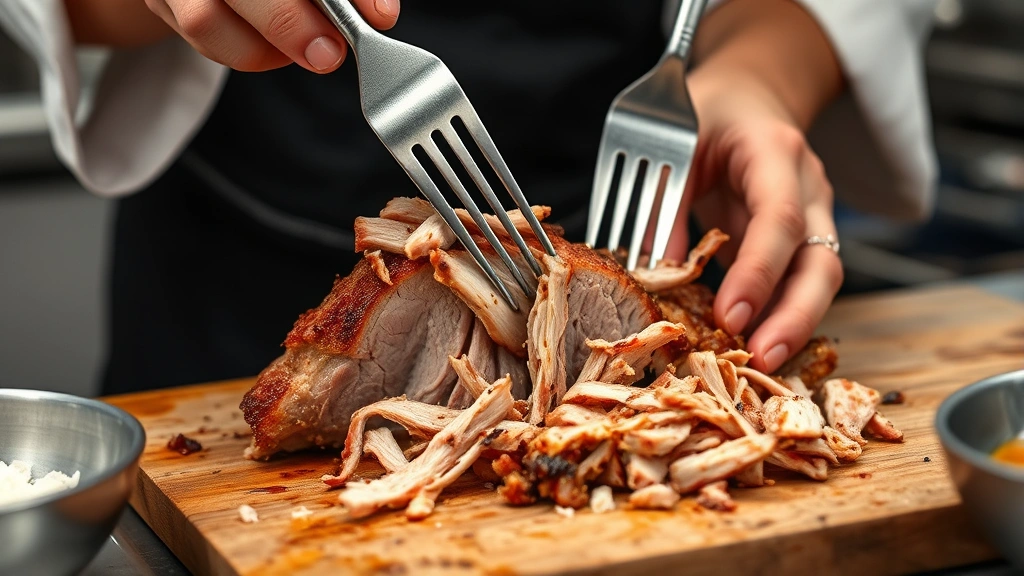
Resting your roast after cooking is absolutely critical and cannot be skipped. Remove the roast from the oven when it reaches 205°F (96°C) and transfer it to a cutting board or warm platter. Tent loosely with foil to retain heat without trapping steam. Allow at least 30 minutes of resting time—during this period, residual heat continues cooking the exterior while the muscle fibers relax and reabsorb released juices.
During resting, prepare your pan sauce from the roasting liquid. Pour the pan drippings through a fine-mesh strainer, pressing on solids to extract maximum flavor. Discard solids or reserve for stock. Skim excess fat from the surface if desired (though some prefer to leave it for richness). Deglaze the pan with wine or stock, scraping up flavorful browned bits, then simmer to reduce and concentrate flavors. Finish with a knob of butter for silky richness and a splash of acid like vinegar or citrus juice for brightness.
When carving, first identify the bone structure—pork shoulder contains the shoulder blade bone and arm bone. Slice against the grain in thin, even pieces, typically quarter-inch thick. For pulled pork applications, shred the meat with two forks once it’s cool enough to handle, discarding any remaining bones or cartilage. The tender meat should pull apart easily at this temperature.
Advanced Cooking Methods
Beyond traditional oven roasting, several modern techniques produce exceptional pork shoulder roasts. The sous vide method involves vacuum-sealing your seasoned roast and cooking it in a precisely controlled water bath at 160°F (71°C) to 165°F (74°C) for 24 to 48 hours. This produces incredibly even cooking and tender results, though you must finish the roast in a very hot oven or with a torch to develop color and crust.
Slow cooker and instant pot methods offer convenience for busy schedules. In a slow cooker on low, a pork shoulder roast cooks in 8 to 10 hours; on high in 5 to 6 hours. Add minimal liquid (one cup maximum) and set it and forget it. An instant pot pressure cooker reduces time dramatically to 90 minutes under pressure (with natural release), though you sacrifice some browning unless you sear first.
Smoking pork shoulder over indirect heat at 225°F (107°C) to 250°F (121°C) using wood smoke creates entirely different flavor dimensions. Hickory, apple, or cherry wood pairs beautifully with pork. Plan for 1.5 to 2 hours per pound, spritzing occasionally with apple juice to keep the surface moist. This method requires more equipment and skill but rewards dedicated cooks with incomparable flavor.
Troubleshooting Common Issues
If your pork shoulder roast turns out dry, several factors may have contributed. Most commonly, cooking beyond 205°F (96°C) causes excess moisture loss. In future attempts, remove the roast at exactly 195°F to 200°F (90°C to 93°C) internal temperature. Alternatively, insufficient resting time allows juices to escape when carving. Always rest for at least 30 minutes. If dryness occurs despite proper technique, consider brining the roast in saltwater for 8 to 12 hours before cooking—this helps the meat retain moisture during heating.
Uneven cooking, where the exterior is overcooked while the interior remains undercooked, suggests your oven temperature may be inaccurate or hot spots exist. Use an oven thermometer to verify actual temperature, and rotate your roasting pan halfway through cooking. Insulating the thinner sections with foil partway through cooking also helps.
Lack of browning usually indicates insufficient heat during the browning phase or inadequate surface drying before cooking. Pat the roast very dry with paper towels and ensure your oven reaches at least 400°F (204°C) for browning. Some cooks prefer finishing under the broiler for 3 to 5 minutes to develop color without extended high-heat cooking.
Tough, chewy texture despite reaching proper temperature suggests the meat wasn’t cooked long enough for collagen to fully convert to gelatin. Collagen breakdown accelerates significantly between 160°F (71°C) and 205°F (96°C), so pushing to the upper range of this temperature produces noticeably more tender results. Plan for at least 6 hours of cooking even for smaller roasts.
If your roast cooks too quickly, your oven runs hot. Reduce oven temperature by 25°F (14°C) in future attempts, or tent the roast loosely with foil once it reaches the desired brown color to slow exterior cooking while the interior continues cooking.
Pork shoulder roasts remain one of the most reliable and impressive dishes you can prepare. Whether you’re feeding a crowd with chicken wings recipe alternatives or creating an elegant dinner, mastering this cut opens countless culinary possibilities. The techniques and knowledge you’ve gained here apply broadly to other large meat roasts and will serve you well throughout your cooking journey.
FAQ
How long does a pork shoulder roast take to cook?
Cooking time depends on size and temperature. At 325°F (163°C), plan for 30 to 40 minutes per pound. A 12-pound roast typically requires 6 to 8 hours. Always use internal temperature (190°F to 205°F or 88°C to 96°C) as your guide rather than relying solely on time.
Can I cook pork shoulder at a higher temperature to save time?
Higher temperatures (above 350°F or 177°C) throughout cooking risk drying the exterior before the interior reaches proper doneness. However, many chefs successfully use 350°F to 375°F (177°C to 190°C) for the entire cook, which reduces time to 4 to 5 hours for a 12-pound roast. Monitor carefully and tent with foil if browning too quickly.
Should I cover my pork shoulder roast while cooking?
Most traditional methods keep the roast uncovered to develop browning and allow fat rendering. However, if browning too quickly, tent loosely with foil. Some chefs cover tightly during the middle portion of cooking to speed the process, then uncover for the final hour to re-crisp the exterior.
What’s the difference between pork butt and pork shoulder?
Boston butt (upper shoulder) contains more intramuscular fat and cooks slightly faster and more tenderly. Picnic shoulder (lower part) has slightly less fat but remains excellent for roasting. Both work beautifully for roasts—choose based on availability and personal preference.
Can I prepare pork shoulder roast the night before?
Yes. Season your roast the night before and refrigerate uncovered on a baking sheet. This dry-brining period helps flavor penetration and develops better browning. Remove from refrigeration 1 to 2 hours before cooking to bring to room temperature.
How do I store leftover pork shoulder roast?
Cool completely, then refrigerate in an airtight container for up to 4 days. Reheat gently in a 300°F (149°C) oven with a bit of broth to restore moisture. Properly stored roasts also freeze beautifully for up to 3 months—slice or shred before freezing for easier thawing and reheating.
What’s the best way to reheat pork shoulder roast?
Gentle, low-temperature reheating works best. Slice or shred the meat, place in a covered baking dish with a splash of broth or pan sauce, and warm in a 300°F (149°C) oven for 20 to 30 minutes. Alternatively, reheat in a slow cooker on low for 1 to 2 hours, adding moisture as needed. Avoid high-heat reheating, which dries the meat.
Can I use pork shoulder roast for pulled pork?
Absolutely. Cook to 205°F (96°C) internal temperature, rest for 30 minutes, then shred with two forks or meat claws. The tender, fatty meat pulls apart beautifully and is ideal for sandwiches, tacos, and other applications. Many cooks prefer pork shoulder specifically for pulled pork applications.
External Resources:
- Culinary Institute of America – Professional cooking techniques and chef training
- Serious Eats – In-depth food science and cooking technique guides
- National Center for Home Food Preservation – Food safety and preservation information
- The Spruce Eats – Comprehensive cooking guides and recipe development


