Prickly Pear Jelly Recipe: Grandma’s Favorite Homemade Treasure
There’s something magical about opening a jar of homemade jelly that transports you back to grandmother’s kitchen, where time seemed to slow down and every recipe told a story. Prickly pear jelly is one of those timeless creations that combines the exotic sweetness of cactus fruit with the comforting ritual of jam-making. This vibrant, jewel-toned preserve has graced family tables for generations, passed down through whispered recipe modifications and handwritten notes tucked into old cookbooks.
Making prickly pear jelly from scratch might seem intimidating at first, but I promise you—with the right guidance and a bit of patience—you’ll create something truly spectacular. The process is surprisingly straightforward, and the reward is a glossy, perfectly-set jelly that sparkles like rubies on your morning toast. Whether you’re a seasoned canner or picking up a wooden spoon for the first time, this recipe will guide you through every step with clarity and confidence.
What Are Prickly Pears and Why They’re Perfect for Jelly
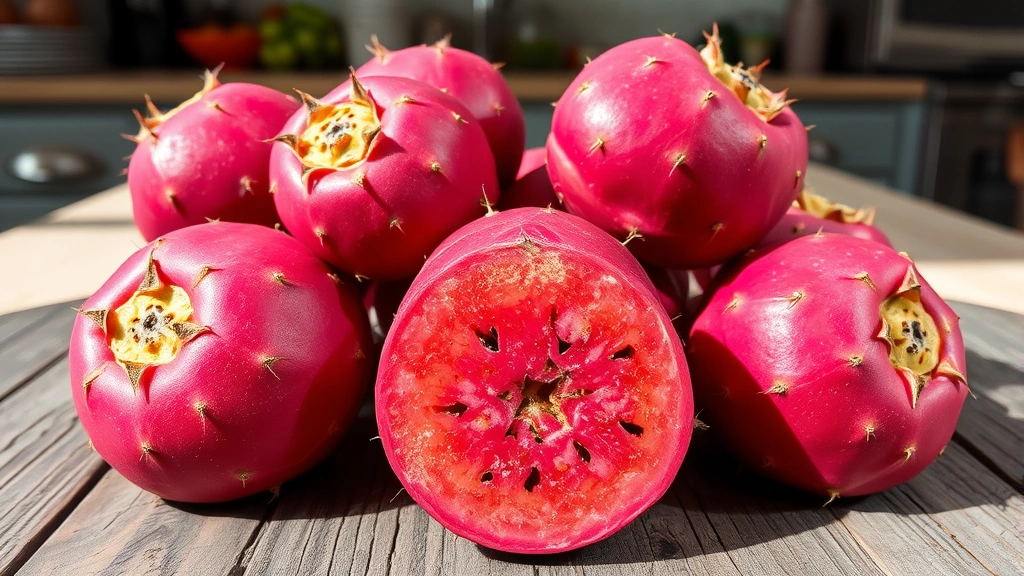
Prickly pears, scientifically known as Opuntia ficus-indica, are the vibrant fruits of the nopal cactus native to Mexico and the Mediterranean region. These fascinating fruits have been cultivated for thousands of years and remain a staple ingredient in Mexican cuisine. The fruit itself is roughly the size of a large plum, with a thick, spiny exterior that protects the jewel-like interior. Inside, you’ll find a sweetly aromatic flesh dotted with tiny edible seeds.
What makes prickly pears exceptional for jelly-making is their natural pectin content and delicate flavor profile. Unlike some fruits that require added pectin, prickly pears contain sufficient natural pectin to achieve a beautiful gel without much intervention. The flavor is subtly sweet with floral notes and a hint of tartness—imagine a cross between watermelon and strawberry with whispers of tropical fruit. This unique taste profile makes prickly pear jelly a conversation starter at breakfast tables and a cherished gift for food-loving friends.
The natural color is equally impressive. Depending on the variety you source, your finished jelly will range from coral-pink to deep magenta, creating a stunning preserve that looks almost too beautiful to eat. This visual appeal, combined with the straightforward preservation techniques required, has made prickly pear jelly a beloved choice for home canners across generations.
Selecting and Preparing Your Prickly Pears
The foundation of exceptional jelly begins with selecting the finest fruit. When shopping for prickly pears, look for specimens that yield slightly to gentle pressure—they should feel ripe but not mushy. The skin color should be deep and rich, ranging from dark green to reddish-pink depending on the variety. Avoid fruits with soft spots, bruising, or wrinkled skin, as these indicate overripeness or damage.
Handling prickly pears requires care due to their notorious spines. Here’s the safest approach: wear thick gloves or use kitchen tongs throughout the preparation process. Never touch the fruit with bare hands, as even tiny spines can embed themselves painfully. Place each fruit on a cutting board and carefully slice off both the top and bottom ends. Make a lengthwise cut through the skin, being careful not to cut too deeply into the flesh, then peel away the thick skin in sections.
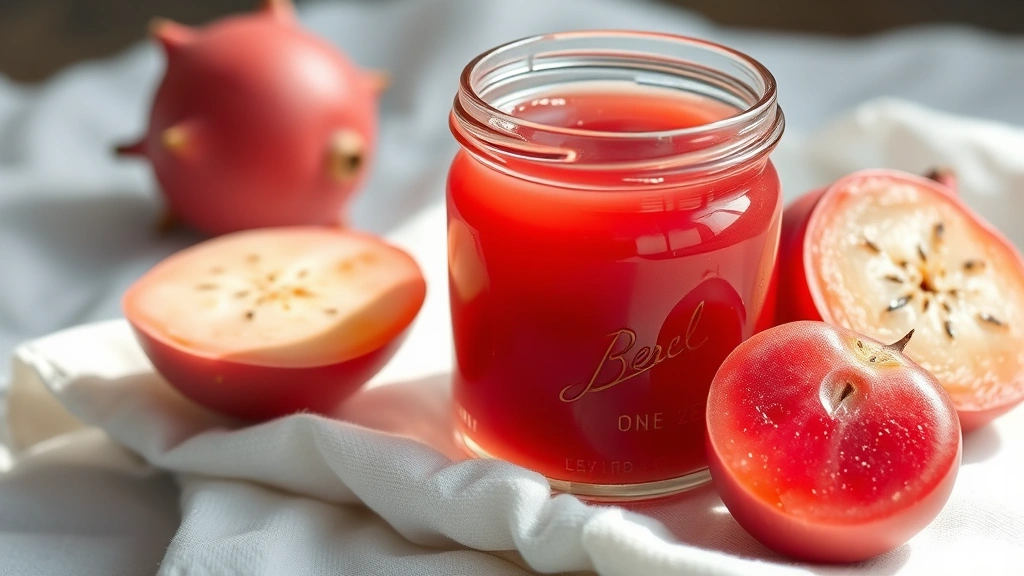
Once peeled, rinse the fruit under cool water to remove any remaining spines or fine hairs. Cut the fruit in half lengthwise and scoop out the flesh into a large bowl. The seeds are completely edible and actually contribute to the jelly’s texture and pectin content, so don’t remove them. You’ll need approximately four to five pounds of fresh prickly pears to yield enough juice for a successful batch of jelly.
Essential Equipment and Ingredients
Proper equipment makes the jelly-making process safer and more efficient. You’ll need a large stainless steel pot (at least eight-quart capacity) for cooking, as prickly pear mixture froths considerably during cooking. A food mill or fine-mesh strainer is essential for extracting the juice while leaving behind seeds and pulp. Consider investing in a quality stainless steel pot, as acidic fruits can react with reactive metals.
Additional equipment includes a candy thermometer for accurate temperature monitoring, a wooden spoon for stirring, clean glass jars with lids (half-pint or pint sizes work beautifully), and a large canning pot with a rack for processing jars. A jar lifter makes handling hot jars significantly safer. While optional, a jelly bag or cheesecloth creates the clearest, most professional-looking jelly by allowing juice to drip through naturally overnight.
For ingredients, you’ll need your prepared prickly pear flesh, granulated sugar (approximately three to four cups per batch), fresh lemon juice for pectin and flavor enhancement, and water. Some recipes include a small amount of butter to reduce foaming, though this is entirely optional. The beauty of this recipe lies in its simplicity—just a few quality ingredients transform into something extraordinary.
Step-by-Step Jelly-Making Instructions
Begin by preparing your jars and lids. Wash them thoroughly in hot, soapy water and rinse completely. Place jars upright on a clean towel. Submerge lids in a small pot of simmering water for five minutes to soften the seal compound, keeping them warm until you’re ready to use them.
Next, extract your prickly pear juice. Add your prepared prickly pear flesh to your large pot along with one cup of water. Bring to a boil over medium-high heat, stirring occasionally to break down the fruit. Once boiling, reduce heat and simmer for fifteen minutes. Pour the mixture through your food mill or fine-mesh strainer into a clean pot, pressing gently to extract all the juice while leaving seeds and pulp behind. You should have approximately four to five cups of juice.
Measure your juice and combine it with sugar in a ratio of one cup juice to three-quarter cup sugar (adjust to taste preference). Add three tablespoons of fresh lemon juice for every four cups of prickly pear juice. The lemon juice serves multiple purposes: it enhances pectin activity, brightens the flavor, and adds necessary acidity for food safety. Stir the mixture over medium heat until the sugar completely dissolves, approximately five to seven minutes.
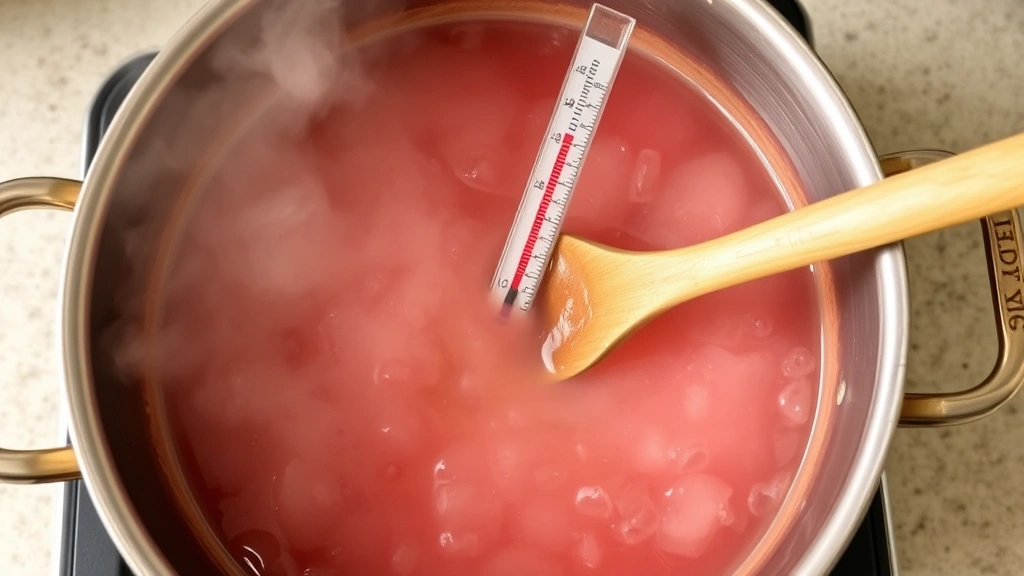
Once the sugar dissolves, increase heat to medium-high and bring the mixture to a rolling boil—a boil that cannot be stirred down. Insert your candy thermometer, ensuring it doesn’t touch the pot bottom. Continue cooking, stirring occasionally and skimming off any foam that rises to the surface. The jelly is ready when it reaches 220°F (104°C), which typically occurs after fifteen to twenty minutes of rolling boil.
Test for proper set by placing a small spoonful on a cold plate (see the testing section below for detailed instructions). If it wrinkles when you push it with your finger, it’s ready. If not, continue cooking and test again in two-minute intervals.
Carefully ladle the hot jelly into prepared jars, leaving one-quarter inch headspace. Wipe the jar rims clean with a damp cloth, then place the warm lids on top and screw bands on until fingertip-tight. Process jars in a boiling water bath for five minutes at sea level (add one minute for every thousand feet of elevation above sea level). Remove jars and allow them to cool undisturbed for twelve to twenty-four hours before checking seals.
Testing for Proper Set and Troubleshooting
The difference between jelly and syrup comes down to proper set, and testing is absolutely crucial. The most reliable method is the wrinkle test: place a spoonful of jelly on a cold plate (pre-chill plates in your freezer beforehand) and allow it to cool for one minute. Push the jelly with your finger. If it wrinkles and doesn’t flow back together, the set is perfect. If it still moves freely, continue cooking.
Alternatively, use the spoon test: dip a cool metal spoon into the jelly, lift it, and watch how the jelly drips off. Properly set jelly will sheet off the spoon in a single mass rather than dripping in separate drops. With experience, this method becomes intuitive and quick.
Common troubleshooting scenarios include jelly that’s too soft (undercooked—reprocess by combining with additional pectin and returning to boil), jelly that’s too stiff (overcooked—thin with a small amount of warmed juice and re-process), or jelly that fails to set entirely (insufficient pectin or improper acid balance—add lemon juice and recook). Don’t discard failed batches; they make excellent syrup for reducing food waste by using over pancakes, in cocktails, or swirled into yogurt.
Storage and Serving Suggestions
Properly sealed jars of prickly pear jelly keep for up to one year in a cool, dark pantry. Once opened, refrigerate and consume within three to four weeks. The jewel-toned jelly is stunning spooned over creamy cheeses like ricotta or mascarpone, paired with warm crusty bread, or swirled into vanilla yogurt for a sophisticated breakfast.
Consider pairing your homemade jelly with savory applications too. A spoonful adds complexity to glazes for roasted meats, complements duck or pork beautifully, and works wonderfully in vinaigrettes for bitter greens. Some adventurous cooks layer it into layer cakes or use it as a filling between delicate pastry sheets.
Gift-giving becomes elevated when you present jars of homemade prickly pear jelly tied with rustic twine and a handwritten label. Include a note about the jelly’s origin and your favorite serving suggestions. These personal touches transform a simple preserve into a treasured gift that speaks to time invested and care taken.
Flavor Variations to Explore
Once you’ve mastered the basic recipe, consider these delightful variations. Add one teaspoon of vanilla extract or one split vanilla bean during the final minute of cooking for sophisticated depth. A quarter teaspoon of ground cardamom or a pinch of cinnamon complements the prickly pear’s subtle floral notes beautifully.
For a spiced version inspired by traditional Mexican flavors, infuse your juice with a small cinnamon stick, two whole cloves, and a sliver of fresh ginger during the initial cooking phase, then strain before adding sugar. Citrus variations are equally rewarding—substitute half the lemon juice with fresh lime juice for a brighter profile, or add the zest of one orange for complexity.
Some creative cooks combine prickly pear with other fruits. A blend of prickly pear and strawberry creates a beautiful coral color and deeper flavor profile. The technique remains identical; simply adjust your fruit ratios and ensure you maintain proper sugar-to-fruit ratios and acidity levels.
For those interested in expanding their preserve-making repertoire, explore how these techniques apply to other culinary projects or investigate advanced preservation methods through resources like the National Center for Home Food Preservation, which offers evidence-based canning guidelines.
FAQ
Can I make prickly pear jelly without added pectin?
Yes! Prickly pears contain natural pectin, especially when combined with lemon juice. The key is reaching the proper temperature (220°F) and including adequate acid. If your batch fails to set, you can always add powdered or liquid pectin and reprocess.
Where can I purchase prickly pears if they’re not available locally?
Check Latin markets, specialty produce stores, or farmers markets, particularly during late summer and fall. Many online specialty food retailers ship fresh prickly pears during peak season. If fresh fruit is unavailable, some suppliers offer frozen prickly pear pulp that works beautifully for jelly-making.
Is it necessary to remove all the seeds?
No. The tiny seeds add texture and contribute to the jelly’s pectin content. Many traditional recipes intentionally keep seeds for these reasons. However, if you prefer seedless jelly, strain through multiple layers of cheesecloth after the initial cooking phase.
How do I know if my jars sealed properly?
After cooling completely, press the center of each lid. Properly sealed lids are concave and don’t flex or pop when pressed. Any lids that remain flat or flex upward should be refrigerated and consumed within a few weeks.
Can I use a microwave or slow cooker for jelly-making?
Traditional stovetop cooking is recommended because you need precise temperature control and the ability to achieve a rolling boil. Microwave and slow cooker methods don’t reliably reach the necessary temperature for proper gel formation.
What’s the difference between jelly, jam, and preserves?
Jelly is made from juice only, creating a clear, smooth product. Jam contains crushed fruit pulp for a thicker, more textured spread. Preserves contain whole or large fruit pieces suspended in syrup. This recipe creates true jelly because we strain out all solids.
Can I reduce the sugar content?
Sugar serves critical functions beyond sweetness: it’s essential for gel formation, acts as a preservative, and balances flavor. Reducing sugar below three-quarter cup per cup of juice may result in poor set and shorter shelf life. If you prefer less sweetness, use the jelly more sparingly or explore low-sugar pectin products designed for reduced-sugar preserves.


