How to Make Slutty Brownies: Easy Recipe
Slutty brownies are an indulgent dessert that combines three irresistible layers into one decadent treat. This show-stopping dessert features a fudgy brownie base, a creamy cookie dough middle, and a melted chocolate top layer that creates an unforgettable flavor experience. Whether you’re baking for a special occasion or satisfying a serious chocolate craving, this easy recipe delivers bakery-quality results from your home kitchen.
The beauty of slutty brownies lies in their simplicity and the dramatic impact they make. Unlike complicated multi-step desserts, this recipe uses straightforward techniques and common ingredients you likely already have in your pantry. The layered construction creates pockets of different textures—fudgy, creamy, and smooth—in every bite. Once you master this recipe, you’ll find yourself making it repeatedly for friends, family, and gatherings.
What Are Slutty Brownies?
Slutty brownies represent the ultimate indulgence for chocolate lovers and dessert enthusiasts. The name reflects the unapologetic combination of multiple decadent elements stacked into one treat. This dessert gained popularity in bakeries and on social media for good reason—they’re absolutely irresistible.
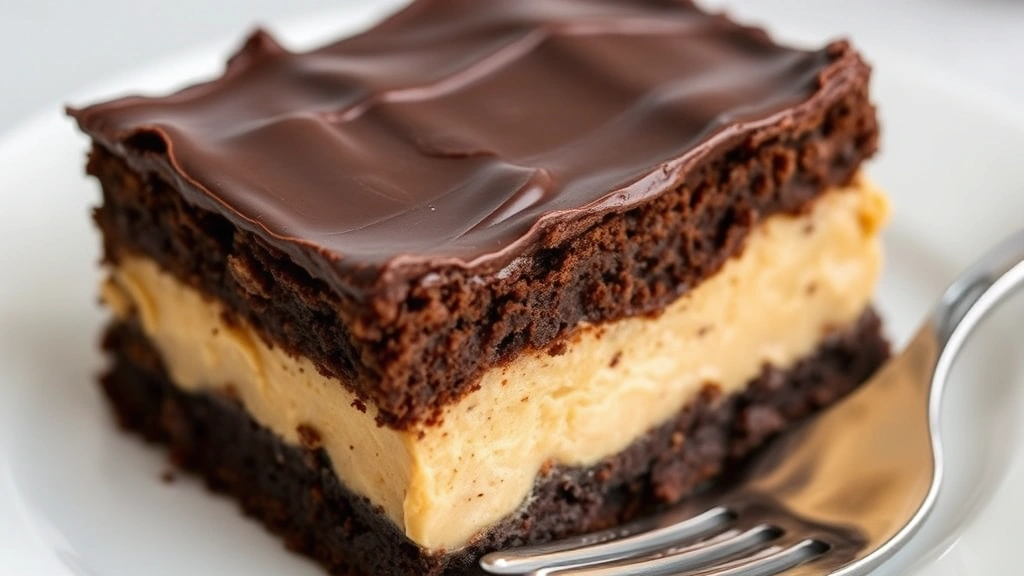
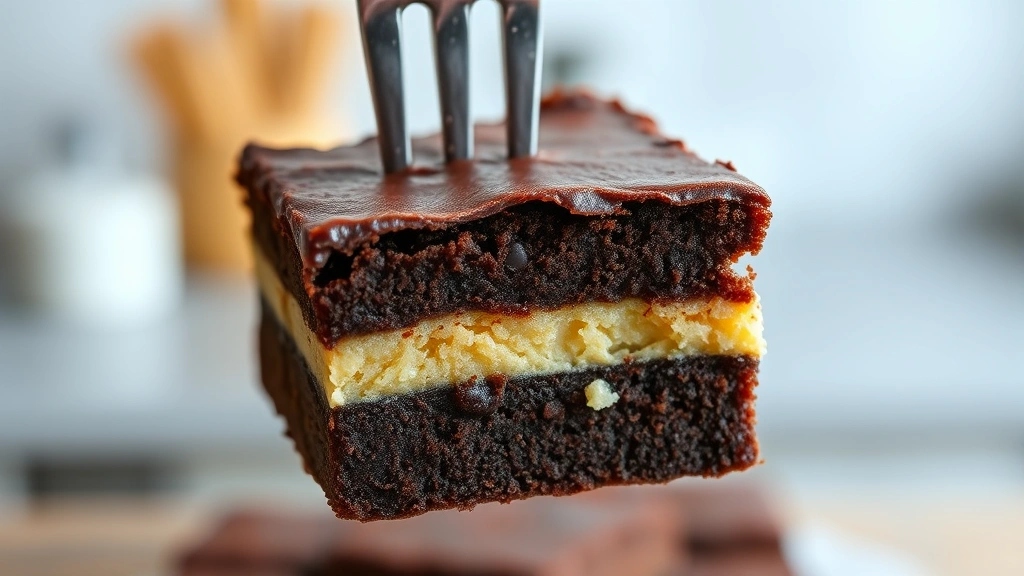
The traditional slutty brownie construction consists of three distinct layers working in harmony. The foundation is a thick, fudgy brownie layer that provides rich chocolate flavor and chewy texture. Above that sits a cookie dough middle layer that adds creamy sweetness and a contrasting texture. Finally, a melted chocolate layer crowns the top, creating a smooth, glossy finish that seals in all the delicious layers beneath.
What makes slutty brownies different from regular brownies is the complexity of flavors and textures. While traditional fudge recipes focus on singular chocolate richness, slutty brownies layer multiple elements to create a more sophisticated dessert experience. The combination of brownie, cookie dough, and chocolate creates flavor depth that keeps people coming back for more.
Ingredients You’ll Need
For the Brownie Layer:
- 1 cup (2 sticks) unsalted butter
- 8 ounces semi-sweet chocolate, chopped
- 1 cup granulated sugar
- ¾ cup brown sugar
- 3 large eggs
- 1 teaspoon vanilla extract
- ¾ cup all-purpose flour
- ¼ cup unsweetened cocoa powder
- ½ teaspoon salt
- ¼ teaspoon baking powder
For the Cookie Dough Layer:
- ½ cup (1 stick) unsalted butter, softened
- ¼ cup granulated sugar
- ¼ cup brown sugar
- 1 large egg yolk
- 1 teaspoon vanilla extract
- ¾ cup all-purpose flour
- ½ teaspoon salt
- ¾ cup mini chocolate chips
For the Chocolate Topping:
- 8 ounces semi-sweet chocolate, chopped
- 3 tablespoons unsalted butter
- 1 tablespoon light corn syrup (optional, for shine)
Quality ingredients matter significantly when baking desserts. Choose real chocolate rather than chocolate chips for the melted layers, as they melt more smoothly and provide superior flavor. Room-temperature butter ensures proper creaming and even mixing throughout your batter.
Step-by-Step Instructions
Preparing Your Baking Pan:
Start by preheating your oven to 350°F (175°C). Line a 9×13-inch baking pan with parchment paper, allowing excess to hang over the sides. This makes removal and cutting significantly easier. Lightly grease the parchment paper with cooking spray or butter to prevent sticking.
Making the Brownie Layer:
In a medium saucepan, combine the 1 cup butter and 8 ounces chopped semi-sweet chocolate over low heat. Stir frequently until completely melted and smooth, approximately 3-4 minutes. Remove from heat and let cool for 2 minutes.
In a separate large bowl, whisk together 1 cup granulated sugar and ¾ cup brown sugar. Pour the slightly cooled chocolate mixture into the sugar and stir vigorously until well combined. Add 3 eggs one at a time, stirring thoroughly after each addition. Stir in 1 teaspoon vanilla extract.
In another bowl, whisk together ¾ cup flour, ¼ cup cocoa powder, ½ teaspoon salt, and ¼ teaspoon baking powder. Gently fold the dry ingredients into the chocolate mixture until just combined—don’t overmix. Pour the brownie batter into your prepared pan and spread evenly.
Bake for 18-20 minutes, until the top looks set but still has slight jiggle in the center. The brownie should be slightly underbaked to remain fudgy. Remove from the oven and let cool for 10 minutes while you prepare the next layer.
Creating the Cookie Dough Layer:
In a medium bowl, cream together ½ cup softened butter, ¼ cup granulated sugar, and ¼ cup brown sugar until light and fluffy, about 2-3 minutes. Beat in 1 egg yolk and 1 teaspoon vanilla extract until fully incorporated.
In a separate bowl, whisk together ¾ cup flour and ½ teaspoon salt. Fold the dry ingredients into the butter mixture until just combined. Stir in ¾ cup mini chocolate chips by hand.
Spread the cookie dough mixture evenly over the cooled brownie layer. Use an offset spatula or the back of a spoon to create an even surface. This layer doesn’t need baking—it will set as the chocolate topping cools.
Adding the Chocolate Topping:
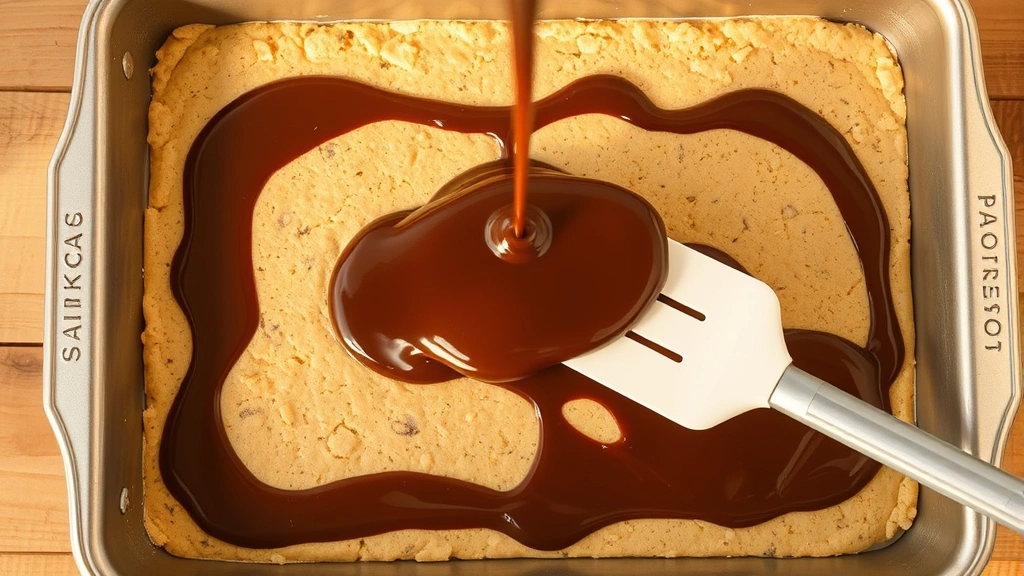
In a microwave-safe bowl, combine 8 ounces chopped semi-sweet chocolate and 3 tablespoons butter. Microwave in 30-second intervals, stirring between each interval, until completely melted and smooth. If using corn syrup, stir it in now for extra shine.
Pour the melted chocolate over the cookie dough layer and spread evenly with an offset spatula or the back of a spoon. Work quickly as the chocolate will begin setting. Create a smooth, even layer covering all the cookie dough.
Allow the slutty brownies to cool completely at room temperature for at least 2 hours, or refrigerate for 1 hour for faster setting. Once fully cooled and set, use the parchment paper overhang to lift the entire dessert from the pan. Place on a cutting board and cut into squares using a sharp, hot knife (run under hot water and wipe dry between cuts for clean edges).
Baking Tips for Perfect Results
Temperature Control Matters:
Baking temperature directly affects texture and browning. An oven thermometer ensures accuracy—many home ovens run hot or cold. If your brownies brown too quickly, reduce temperature by 25°F. If they’re pale and cake-like, increase temperature slightly.
Don’t Overbake the Brownie Base:
The brownie layer should be underbaked intentionally. A toothpick inserted in the center should have moist crumbs clinging to it, not clean. This creates the signature fudgy texture that makes slutty brownies special. Overbaking results in a cake-like texture that loses the indulgent quality.
Chocolate Melting Technique:
Proper chocolate melting prevents seizing and graininess. Use the double boiler method or microwave in short intervals with frequent stirring. Never let chocolate reach temperatures above 115°F. If your chocolate does seize, add 1 teaspoon of coconut oil per ounce of chocolate and stir gently until smooth.
Leveling the Layers:
Uneven layers create cutting challenges. Take time to spread each layer smoothly and evenly. An offset spatula works better than a regular knife for this task. If spreading cookie dough proves difficult, slightly dampen your spatula or hands for easier handling.
Cooling Patience Pays Off:
Rushing the cooling process results in layers sliding apart when cutting. Full cooling ensures all layers set properly and maintain their structure. Refrigeration accelerates this process without compromising texture or flavor.
Storage and Serving Suggestions
Short-Term Storage:
Store slutty brownies in an airtight container at room temperature for up to 3 days. Layer them between parchment paper to prevent sticking. The chocolate topping may soften slightly in warm conditions, so air conditioning helps maintain ideal texture.
Refrigerator Storage:
For extended freshness, refrigerate in an airtight container for up to 1 week. Cold brownies offer firmer texture and cleaner cuts. Remove from refrigeration 15-20 minutes before serving to allow the chocolate to soften slightly for better flavor release.
Freezing for Later:
Slutty brownies freeze beautifully for up to 3 months. Wrap individual pieces in plastic wrap, then place in a freezer-safe container. Thaw at room temperature for 30-45 minutes before serving. Frozen brownies actually cut more cleanly than room-temperature ones.
Serving Recommendations:
Serve slutty brownies slightly warm or at room temperature for optimal flavor. A cup of cold milk, hot coffee, or vanilla ice cream makes the perfect accompaniment. These rich brownies are best enjoyed in smaller portions—they’re incredibly satisfying.
Variations and Customizations
Flavor Additions:
Enhance your slutty brownies with flavor variations. Add 1 teaspoon espresso powder to the brownie batter for deeper chocolate flavor. Incorporate ½ teaspoon peppermint extract into the cookie dough layer for a festive twist. Sea salt sprinkled on the chocolate topping before cooling adds sophisticated contrast.
Mix-In Options:
Customize the chocolate chips in the cookie dough layer. Try white chocolate chips, dark chocolate chips, or a combination. Add crushed pretzels for salty-sweet contrast, or include chopped nuts like walnuts or pecans. These additions create texture variation and personalized flavor profiles.
Chocolate Type Variations:
Experiment with different chocolate varieties. Dark chocolate creates more sophisticated, less sweet brownies. Milk chocolate produces sweeter, creamier results. White chocolate for the topping offers an elegant alternative, though it requires careful melting to avoid scorching.
For those interested in simple cooking techniques, applying the same layer-building approach works across many dessert categories.
FAQ
Can I make slutty brownies without eggs?
You can substitute eggs with flax eggs or applesauce in the brownie layer. Mix 1 tablespoon ground flaxseed with 3 tablespoons water per egg and let sit 5 minutes. However, the cookie dough layer traditionally contains raw egg yolk. Use pasteurized eggs or egg yolk product for food safety, or substitute with 2 tablespoons aquafaba (chickpea liquid) whipped for 1-2 minutes.
Why did my chocolate topping crack?
Cracking occurs from temperature shock. Ensure the cookie dough layer cools to room temperature before adding hot chocolate. If the brownie base is still warm, the chocolate may melt unevenly. Room-temperature chocolate spreads more smoothly than freshly melted chocolate.
Can I make these in a smaller pan?
Yes, adjust baking time accordingly. An 8×8-inch pan creates thicker brownies—increase baking time by 5-10 minutes. A 9×9-inch pan works similarly to the 9×13-inch with slightly thicker pieces. A 10×15-inch pan creates thinner brownies that bake faster.
How do I get clean cuts?
Use a hot, sharp knife and wipe it clean between each cut. Run the knife under hot water and immediately dry it with a paper towel. Cut slowly with downward pressure rather than sawing motions. Chilling brownies before cutting produces the cleanest results.
Can I add a layer of caramel?
Absolutely! Spread a thin layer of caramel sauce over the cooled brownie layer before adding the cookie dough. This creates a four-layer dessert with additional flavor complexity. Allow caramel to cool slightly so it doesn’t melt the cookie dough layer.
What if I don’t have mini chocolate chips?
Chop regular chocolate chips into smaller pieces, or use chopped chocolate bars. You can also substitute with white chocolate chips, dark chocolate chips, or even crushed candy pieces. The size matters less than the flavor preference.
How do I prevent the brownie layer from being too cakey?
Underbake intentionally and don’t overmix the batter. Overmixing develops gluten, creating cake-like texture. Fold ingredients gently and stop as soon as no flour streaks remain. Use eggs at room temperature, as they incorporate more easily and create moister brownies.
Can these brownies be made gluten-free?
Yes, substitute all-purpose flour with a 1:1 gluten-free flour blend in both brownie and cookie dough layers. King Arthur Baking Company and Bob’s Red Mill produce excellent blends that work seamlessly in this recipe. Baking time may vary slightly—watch for the same doneness cues regardless of flour type.
Slutty brownies deliver impressive results with minimal complexity. Their three-layer construction creates a dessert that feels fancy enough for special occasions yet simple enough for weeknight baking. Once you’ve mastered this fundamental dessert technique, you’ll find endless variations to explore and enjoy.
The key to success lies in respecting each layer’s purpose and timing. The brownie base provides structure and chocolate richness, the cookie dough adds creamy sweetness, and the chocolate top seals everything in glossy elegance. Understanding how these elements work together transforms what could be a challenging recipe into an achievable, repeatable success.
Whether you’re baking for a crowd or indulging personally, these brownies impress consistently. The combination of textures and flavors appeals to diverse palates, making them ideal for potlucks, bake sales, or simple dessert enjoyment. Master this recipe and you’ll have a go-to dessert that never fails to delight.


