Sticky Buns Recipe: Grandma’s Secret Method for Perfect Caramelized Rolls
There’s something magical about pulling a tray of sticky buns from the oven—the aroma alone is enough to bring back cherished memories of grandmother’s kitchen. These gooey, caramelized rolls have been a beloved comfort food for generations, and today, I’m sharing the time-tested technique that makes them absolutely irresistible. This isn’t just any sticky buns recipe; it’s a treasured family method that produces rolls with perfectly soft centers, crispy-edged caramel, and that signature sticky glaze that keeps everyone coming back for more.
The secret to exceptional sticky buns lies in understanding the delicate balance between yeast dough preparation, filling distribution, and caramel development. My grandmother taught me that patience and proper technique matter more than fancy ingredients. With her guidance, I’ve perfected a method that delivers bakery-quality results in your own kitchen, and I can’t wait to walk you through every step of this wonderful process.

Ingredients You’ll Need
For a successful sticky buns recipe, gathering quality ingredients is your first step toward excellence. The dough requires basic pantry staples, but their quality directly impacts your final result. Here’s exactly what you need:
For the Dough
- 1 cup whole milk, warmed to 110°F
- 2 teaspoons active dry yeast (one 0.25 oz packet)
- 4 tablespoons granulated sugar
- 4 tablespoons unsalted butter, melted
- 1 teaspoon salt
- 1 large egg, room temperature
- 3 cups all-purpose flour, plus extra for kneading
For the Caramel and Filling
- 6 tablespoons unsalted butter
- 1 cup packed brown sugar
- 3 tablespoons heavy cream or milk
- 1 teaspoon vanilla extract
- Pinch of sea salt
- 3 tablespoons softened butter (for spreading)
- 2 tablespoons granulated sugar mixed with 1 tablespoon ground cinnamon
- ½ cup chopped pecans or walnuts (optional but recommended)
My grandmother always emphasized using real butter rather than margarine—this makes a noticeable difference in flavor and texture. The quality of your brown sugar matters too; it should be moist and fragrant, not hardened or stale.

Dough Preparation and Rising
Creating the perfect dough is where many home bakers stumble. The key is understanding how yeast reacts to temperature and how gluten develops through proper kneading. Let me guide you through grandma’s method step by step.
Activating Your Yeast
Begin by pouring your warmed milk into a large mixing bowl. The temperature is crucial—too hot and you’ll kill the yeast, too cold and it won’t activate properly. Add the yeast and let it sit for one minute, then stir gently. Add the sugar and let the mixture sit undisturbed for about five minutes. You should see foam forming on the surface, indicating active yeast. This is what my grandmother called “the proof of life,” and it’s your assurance that fermentation will occur properly.
If your yeast doesn’t foam, it’s dead, and you’ll need to start over with fresh yeast. This simple test saves countless hours of wasted effort and failed batches.
Building the Dough
Once your yeast is foaming beautifully, add the melted butter, salt, and egg to the bowl. Stir these together thoroughly. Now gradually add your flour, one cup at a time, stirring well after each addition. When the dough becomes too stiff to stir with a spoon, transfer it to a lightly floured work surface.
Knead the dough for 8-10 minutes. This is where patience becomes your greatest tool. Proper kneading develops the gluten network that gives your sticky buns their tender yet structured crumb. Push the dough away from you with the heel of your hand, fold it back over itself, rotate it a quarter turn, and repeat. The dough should gradually transform from shaggy and sticky to smooth and elastic. You’ll know it’s ready when it springs back slowly when poked and feels soft but not sticky.
The First Rise
Place your kneaded dough in a lightly oiled bowl, turning it once to coat all sides. Cover with a damp towel or plastic wrap and let it rise in a warm, draft-free location for 1 to 1.5 hours, or until it doubles in size. A warm oven with the light on, or a proofing box set to 75°F, works perfectly for this stage. My grandmother used to place her bowl on top of the refrigerator, which provided just enough ambient warmth for steady fermentation.
You can also use the cold fermentation method: refrigerate the dough overnight for deeper flavor development. This actually improves the complexity of your sticky buns recipe and is worth the extra time if you’re planning ahead.
Creating the Perfect Caramel Filling
While your dough rises, prepare the caramel that makes these sticky buns truly special. This is where grandma’s secret method shines—she taught me to cook the caramel just to the right color and consistency.
Making the Caramel Base
In a heavy-bottomed saucepan, melt 6 tablespoons of butter over medium heat. Once melted, add your packed brown sugar and stir constantly for about 2-3 minutes. The mixture should combine smoothly without any lumps. Remove from heat and stir in the heavy cream and vanilla extract. Be careful here—the mixture will bubble slightly when you add the cream. Stir until smooth, then add a small pinch of sea salt. This salt enhances the sweetness and adds complexity to the caramel flavor.
The caramel should be thick but pourable. If it seems too thick, warm it gently over low heat. If it’s too thin, let it cool slightly as it will thicken further as it cools. My grandmother always said the perfect caramel consistency is “like honey that just poured from a warm jar.”
Preparing Your Pan
Pour about two-thirds of your caramel into the bottom of a 9×13 inch baking pan, spreading it evenly. Reserve the remaining caramel to drizzle over the rolls after baking—this extra layer creates that signature glossy finish. Let the caramel in the pan cool slightly so it won’t melt the dough when the rolls are placed on top.
Assembly and Rolling Technique
This is where your sticky buns recipe comes together. Proper rolling technique ensures even distribution of filling and consistent results in every bite.
Preparing Your Work Surface
Punch down your risen dough gently—this releases excess gas but doesn’t deflate it completely. Flour your work surface lightly and transfer the dough. Using a rolling pin, roll the dough into a rectangle approximately 16 inches wide by 12 inches tall. The dough should be about ¼-inch thick—thin enough to roll easily but thick enough to support the filling without tearing.
Applying the Filling
Spread the 3 tablespoons of softened butter evenly across the entire dough surface, leaving a small border on all sides. In a small bowl, combine your granulated sugar with ground cinnamon. Sprinkle this mixture generously over the buttered dough, then scatter your chopped nuts over the top if using them. The filling should be visible but not so thick that it falls out during rolling.
Rolling and Cutting
Starting from the long side closest to you, roll the dough tightly into a log shape, sealing the edge as you go. Using a sharp knife or dental floss (grandma’s secret tool!), cut the log into 12 equal pieces, each about 1.5 inches wide. Dental floss cuts cleanly without compressing the dough, preserving those beautiful spiral layers. If using a knife, wipe it clean between cuts for the neatest results.
Arrange the rolls cut-side up in your prepared pan with caramel. They should fit snugly—if they’re too loose, they’ll spread too much during rising. If they’re too tight, they won’t have room to expand. The perfect arrangement has rolls touching lightly but not compressed.
The Final Rise and Baking
The final rise is crucial for achieving those fluffy, tender interiors that make sticky buns recipe success stories.
The Second Rise
Cover your pan loosely with plastic wrap or a damp towel. Let the rolls rise in a warm location for 45 minutes to 1 hour, until they’ve puffed up and are touching each other more firmly. They should look pillowy but not overly domed. This is different from the first rise—you’re looking for them to rise until they nearly fill the pan but still have some structure.
If your kitchen is cool, this may take longer. If it’s very warm, it may happen more quickly. Check them at the 30-minute mark to gauge progress. Grandma always tested readiness by gently poking a roll—if the indentation sprang back slowly, they were ready to bake.
Baking Instructions
Preheat your oven to 375°F. Once preheated, place your pan of rolls in the oven and bake for 20-25 minutes, until the tops are golden brown and the rolls feel set when gently pressed. The timing depends on your oven—some run hotter than others. Start checking at 18 minutes to ensure you don’t overbake them. The rolls should be golden but not dark brown, and a toothpick inserted into the center should come out clean with no raw dough.
Remove from the oven and let cool for exactly 2 minutes—this is the critical timing grandma taught me. It’s long enough for the rolls to set slightly so they won’t fall apart, but short enough that the caramel is still warm and will soak in beautifully.
The Final Glaze
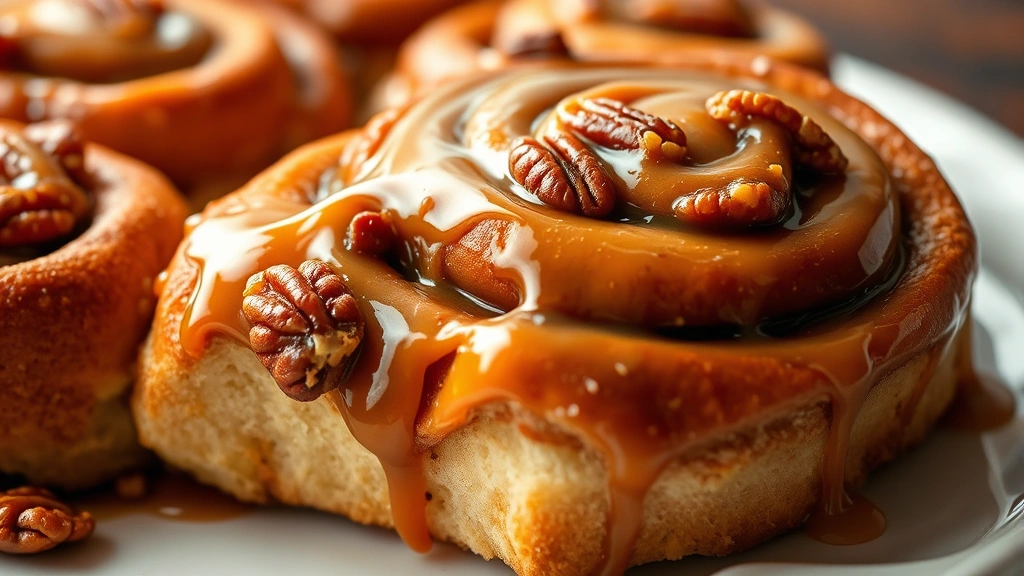
Place a serving platter larger than your baking pan over the pan of rolls. Using oven mitts, carefully flip the pan so the rolls invert onto the platter. The caramel should flow down over the rolls, creating that gorgeous glossy coating. Immediately drizzle the reserved warm caramel over any exposed areas. If your reserved caramel has cooled and thickened, warm it gently over low heat first.
Serve the sticky buns warm, ideally within 30 minutes of removal from the oven. They’re best enjoyed fresh, but leftovers can be reheated gently in a 300°F oven for about 5 minutes.
Grandma’s Tips and Tricks for Perfect Results
My grandmother accumulated decades of wisdom about sticky buns recipe perfection. Here are her most valuable insights:
Temperature Control
Consistent temperature throughout the process produces the most reliable results. Invest in an instant-read thermometer to check your milk temperature before adding yeast. Room temperature ingredients mix more evenly than cold ones. When making caramel, medium heat prevents scorching that can create bitter flavors.
Timing Flexibility
If your dough rises faster than expected, don’t panic. You can slow fermentation by placing it in a cooler location. Conversely, if it’s rising slowly, move it somewhere warmer. Grandma often adjusted her timeline based on humidity and seasonal temperature changes. The key is watching the dough, not the clock.
Make-Ahead Method
Prepare rolls through the rolling and cutting stage, then cover the pan and refrigerate overnight. In the morning, let them come to room temperature (about 30 minutes), then proceed with the final rise and baking. This makes sticky buns recipe perfect for entertaining since you can do most of the work the day before.
Caramel Consistency
If your caramel hardens in the bottom of the pan before you add the rolls, don’t worry. Simply warm it gently in the pan over low heat until it softens. Never try to force hard caramel—gentle heat will restore it without burning. If caramel sticks to your hands while handling rolls, dip your fingers in cold water between touches.
Preventing Soggy Bottoms
Use a heavy-bottomed baking pan rather than thin aluminum. Heavy pans distribute heat more evenly and prevent the caramel from burning on the bottom. If you notice caramel browning too quickly during baking, place a baking sheet on the rack below to shield from excess bottom heat.
Scaling the Recipe
This sticky buns recipe makes 12 rolls in a 9×13 pan. To make 24 rolls, simply double all ingredients and use two pans. The timing remains the same since each pan still receives the same oven heat. For smaller batches, cut the recipe in half and use an 8×8 or 9×9 pan.
Flavor Variations
While cinnamon is traditional, grandma sometimes substituted cardamom or added orange zest to the filling for special occasions. Pecans are classic, but walnuts, almonds, or even chocolate chips work beautifully. Once you master the basic sticky buns recipe, these variations become easy experiments.
Connection to Other Comfort Foods
The yeast dough technique used here is similar to what you’d use for bread-based recipes. If you enjoy sticky buns, you might also appreciate other comfort food classics like chicken and gravy recipe or Cracker Barrel meatloaf recipe for complete comfort food meals. For those watching their nutrition, understanding foods rich in antioxidants helps balance indulgences like sticky buns with nutritious side dishes.
Pairing Suggestions
Sticky buns are perfect for breakfast or brunch but work equally well as dessert. Serve them with strong coffee, hot chocolate, or fresh milk. For a more substantial meal, pair them with savory dishes like smoked ribs recipe for a unique sweet-and-savory combination. They also complement holiday meals beautifully alongside candied yams recipe.
Storage and Reheating
Store cooled sticky buns in an airtight container at room temperature for up to 2 days. For longer storage, wrap them individually in plastic wrap and freeze for up to 1 month. Thaw at room temperature and reheat gently in a 300°F oven until warmed through. Never microwave sticky buns, as this makes them tough and unevenly heated. The oven method preserves their tender texture beautifully.
FAQ
Can I use instant yeast instead of active dry yeast?
Yes, instant yeast works perfectly in this sticky buns recipe. Use the same amount (2 teaspoons) and expect slightly faster fermentation. Instant yeast particles are smaller, so they activate and work more quickly than active dry yeast. Reduce rising times by about 10-15 minutes and monitor the dough closely.
What if my caramel crystallizes or becomes grainy?
Crystallization happens when sugar cools too quickly or when there are sugar crystals in the pan. To fix it, add a tablespoon of water and warm gently over low heat, stirring constantly until smooth. For prevention, ensure your pan is clean before starting and avoid stirring once the sugar begins to caramelize. My grandmother kept a small spray bottle of water nearby to dissolve any sugar crystals that formed on the pan sides.
Why are my rolls dense instead of fluffy?
Dense rolls usually result from insufficient rising time, too much flour, or yeast that wasn’t properly activated. Ensure your yeast foams before mixing into the dough. Check that your rising environment is warm enough (around 75°F). Measure flour by weight when possible, or spoon flour into your measuring cup and level it rather than scooping directly from the bag, which compacts the flour.
Can I make this sticky buns recipe without nuts?
Absolutely. Nuts are optional and add texture and flavor, but this recipe works beautifully without them. Simply omit the nuts and proceed as directed. Some people add a handful of raisins or dried cranberries instead for a different flavor profile.
How do I know when the rolls are fully baked?
The rolls should be golden brown on top, and the sides should feel firm when gently pressed. Insert a toothpick into the center of the middle roll—it should come out clean with no wet dough. The internal temperature should reach about 190°F with an instant-read thermometer inserted into the center of a roll. Don’t overbake, or the edges will become dry and tough.
What’s the best way to reheat sticky buns?
Preheat your oven to 300°F and place rolls on a baking sheet. Cover loosely with foil to prevent the tops from over-browning and bake for 5-8 minutes until warmed through. This gentle method preserves the tender crumb and allows the caramel to soften again. For a single roll, you can wrap it in a damp paper towel and microwave for 15-20 seconds, though the oven method produces superior results.
Can I prepare the dough in a bread machine?
Yes, most bread machines have a dough cycle perfect for this sticky buns recipe. Add ingredients in the order specified by your machine’s manual (usually liquids first, then dry ingredients). Use the dough cycle and remove the dough when it’s finished. Continue from the first rise onward with the hand-rolling method described here. This saves significant time and effort while producing excellent results.
Why did my rolls spread too much and merge together?
Over-proofing during the final rise causes excessive spreading. The rolls should rise until they’re puffy and touching lightly, but not until they’re dome-shaped or very soft. Check them at 30 minutes during the second rise and don’t let them go much beyond 1 hour. If your kitchen is very warm, they’ll rise faster. Cold fermentation overnight also helps control this issue by slowing yeast activity.
Is there a dairy-free version of this sticky buns recipe?
You can substitute dairy milk with unsweetened almond, oat, or coconut milk for the dough. For the butter, use a quality dairy-free butter alternative. The caramel is trickier since it relies on butter and cream for flavor and texture, but dairy-free butter and coconut cream can work. The results won’t be identical to the traditional version, but they’ll still be delicious. Test your substitutions in advance of making the full recipe.
What external resources can help me master yeast baking?
King Arthur Baking Company’s Yeast Bread Guide provides comprehensive information on yeast types and fermentation science. Serious Eats’ Cinnamon Roll Guide offers detailed photography and troubleshooting for rolled yeast doughs. The Culinary Institute of America provides professional-level baking education resources. The Pastry Chef’s Companion offers advanced techniques for caramel work and pastry finishing. Finally, The Perfect Loaf blog specializes in artisan bread and yeast dough techniques with detailed documentation.
Can this sticky buns recipe be frozen at different stages?
You can freeze dough after the first rise. Simply place it in an airtight container and freeze for up to 3 months. Thaw overnight in the refrigerator, then proceed with rolling and filling. You can also freeze assembled, unbaked rolls in the pan. Cover tightly with plastic wrap and freeze for up to 1 month. Bake from frozen, adding 5-10 minutes to the baking time. Fully baked rolls freeze well too—wrap individually and freeze for up to 1 month, then thaw and reheat as needed.
This sticky buns recipe represents generations of family baking wisdom, and I’m delighted to share it with you. The combination of proper technique, quality ingredients, and a little patience produces results that rival any bakery. Your first batch might not be perfect, and that’s completely normal—baking is a skill that improves with practice. My grandmother always said that every batch teaches you something new, and the sticky buns that turn out slightly different are often the most memorable. I encourage you to try this recipe, make notes about what works in your specific kitchen and oven, and soon you’ll be creating sticky buns that become treasured in your own family’s story.


