Sweet Bread Recipe: Grandma’s Secret Method for Perfect Results Every Time
There’s something magical about homemade sweet bread that fills your kitchen with warmth and nostalgia. My grandmother guarded her sweet bread recipe like a precious heirloom, and after years of watching her work her magic in the kitchen, I finally unlocked the secrets that make her version so irresistibly tender, golden, and absolutely unforgettable. This isn’t just any sweet bread recipe—it’s a time-tested method that transforms simple ingredients into something extraordinary through patience, technique, and a few carefully guarded tricks.
What makes Grandma’s approach different from standard sweet bread recipes is her understanding of how each ingredient works together. She taught me that successful sweet bread isn’t about rushing the process or using complicated techniques. Instead, it’s about respecting the dough, understanding fermentation, and knowing exactly when to intervene and when to let time do the heavy lifting. After perfecting this sweet bread recipe over countless batches, I’m thrilled to share every detail so you can recreate this magic in your own kitchen.
Why This Sweet Bread Recipe Stands Out
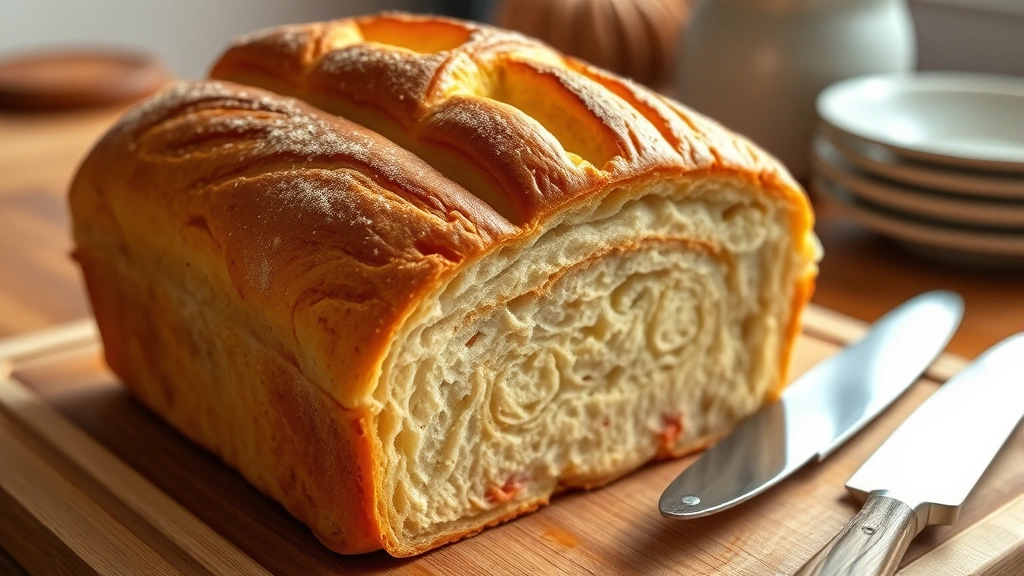
Most sweet bread recipes follow a basic formula: mix ingredients, let it rise, bake it. Grandma’s method goes deeper. She understood that the quality of your final product depends on understanding the science behind each step. This sweet bread recipe produces a crumb structure that’s simultaneously tender and structured, with a subtle sweetness that doesn’t overwhelm your palate. The exterior develops a gorgeous mahogany crust while the interior remains impossibly moist.
The key differentiator in this sweet bread recipe is the use of a preferment—a small batch of dough mixed the day before. This technique, borrowed from professional bakers, develops complex flavors and improves texture dramatically. When you use a sweet bread recipe with a preferment, you’re essentially giving the yeast and flour time to develop a relationship. The enzymes in the flour break down starches into sugars, creating depth of flavor that you simply cannot achieve in a single day.
Additionally, this sweet bread recipe incorporates proper hydration levels that many home bakers overlook. Grandma taught me that wetter doughs produce more open crumb structures and superior texture. However, managing a wetter dough requires technique—which we’ll cover in detail. This sweet bread recipe balances moisture with workability, giving you a dough that’s forgiving yet produces professional-quality results.
Essential Ingredients for Perfect Sweet Bread
Before diving into the sweet bread recipe process, let’s discuss ingredients. Quality matters tremendously here. Grandma always said, “You can’t make great bread with mediocre flour,” and she was absolutely right. Here’s what you’ll need for this authentic sweet bread recipe:
- Bread flour (480g): The higher protein content develops gluten networks that support the dough’s structure. All-purpose flour works in a pinch, but bread flour delivers superior results in any sweet bread recipe.
- Whole wheat flour (120g): Adds nutty complexity and nutritional value. This sweet bread recipe benefits from the flavor contribution whole wheat provides.
- Water (360ml): Room temperature water is essential. Cold water slows fermentation; hot water can kill yeast. Room temperature optimizes this sweet bread recipe’s development.
- Active dry yeast or instant yeast (7g): Fresh yeast works beautifully too, though it requires adjustment. This sweet bread recipe relies on reliable fermentation.
- Sea salt (10g): Don’t skip this. Salt strengthens gluten and enhances flavors in your sweet bread recipe.
- Honey or brown sugar (60g): This sweet bread recipe uses sweetener strategically—enough to feed yeast and create flavor, not so much that it becomes cloying.
- Butter (45g): Adds richness and improves keeping quality. This sweet bread recipe benefits from butter’s emulsifying properties.
- Eggs (2 large): Enriches the dough and adds structure. For a vegan sweet bread recipe, substitute with flax eggs.
- Vanilla extract (1 teaspoon): Enhances sweetness perception without adding sugar. Every sweet bread recipe should include this subtle flavor booster.
- Optional spices: Cinnamon, cardamom, or nutmeg elevate your sweet bread recipe. Grandma often added cardamom for sophistication.
Having these ingredients ready before you start is crucial. This sweet bread recipe requires attention and presence—there’s no time to hunt for ingredients mid-process. Measure everything using a kitchen scale for accuracy. This sweet bread recipe’s success depends on precision.
Step-by-Step Instructions for Success
Day 1: Creating the Preferment
Begin your sweet bread recipe by mixing the preferment the evening before baking. Combine 120g bread flour, 120ml water, and just a pinch (about 1g) of yeast in a small bowl. Mix until no dry flour remains—this should be a shaggy, wet mixture. Cover loosely with plastic wrap and leave at room temperature for 12-16 hours. This preferment develops the flavor foundation for your sweet bread recipe.
After the preferment sits overnight, you’ll notice a pleasant, yeasty aroma and visible bubbles throughout. This is exactly what you want. The preferment’s flavor complexity will transform your sweet bread recipe from ordinary to extraordinary.
Day 2: Mixing and First Rise
Combine your preferment with the remaining water (240ml) in a large mixing bowl. Add the remaining bread flour (360g) and whole wheat flour (120g). Mix by hand or with a stand mixer on low speed until all flour is incorporated and you have a shaggy dough. This should take about 3-4 minutes. Let this mixture rest for 20-30 minutes—this resting period is called the autolyse, and it’s absolutely critical in any sweet bread recipe.
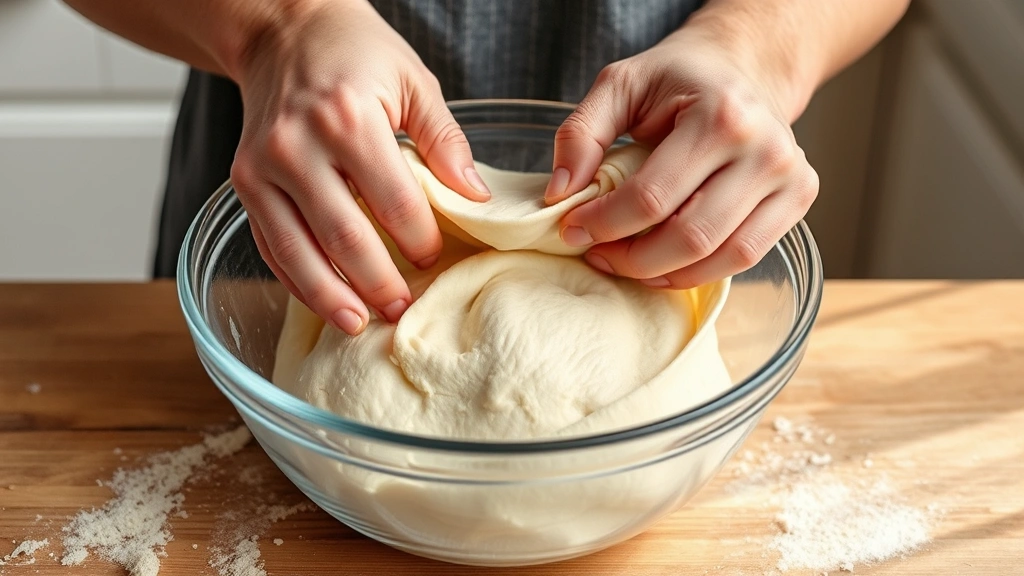
During autolyse, the flour fully hydrates and gluten begins developing naturally. This step makes your sweet bread recipe dramatically easier to work with and improves final texture. After the autolyse rest, add salt (10g) and honey (60g), plus eggs and vanilla. If using a stand mixer, use the dough hook on medium speed for 6-8 minutes. By hand, knead for 10-12 minutes. This sweet bread recipe’s dough should be smooth, slightly sticky, and elastic.
Incorporate softened butter gradually, a small piece at a time. This seems counterintuitive—adding butter to a wet dough—but this technique is essential in professional sweet bread recipes. The dough will initially look shiny and loose, but continue mixing. After about 4-5 minutes of incorporating butter, the dough will come together beautifully, becoming silky and cohesive.
Place the dough in a lightly oiled bowl and cover with plastic wrap. This sweet bread recipe’s first rise happens at room temperature (68-72°F is ideal) for 4-5 hours. You’re looking for the dough to increase by about 50-75% in volume. Grandma taught me that visual cues matter more than exact timing—every kitchen is different.
Stretch and Fold Technique
After 1 hour of the first rise, perform a stretch and fold. Wet your hand slightly, grab one side of the dough, stretch it up and fold it over the center. Rotate the bowl 90 degrees and repeat. Do this four times total (north, south, east, west). This technique, crucial in modern sweet bread recipes, develops gluten without aggressive kneading. Repeat this stretch and fold every 30 minutes for the next 2 hours (three sets total). This sweet bread recipe’s texture depends on these gentle manipulations.
Shaping Your Sweet Bread
After 4-5 hours total, your dough should be puffy and jiggly. Turn it out onto a lightly floured surface. For a traditional loaf, gently shape the dough into a round, then create surface tension by dragging it toward you repeatedly. This sweet bread recipe benefits from proper shaping—it creates structure that supports oven spring.
Place your shaped dough seam-side up in a floured banneton (proofing basket) or a bowl lined with a floured kitchen towel. Cover with plastic wrap and refrigerate overnight (8-12 hours). This cold fermentation is another secret in Grandma’s sweet bread recipe—it develops flavor and makes scoring easier.
Baking Your Sweet Bread
Remove your sweet bread recipe dough from the refrigerator 30-45 minutes before baking. Preheat your oven to 450°F (232°C) with a Dutch oven inside for at least 45 minutes. The Dutch oven traps steam, essential for achieving the beautiful crust this sweet bread recipe is known for.
Turn your dough out onto parchment paper. Score the top with a sharp blade—a simple cross or your preferred pattern. Transfer to the preheated Dutch oven (using the parchment paper makes this easy) and cover with the lid. Bake for 25 minutes covered, then remove the lid and bake for 20-25 minutes until deep golden brown. This sweet bread recipe’s final color should be rich mahogany, not pale blonde.
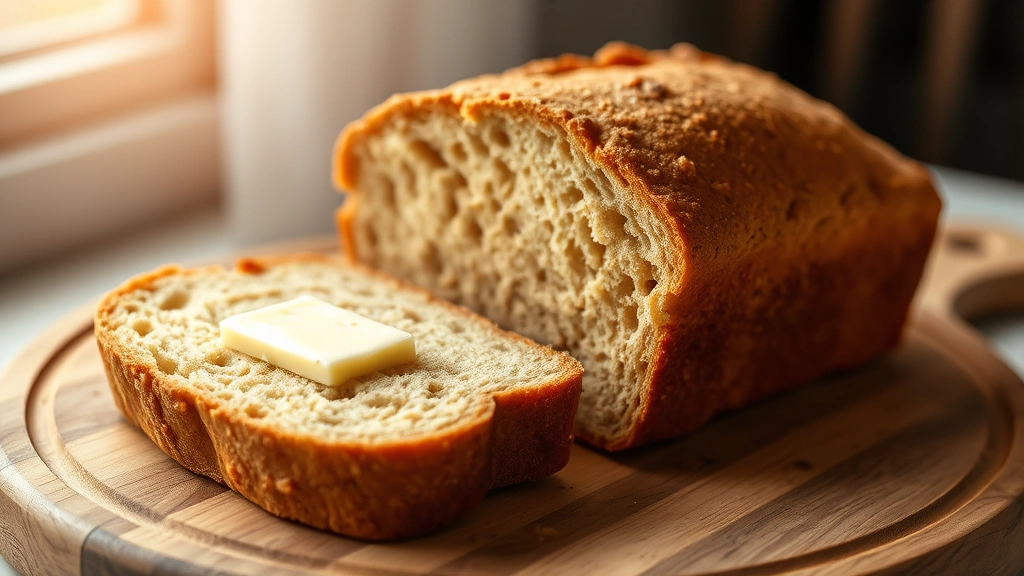
Remove from the oven and let cool in the Dutch oven for 10 minutes, then transfer to a wire rack. Cooling is non-negotiable—slicing warm bread from this sweet bread recipe will ruin the texture. Wait at least 1 hour before slicing, preferably 2-3 hours.
Grandma’s Secret Techniques Revealed
Temperature Control
Grandma kept meticulous notes about kitchen temperature and how it affected her sweet bread recipe. She understood that fermentation speed depends entirely on temperature. In summer, when her kitchen reached 75°F, her sweet bread recipe’s first rise took only 3.5 hours. In winter, the same sweet bread recipe might take 5-6 hours at 65°F. She taught me to trust my eyes and the feel of the dough, not the clock. This flexibility is what separates great bakers from good ones.
She also taught me about retardation—slow, cold fermentation—which is why this sweet bread recipe benefits so much from overnight refrigeration. Cold fermentation allows flavors to develop while making the dough easier to handle. Additionally, cold dough scores more cleanly, creating those beautiful “ear” formations on the crust.
Hydration Management
This sweet bread recipe uses approximately 75% hydration (ratio of water to flour by weight). This is higher than many home bakers attempt, but it’s essential for achieving the open crumb and tender texture Grandma’s sweet bread recipe is famous for. However, managing wet dough requires technique. Never add flour to compensate for stickiness—instead, wet your hands. This sweet bread recipe’s success depends on respecting the dough’s moisture.
Salt’s Critical Role
Many home bakers underestimate salt in sweet bread recipes. Salt strengthens gluten networks, slows fermentation slightly (giving you more control), and intensifies flavor. Grandma never reduced salt in her sweet bread recipe, even though it seems counterintuitive in a “sweet” bread. The salt doesn’t make it taste salty—it makes the sweetness more pronounced and complex.
The Importance of Scoring
Grandma always said a well-scored sweet bread recipe loaf “blooms” in the oven. Scoring controls where the bread expands, creating beautiful patterns while allowing steam to escape in a controlled manner. A dull knife won’t work—use a sharp blade or a lame (baker’s razor). This sweet bread recipe’s appearance matters as much as its taste.
Troubleshooting Common Sweet Bread Issues
Dense, Gummy Crumb
If your sweet bread recipe produced a dense interior, you likely underbaked it or didn’t allow proper cooling. This sweet bread recipe requires an internal temperature of 205-210°F. Use an instant-read thermometer. Additionally, ensure you’re cooling completely—at least 2 hours—before slicing. Cutting warm bread from this sweet bread recipe collapses the crumb structure.
Flat Loaf with No Oven Spring
This sweet bread recipe needs proper shaping and adequate cold fermentation. If your dough was shaped poorly or overproofed, it won’t spring in the oven. Test for proper proofing: gently poke the cold dough. It should slowly spring back about halfway. If it springs back completely, it needs more time. If it doesn’t spring back at all, it’s overproofed. This sweet bread recipe requires this balance.
Overly Sour Flavor
While this sweet bread recipe develops complex flavors through fermentation, excessive sourness means fermentation went too long. Reduce your room temperature rise time or shorten the cold fermentation. This sweet bread recipe should taste subtly complex, not aggressively sour.
Pale Crust
This sweet bread recipe’s gorgeous crust requires adequate oven heat and steam. Ensure your Dutch oven is fully preheated and your oven temperature is accurate. Use an oven thermometer—many home ovens run cool. This sweet bread recipe needs 450°F minimum for proper crust development.
Storage and Serving Suggestions
Properly stored, this sweet bread recipe stays fresh for 3-4 days at room temperature in a paper bag (plastic traps moisture and creates soggy crust). For longer storage, slice your sweet bread recipe and freeze in airtight containers for up to 3 months. Toast slices directly from frozen for best results.
This sweet bread recipe pairs beautifully with butter and jam, or simply enjoyed plain to appreciate its complex flavor. Grandma often served hers slightly warm with good butter and a cup of tea. Consider pairing this homemade sweet bread recipe with homemade spreads and sauces for elevated breakfast service.
The day-old sweet bread recipe is actually superior for toast—the slightly drier texture creates crunchier exterior while maintaining a tender interior. Many people prefer this sweet bread recipe’s second or third day to its first.
Variations to Customize Your Sweet Bread
Spiced Sweet Bread Recipe
Add 1.5 teaspoons ground cinnamon, 0.5 teaspoon cardamom, and 0.25 teaspoon nutmeg to this sweet bread recipe. Grandma’s favorite version included cardamom—it adds sophisticated warmth without overwhelming sweetness. This sweet bread recipe variation develops even more complexity through fermentation.
Fruit-Studded Sweet Bread Recipe
Soak dried cranberries, raisins, or chopped dried apricots in warm water for 30 minutes. Drain well and fold into this sweet bread recipe after the final stretch and fold. This sweet bread recipe benefits from fruit’s natural sugars and moisture. Use about 150-180g dried fruit for this sweet bread recipe.
Chocolate Sweet Bread Recipe
Reduce honey to 30g and add 60g chopped dark chocolate (70% cacao minimum) after the final stretch and fold. This sweet bread recipe variation becomes almost dessert-like without losing its structural integrity. The chocolate melts slightly during fermentation, creating pockets of richness throughout.
Savory Sweet Bread Recipe Pivot
For an unexpected twist on this sweet bread recipe, reduce honey to 15g, add 10g more salt (for 20g total), and incorporate 100g grated cheddar cheese plus 2 teaspoons fresh rosemary. This sweet bread recipe variation defies categorization—it’s breakfast, lunch, or snack.
These variations all use the same fundamental sweet bread recipe technique, just with different inclusions. The method remains constant, only ingredients change. This is the beauty of understanding a core sweet bread recipe—once mastered, endless possibilities emerge.
FAQ
Can I make this sweet bread recipe without a Dutch oven?
Yes, though results won’t be identical. Place a shallow pan of boiling water on the oven’s lowest rack to create steam. This sweet bread recipe will still develop a crust, just not as thick or crispy. A covered baking vessel like a large enamel pot works as a substitute for this sweet bread recipe.
What if I don’t have bread flour for this sweet bread recipe?
Use all-purpose flour, though this sweet bread recipe won’t develop quite as much structure. If possible, add 1 tablespoon vital wheat gluten per cup of all-purpose flour to approximate bread flour’s protein content. This sweet bread recipe is adaptable, but bread flour is ideal.
Can I speed up this sweet bread recipe?
This sweet bread recipe relies on fermentation for flavor development. Rushing it produces inferior results. However, you can increase room temperature to 75-78°F to slightly accelerate this sweet bread recipe, though this sacrifices some flavor complexity.
Is this sweet bread recipe suitable for vegans?
Substitute eggs with 2 flax eggs (2 tablespoons ground flaxseed mixed with 6 tablespoons water, rested 15 minutes) and use vegan butter. This sweet bread recipe works beautifully with these substitutions, though texture differs slightly.
How do I know when this sweet bread recipe is fully baked?
Use an instant-read thermometer inserted into the loaf’s center. This sweet bread recipe is done at 205-210°F internal temperature. Additionally, the crust should be deep golden-brown and tap hollow when the loaf is removed from the pan. This sweet bread recipe’s doneness is both visual and thermometric.
Can I make this sweet bread recipe without the overnight preferment?
Technically yes, but this sweet bread recipe won’t develop the same complex flavor. If you must skip the preferment, extend the first rise to 6-7 hours. This sweet bread recipe’s preferment step isn’t mandatory but dramatically improves results.
Why is my sweet bread recipe gummy after cooling?
Underbaking is the primary culprit. This sweet bread recipe must reach 205-210°F internal temperature. Additionally, ensure adequate cooling—at least 2 hours. If using the poke test, the dough should feel firm, not soft or doughy.
Does this sweet bread recipe freeze well?
Absolutely. Cool completely, slice, and freeze in airtight containers for up to 3 months. This sweet bread recipe actually toasts beautifully from frozen—no thawing necessary. Toast directly from frozen for optimal texture.
Can I use instant yeast instead of active dry yeast in this sweet bread recipe?
Yes, instant yeast works perfectly in this sweet bread recipe. Use the same weight (7g), though it may ferment slightly faster. This sweet bread recipe is forgiving regarding yeast type—just avoid cake yeast, which has different hydration.
What’s the difference between this sweet bread recipe and regular bread?
This sweet bread recipe includes enrichments—eggs, butter, honey—that regular bread lacks. These create a richer crumb, softer texture, and longer shelf life. Additionally, this sweet bread recipe uses a preferment for flavor development, whereas basic bread often skips this step.


