Libby Pumpkin Pie Success? Trusted Recipe Guide
Libby’s pumpkin pie has become an American autumn staple, gracing holiday tables for generations. The iconic orange can sitting on grocery store shelves represents convenience, reliability, and the promise of a perfectly spiced dessert without hours of preparation. But what makes the Libby pumpkin pie recipe so trustworthy, and how can you achieve bakery-quality results in your own kitchen?
Whether you’re a seasoned baker or tackling pumpkin pie for the first time, understanding the science behind this classic dessert and mastering the technique will transform your baking experience. This comprehensive guide walks you through every step, from selecting the right ingredients to troubleshooting common problems, ensuring your pumpkin pie becomes the star of your table.
Why Libby’s Pumpkin Puree Matters
Libby’s dominates the pumpkin puree market with approximately 85% of all canned pumpkin sold in the United States. This isn’t coincidence—it’s the result of decades of quality control and consistency. When you reach for that iconic orange label, you’re getting puree made from a specific pumpkin variety selected for optimal flavor, texture, and moisture content.
The Libby pumpkin pie recipe printed on the can has been refined through countless home baker experiences. The company uses Sugar Pumpkins (also called pie pumpkins), which differ significantly from carving pumpkins. These smaller varieties contain less water, denser flesh, and a sweeter, more refined flavor profile. This matters tremendously because excess moisture leads to a soggy, watery pie, while the right pumpkin-to-binder ratio creates a silky, custard-like filling.
Understanding the product you’re using empowers you to make informed decisions. Libby’s puree is unsweetened, meaning all the sweetness comes from your added sugar and spices. This gives you complete control over the final flavor profile while maintaining consistency batch after batch.
Essential Ingredients Breakdown
The traditional Libby’s pumpkin pie recipe requires surprisingly few components, but each plays a critical role in the final texture and taste.
Pumpkin Puree (15 oz can): This is your base, providing the distinctive flavor, color, and natural moisture. One standard can yields enough filling for one 9-inch pie. The puree contains natural fiber and pectin, which help set the custard without excessive thickening agents.
Sweetened Condensed Milk (14 oz can): This ingredient deserves special attention. Sweetened condensed milk serves multiple purposes: it adds sweetness, creaminess, and most importantly, it contains lactose and milk solids that help create a smooth, stable custard. The high sugar content also aids in setting without requiring additional cornstarch or flour, which can create a grainy texture.
Eggs (2 large): Eggs provide structure and help set the custard through protein coagulation. They also add richness and create a lighter texture than using condensed milk alone. Room-temperature eggs blend more smoothly, reducing lumps in your filling.
Spice Blend (1½ teaspoons pumpkin pie spice): This typically includes cinnamon, ginger, nutmeg, and cloves. You can use the pre-mixed version or create your own. The aromatic compounds in these spices complement the earthy pumpkin flavor and contribute to the pie’s signature autumn character.
Salt (½ teaspoon): Don’t skip this. Salt enhances sweetness perception and balances the spice intensity, creating complexity that prevents the pie from tasting one-dimensional.
Many bakers wonder whether to use evaporated milk instead of sweetened condensed milk. While possible, the results differ significantly. Evaporated milk requires added sugar and lacks the stabilizing properties of condensed milk’s higher milk-solid content. Stick with the original recipe for the most reliable outcome.
Step-by-Step Preparation Guide
Success begins before you combine a single ingredient. Proper preparation sets the foundation for a flawless pie.
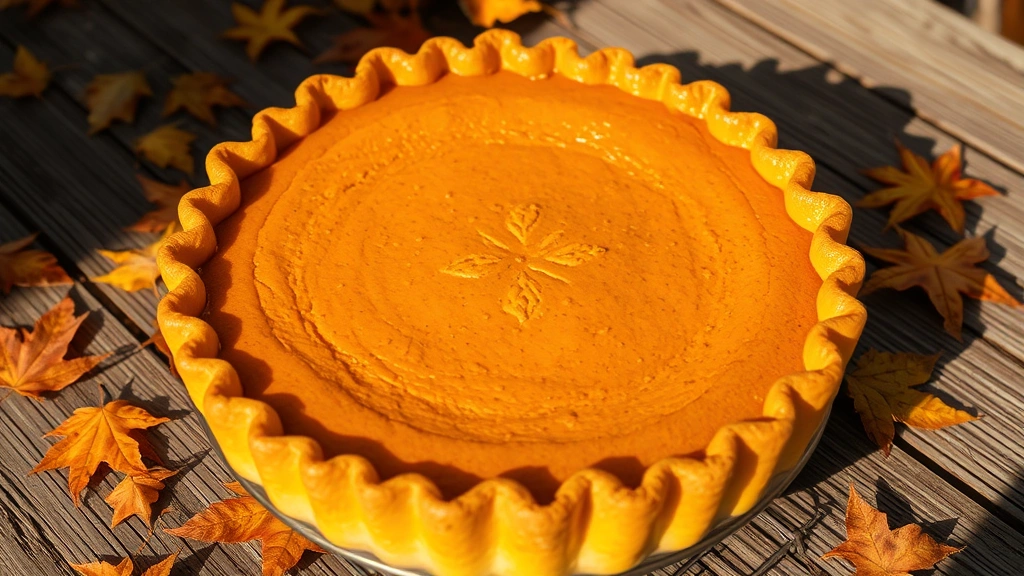
Prepare Your Crust: Whether using a store-bought or homemade crust, ensure it’s ready before mixing your filling. A pre-baked crust (blind-baked for 8-10 minutes at 425°F) prevents a soggy bottom. If using a frozen crust, thaw it slightly for easier handling but don’t let it sit at room temperature for extended periods, as this causes condensation.
Gather and Measure Ingredients: Mise en place—having everything measured and ready—prevents mistakes and ensures smooth mixing. Use a kitchen scale for precision, as volumetric measurements can vary based on how densely ingredients are packed.
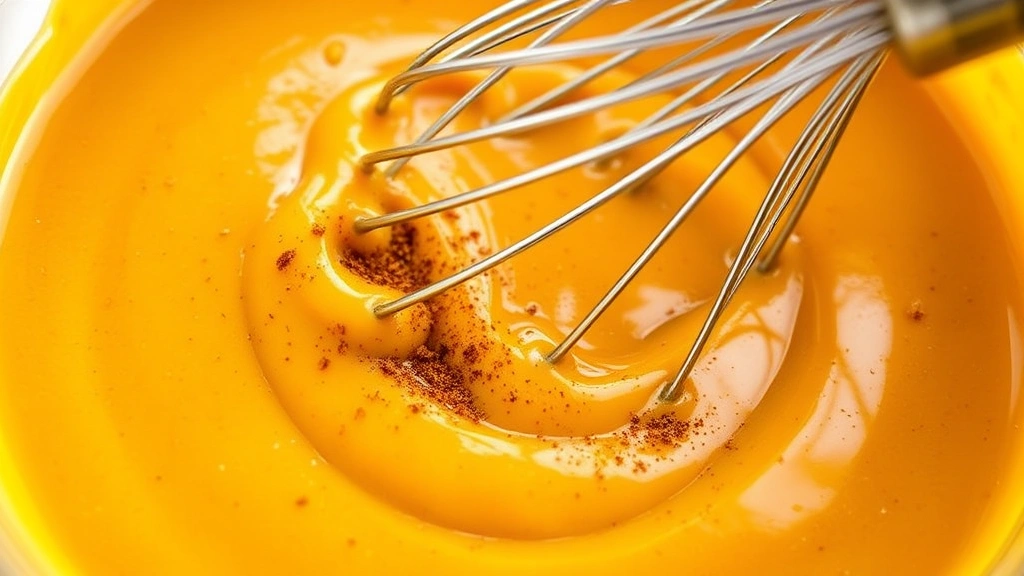
Combine Wet Ingredients: Pour the pumpkin puree into a large mixing bowl. Add the sweetened condensed milk and mix thoroughly using a whisk or electric mixer on low speed. This combination creates a smooth base before adding eggs. The condensed milk should fully incorporate, with no visible streaks of pumpkin remaining.
Add Eggs Carefully: Crack eggs into a separate small bowl first, beating them lightly with a fork. This prevents shell fragments and allows you to check for any that might have broken during cracking. Slowly pour beaten eggs into the pumpkin mixture while stirring continuously. This gradual incorporation prevents temperature shock that could cause curdling.
Season and Blend: Add salt and pumpkin pie spice, then whisk vigorously for 1-2 minutes. The mixture should be smooth, homogeneous, and free of lumps. A lumpy filling creates texture inconsistencies in the baked pie.
For an extra-smooth filling, strain the mixture through a fine-mesh sieve into another bowl. This step removes any small lumps and creates an almost velvety texture that bakes into a silky custard.
Baking Techniques for Perfect Results
The baking process requires attention to temperature control and timing. This is where many home bakers encounter problems—and where proper technique ensures success.
Oven Preparation: Preheat your oven to 425°F. This high initial temperature serves a specific purpose: it sets the crust quickly, preventing it from becoming soggy. The pie will bake at this temperature for only 15 minutes before the temperature drops.
Pour and Position: Pour your filling into the prepared crust, filling it nearly to the rim. Leave about ¼ inch of space to prevent overflow. Place the pie on a baking sheet before putting it in the oven—this catches any drips and makes handling easier.
Two-Temperature Baking: Bake at 425°F for 15 minutes, then reduce the oven temperature to 350°F and continue baking for 40-50 minutes. This graduated approach is crucial. The initial high heat sets the custard from the bottom and sides, while the lower temperature gently finishes the center without overbaking the edges.
Determining Doneness: The pie is done when a knife inserted 1 inch from the edge comes out clean, but the very center still jiggles slightly when gently shaken. This residual jiggle means carryover cooking will finish setting the center as it cools. Overbaking creates a rubbery, cracked surface and dry filling.
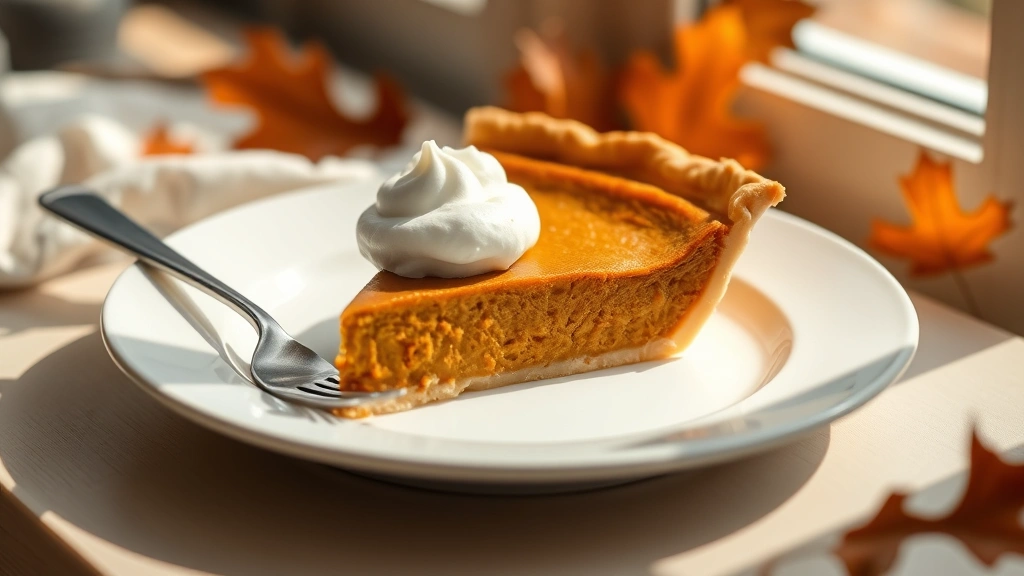
Cooling Process: Let the pie cool on a wire rack for at least 2 hours before slicing. This cooling period is essential—the filling continues setting as it cools, and cutting too early results in a runny pie. For best texture, refrigerate for at least 4 hours or overnight.
Room temperature versus cold serving is a matter of preference, but refrigerated pie holds its shape better when sliced. Allow cold pie to sit at room temperature for 15-20 minutes before serving for improved flavor perception.
Common Problems and Solutions
Soggy Crust: This most common complaint stems from inadequate moisture control. Solution: blind-bake your crust for 8-10 minutes, brush with egg white before filling, or use a pre-baked crust. Additionally, ensure your pumpkin puree isn’t too wet—older cans sometimes separate, with excess liquid on top. Drain this before using.
Cracked Surface: Cracks indicate overbaking or temperature shock from too-high baking heat. Solution: reduce oven temperature slightly, avoid opening the door during baking, and ensure your oven temperature is accurate using an oven thermometer. A water bath can also help moderate heat, though it’s not traditional for this recipe.
Runny Filling: Underbaking is the primary cause, though occasionally pies with a very jiggly center don’t set properly. Solution: bake longer until the knife test shows clean results at the edge, not just the center. If your pie remains runny after proper cooling time, your oven may run cool—verify temperature with a thermometer.
Grainy Texture: This occurs when eggs scramble or the custard breaks. Solution: ensure eggs are fully incorporated gradually, don’t exceed recommended baking temperature, and avoid opening the oven door during baking. Use room-temperature eggs for easier blending.
Insufficient Flavor: Spices can fade during storage. Solution: use fresh spices less than six months old. Toast whole spices before grinding for enhanced flavor. Consider adding a pinch of vanilla extract or a tablespoon of bourbon for depth.
Creative Recipe Variations
Once you’ve mastered the classic Libby pumpkin pie recipe, experiment with variations that build on this foundation.
Maple Bourbon Version: Replace 2 tablespoons of condensed milk with pure maple syrup and add 1 tablespoon of bourbon. This adds complexity and warmth that appeals to adult palates.
Spiced Cream Topping: Skip the whipped cream and instead make a spiced cream by whipping 1 cup heavy cream with 2 tablespoons powdered sugar, ½ teaspoon vanilla, and ¼ teaspoon pumpkin pie spice. This complements the pie’s flavors rather than competing with them.
Brown Butter Crust: Elevate your crust by using brown butter instead of regular butter. The nutty, toasted flavor pairs beautifully with pumpkin’s earthiness. Check out our easy homemade bread recipes for additional baking inspiration.
No-Bake Pumpkin Pie: For a lighter, mousse-like texture, whip heavy cream to soft peaks and fold into the pumpkin mixture after combining all ingredients. Pour into a prepared crust and refrigerate for 6 hours. This version requires no baking.
Mini Pies in Muffin Tins: Divide filling among lined muffin tins filled with pie dough. Bake at 425°F for 12 minutes, then 350°F for 18-22 minutes. These individual pies bake faster and are perfect for portion control.
For those exploring broader culinary techniques, our guide to making homemade jams teaches similar preservation and flavor-layering principles applicable to pie fillings.
Storage and Make-Ahead Tips
Refrigerator Storage: Properly stored pumpkin pie keeps for 3-4 days in the refrigerator. Cover with plastic wrap or aluminum foil to prevent it from absorbing odors and developing a dry surface. Store away from strong-smelling foods.
Freezing for Later: Pumpkin pie freezes beautifully for up to 2 months. Bake completely, cool to room temperature, then wrap tightly in plastic wrap and aluminum foil. Thaw overnight in the refrigerator before serving. Some bakers freeze unbaked pies, which extends freezer life to 3 months. Bake from frozen, adding 10-15 minutes to baking time.
Make-Ahead Filling: Prepare the filling up to 24 hours in advance, storing it covered in the refrigerator. This allows flavors to meld and makes the day of baking less hectic. The filling may separate slightly while refrigerated—simply whisk briefly before pouring into the crust.
Crust Preparation: Pre-made pie crusts can be prepared a day ahead. Wrap and refrigerate, or freeze for up to 2 months. Thaw slightly before filling to prevent cracking.
Serving Suggestions: Serve with unsweetened whipped cream, vanilla ice cream, or Greek yogurt. A drizzle of salted caramel or bourbon sauce adds sophistication. The pie’s sweetness pairs well with coffee, tea, or dessert wines.
FAQ
Can I use fresh pumpkin puree instead of canned?
Yes, but with caveats. Fresh pumpkin puree contains significantly more water than canned. You’ll need to reduce the amount by about 25% or cook the puree down to evaporate excess moisture. The flavor is excellent but less consistent than Libby’s standardized product. For reliability, especially if baking multiple pies, stick with canned.
Why does my pie have a watery layer on top?
This typically indicates underbaking or inadequate cooling time. The center hasn’t fully set, and the custard hasn’t had time to firm up. Bake longer and allow at least 4 hours cooling time before refrigerating. If the problem persists, your oven temperature may be inaccurate—verify with a thermometer.
Can I make this pie dairy-free?
Traditional Libby’s pumpkin pie requires sweetened condensed milk, which is dairy-based. However, you can create a dairy-free version using coconut cream (the thick part from a can of coconut milk) mixed with sugar, though the results differ slightly. The pie will be slightly less stable but still delicious. Ensure your crust is also dairy-free.
What’s the difference between pumpkin pie spice and pumpkin pie filling?
Pumpkin pie spice is a blend of cinnamon, ginger, nutmeg, and cloves—just the seasonings. Pumpkin pie filling is a sweetened mixture already containing pumpkin puree, sugar, spices, and sometimes cornstarch. Use only the spice blend for authentic Libby’s pumpkin pie. The filling product creates an overly sweet, overly spiced result.
How do I prevent the crust from browning too quickly?
Cover the crust edges with aluminum foil or a pie crust shield during the first 15 minutes at 425°F. Remove it for the remaining baking time. This prevents excessive browning while allowing the rest of the pie to bake properly.
Can I use evaporated milk instead of sweetened condensed milk?
While possible, results aren’t identical. You’d need to add ½ cup sugar and increase baking time slightly. Evaporated milk lacks the milk solids that help stabilize the custard, resulting in a slightly less creamy texture. The original recipe calls for sweetened condensed milk for good reason—follow it for best results.
Is it safe to eat pumpkin pie left at room temperature?
The USDA recommends not leaving pies with egg-based fillings at room temperature for more than 2 hours. Refrigerate promptly after serving. This pie contains eggs, so food safety guidelines apply. If your kitchen is warm (above 90°F), reduce the safe time to 1 hour.
Why is my pie filling lumpy?
Lumps typically result from inadequate mixing or eggs not being fully incorporated before adding to the pumpkin mixture. Solution: whisk thoroughly after adding each ingredient. For silky texture, strain the entire filling through a fine-mesh sieve before pouring into the crust. This eliminates any remaining lumps.


