Smoked Ham Recipe: Chef-Approved Method for Perfectly Tender Results
Smoking a ham at home transforms this classic protein into a showstopping centerpiece that rivals any professional kitchen creation. Whether you’re preparing for a holiday gathering or a special weekend dinner, mastering the art of smoking ham requires understanding temperature control, wood selection, and timing precision. This comprehensive guide walks you through every step of the process, from selecting your ham to achieving that coveted smoky crust and juicy interior that keeps guests coming back for seconds.
The beauty of a smoked ham recipe lies in its versatility and forgiving nature compared to other smoking projects. Unlike brisket or ribs that demand constant attention, ham benefits from a more hands-off approach once you establish the right smoking environment. Professional chefs and barbecue enthusiasts alike appreciate how smoke imparts complex flavors while the ham’s natural sugars caramelize beautifully. With proper technique, you’ll create a dish that tastes like you spent hours tending a fire, even if your smoker does most of the heavy lifting.
Choosing Your Ham
The foundation of an exceptional smoked ham recipe begins with selecting the right cut. You’ll encounter two primary options at most butcher counters: bone-in and boneless hams. Bone-in hams typically weigh between 10-16 pounds and offer superior flavor development due to the bone’s contribution to the smoking process. The bone acts as a natural heat conductor and infuses the meat with deeper, more complex flavors. Boneless hams range from 6-10 pounds and cook more evenly throughout, making them ideal for first-time smokers who prefer consistency.
When examining hams, you’ll notice labels indicating whether they’re “pre-smoked” or “fresh.” Pre-smoked hams have already undergone industrial smoking and only require heating, which limits your ability to impart custom smoke flavors. Fresh hams, despite their name, are actually cured pork but haven’t been smoked, making them the superior choice for this recipe. Look for hams with a good meat-to-fat ratio—approximately 20-30% fat ensures moisture retention during the long smoking process.
The quality of your ham directly impacts the final dish. Seek out hams from reputable sources, preferably from a butcher who can provide details about curing methods and ingredient quality. Heritage breed hams or those from specialty producers offer superior flavor compared to mass-produced varieties. Plan to purchase your ham 2-3 days before smoking to allow adequate time for preparation and brining if desired.
Preparation and Seasoning
Proper preparation determines whether your smoked ham recipe achieves restaurant-quality results or merely adequate flavor. Begin by removing your ham from refrigeration 1-2 hours before smoking to bring it closer to room temperature. This ensures even smoke penetration and consistent cooking throughout the meat.
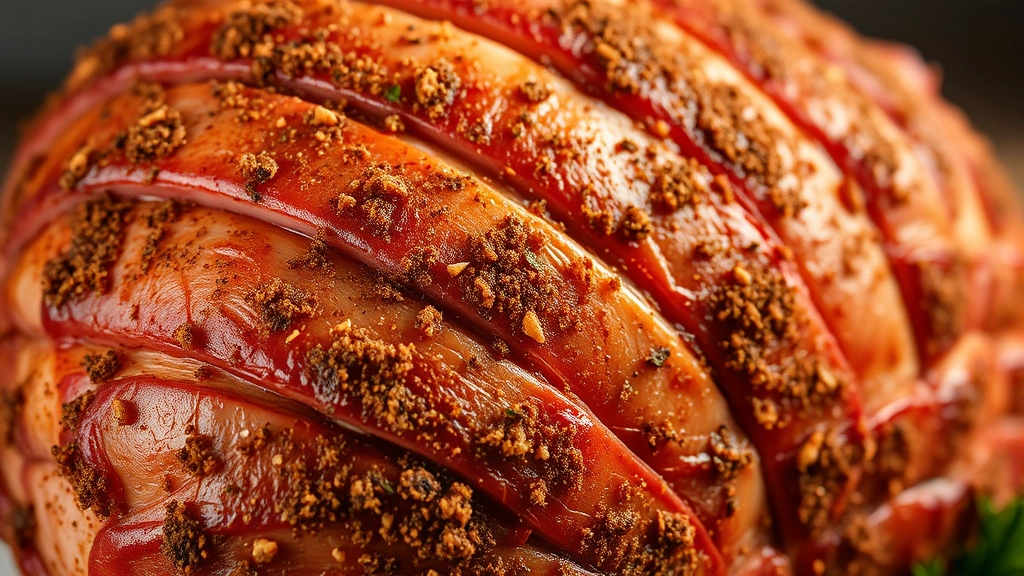
Create a scoring pattern on the surface by making shallow diagonal cuts at half-inch intervals in both directions, creating a diamond pattern about quarter-inch deep. This technique serves multiple purposes: it increases surface area for smoke absorption, allows seasonings to penetrate deeper, and helps any glaze adhere more effectively. Score only the fat cap, never cutting into the meat itself.
For the dry rub, combine these essential components:
- Brown sugar (2 tablespoons per pound of ham)—provides sweetness and aids in bark formation
- Paprika (1 tablespoon per pound)—adds color and mild pepper flavor
- Black pepper (1 teaspoon per pound)—delivers heat and complexity
- Garlic powder (1 teaspoon per pound)—contributes savory depth
- Onion powder (1 teaspoon per pound)—adds aromatic sweetness
- Cayenne pepper (½ teaspoon per pound)—optional, for subtle heat
- Sea salt (½ teaspoon per pound)—enhances all flavors
Combine all dry ingredients in a bowl and rub the mixture thoroughly over the entire ham surface, paying special attention to the scored areas. For enhanced flavor, prepare your ham the night before smoking and refrigerate it uncovered. This allows the rub to cure into the meat and develop deeper flavor bonds. If you prefer a glazed finish, reserve the glazing process for the final 30-45 minutes of smoking rather than applying it at the beginning.
Consider enhancing your smoked ham recipe with an optional brine soak. Dissolve 1 cup of brown sugar, ½ cup of sea salt, and 2 tablespoons of pickling spice in 1 gallon of water. Submerge your ham for 8-12 hours, which intensifies the smoky flavor and improves moisture retention. This step proves particularly valuable when smoking boneless hams, which tend to dry out more readily than bone-in varieties.
The Smoking Process
Setting up your smoker correctly makes the difference between mediocre and magnificent results. Whether using an offset smoker, vertical water smoker, or pellet smoker, the fundamental principles remain consistent. Clean your grates thoroughly and ensure all vents function properly before beginning.
Begin by establishing your wood selection strategy. Hickory provides a strong, traditional bacon-like smoke flavor that pairs beautifully with ham’s natural sweetness. Apple wood offers milder, fruitier notes that appeal to those preferring subtlety. Cherry wood imparts a slightly sweet, delicate smoke with beautiful color development. Many experienced pitmasters combine two wood varieties—using hickory as the primary smoke source with apple or cherry as a secondary accent wood. Avoid soft woods like pine or cedar, which produce acrid, unpleasant flavors.
Arrange your wood strategy by soaking wood chunks for 30 minutes if using a charcoal-based smoker, or using dry pellets if operating a pellet smoker. The moisture in soaked wood creates longer, cooler smoke—exactly what ham requires. Establish your smoke generation method, whether through a dedicated smoke box, placing wood directly on coals, or using a pellet tube smoker.
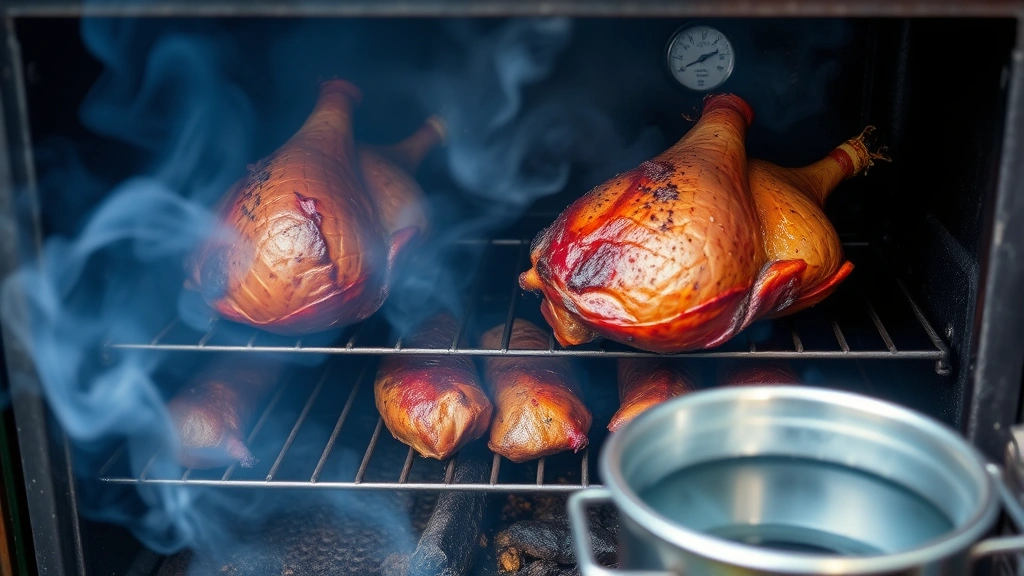
Place a water pan in your smoker positioned away from direct heat. Fill it with warm water, apple juice, or a combination of both. This moisture source regulates temperature fluctuations and keeps the ham’s surface from drying during the long cook. Replace the liquid periodically to maintain consistent humidity levels throughout the smoking process.
Once your smoker reaches the target temperature of 225-250°F, place your ham on the grates with the fat cap facing up. Position it where it receives even, indirect heat. If your smoker has hot and cool zones, place the ham in the cooler area. For easy dinner recipes for beginners that build confidence, smoked ham represents an excellent choice due to its forgiving nature and impressive presentation.
Temperature and Timing Guide
Maintaining consistent temperature throughout the smoking process proves essential for even cooking and optimal flavor development. Target an internal smoker temperature of 225°F for the gentlest, most flavorful smoke penetration. This low-and-slow approach takes longer but produces superior results compared to higher temperatures.
Expect cooking times of approximately 12-15 minutes per pound for bone-in hams and 10-12 minutes per pound for boneless varieties. A 12-pound bone-in ham typically requires 2.5-3 hours of smoking at 225°F. However, these estimates serve as guidelines—every smoker behaves differently, and external factors like ambient temperature and humidity influence cooking duration.
Monitor the ham’s internal temperature using a reliable meat thermometer inserted into the thickest part without touching bone. The target internal temperature for pre-cured ham is 140°F, since the curing process has already preserved the meat. Insert your thermometer after approximately two-thirds of the estimated cooking time has elapsed, then check every 30 minutes thereafter. This prevents temperature spikes from opening the smoker too frequently early in the process.
Maintain steady smoke production throughout cooking by adding wood every 45-60 minutes. Thin blue smoke indicates proper combustion; thick white smoke suggests incomplete burning and unpleasant flavors. If you notice excessive white smoke, reduce wood quantity or ensure your wood has proper airflow around the heat source.
Many experienced cooks employ the “3-2-1” method adapted for ham: smoke for three hours at 225°F, then wrap in foil for two hours (which helps retain moisture and speeds cooking), and finish unwrapped for one final hour to develop bark and apply glaze. However, this method works best with bone-in hams; boneless varieties may cook too quickly in foil wrapping and lose structural integrity.
Glazing and Finishing Touches
Glazing transforms your smoked ham recipe from excellent to extraordinary. Begin preparing your glaze approximately 30-45 minutes before your target internal temperature. Classic glazes balance sweet, savory, and acidic elements.
Honey-Mustard Glaze Recipe: Whisk together 1 cup honey, ½ cup Dijon mustard, 3 tablespoons apple cider vinegar, 2 tablespoons butter, 1 tablespoon Worcestershire sauce, and 1 teaspoon ground cloves. Brush this mixture over the ham’s surface, reapplying every 15 minutes until the ham reaches temperature. The honey caramelizes beautifully while the mustard adds complexity.
Brown Sugar-Pineapple Glaze: Combine 1 cup packed brown sugar, ½ cup pineapple juice, ¼ cup Dijon mustard, 2 tablespoons butter, 1 tablespoon apple cider vinegar, and ½ teaspoon ground ginger. This glaze celebrates ham’s natural affinity for tropical flavors while maintaining savory balance. The ginger adds warming spice notes that elevate the overall profile.
Maple-Bourbon Glaze: Blend ¾ cup pure maple syrup, ¼ cup bourbon or whiskey, 3 tablespoons Dijon mustard, 2 tablespoons butter, and 1 teaspoon smoked paprika. This sophisticated option appeals to those preferring complex, adult-forward flavor profiles. The alcohol cooks off during application, leaving only the bourbon’s rich, oaky character.
Apply glaze in thin, even coats, allowing each layer to set slightly before adding the next. This builds layers of flavor and creates a glossy, professional appearance. Some pitmasters prefer moppping—using a mop or spray bottle to apply liquid glaze repeatedly—while others brush thicker glazes. Either method works beautifully; choose based on your glaze consistency and personal preference.
During the final 15 minutes of cooking, increase your smoker temperature slightly to 275°F if desired. This gentle heat boost helps glaze caramelize without burning, creating an attractive mahogany exterior. Watch carefully during this phase, as sugary glazes can char quickly if temperatures climb too high.
Resting and Slicing
Resist the temptation to slice immediately after removing your ham from the smoker. Resting allows carryover cooking to complete, redistributes internal juices, and allows the exterior to firm up slightly for cleaner slicing. Wrap your finished ham in aluminum foil and allow it to rest at room temperature for 15-20 minutes.
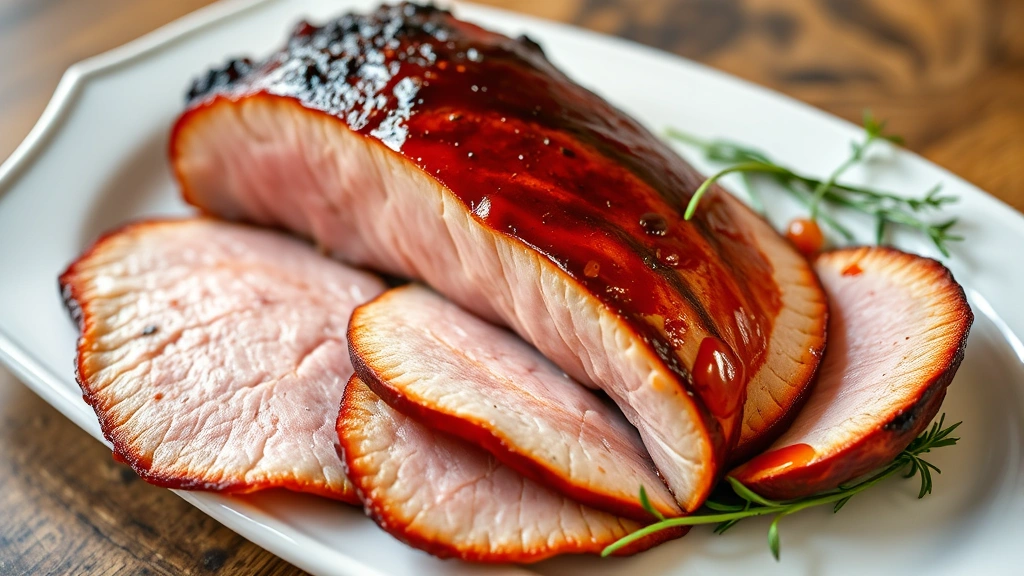
For slicing, use a sharp carving knife or ham knife with a long blade. Position the ham with the flat side down on a stable cutting board. Make thin, even cuts perpendicular to the bone, maintaining consistent thickness throughout. Approximately ¼-inch thick slices provide optimal presentation and eating experience—thin enough for easy chewing but substantial enough to showcase the smoke ring and glaze.
If you’ve smoked a boneless ham, slicing becomes even easier. Position the ham on its flat side and slice lengthwise first, then cut the resulting planks into individual portions. Boneless hams benefit from slightly thicker slicing due to their more uniform texture.
Arrange slices slightly overlapping on your serving platter to create an elegant presentation. Drizzle any pan drippings over the sliced ham, which adds moisture and visual appeal. If you’ve prepared homemade salad dressings, consider creating a complementary sauce to accompany the ham.
Serving Suggestions
Your smoked ham recipe serves as a centerpiece that pairs beautifully with diverse side dishes. Traditional accompaniments include scalloped potatoes, candied sweet potatoes, or creamed corn—dishes that echo the ham’s sweetness without overwhelming the palate. Fresh vegetables like roasted Brussels sprouts or glazed carrots provide brightness and textural contrast.
For a complete holiday meal, serve your smoked ham alongside organic vegetables and fresh salads featuring acidic dressings that cut through the meat’s richness. The combination of smoky ham with crisp greens and tangy vinaigrettes creates memorable dining experiences.
Leftover ham provides incredible versatility for subsequent meals. Dice it for homemade pasta dishes, incorporate it into sandwiches, or add it to bean soups for depth of flavor. Many cooks find that leftover smoked ham actually improves in flavor as it sits, with smoke notes developing further over several days. Store leftovers in airtight containers for up to five days, or freeze portions for future use.
For entertaining, consider preparing homemade sushi or other international preparations to round out your menu. The contrast between smoked ham’s traditional comfort and contemporary cuisine creates sophisticated, memorable meals.
FAQ
Can I smoke a pre-smoked ham?
Yes, you can smoke pre-smoked ham, though results differ from smoking fresh ham. Pre-smoked hams require less total cooking time since they’re already fully cured and partially smoked. Reduce your estimated cooking time by 25-30%, and focus on glazing and developing exterior color rather than deep smoke penetration. The ham will absorb additional smoke flavor, but the effect proves less dramatic than with fresh ham.
What temperature should smoked ham reach internally?
Pre-cured ham requires reaching only 140°F internal temperature, as the curing process has already preserved the meat. Fresh ham, which is rarely encountered outside specialty butchers, requires 160°F. Always verify with your butcher whether your ham is cured or fresh, then use the appropriate target temperature.
How do I prevent my ham from drying out?
Maintain a water pan throughout smoking, wrap the ham in foil during the middle cooking phase, and avoid cooking at temperatures exceeding 250°F. Additionally, select bone-in ham over boneless when possible, as bone-in varieties retain moisture more effectively. Monitor internal temperature carefully to avoid overcooking, and allow proper resting time before slicing.
Can I smoke ham on a gas grill?
Yes, though results require more attention than dedicated smokers. Turn off one burner and create indirect heat by placing your ham away from flames. Add wood chips in a smoker box or wrapped foil packet above the lit burner. Maintain temperature between 225-250°F using burner adjustments. Gas grills cool quickly when opened, so minimize lid lifting and use a reliable thermometer.
What wood pairs best with ham?
Hickory provides traditional, strong smoke flavor; apple wood offers milder fruitiness; cherry wood delivers subtle sweetness. Many cooks combine hickory with apple or cherry for balanced complexity. Avoid soft woods like pine or cedar, which create unpleasant flavors. Experiment with your preferred combination to develop your signature style.
How long can I store leftover smoked ham?
Properly stored smoked ham keeps for 3-5 days in the refrigerator in airtight containers. Freeze portions for up to two months for extended storage. Thaw frozen ham in the refrigerator overnight before reheating. Reheat gently at 325°F, covering with foil to prevent drying, until warmed through.
External Resources: Learn more from the National Barbecue and Grilling Association, explore smoking techniques at Amazing Ribs, discover Food & Wine’s smoking guides, consult Serious Eats for scientific cooking methods, and visit Smithsonian Magazine’s food history articles.
For more cooking inspiration, explore the Fresh Plated Daily Blog for additional recipes and techniques.


