There’s something magical about a tuna salad sandwich that brings back memories of simpler times. My grandmother has been making the same version for over fifty years, and it’s become legendary in our family gatherings. What sets her recipe apart isn’t any exotic ingredient—it’s the careful balance of flavors and textures that she’s perfected through decades of cooking. This isn’t just about mixing canned tuna with mayo; it’s about understanding how each component contributes to creating something truly memorable.
The secret to the best tuna salad sandwich lies in quality ingredients, proper technique, and a few unexpected touches that elevate it from ordinary to extraordinary. Whether you’re preparing lunch for yourself or feeding a crowd, this classic recipe proves that sometimes the most satisfying meals are the ones passed down through generations. I’ve spent years learning the nuances of her method, and I’m excited to share every detail with you today.
Ingredients That Make the Difference
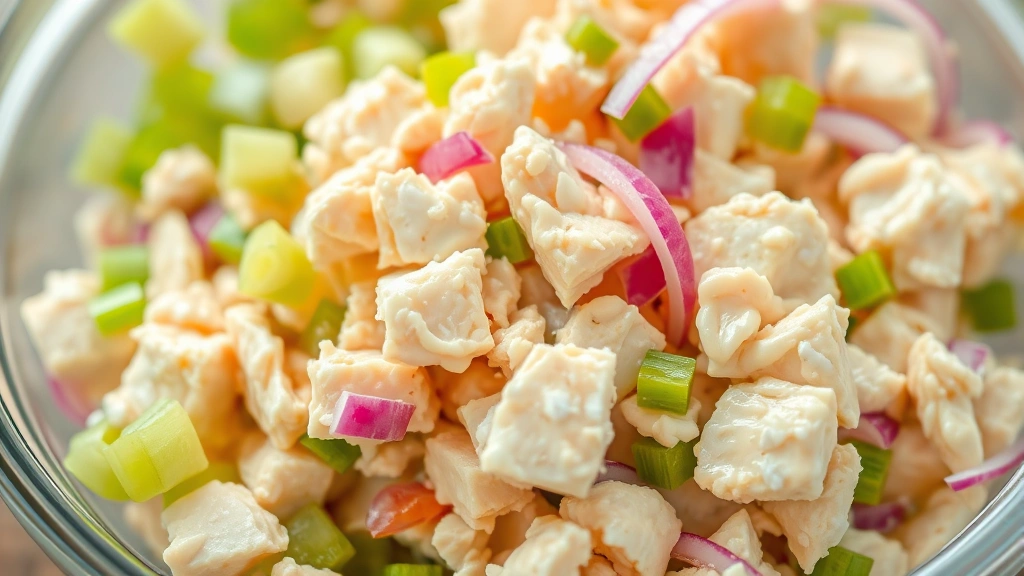
Creating the best tuna salad sandwich starts with gathering quality ingredients. My grandmother always insisted on using solid white albacore tuna, which has a milder flavor and firmer texture compared to chunk light varieties. She keeps three cans on hand at all times, along with her carefully curated pantry staples.
Here’s what you’ll need for four generous sandwiches:
- 3 cans (5 ounces each) solid white albacore tuna in water or oil, drained thoroughly
- ¾ cup mayonnaise (she prefers a quality brand with simple ingredients)
- ¼ cup finely diced celery for crunch and freshness
- 2 tablespoons diced red onion for subtle bite and color
- 2 tablespoons fresh lemon juice for brightness and flavor balance
- 1 tablespoon Dijon mustard for depth
- ½ teaspoon dried dill or 1 tablespoon fresh dill if available
- ¼ teaspoon sea salt and freshly ground black pepper to taste
- 2 tablespoons finely chopped fresh parsley (optional but recommended)
- 1 tablespoon minced capers (her secret weapon for complexity)
- 8 slices quality bread of your choice
- Lettuce, tomato slices, and additional toppings as desired
The beauty of this ingredient list is its simplicity. Grandma never believed in over-complicating things. Each ingredient serves a purpose: the celery adds textural contrast, the red onion provides sharpness, the lemon juice brightens everything, and the capers add an umami dimension that makes people wonder what makes it so special.
Selecting the Perfect Tuna
Not all canned tuna is created equal, and this is where many home cooks make their first mistake. My grandmother taught me to always read the label carefully. Solid white albacore tuna is superior to chunk light because it maintains its texture better and has a cleaner, less fishy taste. The difference is noticeable when you’re making something as simple as a sandwich where the tuna is the star.
When choosing between water-packed and oil-packed tuna, consider your preference. Water-packed is lighter and allows you to control the oil content with mayonnaise. Oil-packed varieties sometimes come in olive oil, which adds richness but can overpower delicate flavors. My grandmother typically uses water-packed tuna and lets the mayo provide the necessary fat and richness.
Drain your tuna thoroughly—this step is crucial. Place the drained tuna in a fine-mesh strainer and press gently with the back of a spoon to remove excess liquid. Too much liquid will make your salad watery and dilute the flavors. Some cooks even wrap the drained tuna in paper towels to absorb additional moisture. This attention to detail is what separates good tuna salad from great tuna salad.
The Secret Ingredient Method
Here’s where my grandmother’s recipe diverges from typical versions. The secret ingredient isn’t something exotic—it’s actually the method of combining ingredients and the specific proportions. However, those capers I mentioned earlier are genuinely her secret weapon. They provide a briny, tangy note that adds complexity without being identifiable. Most people can’t pinpoint what makes it taste so good; they just know it’s special.
The second part of her secret is the order of assembly. Rather than dumping everything together at once, she builds the salad methodically. This ensures even distribution and prevents the mayo from completely coating everything before other flavors can shine through. Additionally, she uses homemade salad dressings principles—balancing acid, fat, and seasoning—to create a harmonious flavor profile.
Another technique she employs is slightly warming the tuna before mixing. She drains the cans and lets them sit at room temperature for a few minutes. This subtle warming helps the tuna absorb flavors better and creates a more cohesive mixture. It’s a small detail that makes a measurable difference in the final result.
Step-by-Step Preparation
Now let’s walk through the actual preparation process. Proper technique ensures consistent results every time.
- Prepare your workspace: Gather all ingredients and equipment. Use a clean cutting board and sharp knife for chopping vegetables. Have a medium mixing bowl ready.
- Drain the tuna: Open all three cans and drain thoroughly using a fine-mesh strainer. Press gently to remove excess liquid. Set aside in a small bowl to come to room temperature.
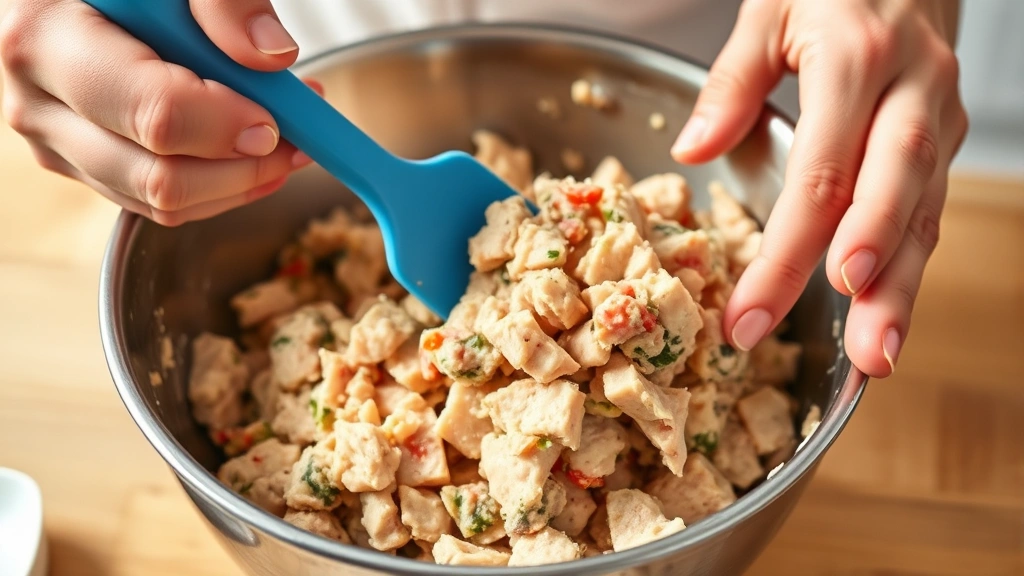
- Prepare the vegetables: Finely dice the celery into small, uniform pieces—aim for ¼-inch cubes. This ensures they distribute evenly throughout and provide consistent texture in each bite. Dice the red onion similarly, then mince the fresh parsley and capers.
- Combine the wet ingredients: In your mixing bowl, whisk together the mayonnaise, Dijon mustard, and fresh lemon juice. This creates an emulsified base that will hold everything together. The whisking action incorporates air and creates a lighter texture.
- Add the tuna: Gently fold the drained tuna into the mayo mixture using a rubber spatula. Use a folding motion rather than stirring to keep the tuna pieces intact and prevent it from becoming a paste.
- Incorporate vegetables and seasonings: Add the diced celery, red onion, dill, capers, and parsley. Fold gently until everything is evenly distributed. Taste and adjust seasoning with salt and freshly ground black pepper.
- Chill briefly: Cover and refrigerate for at least 15 minutes. This allows flavors to meld and makes assembly easier. The mixture can be prepared up to 24 hours ahead.
The entire preparation takes about 15 minutes, but the results are worth the care you invest. Avoid using a food processor, which will break down the tuna too much and create an undesirable texture.
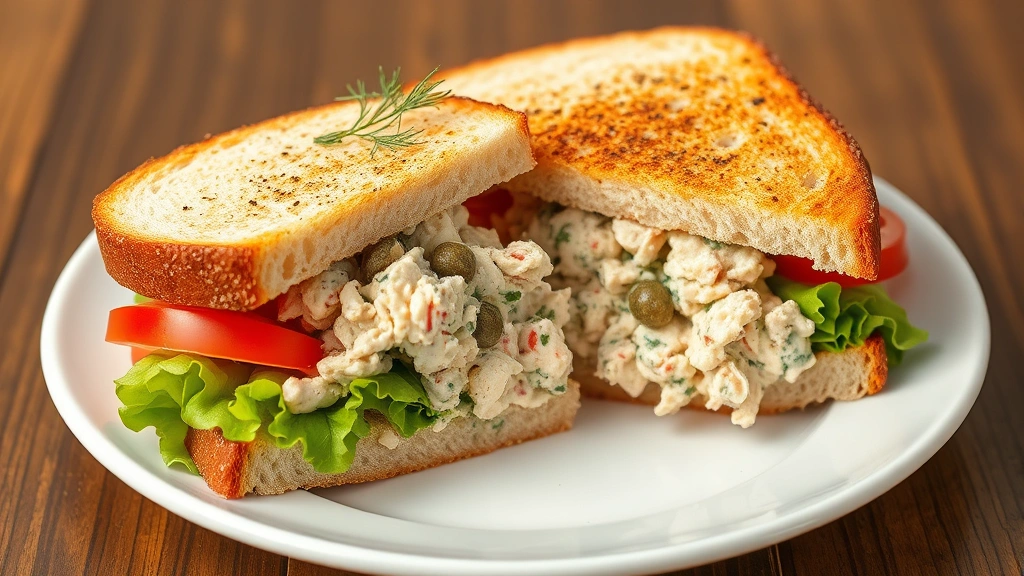
Bread Selection and Preparation
The bread is equally important as the filling. My grandmother never uses standard white sandwich bread for this recipe. Instead, she prefers hearty options like whole wheat, sourdough, or a quality ciabatta. The bread needs enough structure to support the moist filling without falling apart.
For homemade bread, I recommend checking our guide on how to make homemade bread, which provides excellent techniques for creating the perfect foundation for your sandwich. Fresh, crusty bread makes an enormous difference in the overall eating experience.
Lightly toasting your bread is optional but highly recommended. A light toast creates a barrier that prevents the filling from soaking through while still maintaining the bread’s tenderness. Toast for just 2-3 minutes until you see light browning but the bread is still pliable.
Some people prefer open-faced sandwiches, which showcase the beautiful tuna mixture and allow you to taste each component distinctly. Others layer it between two slices. My grandmother usually makes it both ways depending on the occasion and who’s eating.
Assembly Techniques
Assembly might seem straightforward, but there’s technique involved here too. Start with your bread—whether toasted or fresh. If you’re making two-slice sandwiches, spread a thin layer of your homemade sauces or additional mayo on each slice to create a moisture barrier. This prevents sogginess.
Layer your lettuce first if using it—iceberg or butter lettuce work beautifully. The lettuce creates another protective layer and adds freshness. Then spoon the tuna mixture generously onto one slice. Use the back of your spoon to gently spread it evenly, leaving about ½ inch from the edges to prevent overflow.
Add tomato slices if desired, then top with the second slice of bread. Cut diagonally for a more appealing presentation—this is a small detail Grandma always mentioned. Press gently to compress everything, then serve immediately or wrap in parchment paper for transport.
Storage and Make-Ahead Tips
One of the best aspects of this recipe is its flexibility for meal planning. The tuna salad mixture keeps beautifully in the refrigerator for up to three days when stored in an airtight container. This makes it perfect for preparing at the beginning of the week.
However, assemble sandwiches no more than an hour before serving to prevent bread from becoming soggy. If you need to prepare them further in advance, wrap the tuna salad and bread separately, then assemble just before eating.
For transporting sandwiches, wrap individually in parchment paper or foil. This keeps them fresh and makes them easy to grab. Pack any wet ingredients separately if traveling long distances, and assemble upon arrival at your destination.
Freezing tuna salad is not recommended as the texture of the vegetables and the emulsion of the mayo can be compromised. However, the bread can be frozen separately if needed.
Variations and Customizations
While Grandma’s original recipe is perfect as-is, there’s room for personalization based on your preferences and dietary needs.
- Add crunch: Include finely chopped walnuts, sliced almonds, or crispy bacon for additional texture contrast
- Go Mediterranean: Add sun-dried tomatoes, olives, and a touch of olive oil for a different flavor profile
- Spicy version: Include a pinch of cayenne pepper, diced jalapeños, or a teaspoon of sriracha for heat
- Asian-inspired: Add sesame oil, soy sauce, wasabi, and pickled ginger for an entirely different direction
- Egg addition: Finely chop hard-boiled eggs for extra richness and protein
- Herb variations: Substitute or supplement dill with tarragon, chives, or cilantro depending on your preference
- Mayo alternatives: Use Greek yogurt for tanginess, or mix mayo with avocado for creaminess
The beauty of understanding the base recipe is that you can confidently experiment. Start with the classic version to appreciate why it works, then adjust from there.
Frequently Asked Questions
Can I use fresh tuna instead of canned?
Absolutely! Fresh tuna creates a more delicate, refined version. Cook fresh tuna steaks until just done (medium-rare is ideal), cool completely, then flake into bite-sized pieces. The preparation method remains the same, though you might want to slightly increase the mayo since fresh tuna is drier than canned.
Is there a dairy-free version?
Yes! Replace mayonnaise with dairy-free mayo made from aquafaba or oil-based alternatives. The texture and flavor will be slightly different but still delicious. Some people also use a mixture of Greek yogurt and olive oil as a compromise.
How do I prevent my sandwich from getting soggy?
Toast your bread lightly, use a moisture barrier like lettuce or mayo on the bread itself, and assemble as close to serving time as possible. If making sandwiches ahead, wrap components separately and assemble just before eating.
What’s the best way to store leftover tuna salad?
Keep it in an airtight container in the coldest part of your refrigerator. It will keep for three days. Always use clean utensils when scooping to prevent contamination.
Can I make this recipe in bulk?
Absolutely! The recipe scales easily. Simply multiply the ingredients by the number of sandwiches you need. Prepare the mixture in advance and assemble sandwiches fresh as needed throughout the week.
What bread pairs best with this tuna salad?
Whole wheat, sourdough, ciabatta, and focaccia all work wonderfully. Avoid overly soft white bread that can’t support the moist filling. For open-faced sandwiches, use sturdy bread that won’t bend under the weight.
Can I add mayo-free elements for lower-fat version?
You can reduce mayo to ½ cup and supplement with Greek yogurt or mashed avocado. The flavor profile will shift slightly, but it remains delicious and more nutritionally balanced.
How far in advance can I prepare this for a party?
Prepare the tuna salad mixture up to 24 hours ahead. Assemble sandwiches no more than one hour before serving. For large gatherings, set up a sandwich station where guests can assemble their own.


