Best Beef Pot Pie? Family Favorite Recipe
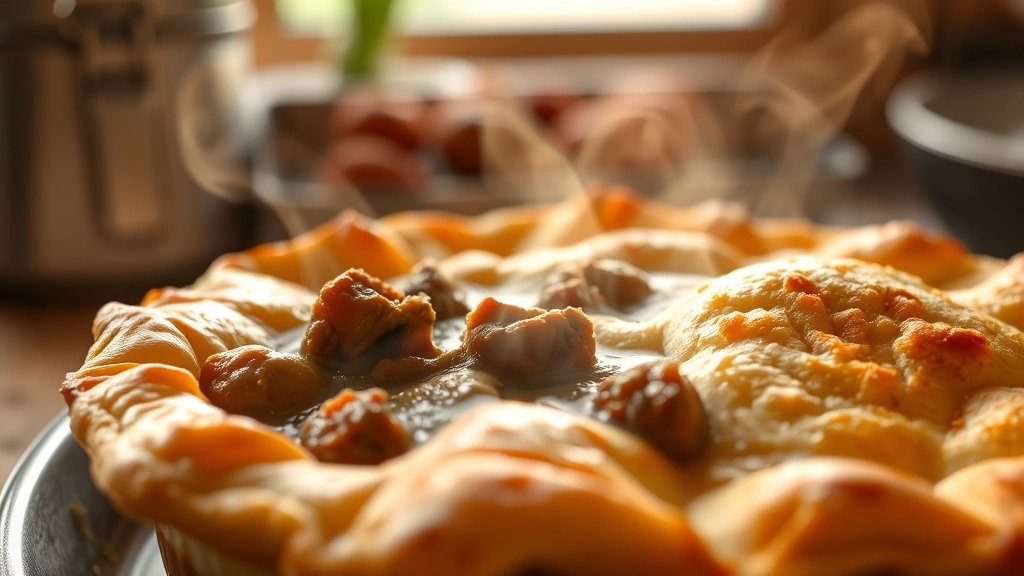
There’s something profoundly comforting about a homemade beef pot pie fresh from the oven. The golden, flaky crust gives way to a rich, savory filling loaded with tender beef, vegetables, and a velvety sauce that’s been simmered to perfection. This isn’t just any weeknight dinner—it’s the kind of dish that brings families around the table, creates lasting memories, and gets requested again and again. Whether you’re cooking for a special occasion or simply want to elevate your regular dinner rotation, this beef pot pie recipe delivers restaurant-quality results from your own kitchen.
Creating the perfect beef pot pie requires understanding several key components: the filling, the sauce, the crust, and the assembly technique. Each element plays a crucial role in the final result. From selecting the right cut of beef to achieving the ideal crust texture, we’ll walk you through every step to ensure your beef pot pie becomes a family favorite that stands the test of time. This comprehensive guide will transform you from a curious cook into a confident pot pie maker.
Choosing Your Beef
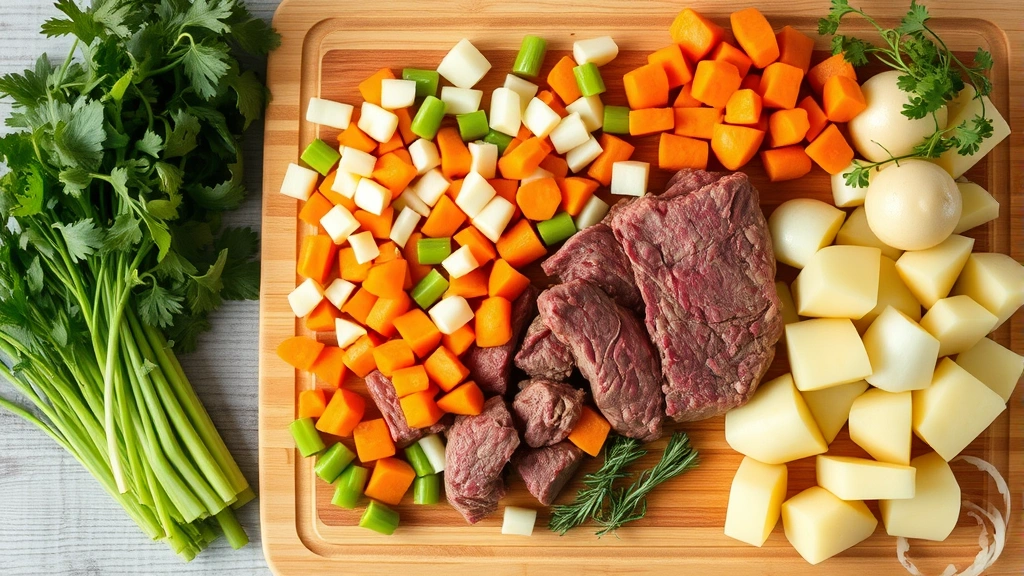
The foundation of an exceptional beef pot pie starts with selecting the right cut of beef. You want meat that becomes tender and flavorful when braised, not something that will remain tough after cooking. Chuck roast is the gold standard for pot pies—it contains enough fat and connective tissue to break down into gelatin during the cooking process, creating a naturally rich and silky sauce without additional thickening agents.
Look for chuck roast with good marbling (white fat distributed throughout the meat) and aim for pieces that are roughly one-inch cubes. If your butcher will cut it for you, even better. Plan on about two pounds of beef for a standard nine-inch pot pie that serves six to eight people. The beef should be browned before adding to the filling—this creates a flavorful crust through the Maillard reaction and adds depth to your final dish.
When browning your beef, work in batches and avoid overcrowding the pan. Overcrowding causes the meat to steam rather than sear, which means you’ll miss out on that delicious caramelization. A heavy-bottomed Dutch oven or large skillet works perfectly for this task. Season the beef generously with salt and pepper before browning, and don’t skip this step—it’s non-negotiable for flavor development.
Essential Ingredients & Preparation
Beyond the beef, your pot pie filling requires a selection of vegetables, aromatics, and a flavorful liquid base. Here’s what you’ll need:
- Vegetables: Carrots, celery, onions, and potatoes form the vegetable foundation. Peas are traditionally added near the end for color and sweetness. Cut vegetables into uniform sizes so they cook evenly.
- Aromatics: Yellow onions and garlic provide aromatic depth. Fresh thyme and bay leaves add herbaceous notes that round out the savory profile.
- Liquid base: Beef broth creates the foundation for your sauce. Choose low-sodium broth so you can control the saltiness of your final dish.
- Thickening agent: Butter and flour create a roux that thickens your sauce to the perfect consistency—not too thin, not too thick.
- Seasonings: Salt, black pepper, Worcestershire sauce, and a touch of tomato paste add complexity and umami.
Preparation is where organization becomes your greatest ally. Mise en place—having all ingredients measured, chopped, and ready before you begin cooking—transforms the process from chaotic to smooth. Dice your vegetables into half-inch pieces, mince your garlic, measure your broth, and have your herbs ready. This approach prevents scrambling mid-recipe and ensures nothing burns while you’re searching for an ingredient.
Making the Perfect Filling
The filling is where magic happens. Start by heating two tablespoons of oil in a large Dutch oven over medium-high heat. Once shimmering, add your seasoned beef in a single layer and resist the urge to stir for two to three minutes. This allows a beautiful brown crust to form. Stir, then continue cooking until all sides are browned, about eight to ten minutes total. Remove the beef with a slotted spoon and set aside.
In the same pot, melt three tablespoons of butter over medium heat. Add diced onions and celery, cooking for about five minutes until softened and fragrant. Add minced garlic and cook for another minute until aromatic. Stir in two tablespoons of tomato paste and cook for two minutes—this deepens the savory character of your filling.
Sprinkle three tablespoons of flour over the vegetables and stir constantly for two minutes. This creates your roux base. Gradually add four cups of beef broth, stirring constantly to prevent lumps. Add one teaspoon of Worcestershire sauce, one bay leaf, one teaspoon of fresh thyme (or half a teaspoon dried), and return the beef to the pot. Bring to a simmer, then reduce heat to low and cover partially.
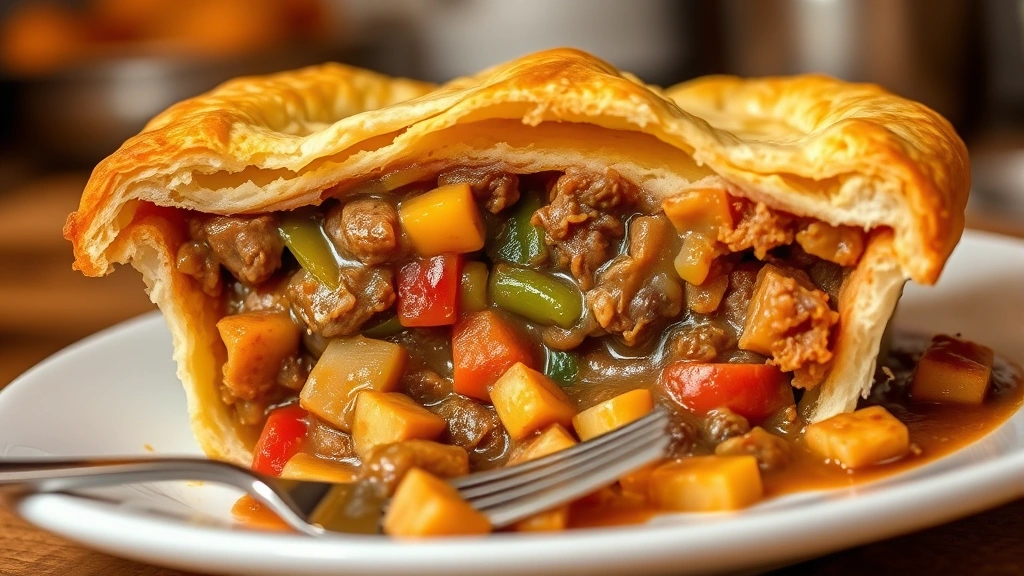
Let this simmer for about ninety minutes, stirring occasionally. The beef should be fork-tender and the sauce should be thickened but still pourable. About fifteen minutes before the beef finishes cooking, add two cups of diced potatoes and one cup of diced carrots. In the final five minutes, stir in one cup of frozen peas. The vegetables should be tender but not mushy.
Taste your filling and adjust seasonings. This is crucial—you want robust, well-balanced flavors. Add more salt, pepper, or Worcestershire sauce as needed. Remember that the filling will cool slightly before baking in the crust, so it should taste slightly more flavorful than you’d eat it alone.
If your filling seems too thin, you can thicken it further. Mix one tablespoon of cornstarch with two tablespoons of cold water to create a slurry, then stir it into the simmering filling. If it’s too thick, add more broth a quarter-cup at a time. The ideal consistency is like a thick stew—it should coat a spoon but still flow slowly.
Crafting Your Crust
The crust is what elevates a pot pie from ordinary to extraordinary. A proper pie crust should be flaky, buttery, and golden brown. You have two options: make your own from scratch or use quality store-bought pie dough. Homemade is always superior if you have the time.
For homemade crust, combine two and a half cups of all-purpose flour with one teaspoon of salt in a large bowl. Cut one cup of cold, cubed butter into the flour using a pastry cutter or your fingertips until the mixture resembles coarse breadcrumbs with some pea-sized pieces of butter remaining. This creates the layers that produce flakiness.
Add six to eight tablespoons of ice water, one tablespoon at a time, mixing gently with a fork until the dough just comes together. Don’t overwork it—overworking develops gluten, which makes the crust tough rather than tender. Divide the dough in half, flatten each portion into a disk, wrap in plastic wrap, and refrigerate for at least one hour.
When ready to use, roll one disk of dough on a floured surface to fit your nine-inch pie dish. Place it in the dish and trim the edges. Roll the second disk to about an eighth-inch thickness. This will be your top crust.
For a more decorative finish, you can cut shapes from the top crust using small cookie cutters before placing it over the filling. Alternatively, simply lay it flat and crimp the edges with a fork for a rustic appearance. Brush the top crust with one beaten egg mixed with one tablespoon of water—this creates a beautiful golden sheen.
Consider adding a few small vents to the top crust to allow steam to escape during baking. These can be simple slits or decorative shapes. Venting prevents the crust from becoming soggy and allows the filling to release steam properly.
Assembly & Baking
Once your filling has cooled slightly (it should be warm but not piping hot), pour it into your pie dish lined with the bottom crust. The warm filling will set the bottom crust slightly, preventing it from becoming soggy. Top with your second crust and crimp the edges together using your fingers or a fork to seal.
Place your assembled pot pie on a baking sheet—this catches any drips and makes handling easier. Brush the top crust with your egg wash for that professional golden finish. If you want extra shine, apply a second coat after fifteen minutes of baking.
Bake at four hundred twenty-five degrees Fahrenheit for twenty-five to thirty minutes, until the crust is golden brown and the filling begins bubbling at the edges. If the crust is browning too quickly, tent it loosely with aluminum foil. The filling should be hot throughout—a thermometer inserted through a vent hole should read one hundred sixty-five degrees Fahrenheit.
Once baked, remove the pot pie from the oven and let it rest for ten to fifteen minutes before serving. This allows the filling to set slightly, making it easier to serve without the crust falling apart. The resting period also allows the interior to cool to a safe eating temperature.
Serving & Storage Tips
Serve your beef pot pie directly from the baking dish, using a large spoon to ensure each portion includes both crust and filling. A simple green salad with vinaigrette or steamed vegetables provide nice accompaniments without overwhelming the pot pie’s rich flavors. Crusty bread is also welcome for soaking up any extra sauce.
Leftovers can be stored in an airtight container in the refrigerator for up to four days. Reheat gently in a three hundred fifty-degree oven for about twenty minutes, covered with foil to prevent the crust from drying out. You can also reheat individual portions in the microwave, though the crust won’t maintain its original crispness.
For longer storage, you can freeze an unbaked assembled pot pie. Wrap it tightly in plastic wrap and aluminum foil, then freeze for up to three months. Bake directly from frozen, adding five to ten minutes to the baking time and covering loosely with foil if the crust browns too quickly.
If you want to make multiple pot pies, consider using individual pie dishes instead of one large one. This makes serving easier and allows you to freeze extras for quick weeknight dinners. Simply reduce the baking time to twenty to twenty-five minutes for individual pies.
To enhance your pot pie experience, explore complementary recipes. Understanding how to make homemade condiments can help you create pickled vegetables to serve alongside. If you enjoy preserving techniques, pickled onions add a tangy brightness to rich dishes. For those interested in building your culinary skillset, resources like Auguste Escoffier School of Culinary Arts offer comprehensive cooking education.
FAQ
Can I make beef pot pie ahead of time?
Absolutely. You can prepare the filling up to two days in advance and store it in the refrigerator. Assemble with the crust and bake when ready. Alternatively, assemble the complete pot pie and freeze unbaked for up to three months. Bake from frozen, adding extra time as needed.
What if my filling is too thin or too thick?
If too thin, create a cornstarch slurry (one tablespoon cornstarch mixed with two tablespoons cold water) and stir into the simmering filling. If too thick, add beef broth a quarter-cup at a time until you reach the desired consistency. The filling should be thick enough to coat a spoon but still flow slowly.
Why is my crust soggy on the bottom?
A soggy bottom crust typically results from wet filling or insufficient baking time. Ensure your filling has cooled slightly before adding it to the crust. Additionally, place your pot pie on a baking sheet in the lower third of your oven to allow the bottom to bake longer. You can also blind-bake your bottom crust for five minutes at four hundred twenty-five degrees before adding the filling.
Can I use different vegetables in my pot pie?
Yes, pot pie is very forgiving. Green beans, mushrooms, corn, and parsnips all work beautifully. Keep the total volume of vegetables consistent with the recipe, and adjust cooking times based on vegetable density. Harder vegetables should be added earlier, softer vegetables near the end.
What’s the best beef broth for pot pie?
Look for low-sodium beef broth so you can control the final saltiness. Quality matters here—avoid broths with excessive sodium or odd ingredients. For the deepest flavor, consider making your own broth, or Serious Eats offers excellent homemade broth recipes. Bone broth adds additional depth from collagen and gelatin.
Can I use puff pastry instead of pie crust?
Puff pastry creates a different texture—crispier and more delicate than traditional pie crust. It works beautifully for pot pie if you prefer that style. Use it only for the top crust, and brush with egg wash before baking. Reduce baking time slightly since puff pastry browns quickly.
How do I prevent the filling from bubbling over?
Place your pot pie on a baking sheet to catch drips. Don’t fill the pie dish completely to the top—leave about a half-inch of space. If filling bubbles out during baking, it’s usually because the filling was too hot when assembled or the oven temperature was too high.
Can I make this with chicken instead of beef?
Absolutely. Use two pounds of chicken thighs cut into one-inch pieces. Reduce the initial cooking time to about forty-five minutes since chicken cooks faster than beef. Substitute chicken broth for beef broth. The technique remains identical, and many prefer the lighter flavor of chicken pot pie.
What’s the difference between pot pie and chicken pie?
The primary difference is the meat used and the resulting flavor profile. Beef pot pie has a richer, deeper flavor due to the beef and longer cooking time. Chicken pie is lighter and more delicate. The cooking techniques and crust preparation are essentially identical—it’s really just about your protein choice.


