Honey Walnut Shrimp: Proven Restaurant Recipe
Honey walnut shrimp is one of those dishes that seems impossibly elegant yet surprisingly simple to execute at home. This crispy, sweet, and nutty masterpiece originated from Chinese-American cuisine and has become a staple in upscale restaurants worldwide. The magic lies in the contrast between the golden-fried shrimp, the crunchy candied walnuts, and the silky honey-mayo sauce that ties everything together. What makes this dish so restaurant-worthy is not complicated technique—it’s understanding the balance of textures and flavors that create an unforgettable dining experience.
If you’ve ever ordered this dish at a restaurant and wondered how to recreate it, you’re in for a pleasant surprise. This proven recipe breaks down every step, from preparing the shrimp to crafting that signature sauce and candying the walnuts to perfection. Whether you’re cooking for a special dinner or impressing guests, this honey walnut shrimp recipe will elevate your home cooking to professional standards.
Understanding the Dish Components
Honey walnut shrimp succeeds because it masterfully combines four distinct elements. Each component plays a crucial role in the overall experience. The shrimp provides a tender, protein-rich base. The crispy exterior adds textural contrast. The candied walnuts contribute crunch and nutty richness. Finally, the honey-mayo sauce brings sweetness and creaminess that binds everything together.
Professional chefs understand that this dish’s success depends on proper timing and temperature control. The shrimp must be cooked just until opaque—overcooking makes them rubbery. The walnuts need careful monitoring during candying to achieve that perfect golden exterior without burning. The sauce should be balanced so honey sweetness doesn’t overpower the mayo’s subtle tang. When you master these elements individually, assembly becomes straightforward.
This is where many home cooks stumble: they focus on one element while neglecting others. Restaurant kitchens have dedicated stations for each component, allowing simultaneous preparation and perfect timing. You can replicate this by preparing your mise en place thoroughly before cooking begins.
Selecting and Preparing Your Shrimp
The quality of your shrimp directly impacts the final dish. Choose large shrimp (16/20 count per pound) for this recipe—they’re substantial enough to coat well and remain tender when fried. Frozen shrimp works perfectly if thawed properly. Never use pre-cooked shrimp, as they’ll become tough and rubbery when fried.
Thaw frozen shrimp in the refrigerator overnight or use the cold-water method: submerge sealed shrimp in cold water for 15-20 minutes, changing the water every 5 minutes. Pat them completely dry with paper towels—moisture prevents proper coating and creates splattering oil.
Devein the shrimp by making a shallow cut along the back and removing the dark vein. Leave the tail intact for presentation and easier handling. Some cooks butterfly the shrimp (cutting deeper to open them slightly), which increases surface area for the batter. This technique is optional but creates more textural interest.
Season your prepared shrimp with salt and white pepper 15 minutes before battering. This allows seasoning to penetrate the flesh. If you rush straight to battering, the salt sits on the surface rather than flavoring the meat itself.
Crafting the Perfect Batter
The batter is what creates that signature crispy exterior. Restaurant batter formulas are surprisingly simple, relying on technique rather than exotic ingredients. Here’s the proven formula:
- 1 cup cornstarch (provides crispness and crunch)
- ½ cup all-purpose flour (structure and binding)
- 2 tablespoons baking powder (lightness and lift)
- 1 teaspoon salt
- ½ teaspoon white pepper
- ¾ cup ice-cold water (cold temperature prevents gluten development)
- 1 egg white (extra binding without added yolk richness)
- 1 tablespoon vegetable oil (helps batter adhere)
Combine dry ingredients in a bowl. Whisk wet ingredients separately, keeping everything cold. Never overmix—fold wet into dry just until combined. A slightly lumpy batter actually produces better results than a smooth one. Lumps create irregular, extra-crispy edges.
The batter should coat the back of a spoon and drip slowly—not too thick (it won’t coat evenly) or too thin (it slides off). Keep batter at room temperature while frying, but prepare it just before use. Batter left sitting becomes heavy and produces greasy results.
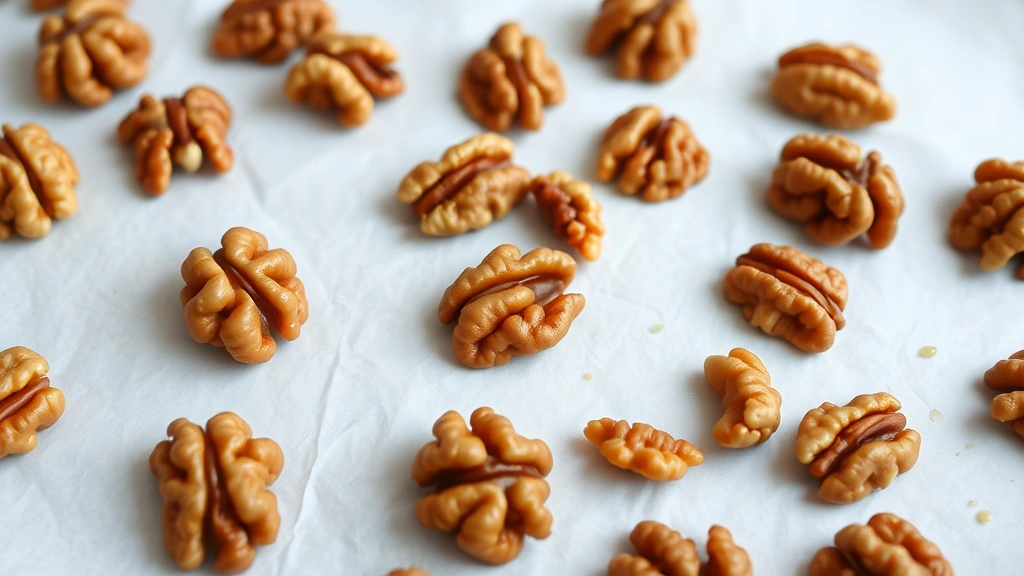
Making Candied Walnuts
Candied walnuts are where home cooks often go wrong. They burn easily or turn out soggy rather than crispy. The secret is precise temperature control and timing.
- Prepare walnuts: Use 1½ cups raw walnut halves. Toss with 3 tablespoons sugar, ½ teaspoon salt, and ¼ teaspoon cayenne pepper (optional, adds complexity).
- Toast the walnuts: Spread on a baking sheet and bake at 325°F for 8-10 minutes, stirring halfway through. They should smell fragrant but not be dark.
- Make the coating: Combine 3 tablespoons honey and 1 tablespoon butter in a small saucepan over medium heat. When melted, add your toasted walnuts and stir constantly for 2-3 minutes until they’re well coated.
- Cool and crisp: Spread on parchment paper immediately and separate any clumps with a fork. The walnuts will crisp as they cool. Once completely cool, store in an airtight container.
The timing here is crucial. Honey-coated walnuts can burn quickly if left on heat too long. Watch for a slight darkening of the coating—this indicates proper caramelization without burning. If walnuts clump together after cooling, you can break them apart and briefly re-toast at low temperature.
Prepare these several hours ahead or even the day before. They actually improve with time as flavors meld. This advance preparation reduces stress on cooking day.
Creating the Honey-Mayo Sauce
This sauce is deceptively simple yet absolutely essential. It’s what transforms individual components into a cohesive dish. The formula:
- 1 cup mayonnaise (quality matters—use real mayo, not salad dressing)
- ⅓ cup honey (mild honey works best; avoid overly floral varieties)
- 2 tablespoons sweetened condensed milk (adds richness and slight tang)
- 1 tablespoon rice vinegar (brightness and balance)
- ½ teaspoon vanilla extract (subtle depth)
- Pinch of salt
Whisk all ingredients together until completely smooth. The sauce should be pale golden and glossy. Do not use a food processor—the mechanical action can break down mayonnaise, creating a separated, greasy mess.
Taste and adjust: if too sweet, add more vinegar; if too thin, add another tablespoon of mayo; if lacking depth, add a tiny pinch more vanilla. This sauce can be made up to 2 days ahead and refrigerated. Bring to room temperature before serving for best flavor.
The condensed milk is a restaurant secret often overlooked by home cooks. It provides subtle sweetness and a slight tang that prevents the sauce from becoming cloying. If you can’t find it, substitute 2 tablespoons heavy cream plus 1 tablespoon sugar.
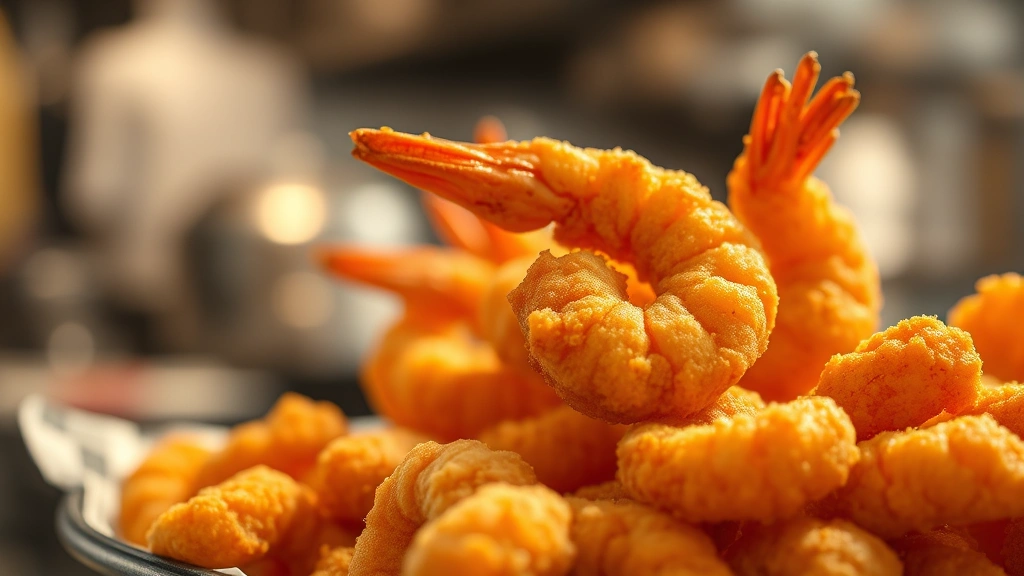
The Frying Process
Proper frying technique separates restaurant-quality results from mediocre home attempts. Temperature control is paramount.
- Heat oil to 350°F: Use a deep-fry or candy thermometer—guessing leads to disaster. Neutral oils like vegetable, canola, or peanut oil work best. You need at least 3-4 inches of oil.
- Batch the shrimp: Don’t overcrowd the pan. Working in batches of 6-8 shrimp, depending on your vessel size, prevents temperature drop and ensures even cooking.
- Coat and fry: Dip each seasoned shrimp in batter, allowing excess to drip off. Gently place in hot oil. The shrimp should sizzle immediately but not violently.
- Monitor cooking: Fry for 2-3 minutes until the batter turns golden-brown and the shrimp curls slightly. The tail should be the deepest color, indicating thorough cooking.
- Drain properly: Remove shrimp with a slotted spoon and place on a wire rack set over paper towels. Never stack them on plain paper towels—they’ll steam and lose crispness.
- Rest briefly: Allow fried shrimp to rest for 1-2 minutes before saucing. This brief rest lets the exterior set and stay crispy.
Oil temperature is non-negotiable. At 325°F, the batter absorbs too much oil and becomes greasy. At 375°F, the exterior burns before the shrimp cooks through. The 350°F sweet spot creates a crispy exterior while the shrimp cooks gently inside.
Between batches, let the oil return to 350°F before continuing. If oil temperature drops too much, the next batch will absorb excess oil. This is why resting between batches matters.
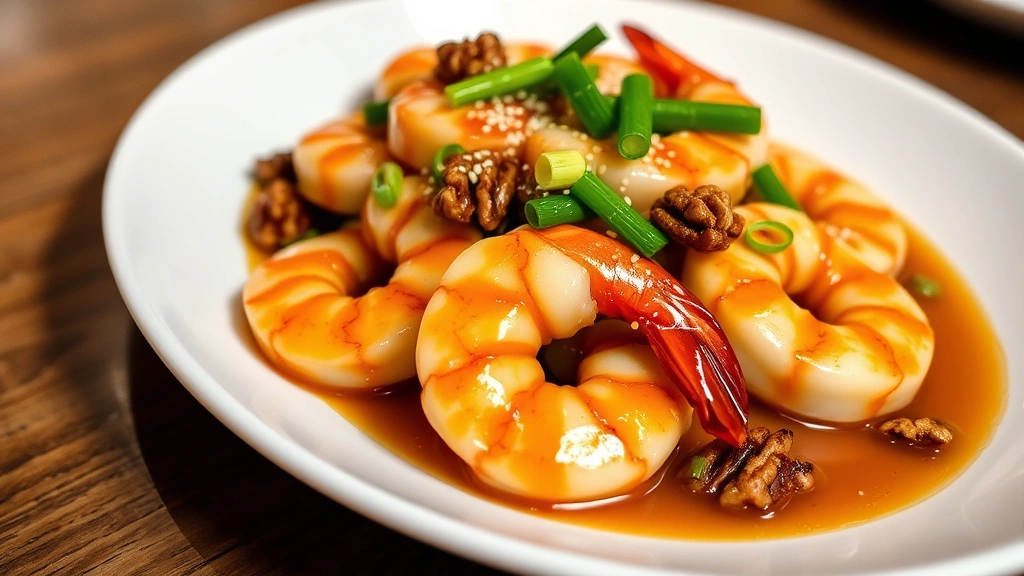
Assembly and Plating
Now comes the moment where all components unite. Timing is critical here—you want fried shrimp hot and crispy, sauce at room temperature, and walnuts fresh.
Place the honey-mayo sauce in a large mixing bowl. Add your hot fried shrimp and candied walnuts. Using two spoons or salad servers, toss gently but thoroughly, ensuring each shrimp gets coated without breaking. The residual heat from the shrimp will warm the sauce slightly, creating a silky coating.
Transfer to a serving platter or individual plates immediately. The shrimp should glisten with sauce while maintaining their crispy exterior. Garnish with sesame seeds and sliced green onions if desired. Some restaurants add a light drizzle of honey around the plate for visual appeal.
This dish is best served immediately, but it remains acceptable for up to 10 minutes. Beyond that, the shrimp begins absorbing moisture from the sauce and loses its crispy quality. If serving for a crowd, consider doing final tossing in smaller batches to maintain optimal texture.
Pro Tips from Restaurant Kitchens
Professional chefs employ several techniques that elevate this dish beyond home-cook versions. First, they often add a light cornstarch dusting before battering—this creates an extra-crispy layer. Simply toss your seasoned shrimp in cornstarch, shake off excess, then proceed with the batter.
Second, some restaurants use carbonated water in the batter instead of regular water. The carbonation creates tiny bubbles that expand during frying, producing an extraordinarily light, crispy crust. Substitute ¾ cup ice-cold sparkling water or club soda for regular water.
Third, professional kitchens often finish the dish with a brief toss in the hot wok or sauté pan with the sauce. This technique is optional for home cooks but creates a slightly more integrated flavor profile. Use medium heat and keep it brief—15-20 seconds maximum—to avoid overcooking the shrimp.
Fourth, consider the quality of your honey. Raw or artisanal honey varieties add complexity that standard processed honey can’t match. While it’s not essential, upgrading this ingredient noticeably improves results.
Finally, restaurant chefs often prepare components hours in advance, requiring only final assembly during service. You can do the same: make sauce the day before, prepare candied walnuts in the morning, and fry shrimp to order. This approach reduces last-minute stress.
Ingredient Quality and Selection
The difference between good and exceptional honey walnut shrimp often comes down to ingredient selection. When you’re using relatively few ingredients, each one matters significantly.
Shrimp sourcing is paramount. Wild-caught Gulf shrimp typically has superior flavor compared to farmed varieties, though farm-raised options are acceptable if sourced responsibly. Look for shrimp with firm texture and mild ocean smell—avoid any with ammonia odor, indicating age.
For your walnuts, purchase from bulk bins when possible and store in the freezer. Fresh walnuts have noticeably better flavor than those sitting on shelves for months. Rancid walnut flavor ruins the entire dish.
Your honey selection impacts the final flavor significantly. Clover honey is mild and versatile. Wildflower honey adds floral notes. Acacia honey is lighter and less crystalline. Avoid blended commercial products—they often contain corn syrup.
The mayonnaise choice matters more than many realize. Homemade mayo is superior if you have time, but quality store-bought versions like Hellmann’s or Duke’s work excellently. Avoid low-fat or olive oil variants, which have different emulsification and flavor profiles.
Variations and Adaptations
While the classic recipe is magnificent, thoughtful variations can personalize this dish to your preferences. Some cooks add sriracha to the sauce for a spicy kick—start with ½ teaspoon and adjust to taste. Others incorporate toasted sesame oil for nuttiness, using 1 teaspoon in place of vanilla extract.
Vegetarian adaptations work surprisingly well. Substitute shrimp with firm tofu or cauliflower florets, following identical frying and saucing procedures. The candied walnuts become even more central to the texture profile in vegetarian versions.
For those seeking lighter preparations, air-frying produces respectable results, though the exterior won’t achieve quite the same crispness as oil-frying. Toss air-fried shrimp with sauce carefully to avoid breaking them.
Some chefs add candied ginger or crystallized citrus peel alongside walnuts for additional complexity. Others incorporate toasted cashews or macadamia nuts as partial walnut replacements, creating interesting flavor variations.
Serving Suggestions and Pairings
Honey walnut shrimp works beautifully as an appetizer for 4-6 people or as a main course component. When serving as an appetizer, present on a large platter with toothpicks for easy grabbing. The sauce will accumulate in the platter’s center, creating a dipping station.
As a main course, serve alongside steamed jasmine rice or fried rice. The starch absorbs excess sauce beautifully. Light vegetable sides like stir-fried bok choy or steamed broccoli provide balance.
Wine pairings should consider the dish’s sweetness. A dry Riesling complements without competing. Albariño or Sauvignon Blanc offer crisp acidity that cuts through richness. For non-wine drinkers, sparkling water with lemon or jasmine tea work excellently.
For beverage pairings, consider that the sauce’s sweetness means you want something with acidity or slight bitterness. Avoid overly sweet cocktails. A simple gin and tonic or whiskey sour provides ideal contrast.
FAQ
Can I prepare honey walnut shrimp ahead of time?
Partial preparation works well: sauce can be made 2 days ahead, candied walnuts keep for several days in an airtight container, and you can devein and season shrimp hours in advance. The actual battering and frying should happen close to serving. Final assembly should occur within 10 minutes of eating for optimal texture.
Why is my batter greasy rather than crispy?
This typically indicates oil temperature was too low (below 340°F), causing excessive oil absorption. Overcrowding the pan also drops temperature. Additionally, using a batter prepared too far in advance can result in greasiness—make batter immediately before use. Finally, ensure shrimp are completely dry before battering.
My candied walnuts burned. How do I prevent this?
Temperature control during the honey-coating step is crucial. Keep heat at medium and stir constantly. The entire process should take only 2-3 minutes. If walnuts are already toasted, they’ll burn more easily during the honey-coating phase. Consider reducing toast time slightly if you find yourself burning walnuts repeatedly.
Can I use frozen shrimp directly without thawing?
You can, but thawing first produces better results. Frozen shrimp contain ice crystals that create splattering when oil is introduced. Additionally, frozen shrimp don’t coat evenly with batter. Proper thawing takes 12 hours in the refrigerator or 20 minutes in cold water—a worthwhile investment for superior results.
What’s the difference between mayo and salad dressing in this recipe?
Mayonnaise is an emulsion of egg, oil, and acid with a smooth texture and rich flavor. Salad dressing is often sweeter with added sugar and less egg content. Using salad dressing creates a different flavor profile—sweeter and less rich—which changes the balance of your final dish. Real mayonnaise is essential for the authentic restaurant taste.
How do I store leftovers?
Store components separately: refrigerate sauce in an airtight container for up to 5 days, keep walnuts in an airtight container for up to 1 week, and refrigerate cooked shrimp for up to 2 days. Don’t store them together, as the shrimp will absorb sauce and lose crispness. Reheat shrimp briefly in a 350°F oven (3-4 minutes) before re-tossing with fresh sauce.
Can I make this dish without deep frying?
Shallow frying works if you don’t have deep-frying capability. Use 1-1.5 inches of oil in a large skillet and fry shrimp 1-2 minutes per side, turning carefully. The result won’t be quite as crispy, but it’s acceptable. Air-frying produces decent results with less oil, though the exterior won’t achieve the same golden crispness as traditional frying.
Why does restaurant honey walnut shrimp taste different from my homemade version?
Restaurants often use quality ingredients you might overlook—premium mayonnaise brands, fresh wild shrimp, and carefully sourced honey. They also have temperature-controlled equipment and dedicated frying stations. Additionally, restaurants often add subtle ingredients like vanilla extract or a whisper of sesame oil that elevate flavor without being obvious. Finally, professional kitchens have refined technique through thousands of repetitions—your results will improve with practice.


