No Bean Chili Recipe: A Flavor-Packed Delight Without the Beans
Bean-free chili might sound unconventional, but this hearty, meat-forward version delivers incredible depth of flavor and satisfying texture that rivals traditional recipes. Whether you’re avoiding beans due to dietary preferences, digestive concerns, or simply want to highlight the rich meat and spices, a no bean chili recipe is your answer to comfort food perfection. This style of chili celebrates bold spices, quality ground meat, and aromatic vegetables in a way that lets every ingredient shine.
The beauty of eliminating beans is that you can focus entirely on building layers of flavor through slow-simmering tomatoes, caramelized onions, and a carefully balanced spice blend. Many professional chefs and competition cooks actually prefer bean-free chili for its ability to showcase meat quality and spice complexity. This recipe yields a rich, deeply satisfying bowl that’s perfect for weeknight dinners or feeding a crowd at your next gathering.
Why Choose No Bean Chili?
A no bean chili recipe offers several distinct advantages over traditional versions. First, the texture becomes creamier and more cohesive as the meat breaks down and thickens the sauce naturally. Without beans competing for space, each spoonful delivers concentrated meat flavor and aromatic spices. This style also works beautifully for those following low-carb or paleo diets, making it adaptable to various nutritional goals.
Bean-free chili also eliminates the need for precise bean soaking and cooking times, simplifying your prep work considerably. You can focus on what truly matters: developing complex, layered flavors through proper technique and quality ingredients. Many regional chili competitions, particularly in Texas, actually prohibit beans entirely, underscoring how respected this approach is among culinary professionals.
If you’re looking for other hearty, meat-based comfort foods, consider exploring chicken and gravy recipes or easy chicken casserole recipes for similar satisfaction levels with different protein bases.
Essential Ingredients for No Bean Chili
Creating an exceptional no bean chili requires quality ingredients that work in harmony. The foundation starts with ground beef—choose 80/20 or 85/15 for the best flavor and texture balance. You’ll also need:
- 2 pounds ground beef (80/20 blend preferred)
- 3 tablespoons chili powder (high-quality, fresh)
- 2 tablespoons cumin (freshly ground if possible)
- 1 tablespoon paprika (smoked or sweet)
- 2 teaspoons oregano (dried Mexican oregano preferred)
- 1 teaspoon cayenne pepper (adjust to heat preference)
- 2 large onions (diced)
- 4 cloves garlic (minced)
- 2 cans (28 ounces each) crushed tomatoes
- 1 can (6 ounces) tomato paste
- 2 cups beef broth
- 2 tablespoons olive oil
- Salt and black pepper (to taste)
- 1 tablespoon Worcestershire sauce
- 1 teaspoon hot sauce (optional, for depth)
The spice blend is absolutely critical to success. Invest in fresh spices from a reputable source like The Spice House, as stale spices will result in flat, uninspiring flavor. Check your spice cabinet—anything older than six months should be replaced for optimal results.
Step-by-Step Preparation
Proper preparation makes the difference between good chili and exceptional chili. Begin by preparing all your ingredients before you start cooking—this technique, called mise en place, ensures smooth execution and prevents overcooking any component.
Prepare your vegetables: Dice your onions into quarter-inch pieces for even cooking and quick breakdown during simmering. Mince your garlic finely—you want it distributed throughout rather than in large chunks. Having everything prepped and ready prevents you from stepping away during critical cooking moments.
Measure your spices: Combine your chili powder, cumin, paprika, oregano, and cayenne in a small bowl. This pre-mixing technique allows you to add them all at once, creating even distribution and preventing any spice from burning before others are added. This approach is similar to how professional chefs prepare custom chicken seasoning recipes.
Prepare liquids: Open your cans of tomatoes and tomato paste. Pour beef broth into a measuring cup. Having these ready ensures you won’t scramble during the cooking process.
The Cooking Process
Now that everything is prepped, let’s build this magnificent no bean chili recipe step by step.
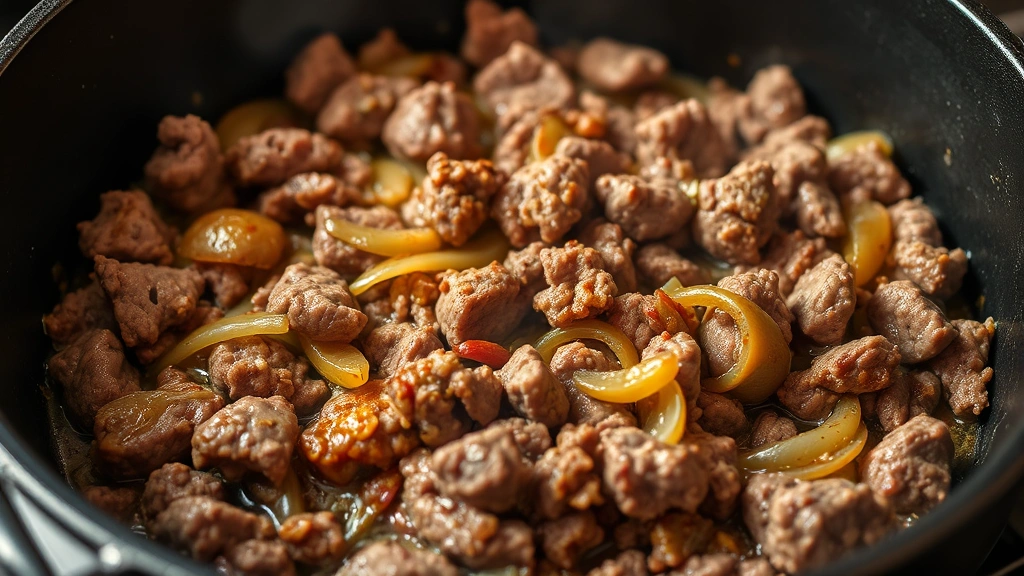
Step 1: Brown the meat properly Heat your Dutch oven or large heavy pot over medium-high heat. Add one tablespoon of olive oil and allow it to shimmer. Add your ground beef in batches—don’t overcrowd the pan. This is crucial for developing a proper fond (the browned bits on the bottom) that will deepen your chili’s flavor. Brown the meat for 5-7 minutes per batch, breaking it into small pieces with a wooden spoon. Don’t rush this step; proper browning creates complex, savory flavors through the Maillard reaction. Once all meat is browned, transfer it to a plate.
Step 2: Sauté aromatics Add the remaining tablespoon of oil to your pot. Add diced onions and cook for 8-10 minutes, stirring occasionally, until they’re soft and beginning to caramelize. This caramelization adds natural sweetness that balances the spices. Add minced garlic and cook for another minute until fragrant. You’ll notice the pot beginning to smell absolutely incredible at this point.
Step 3: Bloom the spices Add your pre-mixed spice blend to the onions and garlic. Stir constantly for 60-90 seconds. This blooming process releases the essential oils in the spices, intensifying their flavors dramatically. You’ll see the mixture become fragrant and slightly darker.
Step 4: Deglaze and build liquid base Add one can of crushed tomatoes to the pot, using a wooden spoon to scrape up all the browned bits from the bottom. These flavorful bits are liquid gold—don’t leave them behind. Stir in the tomato paste, mixing well to incorporate. Add the beef broth and Worcestershire sauce.
Step 5: Return meat and simmer Return the browned ground beef to the pot, along with any accumulated juices. Add the second can of crushed tomatoes. Stir everything together thoroughly. Season with salt and black pepper to taste—start conservatively, as you’ll adjust flavors later during simmering.
Step 6: Establish the simmer Bring the chili to a gentle boil, then reduce heat to low. You want a slow, gentle simmer—just a few bubbles breaking the surface every few seconds. Cover partially (leave the lid slightly ajar) and simmer for at least 90 minutes, though 2-3 hours is ideal. The longer simmer allows flavors to meld and deepen significantly.
If you want to use modern cooking methods, consult our guide on easy Instant Pot recipes—you can prepare this chili in about 30 minutes using pressure cooking, though the flavor development won’t be quite as deep.
Building Deeper Flavor in Your No Bean Chili
As your chili simmers, you’ll notice the sauce thickening and flavors intensifying. After 90 minutes, taste and adjust seasonings. This is where your chili truly comes alive.
Developing complexity: If your chili tastes flat, add a pinch more cumin or chili powder—these spices are forgiving and can be built up gradually. If it lacks depth, add one teaspoon of hot sauce or a pinch of cinnamon (yes, really—a tiny amount adds mysterious depth without identifiable sweetness). A tablespoon of cocoa powder or coffee can also add richness, as these ingredients complement chili spices beautifully.
Balancing heat: If your chili is too spicy, add a splash more beef broth or tomatoes to dilute the heat. If it’s not spicy enough and you want more kick, add cayenne or hot sauce drop by drop, tasting between additions. Remember that heat builds over time, so add conservatively.
Adjusting consistency: If your chili is too thin after 2 hours of simmering, increase heat slightly and leave the lid off to allow evaporation. If it’s too thick, add more broth or tomato juice. The ideal consistency is thick enough to coat a spoon but loose enough to be spoonable.
The final hour: During the last 30 minutes of cooking, resist the urge to add anything new. Let the chili settle and marry its flavors. Many cooks find that chili tastes even better the next day after flavors have fully melded overnight.
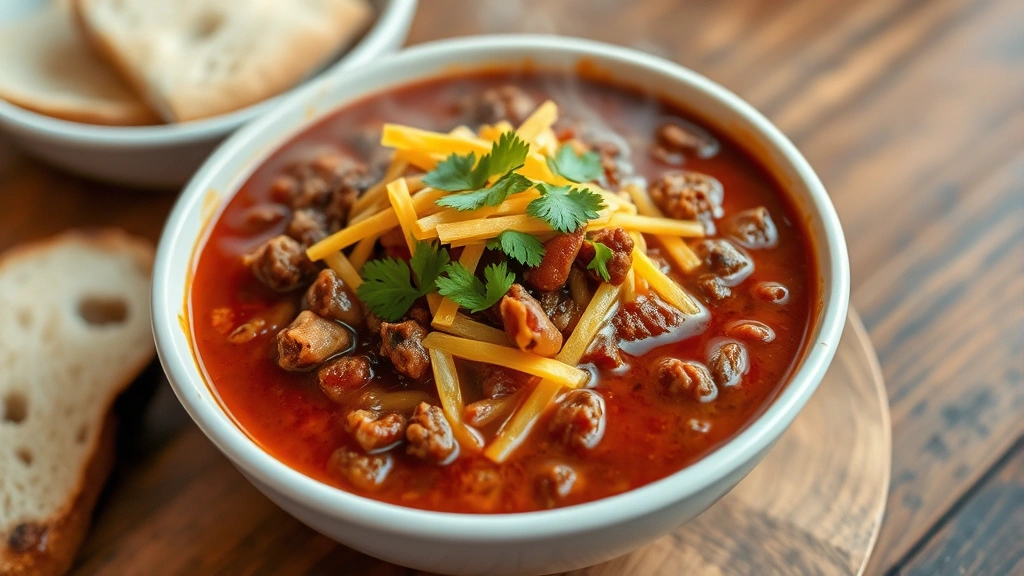
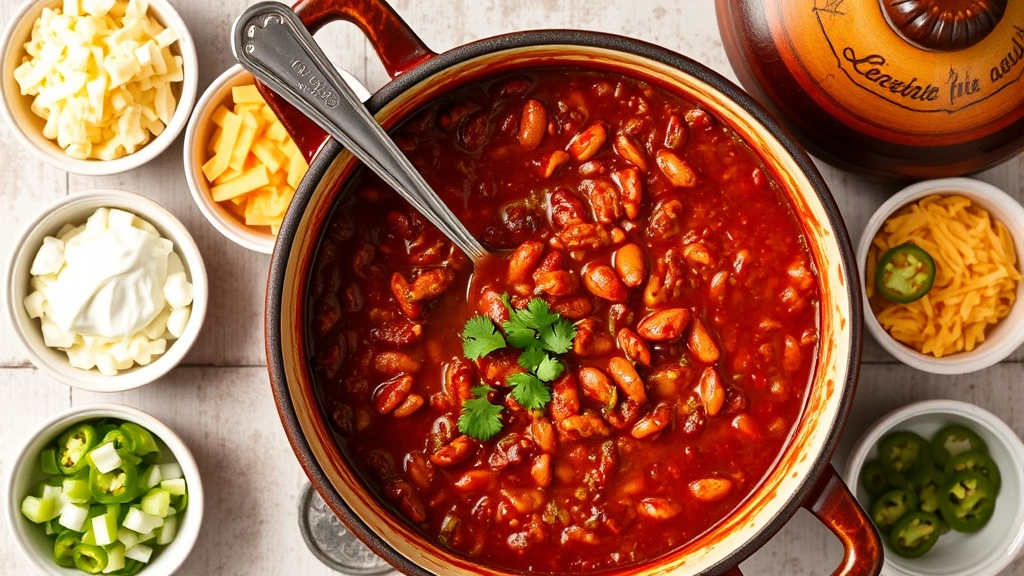
Serving and Topping Ideas
A great no bean chili recipe deserves equally great toppings. Serve your chili piping hot in bowls, and let guests customize with their preferred toppings:
- Shredded cheddar cheese (sharp cheddar adds complexity)
- Sour cream or Greek yogurt (cooling contrast)
- Diced white onion (fresh crunch)
- Fresh cilantro (bright herbaceous note)
- Jalapeño slices (additional heat and brightness)
- Cornbread or crusty bread (for soaking up sauce)
- Lime wedges (squeeze over for acidity)
- Crispy tortilla strips (added texture)
- Diced avocado (creamy richness)
For a complete meal, pair your chili with sides like rice, cornbread, or a fresh salad. If you’re serving this alongside poultry, check out our healthy food recipes with chicken breast for complementary dishes that work well together.
Storage and Make-Ahead Tips
One of the greatest advantages of no bean chili is how beautifully it stores and reheats. Properly stored chili actually improves over several days as flavors continue developing.
Refrigerator storage: Allow chili to cool to room temperature (about 30 minutes), then transfer to an airtight container. Refrigerate for up to 5 days. The chili may thicken significantly when cold—simply add a splash of broth when reheating to restore the original consistency.
Freezer storage: Chili freezes exceptionally well for up to 3 months. Use freezer-safe containers or heavy-duty freezer bags (lay flat for space efficiency). Leave about an inch of headspace in containers to allow for expansion. Thaw overnight in the refrigerator before reheating.
Make-ahead strategy: Prepare your chili up to 2 days in advance. This actually improves the final product, as flavors meld and develop further. Reheat gently on the stovetop over medium-low heat, stirring occasionally and adding broth as needed to reach desired consistency. Avoid high heat, which can cause the bottom to scorch.
Recipe Variations and Adaptations
While this classic no bean chili recipe is fantastic as-is, you can easily adapt it for different preferences and dietary needs.
Turkey or venison chili: Substitute ground turkey or venison for beef in equal amounts. Turkey creates a leaner chili with slightly less richness, while venison adds an earthy, gamey depth that chili spices complement beautifully. Cooking time remains the same.
Vegetable additions: While traditional bean-free chili stays meat-focused, you can add diced bell peppers, jalapeños, or even mushrooms. Add these in Step 2 with your onions, giving them time to soften and contribute their flavors to the base.
Low-carb version: This recipe is naturally quite low in carbohydrates. To make it even lighter, ensure you’re using quality beef broth with minimal additives and avoid adding any sugar or sweetening ingredients.
Slow cooker method: Brown your meat and sauté aromatics following Steps 1-3 in a skillet, then transfer everything to a slow cooker with remaining ingredients. Cook on low for 6-8 hours or high for 3-4 hours. The extended cooking time allows incredible flavor development.
Creamy variation: For a unique twist, stir in one cup of heavy cream or sour cream at the very end of cooking. This creates a luxurious, slightly milder chili that’s absolutely decadent.
Frequently Asked Questions
Can I make this no bean chili in a slow cooker?
Absolutely! Brown your meat and sauté your aromatics and spices in a skillet first (this develops crucial flavor), then transfer everything to your slow cooker with the remaining ingredients. Cook on low for 6-8 hours. While the long cooking time is convenient, you lose some of the flavor development that comes from active stovetop simmering, so the quick-seared meat and bloomed spices become even more important.
What’s the best ground beef ratio for chili?
Use 80/20 ground beef (80% lean, 20% fat) for the best balance. This ratio provides enough fat for flavor and richness without creating an excessively greasy final product. If you only have 90/10 available, add an extra tablespoon of olive oil when browning to compensate for the lost fat.
How do I thicken my no bean chili?
Let it simmer uncovered for extended time—evaporation naturally thickens the sauce. If you need faster results, mix one tablespoon of cornstarch with two tablespoons of cold water to create a slurry, then stir it into your simmering chili. Simmer for 2-3 minutes until thickened. Alternatively, add tomato paste (one tablespoon at a time) for thickening plus additional depth.
Can I make this chili without tomato paste?
Yes, though you’ll lose some depth. Use an additional half-can of crushed tomatoes instead. The tomato paste concentrates flavors in a way that crushed tomatoes alone cannot replicate, so your chili will taste good but slightly less complex.
Is this recipe freezer-friendly?
Completely! Freeze in airtight containers or freezer bags for up to 3 months. The chili actually benefits from freezing and thawing, as it allows flavors to continue developing. Thaw overnight in the refrigerator and reheat gently on the stovetop.
What spices can I substitute if I don’t have all of them?
This is tricky because each spice plays a specific role. However, if you’re missing one: cumin is essential and shouldn’t be skipped; chili powder can be replaced with additional paprika plus a pinch of cayenne; oregano can be replaced with marjoram or omitted entirely (the chili will taste slightly less complex); paprika can be replaced with additional chili powder. Never skip the cayenne entirely—it provides crucial heat balance.
How much does this recipe serve?
This recipe yields approximately 8-10 servings as a main course, or 12-15 servings if served as part of a larger meal with sides. The quantities can be easily halved for smaller households, though the flavor development might be slightly less pronounced due to reduced simmering volume.
Can I add cream or dairy to this chili?
Yes! Stir in up to one cup of heavy cream, sour cream, or Greek yogurt at the very end of cooking. Add it slowly while stirring to prevent curdling. This creates a luxurious, slightly milder chili that’s absolutely delicious. Never add dairy early in the cooking process, as the acidity of tomatoes can cause curdling.


