Classic Stuffed Bell Peppers: Grandma’s Secret Recipe
There’s something deeply comforting about a dish that has been passed down through generations, carrying with it the warmth of family dinners and cherished memories. Stuffed bell peppers represent exactly that kind of timeless classic—a recipe that appears on dinner tables across America, yet each family claims their own special version. My grandmother’s old fashioned stuffed bell peppers recipe has been the star of countless family gatherings, and today I’m thrilled to share her secrets with you.
What makes Grandma’s version stand out isn’t just a single ingredient or technique, but rather the thoughtful combination of simple, quality components prepared with care and patience. This recipe has fed our family for over forty years, and it continues to be requested at every celebration. The beauty of this dish lies in its versatility—it’s hearty enough to satisfy, yet elegant enough to serve to guests.
Whether you’re looking to expand your collection of comfort food recipes or searching for a dish that bridges generations, this old fashioned stuffed bell peppers recipe will become a staple in your kitchen. Let me walk you through every step of creating this beloved classic.
Why This Recipe Stands the Test of Time
Grandma’s stuffed bell peppers recipe has endured because it strikes the perfect balance between wholesome nutrition and indulgent comfort. This dish represents the foundation of what makes best healthy food recipes so appealing—it delivers genuine flavor without requiring complicated techniques or hard-to-find ingredients.
The appeal of this classic dish extends beyond taste. Stuffed peppers offer visual appeal that makes them perfect for both family dinners and more formal occasions. The vibrant colors of the bell peppers create an inviting presentation, while the aroma that fills your kitchen during cooking is absolutely irresistible. This is the kind of dish that announces itself—your family will know something special is happening in the kitchen.
From a practical standpoint, this recipe demonstrates why grandma approved dinner recipes continue to be relevant. Everything comes together in one dish, minimizing cleanup while maximizing flavor. You can prepare it ahead of time, making it ideal for busy weeknights or when you’re planning ahead for entertaining.
Essential Ingredients for Authentic Stuffed Peppers
Before we dive into technique, let’s talk about the ingredients that make this recipe truly special. Grandma always insisted on quality ingredients, even if it meant shopping at multiple stores to find exactly what she wanted. Here’s what you’ll need:
- 4-6 large bell peppers (red, yellow, orange, or green—Grandma preferred a mix for color)
- 1 pound ground beef (or a combination of beef and ground pork for added flavor)
- 1 cup long-grain white rice (uncooked)
- 1 medium onion, finely diced
- 3-4 cloves garlic, minced
- 1 can (14.5 oz) diced tomatoes
- 1 can (8 oz) tomato sauce
- 1 cup beef broth
- 1/2 cup water
- 1 teaspoon salt
- 1/2 teaspoon black pepper
- 1 teaspoon dried oregano
- 1/2 teaspoon dried basil
- 1/4 teaspoon cayenne pepper (optional, for subtle heat)
- 2 tablespoons olive oil
- 1/2 cup grated Parmesan cheese (optional topping)
Grandma’s secret was using a combination of how to make homemade pasta sauce techniques in her filling. She never used jarred sauce when she could make her own, and this attention to detail truly elevates the final dish.
Step-by-Step Preparation Guide
Proper preparation is where many home cooks lose track, but Grandma taught me that taking time with prep work ensures success in the final dish. Here’s exactly how to prepare everything:
Preparing the Bell Peppers
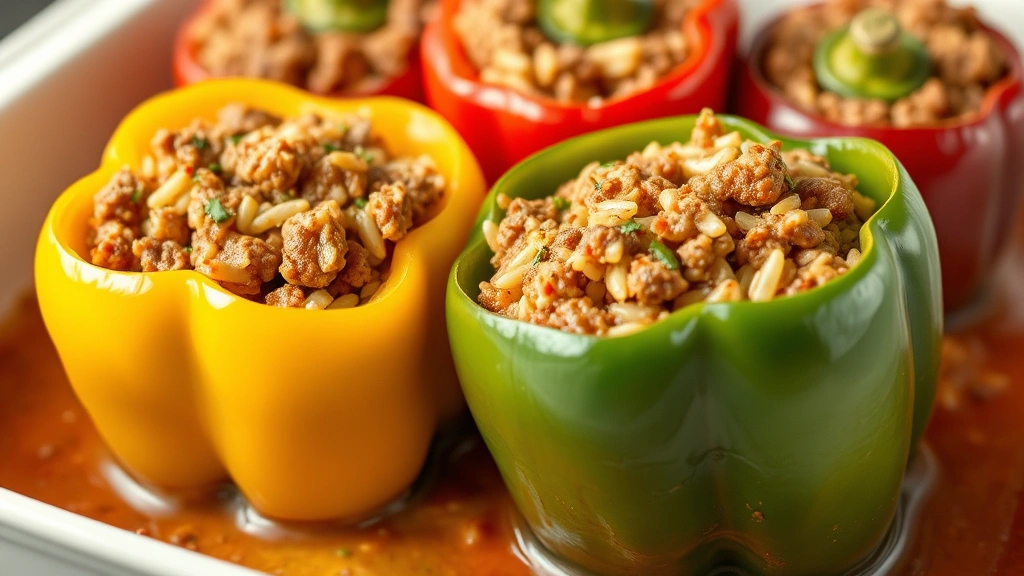
Start by rinsing your bell peppers under cold water and patting them dry. Using a sharp knife, carefully cut off the top quarter of each pepper, creating a lid. Remove and discard the seeds and white membrane from inside each pepper. If your peppers don’t stand upright, you can trim a thin slice from the bottom, being careful not to create a hole. Lightly brush the outside of each pepper with olive oil—this helps them cook evenly and prevents them from drying out.
Creating the Filling
Heat two tablespoons of olive oil in a large skillet over medium-high heat. Once the oil shimmers, add your diced onion and cook for about three minutes until it becomes translucent. Add the minced garlic and cook for another minute until fragrant. This aromatic base is crucial—never skip this step, as it builds flavor that permeates the entire dish.
Add your ground meat to the skillet, breaking it up with a wooden spoon as it cooks. Cook until the meat is completely browned, about 5-7 minutes. Drain any excess fat if needed. This is where you can incorporate recipes with shredded chicken principles if you prefer a lighter version—simply use ground chicken instead of beef.
Stir in the uncooked rice, coating it well with the meat and oil. Cook for two minutes, allowing the rice to toast slightly. This toasting step adds depth and prevents the rice from becoming mushy during cooking. Add the diced tomatoes with their juice, tomato sauce, and beef broth. Season with salt, pepper, oregano, basil, and cayenne pepper if using. Stir everything together and bring the mixture to a simmer. Reduce heat to low and let it cook for about ten minutes, stirring occasionally. The rice will absorb some liquid but won’t be fully cooked yet—this is exactly what you want.
The Cooking Process Explained
Now comes the part where patience truly pays off. Preheat your oven to 350°F. While the oven heats, arrange your prepared peppers upright in a baking dish that’s just large enough to hold them snugly. Fill each pepper with the meat and rice mixture, packing it gently but not too tightly—you want the filling to be secure but still allow some room for the rice to expand.
If you have any remaining filling, spread it around the base of the peppers in the baking dish. Pour any remaining sauce from the skillet over and around the peppers. Cover the baking dish tightly with aluminum foil. This trapping of steam is essential for cooking the rice properly and keeping the peppers tender.
Place the covered baking dish in your preheated oven for 45 minutes. After 45 minutes, carefully remove the foil and check the peppers. They should be tender when pierced with a fork, and the rice should be fully cooked. If the peppers still seem firm, cover and cook for an additional 10-15 minutes.
For those interested in exploring different flavor profiles, consider checking out Asian recipes that use similar techniques but with different seasonings. Grandma’s method is adaptable to many cuisines.
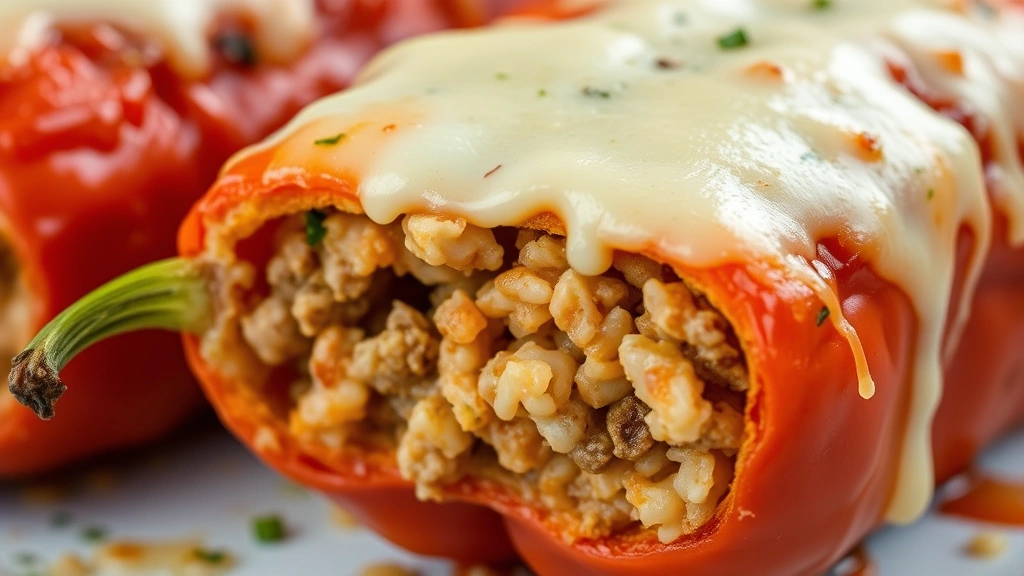
Once the peppers are tender and the filling is cooked through, remove the baking dish from the oven. If desired, sprinkle the top of each pepper with grated Parmesan cheese and place under the broiler for 2-3 minutes until the cheese melts and begins to brown. This optional step adds a wonderful textural contrast to the dish.
Tips for Perfect Results Every Time
Choose the Right Peppers: Select peppers that are similar in size so they cook evenly. Avoid peppers with soft spots or blemishes. Red and yellow peppers are naturally sweeter than green ones, so choose based on your flavor preference.
Don’t Skip the Toasting Step: Toasting the uncooked rice before adding liquid is a professional technique that prevents mushy rice and adds subtle nutty flavor.
Use a Meat Thermometer: To ensure the filling reaches a safe temperature, insert a meat thermometer into the center of the filling (not touching the pepper). It should read 160°F for beef or 165°F for poultry.
Make Ahead Magic: You can assemble these peppers up to 24 hours before cooking. Simply cover and refrigerate, then add 10-15 minutes to the cooking time since you’re starting from cold.
Adjust Seasoning to Taste: Everyone’s palate is different. Taste the filling mixture before stuffing the peppers and adjust seasonings as needed. Remember that flavors will intensify as the dish cooks.
Prevent Soggy Bottoms: If your peppers tend to leak, place them on a sheet of parchment paper before putting them in the baking dish. This helps with cleanup and prevents the filling from escaping.
Serving and Storage Suggestions
Grandma always served her stuffed peppers with simple sides that let the peppers take center stage. A fresh green salad with vinaigrette, crusty bread for soaking up the delicious sauce, and perhaps a light vegetable like steamed green beans complement the dish beautifully.
These peppers are best served immediately after cooking while the peppers are still tender and the filling is warm. Allow them to rest for five minutes before serving—this helps them hold their shape better when plating.
Storage Instructions: Leftover stuffed peppers can be stored in an airtight container in the refrigerator for up to four days. To reheat, place in a baking dish, cover with foil, and warm in a 350°F oven for about 20 minutes until heated through. You can also freeze the cooked peppers for up to three months. Thaw overnight in the refrigerator before reheating.
For meal planning purposes, these peppers actually taste even better the next day as the flavors meld together. This makes them perfect for preparing ahead for busy weeknights.
Variations to Explore
Vegetarian Version: Replace the ground meat with a combination of cooked lentils and finely chopped mushrooms. Add an extra cup of vegetables like zucchini and spinach to the filling. The earthiness of mushrooms provides a satisfying texture similar to meat.
Lighter Option: Use ground turkey or chicken instead of beef. Reduce the rice to three-quarters cup and add finely diced vegetables like carrots, celery, and bell pepper pieces to bulk up the filling with fewer calories.
Cheese Lover’s Version: Add one cup of shredded mozzarella cheese to the filling mixture before stuffing the peppers. Top with additional cheese before baking for a decadent variation.
Spanish-Inspired Version: Add diced chorizo sausage to the filling, reduce the beef accordingly, and add cumin and smoked paprika to the seasonings. This creates a more robust, Spanish flavor profile.
Mediterranean Version: Include diced tomatoes, Kalamata olives, feta cheese, and oregano in generous amounts. This lighter version celebrates fresh Mediterranean flavors.
For those interested in exploring more complex flavor combinations, resources like Serious Eats offer detailed explanations of cooking science that can help you understand why certain ingredient combinations work.

FAQ
Can I use brown rice instead of white rice?
Yes, but you’ll need to adjust your cooking time. Brown rice takes longer to cook, so increase the initial simmering time to 15 minutes and the baking time to 60 minutes. You may also need to add an extra half cup of liquid to account for brown rice’s higher absorption rate.
What if my peppers are still hard after cooking?
This usually means the oven temperature was too low or the peppers were particularly thick-walled. Continue cooking covered in 10-minute increments until they reach your desired tenderness. You can also try using a knife to pierce the peppers slightly before cooking to help them soften faster.
Can I make these in a slow cooker?
Absolutely! Prepare the filling as directed but don’t cook it on the stove. Stuff the peppers and arrange them in a slow cooker on the low setting. Cook for 6-8 hours on low or 3-4 hours on high. The slow cooker method produces very tender peppers but may result in slightly softer texture.
How do I prevent the peppers from tipping over?
Trim a thin slice from the bottom of each pepper to create a flat surface. You can also wedge them upright by placing them snugly in the baking dish or using rolled aluminum foil as supports between peppers.
What’s the best way to reheat frozen stuffed peppers?
Thaw overnight in the refrigerator, then reheat covered in a 350°F oven for 20-25 minutes. Alternatively, you can reheat from frozen by covering tightly with foil and baking at 350°F for 45-50 minutes.
Can I substitute the ground meat with plant-based alternatives?
Yes! Plant-based ground meat substitutes work well. Use the same amount as you would ground beef. You may want to add a tablespoon of soy sauce or worcestershire sauce to enhance the savory depth since plant-based options sometimes lack that umami quality.
How do I know when the rice is fully cooked?
The rice should be tender and have absorbed most of the liquid. A grain should easily break between your fingers when squeezed. If you see liquid still pooling in the peppers, they need more time.
Can I prepare these peppers without an oven?
Yes! After stuffing, arrange them in a large pot with a tight-fitting lid. Add one cup of water or broth around the peppers, cover, and simmer over low heat for 45-60 minutes until the peppers are tender and the filling is cooked through. This stovetop method works beautifully.
Grandma’s old fashioned stuffed bell peppers recipe represents more than just a collection of ingredients—it’s a connection to tradition, a celebration of simple cooking done well, and a dish that brings families together. Whether you’re making this for the first time or adding it to your regular rotation, you’re joining generations of home cooks who understand that the best recipes are those made with care and shared with love. Happy cooking!


